
Hyundai Kona 2023
Welcome to the 2023 Hyundai Kona User Guide, your key to maximizing your Hyundai Kona driving experience. These pages serve as your indispensable travel companion as you set out on your journey with this remarkable car, providing thorough insights into every facet of using, caring for, and enjoying your Kona. This manual guarantees that you can manage the road ahead with comfort and confidence, from comprehending engine options and fuel efficiency to mastering the cutting-edge infotainment system. The 2023 Kona User Guide is your guide to making every drive not just effective but also pleasurable and informative, with Hyundai’s commitment to safety, upkeep, and innovation at the forefront.
2023 Hyundai KONA Specs, Price, Features, Milage (Brochure)
Hyundai Kona 2023 Foreword User Guide
2023 Hyundai Kona Foreword Instructions
Hyundai Kona 2023 Foreword User Guide
Foreword
Congratulations, and thank you for choosing HYUNDAI. We are pleased to welcome you to the growing number of discerning people who drive HYUNDAI. We are very proud of the advanced engineering and high-quality construction of each HYUNDAI we build.
Your Owner’s Manual will introduce you to the features and operation of your new HYUNDAI. To become familiar with your new HYUNDAI, so that you can fully enjoy it, read this Owner’s Manual carefully before driving your new vehicle.
This manual contains important safety information and instructions intended to familiarize you with your vehicle’s controls and safety features so you can safely operate your vehicle.
This manual also contains information on maintenance designed to enhance safe operation of the vehicle. It is recommended that all service and maintenance on your car be performed by an authorized HYUNDAI dealer. An authorized HYUNDAI dealer are prepared to provide high-quality service, maintenance and any other assistance that may be required.
This Owner’s Manual should be considered a permanent part of your vehicle, and should be kept in the vehicle so you can refer to it at any time. The manual should stay with the vehicle if you sell it to provide the next owner with important operating, safety and maintenance information.
HYUNDAI MOTOR AMERICA
CAUTION
Severe engine and transmission damage may result from the use of poor quality fuels and lubricants that do not meet HYUNDAI specifications. You must always use high quality fuels and lubricants that meet the specifications listed on Page 2-13 in the Vehicle Specifications section of the Owner’s Manual.
Copyright 2022 HYUNDAI Motor America. All rights reserved. No part of this publication may be reproduced, stored in any retrieval system or transmitted in
any form or by any means without the prior written permission of HYUNDAI Motor America.
GUIDE TO HYUNDAI GENUINE PARTS
What are HYUNDAI Genuine Parts?
HYUNDAI Genuine Parts are the same parts used by HYUNDAI Motor Company to manufacture vehicles. They are designed and tested for the optimum safety, performance, and reliability for our customers.

Why Hyundai Genuine Parts?
HYUNDAI Genuine Parts are engineered and built to meet rigid manufacturing requirements. Damage caused by using imitation, counterfeit or used salvage parts is not covered under the HYUNDAI New Vehicle Limited Warranty or any other HYUNDAI warranty.
In addition, any damage to or failure of HYUNDAI Genuine Parts caused by the installation or failure of an imitation, counterfeit or used salvage part is not covered by any HYUNDAI Warranty.
How can you tell if you are purchasing HYUNDAI Genuine Parts?
Look for the HYUNDAI Genuine Parts Logo on the package (see below). HYUNDAI Genuine Parts exported to the U.S. are packaged with labels written only in English. HYUNDAI Genuine Parts are only sold through authorized HYUNDAI Dealerships.
Read all Instructions for Foreword User Guide
Hyundai Kona 2023 Vehicle Information, Consumer Information and Reporting Safety Defects User Guide
2023 Hyundai Kona Vehicle Information, and Safety Defects Instructions
Exterior Overview (I)
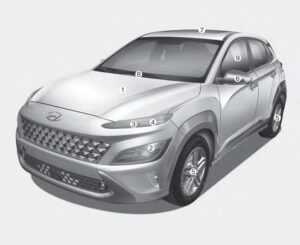
- Hood
- Head lamp
- DRL (Daytime Running Light)
- Turn signal lamp
- Tires and wheels
- Side view mirror
- Sunroof
- Front windshield wiper blades
- Windows
- Hood
- Headlamp
- DRL (Daytime Running Light)
- Turn signal lamp
- Tires and wheels
- Side view mirror
- Sunroof
- Front windshield wiper blades
- Windows
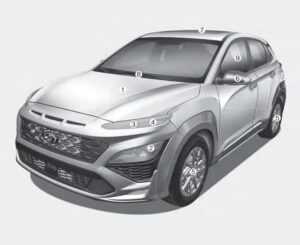
Exterior Overview (II)
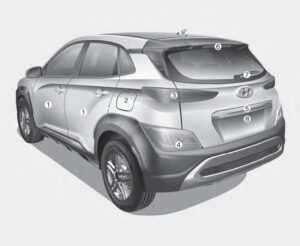
- Door
- Fuel filler door
- Rear combination lamp
- Turn signal lamp, Reverse lamp
- Liftgate
- High-mounted stop lamp
- Rear window wiper blade
- Rearview camera
- Antenna
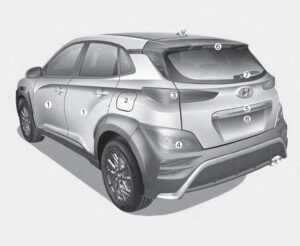
- Door
- Fuel filler door
- Rear combination lamp
- Turn signal lamp, Reverse lamp
- Liftgate
- High-mounted stop lamp
- Rear window wiper blade
- Rearview camera
- Antenna
Interior Overview (I)
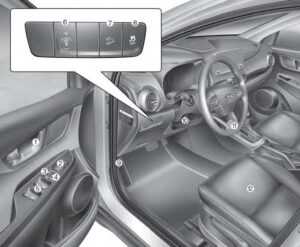
- Inside door handle
- Side view mirror control
- Central door lock switch
- Power window lock switch
- Power window switches
- Instrument panel illumination control switch
- DBC button
- ESC OFF button
- Hood release lever
- Steering wheel tilt/telescopic lever
- Steering wheel tilt/telescopic lever
- Seat
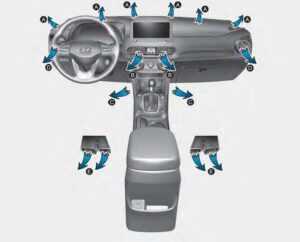
Interior Overview (II)
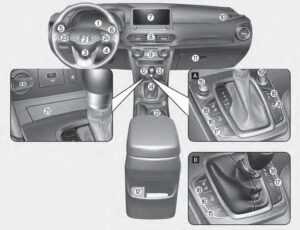
- Instrument cluster
- Horn
- Driver’s front air bag
- Engine Start/Stop button
- Light control/Turn signals
- Wiper/Washer
- Infotainment system
- Hazard warning flasher switch
- Manual climate control system
- Automatic climate control system
- Passenger’s front air bag
- Glove box
- USB Charger
- Power outlet
- Dual clutch transmission shift lever
- Intelligent variable transmission shift lever
- Drive mode button
- Heated steering wheel
- Idle stop and go (ISG) OFF button
- Seat warmer/Air ventilation seat
- AWD lock button
- Parking Safety button
- Wireless Smart Phone Charging
System - Cup holder
- Steering wheel audio controls
- Bluetooth® wireless technology
hands-free controls - Driving Assist button
- Lane Driving Assist button
- Vehicle Distance button
Hyundai Kona 2023 Important Safety Precautions and Seats and Seat Belts User Guide
2023 Hyundai Kona Safety Precautions, Seats and Seat Belts Guidelines
Important Safety Precautions
You will find many safety precautions and recommendations throughout this section, and throughout this manual. The safety precautions in this section are among the most important.
Always Wear Your Seat Belt
A seat belt is your best protection in all types of accidents. Air bags are designed to supplement seat belts, not replace them. So even though your vehicle is equipped with air bags, ALWAYS make sure you and your passengers wear your seat belts, and wear them properly.
Restrain All Children
All children under age 13 should ride in your vehicle properly restrained in a rear seat, not the front seat. Infants and small children should be restrained in an appropriate child restraint. Larger children should use a booster seat with the lap/shoulder belt until they can use the seat belt properly without a booster seat.
Air Bag Hazards
While airbags can save lives, they can also cause serious or fatal injuries to occupants who sit too close to them, or who are not properly restrained. Infants, young children, and shorter adults are at the greatest risk of being injured by an inflating airbag. Follow all instructions and warnings in this manual.
Driver Distraction
Driver distraction presents a serious and potentially deadly danger, especially for inexperienced drivers. Safety should be the first concern when behind the wheel, and drivers need to be aware of the wide array of potential distractions, such as drowsiness, reaching for objects, eating, personal grooming, other passengers, and using cellular phones.
Drivers can become distracted when they take their eyes and attention off the road or their hands off the wheel to focus on activities other than driving. To reduce your risk of distraction or getting into an accident:
- ALWAYS set up your mobile devices (for example, MP3 players, phones, navigation units, etc.) when your vehicle is parked or safely stopped. ONLY use your mobile device when allowed by laws and when conditions permit safe use. NEVER text or email while driving. Most states have laws prohibiting drivers from texting. Some states and cities also prohibit drivers from using handheld phones. NEVER let the use of a mobile device distract you from driving. You have a responsibility to your passengers and others on the road to always drive safely, with your hands on the wheel as well as your eyes and attention on the road.
Control Your Speed
Excessive speed is a major factor in crash injuries and deaths. Generally, the higher the speed, the greater the risk, but serious injuries can also occur at lower speeds. Never drive faster than is safe for current conditions, regardless of the maximum speed posted.
Keep Your Vehicle in Safe Condition
Having a tire blowout or a mechanical failure can be extremely hazardous. To reduce the possibility of such problems, check your tire pressures and condition frequently, and perform all regularly scheduled maintenance.
Hyundai Kona 2023 Seats and Seat Belts User Guide
Seats
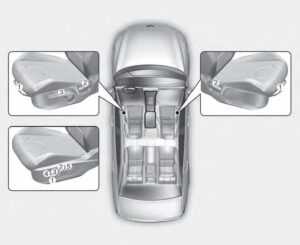
The actual layout of the vehicle may differ from the illustration
Driver’s seat
- Forward and rearward
- Seatback angle
- Seat cushion height
- Seat cushion angle
- Lumbar support
Front passenger’s seat
- Forward and rearward
- Seatback angle
Safety Precautions
Adjusting the seats so that you are sitting in a safe, comfortable position plays an important role in driver and passenger safety together with the seat belts and airbags in an accident.
WARNING
Do not use a cushion that reduces friction between the seat and the passenger. The passenger’s hips may slide under the lap portion of the seat belt during an accident or a sudden stop. Serious or fatal internal injuries could result because the seat belt cannot operate properly.
Air bags
You can take steps to reduce the risk of being injured by an inflating airbag. Sitting too close to an airbag greatly increases the risk of injury in the event the air bag inflates.
The National Highway Traffic Safety Administration (NHTSA) recommends that drivers allow at least 10 inches (25 cm) between the center of the steering wheel and their chest.
WARNING
To reduce the risk of serious injury or death from an inflating airbag, take the following precautions:
- Adjust the driver’s seat as far to the rear as possible while maintaining the ability to maintain full control of the vehicle.
- Adjust the front passenger seat as far to the rear as possible.
- Hold the steering wheel by the rim with your hands at the 9 o’clock and 3 o’clock positions to minimize the risk of injuries to your hands and arms.
- NEVER place anything or anyone between the steering wheel and the air bag.
- Do not allow the front passenger to place feet or legs on the dashboard to minimize the risk of leg injuries.
Read all Instructions for Important Safety Precautions and Seats and Seat Belts User Guide
Hyundai Kona 2023 Child Restraint System (CRS) User Guide
2023 Hyundai Kona Child Restraint System (CRS) System
Child Restraint System (CRS)
Children Always in the Rear
WARNING
Always properly restrain children in the vehicle. Children of all ages are safer when restrained in the rear seat. A child riding in the front passenger seat can be forcefully struck by an inflating air bag resulting in SERIOUS INJURY or DEATH.
Children under age 13 should always ride in the rear seats and must always be properly restrained to minimize the risk of injury in an accident, sudden stop or sudden maneuver.
According to accident statistics, children are safer when properly restrained in the rear seats than in the front seat. Even with airbags, children can be seriously injured or killed. Children too large for a Child Restraint System must use the seat belts provided.
All 50 states have child restraint laws that require children to travel in approved Child Restraint Systems.
The laws governing the age or height/weight restrictions at which seat belts can be used instead of the Child Restraint System differs among states, so
you should be aware of the specific requirements in your country, and where you are traveling.
Child Restraint Systems must be properly placed and installed in the rear seat. You must use a commercially available Child Restraint System that meets the requirements of the Federal Motor Vehicle Safety Standards (FMVSS 213).
Child Restraint Systems are generally designed to be secured in a vehicle seat by lap belt portion of a lap/shoulder belt, or by a LATCH system in the rear seats of the vehicle.
Child Restraint System (CRS)
Infants and younger children must be restrained in an appropriate rearward-facing or forward-facing CRS that has first been properly secured to the seat of the vehicle. Read and comply with the instructions for installation and use provided by the manufacturer of the Child Restraint System.
WARNING
An improperly secured child restraint can increase the risk of SERIOUS INJURY or DEATH in an accident. Always take the following precautions when using a Child Restraint System:
- NEVER install a child or infant restraint in the front passenger’s seat.
- Always properly secure the child restraint to a rear seat of the vehicle.
- Always follow the child restraint system manufacturer’s instructions for installation and use.
- Always properly restrain your child in the child restraint.
- If the vehicle head restraint prevents proper installation of a child seat (as described in the child restraint system manual), the head restraint of the respective seating position shall be readjusted or entirely removed.
- Do not use an infant carrier or a child safety seat that “hooks” over a seatback, it may not provide adequate protection in an accident.
- After an accident, have an authorized HYUNDAI dealer check the child restraint system, seat belts, tether anchors and lower anchors.
Selecting a Child Restraint System (CRS)
When selecting a Child Restraint System for your child, always:
- Make sure the Child Restraint System has a label certifying that it meets applicable Federal Motor Vehicle Safety Standards (FMVSS 213).
- Select a Child Restraint System based on your child’s height and weight. The required label or the instructions for use typically provide this information.
- Select a Child Restraint System that fits the vehicle seating position where it will be used.
- Read and comply with the warnings and instructions for installation and use provided with the Child Restraint System.
Child Restraint System types
There are three main types of Child Restraint Systems: rearward-facing, forward-facing and booster Child Restraint Systems.
They are classified according to the child’s age, height and weight.
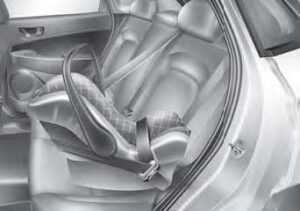
Rearward-facing Child Restraint System
A rearward-facing Child Restraint System provides restraint with the seating surface against the back of the child. The harness system holds the child in place, and in an accident, acts to keep the child positioned in the Child Restraint System and reduce the stress to the fragile neck and spinal cord.
All children under the age of one year must always ride in a rearward-facing Child Restraint System. Convertible and 3-in-1 Child Restraint Systems typically have higher height and weight limits for the rearward-facing position, allowing you to keep your child rearward-facing for a longer period of time.
Keep using Child Restraint Systems in the rearward-facing position as long as children fit within the height and weight limits allowed by the Child Restraint System’s manufacturer. It’s the best way to keep them safe.
Once your child has outgrown the rearward-facing Child Restraint System, your child is ready for a forward-facing Child Restraint System with a harness.
WARNING
NEVER install a child or infant restraint in the front passenger’s seat.
Placing a rearward-facing child restraint in the front seat can result in SERIOUS INJURY or DEATH if the child restraint is struck by an inflating airbag.
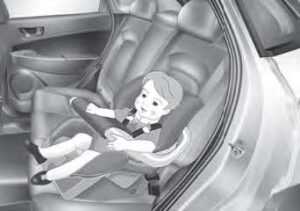
Forward-facing Child Restraint System
A forward-facing Child Restraint System provides restraint for the child’s body with a harness. Keep children in a forward-facing Child Restraint System with a harness until they reach the top height or weight limit allowed by your Child Restraint System’s manufacturer.
Once your child outgrows the forward-facing Child Restraint System, your child is ready for a booster seat.
Booster seats
A booster seat is a Child Restraint System designed to improve the fit of the vehicle’s seat belt system. A booster seat positions the seat belt so that it fits properly over the stronger parts of your child’s body. Keep your children in booster seats until they are big enough to fit in a seat belt properly.
For a seat belt to fit properly, the lap belt must lie comfortably across the upper thighs, not the stomach. The shoulder belt should lie comfortably across the shoulder and chest and not across the neck or face. Children under age 13 must always be properly restrained to minimize the risk of injury in an accident, sudden stop or sudden maneuver.
Installing a Child Restraint System (CRS)
WARNING
Before installing your Child Restraint System always:
Read and follow the instructions provided by the manufacturer of the Child Restraint System.
Failure to follow all warnings and instructions could increase the risk of the SERIOUS INJURY or DEATH if an accident occurs.
WARNING
If the vehicle head restraint prevents proper installation of a Child Restraint System, the head restraint of the respective seating position shall be readjusted or entirely removed.
After selecting a proper Child Restraint System for your child and checking that the Child Restraint System fits properly on the seating position, there are three general steps for a proper installation:
- Properly secure the Child Restraint System to the vehicle. All Child Restraint Systems must be secured to the vehicle with the lap belt or lap part of a lap/shoulder part of a lap/shoulder belt or with the LATCH system.
- Make sure the Child Restraint System is firmly secured. After installing a Child Restraint System to the vehicle, push and pull the seat forward and from side-to-side to verify that it is securely attached to the seat. A Child Restraint System secured with a seat belt should be installed as firmly as possible. However, some side-to-side movement can be expected. When installing a Child Restraint System, adjust the vehicle seat and seatback (up and down, forward and rearward) so that your child fits in the Child Restraint System in a comfortable manner.
- Secure the child in the Child Restraint System. Make sure the child is properly strapped in the Child Restraint System according to the Child Restraint System manufacturer’s instructions.
CAUTION
A Child Restraint System in a closed vehicle can become very hot. To prevent burns, check the seating surface and buckles before placing your child in the Child Restraint System.
Read all Instructions for Child Restraint System (CRS) User Guide
Hyundai Kona 2023 Air Bag – Supplemental Restraint System User Guide
2023 Hyundai Kona – Air Bag – Supplemental Restraint System
Air Bag – Supplemental Restraint System
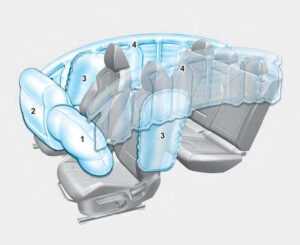
The actual airbags in the vehicle may differ from the illustration
- Driver’s front airbag
- Passenger’s front airbag
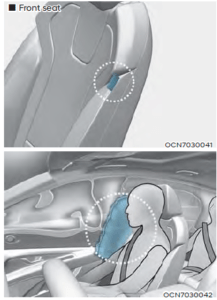
- Side airbag
- Curtain airbag
This vehicle is equipped with an Advanced Supplemental Air Bag System for the driver’s seat and front passenger’s seats.
The front airbags are designed to supplement the three-point seat belts. For these airbags to provide protection, the seat belts must be worn at all times when driving.
You can be severely injured or killed in an accident if you are not wearing a seat belt. Airbags are designed to supplement seat belts but do not replace them. Also, airbags are not designed to deploy in every collision. In some accidents, the seat belts are the only restraint protecting you.
WARNING
AIRBAG SAFETY PRECAUTIONS
ALWAYS use seat belts and child restraints – every trip, every time, everyone! Even with airbags, you can be seriously injured or killed in a collision if you are improperly belted or not wearing your seat belt when the airbag inflates.
NEVER place a child in any child restraint or booster seat in the front passenger seat. An inflating air bag could forcefully strike the infant or child causing serious or fatal injuries.
ABC – Always Buckle Children under age 13 in the back seat. It is the safest place for children of any age to ride. If a child age 13 or older must be seated in the front seat, he or she must be properly belted and the seat should be moved as far back as possible.
All occupants should sit upright with the seatback in an upright position, centered on the seat cushion with their seat belt on, legs comfortably extended and their feet on the floor until the vehicle is parked and is turned off. If an occupant is out of position during an accident, the rapidly deploying air bag may forcefully contact the occupant causing serious or fatal injuries.
You and your passengers should never sit or lean unnecessarily close to the airbags or lean against the door or center console.
Move your seat as far back as possible from front airbags, while still maintaining control of the vehicle. The U.S. National Highway Traffic Safety Administration
(NHTSA) recommends that drivers allow at least 10 inches (25 cm) between the center of the steering wheel and the chest.
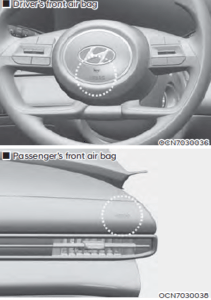
Where are the Air Bags?
Driver’s and passenger’s front airbags
Your vehicle is equipped with an Advanced Supplemental Restraint System (SRS) and lap/shoulder belts at both the driver and passenger seating positions.
The SRS consists of air bags which are located in the center of the steering wheel, in the driver’s side lower crash pad below the steering wheel column and the passenger’s side front panel pad above the glove box.
The airbags are labeled with the letters “AIR BAG” embossed on the pad covers.
 The purpose of the SRS is to provide the vehicle’s driver and front passengers with additional protection than that offered by the seat belt system alone. The SRS uses sensors to gather information about the driver’s and front passenger’s seat belt usage and impact severity. The seat belt buckle sensors determine if the driver and front passenger’s seat belts are fastened. These sensors provide the ability to control the SRS deployment based on whether or not the seat belts are fastened, and how severe the impact is. The advanced SRS offers the ability to control the air bag inflation within two levels. A first stage level is provided for moderate-severity impacts. A second stage level is provided for more severe impacts. According to the impact severity, and seat belt usage, the SRS Control Module (SRSCM) controls the air bag inflation. Failure to properly wear seat belts can increase the risk or severity of injury in an accident.
WARNING
To reduce the risk of serious injury or death from inflating front air bags, take the following precautions:
- Seat belts must be worn at all times to help keep occupants positioned properly
- Move your seat as far back as possible from front air bags, while still maintaining control of the vehicle.
- Never lean against the door or center console.
- Do not allow the front passenger to place their feet or legs on the dashboard.
- No objects (such as crash pad cover, cellular phone holder, cup holder, air fresheners or stickers) should be placed over or near the air bag modules on the steering wheel, instrument panel, windshield glass, and the front passenger’s panel above the glove box. Such objects could cause harm if the vehicle is in a crash severe enough to cause the air bags to deploy.
Side air bags
Read all Instructions for Air Bag – Supplemental Restraint System User Guide
Hyundai Kona 2023 Instrument Cluster Control, Gauges and Meters User Guide
2023 Hyundai Kona Instrument Cluster Control and Meters Instructions
Instrument Cluster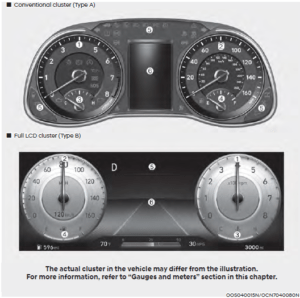
- Tachometer
- Speedometer
- Engine coolant temperature gauge
- Fuel gauge
- Warning and indicator lights
- LCD display (including Trip computer)
Instrument Cluster Control
Instrument panel illumination
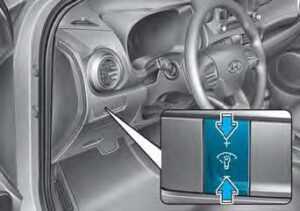
When the vehicle’s position lights or headlights are on, press the illumination control button to adjust the brightness of the instrument panel illumination.
When pressing the illumination control button, the interior switch illumination intensity is also adjusted.
WARNING
Never adjust the instrument cluster while driving. This could result in loss of control and lead to an accident that may cause death, serious injury, or vehicle damage.
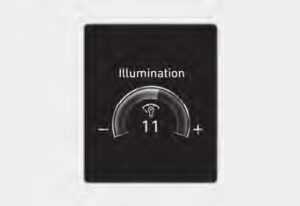
- The brightness of the instrument panel illumination is displayed.
- If the brightness reaches to the maximum or minimum level, a chime will sound.
Gauges and Meters
Speedometer
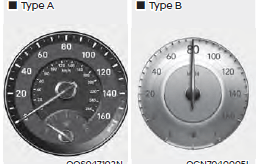
The speedometer indicates the speed of the vehicle and is calibrated in miles per hour (MPH) and/or kilometers per hour (km/h).
Tachometer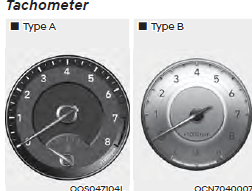
The tachometer indicates the approximate number of engine revolutions per minute (rpm).
Use the tachometer to select the correct shift points and to prevent lugging and/or over-revving the engine.
NOTICE
Do not operate the engine within the tachometer’s RED ZONE. This may cause severe engine damage.
Engine coolant temperature gauge
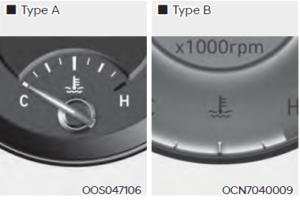
This gauge indicates the temperature of the engine coolant when the ignition switch is in the ON position.
NOTICE
If the gauge pointer moves beyond the normal range area toward the “H (Hot)” position, it indicates overheating that may damage the engine.
Do not continue driving with an overheated engine. If your vehicle overheats, refer to “If the Engine Overheats” section in chapter 8.
WARNING
Never remove the engine coolant reservoir cap when the engine is hot. The engine coolant is under pressure and could cause a severe burn. Wait until the engine is cool before adding coolant to the reservoir.
Fuel gauge
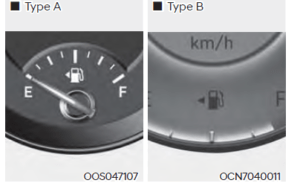 This gauge indicates the approximate amount of fuel remaining in the fuel tank.
Information
- The fuel tank capacity is given in chapter 2.
- The fuel gauge is supplemented by a low fuel warning light, which will illuminate when the fuel tank is nearly empty.
- On inclines or curves, the fuel gauge pointer may fluctuate or the low fuel warning light may come on earlier than usual due to the movement of fuel in the tank.
WARNING
Running out of fuel can expose vehicle occupants to danger.
You must stop and obtain additional fuel as soon as possible after the warning light comes on or when the gauge indicator comes close to the “E (Empty)” level.
NOTICE
Avoid driving with an extremely low fuel level. Running out of fuel could cause the engine to misfire damaging the catalytic converter.
Outside temperature gauge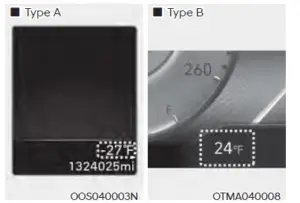
This gauge indicates the current outside air temperatures by 1°F (1°C).
Note that the temperature indicated on the LCD display may not change
as quickly as the outside temperature (there may be a slight delay before the temperature changes.)
The temperature unit (from °C to °F or from °F to °C) can be changed by:-
- User Settings mode in the Cluster: You can change the temperature unit in the “Other Features – Temperature unit”.
- Automatic climate control system: While pressing the OFF button, press the AUTO button for 3 seconds or more.
The temperature unit of the instrument cluster and climate control system will change at once.
Odometer
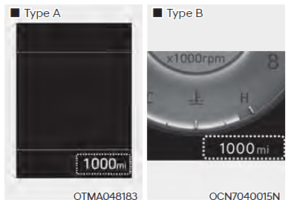
The odometer indicates the total distance that the vehicle has been driven and should be used to determine when periodic maintenance should be performed.
Distance to empty
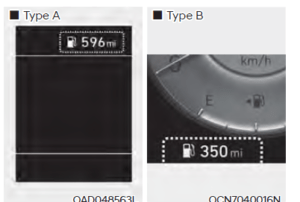
- The distance to empty is the estimated distance the vehicle can be driven with the remaining fuel.
- If the estimated distance is below 1 mi. (1 km), the trip computer will display “—” as the distance to empty.
Information
- If the vehicle is not on level ground or the battery power has been interrupted, the distance to the empty function may not operate correctly.
- The distance to empty may differ from the actual driving distance as it is an estimate of the available driving distance.
- The trip computer may not register additional fuel if less than 6 liters (1.5 gallons) of fuel are added to the vehicle.
- The distance to empty may vary significantly based on driving conditions, driving habits, and the condition of the vehicle.
Read all Instructions for Instrument Cluster Control, Gauges and Meters User Guide
Hyundai Kona 2023 Transmission Shift Indicator, Warning and Indicator Lights User Guide
2023 Hyundai Kona Transmission Shift and Lights Indicator Instructions
Transmission Shift Indicator
Intelligent variable transmission (if equipped)
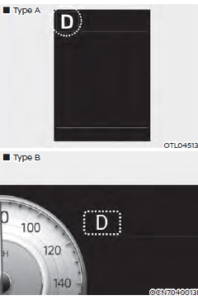
This indicator displays which shift lever position is selected.
Dual clutch transmission shift indicator
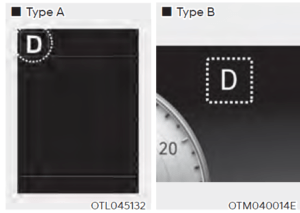
This indicator displays which shift lever position is selected.
- Park : P
- Reverse: R
- Neutral: N
- Drive : D
- Manual shift mode : D1, D2, D3, D4, D5, D6, D7
Warning and Indicator Lights
Information
Make sure that all warning lights are OFF after starting the engine. If any light is still ON, this indicates a situation that needs attention.
Seat belt warning light
This warning light informs the driver that the seat belt is not fastened.
For more details, refer to the “Seat Belts” section in chapter 3.
Airbag warning light
This warning light illuminates:
- When you turn the ignition switch to the ON position.
- It illuminates for approximately 3~6 seconds and then goes off.
- When there is a malfunction with the SRS.
In this case, have the vehicle inspected by an authorized HYUNDAI dealer.
Parking brake and brake fluid warning light
This warning light illuminates:
- When you set the ignition switch to the ON position.
- The parking brake & brake fluid warning light illuminates for about 3 seconds and will then turn off once the parking brake is released.
- Whenever the parking brake is applied.
- Whenever the brake fluid level in the reservoir is low.
- If the warning light illuminates with the parking brake released, it indicates the brake fluid level in the reservoir is low.
If the brake fluid level in the reservoir is low:
- Drive carefully to the nearest safe location and stop your vehicle.
- With the engine stopped, check the brake fluid level immediately and add fluid as required (For more details, refer to the “Brake Fluid” section in Chapter 9). After adding brake fluid, check all brake components for fluid leaks. If a brake fluid leak is found, or if the warning light remains on, or if the brakes do not operate properly, do not drive the vehicle. Have the vehicle inspected by an authorized HYUNDAI dealer?
Dual-diagonal braking system
Your vehicle is equipped with dual-diagonal braking system. This means you still have braking on two wheels even if one of the dual systems should fail.
With only one of the dual systems working, more than normal pedal travel and greater pedal pressure are required to stop the vehicle.
Also, the vehicle will not stop in as short a distance with only a portion of the brake system working.
If the brakes fail while you are driving, shift to a lower gear for additional engine braking and stop the vehicle as soon as it is safe to do so.
WARNING
Parking Brake & Brake Fluid warning light Driving the vehicle with a warning light ON is dangerous. If the Parking Brake & Brake Fluid warning light illuminates with the parking brake released, it indicates that the brake fluid level is low. If this occurs, have the vehicle inspected by an authorized HYUNDAI dealer.
Anti-lock Brake System (ABS) warning light
This warning light illuminates:
- When you set the ignition switch to the ON position.
- The ABS warning light illuminates for about 3 seconds and then goes off.
- Whenever there is a malfunction with the ABS. Note that the hydraulic braking system will still be operational even if there is a malfunction with the ABS. If this occurs, have the vehicle inspected by an authorized HYUNDAI dealer.
Read all Instructions for the Transmission Shift Indicator, Warning, and Indicator Lights User Guide
Hyundai Kona 2023 LCD Display Messages User Guide
2023 Hyundai Kona LCD Display Messages Guidelines
LCD Display Messages
Shift to P (for a smart key system and dual-clutch transmission)
This message is displayed if you try to turn off the vehicle without the gear in the P (Park) position. If this occurs, the Engine Start/Stop button turns to the ACC position.
Low key battery (for the smart key system)
This message is displayed if the battery of the smart key is discharged while changing the Engine Start/Stop button to the OFF position.
Press the START button while turning the wheel (for the smart key system)
This message is displayed if the steering wheel does not unlock normally when the Engine Start/Stop button is pressed. You should press the Engine Start/Stop button while turning the steering wheel right and left.
The steering wheel is not locked (for the smart key system)
This message is displayed if the steering wheel does not lock normally while the Engine Start/Stop button is pressed to the OFF position.
Press the brake pedal to start the engine (for a smart key system and dual-clutch transmission)
This message is displayed if the Engine Start/Stop button changes to the ACC position twice by pressing the button repeatedly without depressing the brake pedal. You can start the vehicle by depressing the brake pedal and then pressing the Engine Start/Stop button.
Key not in a vehicle (for the smart key system)
This message is displayed if the smart key is not in the vehicle when you leave the vehicle with the Engine Start/Stop button in the ON or Start position. Always turn off the engine before leaving your vehicle.
Key not detected (for the smart key system)
This message is displayed if the smart key is not detected when you press the Engine Start/Stop button.
Press the START button again (for a smart key system)
This message is displayed if you were unable to start the vehicle when the Engine Start/Stop button was pressed.
If this occurs, attempt to start the engine by pressing the Engine Start/ Stop button again.
If the warning message appears each time you press the Engine Start/Stop button, have the vehicle inspected by an authorized HYUNDAI dealer.
Press the START button with the key (for the smart key system)
This message is displayed if you press the Engine Start/Stop button while the warning message “Key not detected” is displayed. At this time, the immobilizer indicator light blinks.
Check the BRAKE SWITCH fuse (for a smart key system and dual-clutch transmission)
This message is displayed if the brake switch fuse is disconnected. You need to replace the fuse with a new one before starting the engine. If that is not possible, you can start the engine by pressing the Engine Start/Stop button for 10 seconds in the ACC position.
Shift to P or N to start the engine (for smart key system and dual-clutch transmission)
This message is displayed if you try to start the engine in any other position except P (Park) or N (Neutral).
Information
You can start the engine with the gear in N (Neutral). But, for your safety, start the engine with the gear shift to P (Park).
Battery discharging due to external electrical devices (if equipped)
This message is displayed if the 12V battery voltage is weak due to any non-factory electrical accessories (for example, dashboard camera) while parking. Be careful that the battery is not discharged. If the message appears after removing the non-factory electrical accessories, have the vehicle inspected by an authorized HYUNDAI dealer.
2023 Hyundai KONA Specs, Price, Features, Milage (Brochure)
Door, Hood, Liftgate open indicator
This warning is displayed if any door or hood or liftgate is left open. The warning will indicate which door is open in the display.
CAUTION
Before driving the vehicle, you should confirm that the door/ hood/liftgate are fully closed. Also, check there is no door/hood/liftgate open warning light or message displayed on the instrument cluster.
Sunroof open indicator (if equipped)
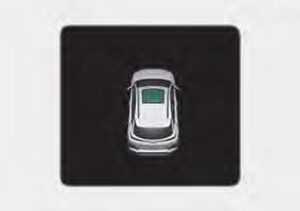
This warning is displayed if you turn off the engine when the sunroof is open. Close the sunroof securely before leaving your vehicle.
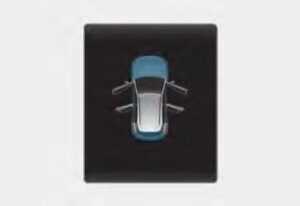
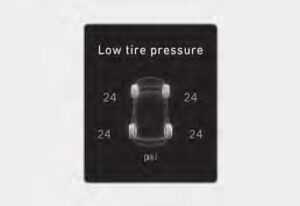
Low tire pressure (if equipped)
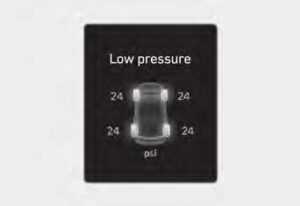
This warning message is displayed if the tire pressure is low. The corresponding tire on the vehicle will be illuminated. For more details, refer to “Tire Pressure Monitoring System (TPMS)” section in chapter 8.
Lights
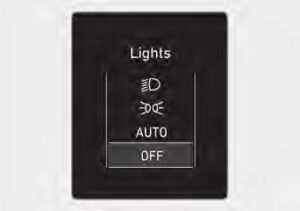
This indicator displays which exterior light is selected using the lighting control.
Read all Instructions for LCD Display Messages User Guide
Hyundai Kona 2023 LCD Display User Guide
2023 Hyundai Kona LCD Display Control System Guidelines
LCD Display
LCD Display Control
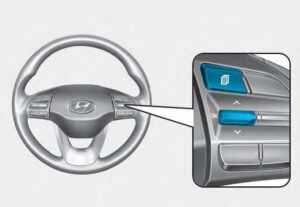
The LCD display modes can be changed by using the control buttons.
| Switch | Function |
| MODE button for changing modes | |
| , | MOVE switch for changing items |
| OK | SELECT/RESET button for setting or resetting the selected item |
View Modes
| View modes | Symbol | Explanation |
| Driving Assist |
|
This mode displays the state of :
For more information, refer to “Smart Cruise Control (SCC) “, “Highway Driving Assist (HDA) “, “Lane Keeping Assist (LKA) ”, “Driver Attention Warning (DAW) ” in chapter 7 and ” All Wheel Drive (AWD)” in chapter 6. |
| Trip Computer | This mode displays driving information such as the trip meter, fuel economy, etc.
For more details, refer to “Trip Computer” in this chapter. |
|
| Turn By Turn (TBT) | This mode displays the state of the navigation. | |
| User Settings | In this mode, you can change the settings of the doors, lamps, etc. | |
| Warning | The Warning mode displays warning messages related to the vehicle when one or more systems are not operating normally. |
The information provided may differ depending on which functions are applicable to your vehicle.
Trip computer mode
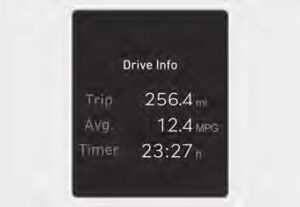
The trip computer mode displays information related to vehicle driving parameters including fuel economy, trip meter information and vehicle speed.
For more information, refer to “Trip Computer” in this chapter.
Turn By Turn (TBT) mode
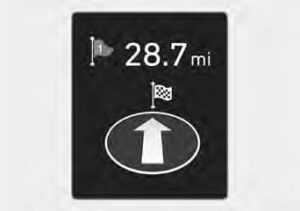
Turn-by-turn navigation, distance/time to destination information is displayed when Turn by Turn view is selected.
Driving Assist mode
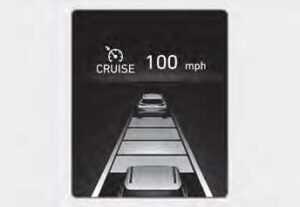
SCC/HDA/LKA
This mode displays the state of Smart Cruise Control, Highway Driving Assist, and Lane Keeping Assist. For more details, refer to each system information in chapter 7.
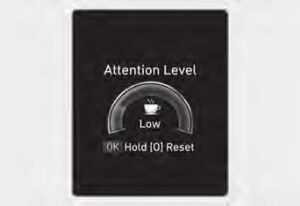
Driver Attention Warning
This mode displays the state of the Driver Attention Warning. For more details, refer to “Driver Attention Warning (DAW)” in chapter 7.
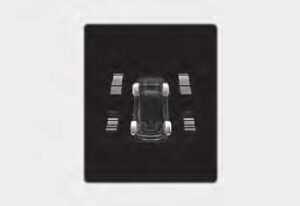
Driving force distribution (AWD)
This mode displays information related to AWD’s driving force. If the vehicle is in an AWD lock state, this mode is not displayed. For detailed information, refer to the “All Wheel Drive” in chapter 6.
Master warning group
This warning light informs the driver of the following situations.
- Forward Collision-Avoidance Assist malfunction (if equipped)
- Forward Collision-Avoidance Assist radar blocked (if equipped)
- Blind-Spot Collision Warning malfunction (if equipped)
- Blind-Spot Collision Warning radar blocked (if equipped)
- LED headlight malfunction (if equipped)
- High Beam Assist malfunction B(if equipped)
- Smart Cruise Control malfunction (if equipped)
- Smart Cruise Control radar blocked (if equipped)
- Tire Pressure Monitoring System
(TPMS) malfunction
The Master Warning Light illuminates if one or more of the above warning situations occur. At this time, a Master Warning icon ( ) will appear beside the User Settings icon ( ), on the LCD display. If the warning situation is solved, the master warning light will be turned off and the Master Warning icon will disappear.
Tire Pressure
This mode displays information related to Tire Pressure. For more details, refer to “Tire Pressure Monitoring System (TPMS)” in chapter 8.
User Settings Mode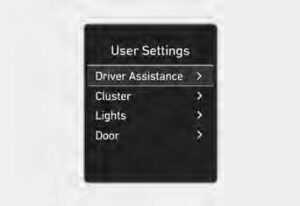
In this mode, you can change the settings of the instrument cluster, doors, lamps, etc.
Read all Instructions for the LCD Display User Guide
Hyundai Kona 2023 Accessing Your Vehicle User Guide
2023 Hyundai Kona Accessing Vehicle Guidelines
Accessing Your Vehicle
Remote Key
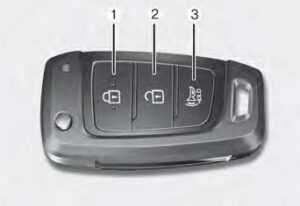
Your HYUNDAI uses a remote key, which you can use to lock or unlock the driver and passenger doors or the liftgate.
- Door Lock
- Door Unlock
- Panic
Locking
To lock :
- Close all doors, engine hood and liftgate.
- Press the Door Lock button (1) on the remote key.
- If the Door Lock button (1) is pressed once more within four seconds, the horn will beep once and the hazard warning lights will blink.
- Make sure the doors are locked by checking the position of the door lock button inside the vehicle.
WARNING
Do not leave the keys in your vehicle with unsupervised children. Unattended children could place the key in the ignition switch and may operate power windows or other controls, or even make the vehicle move, which could result in serious injury or death.
Unlocking
To unlock:
- Press the Door Unlock button (2) on the remote key.
- The doors will unlock. The hazard warning lights will blink two times.
Two press unlock setting:
If you press the Door Unlock button on the remote key again within four seconds, then all the doors will unlock. Two press unlock settings can be changed according to the owner’s preference in the cluster User Settings mode or with the remote key. Select or deselect the ‘Two Press Unlock’ feature in the User Settings mode on the Press and hold both Door Lock (1) and Door Unlock (2) buttons at the same time until the hazard warning lights blink. Now all doors will unlock when the Door Unlock button is pressed one time. To change the setting back, repeat this procedure.
Information
After unlocking the doors, the doors will automatically relock after 30 seconds unless a door is opened.
Panic button (if equipped)
Press and hold the Panic button (3) for more than one second. The horn sounds and hazard warning lights flash for about 30 seconds. To cancel the panic mode, press any button on the remote key.
Information
The word “HOLD” is written on the button to inform you that you must press and hold the button for more than one second.
Start-up
For detailed information refer to “Key Ignition Switch” in chapter 6.
NOTICE
To prevent damaging the remote key:
- Keep the remote key away from water or any liquid and fire. If the inside of the remote key gets damp (due to drinks or moisture), or is heated, internal circuit may malfunction, excluding the car from the warranty.
- Avoid dropping or throwing the remote key.
- Protect the remote key from extreme temperatures.
Mechanical key
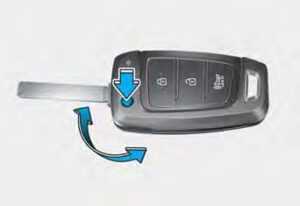
If the remote key does not operate normally, you can lock or unlock the door by using the mechanical key.
To unfold the key, press the release button then the key will unfold automatically.
To fold the key, fold the key manually while pressing the release button.
NOTICE
Do not fold the key without pressing the release button. This may damage the key.
Remote key precautions
The remote key will not work if any of the following occur:
- The key is in the ignition switch.
- You exceed the operating distance limit (about 10 m [30 feet]).
- The remote key battery is weak.
- Other vehicles or objects may be blocking the signal.
- The weather is extremely cold.
- The remote key is close to a radio transmitter such as a radio station or an airport which can interfere with normal operation of the remote key.
When the remote key does not work correctly, open and close the door with the mechanical key. If you have a problem with the remote key, it is recommended that you contact an authorized HYUNDAI dealer. If the remote key is in close proximity to your mobile phone, the signal could be blocked by your mobile phone’s normal operational signals. This is especially important when the phone is active such as making and receiving calls, text messaging, and/ or sending/receiving emails. Avoid placing the remote key and your mobile phone in the same location and always try to maintain an adequate distance between the two devices.
Information
This device complies with Part 15 of the FCC rules.
Operation is subject to the following three conditions:
- This device may not cause harmful interference.
- This device must accept any interference received, including interference that may cause undesired operation.
- Changes or modifications not expressly approved by the party responsible for compliance could void the user’s authority to operate the device.
NOTICE
Keep the remote key away from electromagnetic materials that block electromagnetic waves to the key surface.
Battery replacement

Read all Instructions for Accessing Your Vehicle User Guide
Hyundai Kona 2023 Door Locks and Rear Occupant Alert (ROA) User Guide
2023 Hyundai Kona Door Locks and Rear Occupant Guidelines
Door Locks
Operating Door Locks from Outside the Vehicle
Mechanical key

- Press the lever located under the cover with mechanical key. (1)
- While pushing the lever so that the mechanical key does not fall out of the cover hole, slowly push it towards the rear of the vehicle and remove the cover. (2)
- After removing the cover, only driver’s door can be locked or unlocked by using mechanical key.
- Turn the key toward the rear of the vehicle to lock and toward the front of the vehicle to unlock. (3)
If you lock/unlock the driver’s door with a key, the driver’s door will lock/ unlock automatically.
Once the door is unlocked, it may be opened by pulling the door handle.
Make sure that doors are closed securely.
Information
Be careful when locking the door by mechanical key operation, only the driver’s door can be locked/unlocked.
Refer to Chapter 5 “Operating door locks from inside the vehicle” to lock from inside the vehicle.
Information
When removing the cover, be careful not to lose cover and any scratches.
When the key cover freezes and does not open, lightly tap or indirectly warm(hand temperature, etc.) it.
Do not apply excessive force to the door and door handle. It may be damaged.
Remote key

To lock the doors, press the Door Lock button (1) on the remote key.
To unlock the doors, press the Door Unlock button (2) on the remote key.
Once the doors are unlocked, they may be opened by pulling the door handle.
When closing the door, push the door by hand. Make sure that doors are closed securely.
Smart key

To lock the doors, press the button on the outside door handle while carrying the smart key with you or press the door lock button on the smart key.
To unlock the doors, press the button on the outside door handle while carrying the smart key with you or press the door unlock button on the smart key.
Once the doors are unlocked, they may be opened by pulling the door handle.
When closing the door, push the door by hand. Make sure that doors are closed securely.
Information
- In cold and wet climates, door lock and door mechanisms may not work properly due to freezing conditions.
- If the door is locked/unlocked multiple times in rapid succession with either the vehicle key or door lock switch, the system may stop operating temporarily in order to protect the circuit and prevent damage to system components.
- Two press unlock setting can be changed in the User Settings mode on the cluster.
Operating Door Locks from Inside the Vehicle
With the door handle

Front door
If the inner door handle is pulled when the door is locked, the door will unlock and open.
Rear door
If the inner door handle is pulled once when the door is locked, the door will unlock. If the inner door handle is pulled once more, the door will open.
If any door is opened, the doors will not lock even though the central door lock switch is pressed.
Information
If a power door lock ever fails to function while you are in the vehicle try one or more of the following techniques to exit:
Read all Instructions for Door Locks and Rear Occupant Alert (ROA) User Guide
Hyundai Kona 2023 Theft-Alarm System and Steering Wheel User Guide
2023 Hyundai Kona Theft-Alarm and Steering Wheel System
Theft-Alarm System
This system helps to protect your vehicle and valuables. The horn will sound and the hazard warning lights will blink continuously if any of the following occur:
- A door is opened without using the remote key or smart key.
- The trunk is opened without using the remote key or smart key.
- The engine hood is opened.
The alarm continues for 30 seconds, then the system resets. To turn off the alarm, unlock the doors with the remote key or smart key.
The Theft Alarm System automatically sets 30 seconds after you lock the doors and the trunk. For the system to activate, you must lock the doors and the trunk from outside the vehicle with the remote key or smart key or by pressing the button on the outside of the door handle with the smart key in your possession.
The hazard warning lights will blink and the chime will sound once to indicate the system is armed.
Once the security system is set, opening any door, trunk, or hood without using the remote key or smart key will cause the alarm to activate.
The Theft Alarm System will not set if the hood, the trunk, or any door is not fully closed. If the system will not set, check the hood, the trunk, or the doors are fully closed.
Do not attempt to alter this system or add other devices to it.
Information
- Do not lock the doors until all passengers have left the vehicle. If the remaining passenger leaves the vehicle when the system is armed, the alarm will be activated.
- If the vehicle is not disarmed with the remote key or smart key, open the doors by using the mechanical key and place the ignition switch in the ON position (for remote key) or start the engine (for the smart key) and wait for 30 seconds.
- When the system is disarmed but a door or trunk is not opened within 30 seconds, the system will be rearmed.
Driver Position Memory System

The Driver Position Memory System is provided to store and recall the following memory settings with a simple button operation.
- Driver’s seat position
- Instrument panel illumination intensity
WARNING
Never attempt to operate the driver position memory system while the vehicle is moving.
This could result in loss of control, and an accident causing death, serious injury, or property damage.
Information
- If the battery connector is disconnected, the memory settings will be erased.
- If the Driver Position Memory System does not operate normally, we recommend that you have the system checked by an authorized HYUNDAI dealer.
Storing Memory Positions
- Shift to P (Park) while the Engine Start/Stop button is in the ON position.
- Adjust the driver’s seat position and instrument panel illumination intensity to the desired position.
- Press the SET button. The system will beep once and notify you ‘Press the button to save settings on the cluster LCD display.
- Press one of the memory buttons (1 or 2) within 4 seconds. The system will beep twice when the memory has been successfully stored.
- “Settings 1 (or 2) saved” will appear on the LCD display.
Recalling Memory Positions
- . The ignition switch is in the ON position.
- Press the desired memory button (1 or 2). The system will beep once, and then the driver’s position and instrument panel illumination intensity will automatically adjust to the stored positions.
- “Settings 1 (or 2) applied“ will appear on the LCD display.
If your vehicle is equipped with additional navigation, please refer to the infotainment system manual separately supplied.
Information
- While recalling the “1” memory position, pressing the SET or 1 button temporarily stops the adjustment of the recalled memory position. Pressing the 2 button recalls the “2” memory position.
- While recalling the “2” memory position, pressing the SET or 2 button temporarily stops the adjustment of the recalled memory position. Pressing the 1 button recalls the “1” memory position.
- While recalling the stored positions, pressing one of the control buttons for the driver’s seat or instrument panel illumination will cause the movement of that component to stop and move in the direction that the control button is pressed.
Driver Position Memory System Reset
If the Driver position memory system does not work properly, initialize the system as follows.
Read all Instructions for Door Locks and Rear Occupant Alert (ROA) User Guide
Hyundai Kona 2023 Theft-Alarm System and Steering Wheel User Guide
2023 Hyundai Kona Theft-Alarm and Steering Wheel System
Theft-Alarm System
This system helps to protect your vehicle and valuables. The horn will sound and the hazard warning lights will blink continuously if any of the following occur:
- A door is opened without using the remote key or smart key.
- The trunk is opened without using the remote key or smart key.
- The engine hood is opened.
The alarm continues for 30 seconds, then the system resets. To turn off the alarm, unlock the doors with the remote key or smart key.
The Theft Alarm System automatically sets 30 seconds after you lock the doors and the trunk. For the system to activate, you must lock the doors and the trunk from outside the vehicle with the remote key or smart key or by pressing the button on the outside of the door handle with the smart key in your possession.
The hazard warning lights will blink and the chime will sound once to indicate the system is armed.
Once the security system is set, opening any door, the trunk, or the hood without using the remote key or smart key will cause the alarm to activate.
The Theft Alarm System will not set if the hood, the trunk, or any door is not fully closed. If the system will not set, check the hood, the trunk, or the doors are fully closed.
Do not attempt to alter this system or add other devices to it.
Information
- Do not lock the doors until all passengers have left the vehicle. If the remaining passenger leaves the vehicle when the system is armed, the alarm will be activated.
- If the vehicle is not disarmed with the remote key or smart key, open the doors by using the mechanical key and place the ignition switch in the ON position (for remote key) or start the engine (for smart key) and wait for 30 seconds.
- When the system is disarmed but a door or trunk is not opened within 30 seconds, the system will be rearmed.
Driver Position Memory System
The Driver Position Memory System is provided to store and recall the following memory settings with a simple button operation.
- Driver’s seat position
- Instrument panel illumination intensity
WARNING
Never attempt to operate the driver position memory system while the vehicle is moving.
This could result in loss of control, and an accident causing death, serious injury, or property damage.
Information
- If the battery connector is disconnected, the memory settings will be erased.
- If the Driver Position Memory System does not operate normally, we recommend that you have the system checked by an authorized HYUNDAI dealer.
Storing Memory Positions
- Shift to P (Park) while the Engine Start/Stop button is in the ON position.
- Adjust the driver’s seat position and instrument panel illumination intensity to the desired position.
- Press the SET button. The system will beep once and notify you ‘Press button to save settings’ on the cluster LCD display.
- Press one of the memory buttons (1 or 2) within 4 seconds. The system will beep twice when the memory has been successfully stored.
- “Settings 1 (or 2) saved” will appear on the LCD display.
Recalling Memory Positions
- . The ignition switch is in the ON position.
- Press the desired memory button (1 or 2). The system will beep once, and then the driver’s position and instrument panel illumination intensity will automatically adjust to the stored positions.
- “Settings 1 (or 2) applied“ will appear on the LCD display.
If your vehicle is equipped with additional navigation, please refer to the infotainment system manual separately supplied.
Information
- While recalling the “1” memory position, pressing the SET or 1 button temporarily stops the adjustment of the recalled memory position. Pressing the 2 button recalls the “2” memory position.
- While recalling the “2” memory position, pressing the SET or 2 button temporarily stops the adjustment of the recalled memory position. Pressing the 1 button recalls the “1” memory position.
- While recalling the stored positions, pressing one of the control buttons for the driver’s seat or instrument panel illumination will cause the movement of that component to stop and move in the direction that the control button is pressed.
Driver Position Memory System Reset
If the Driver position memory system does not work properly, initialize the system as follows.
How to initialize:
- Stop the vehicle and open the driver’s door with the ignition switch in the ON position and the vehicle shifted to P (Park).
- Pull the driver’s seat forward as far as possible and have the seatback upright as much as possible using the driver’s seat forward/backward adjustment and seatback angle (recline) switches.
- Push the SET button and seat forward movement switch for 2 seconds simultaneously.
Initialization in the process:
- Initialization begins as the alarm sounds.
- The seat and seatback will automatically move backward. The alarm sound will continue while the system is in operation.
]Initialization will be complete after the seat and seatback move to
the center with an alarm sound. If, however, cases, as follows, occur, the initialization process will come to a stop and the alarm sound will stop as well.- When pushing the driving position memory system button
- When pushing the driver’s seat height adjustment switch
- When shifting from P (Park) to other positions
- When driving speed exceeds 3 km/h
- When the driver’s door is closed
Read all Instructions Theft-Alarm System and Steering Wheel User Guide
Hyundai Kona 2023 Mirrors, Windows and Sunroof Hood, Trunk And Fuel Filler Door User Guide
2023 Hyundai Kona Mirrors, Windows and Fuel Filler Door Guidelines
Inside Rearview Mirror
Before driving your vehicle, check to see that your inside rearview mirror is properly positioned. Adjust the rearview mirror so that the view through the rear window is properly centered.
WARNING
Make sure your line of sight is not obstructed. Do not place objects in the rear seat, cargo area, or behind the rear head restraints which could interfere with your vision through the rear window.
WARNING
To prevent serious injury during an accident or deployment of the air bag, do not modify the rearview mirror and do not install a wide mirror.
WARNING
NEVER adjust the mirror while driving. This may cause loss of vehicle control resulting in an accident.
NOTICE
When cleaning the mirror, use a paper towel or similar material dampened with glass cleaner. Do not spray glass cleaner directly on the mirror as this may cause the liquid cleaner to enter the mirror housing.
Day/night rearview mirror (if equipped)

[A] : Lever, [B] : Day, [C] : Night
Make this adjustment before you start driving and while the day/night lever is in the day position.
Pull the day/night lever towards you to reduce glare from the headlights of the vehicles behind you during night driving.
Remember that you lose some rearview clarity in the night position.
Electrochromic mirror (ECM) with HomeLink® system (if equipped)
 Your vehicle may be equipped with a Gentex Automatic-Dimming Mirror with an Integrated HomeLink® Wireless Control System.
During nighttime driving, this feature will automatically detect and help reduce rearview mirror glare. The HomeLink® Universal Transceiver allows you to activate your garage door(s), electric gate, home lighting, etc.
- HomeLink Channel 1
- HomeLink Channel 2
- HomeLink Channel 3
- Garage Door Opener Status Indicator : Closing or Closed
- HomeLink Operation Indicator
- Garage Door Opener Status Indicator: Opening or Opened
- HomeLink User Interface Indicator
Automatic-Dimming Night Vision Safety™ (NVS®) Mirror (if equipped)
The NVS® Mirror automatically helps reduce glare by monitoring light levels in the front and rear of the vehicle. Any object that obstructs either light sensor will degrade the automatic dimming control feature.
For more information regarding NVS® mirrors and other applications, please refer to the Gentex website:
www.gentex.com
Your mirror will automatically dim upon detecting glare from the vehicles traveling behind you.
The mirror defaults to the ON position each time the vehicle is started.
Integrated HomeLink® Wireless Control System
The HomeLink® Wireless Control System can replace up to three hand-held radio-frequency (RF) transmitters with a single built-in device. This innovative feature will learn the radio frequency codes of most current transmitters to operate devices such as gate operators, garage door openers, entry door locks, security systems, even home lighting. Both standard and rolling code-equipped transmitters can be programmed by following the outlined procedures.
Additional HomeLink® information can be found at: www.homelink.com, www. youtube.com/HomeLinkGentex or by calling 1-800-355-3515.
Retain the original transmitter of the RF device you are programming for use in other vehicles as well as for future HomeLink® programming. It is also suggested that upon the sale of the vehicle, the programmed HomeLink® buttons be erased for security purposes.
WARNING
Before programming HomeLink® to a garage door opener or gate operator, make sure people and objects are out of the way of the device to prevent potential harm or damage. Do not use the HomeLink® with any garage door opener that lacks the safety stop and reverse features required by U.S. federal safety standards (this includes any garage door opener model manufactured before April 1, 1982).
A garage door that cannot detect an object – signaling the door to stop and reverse – does not meet current U.S. federal safety standards. Using a garage door opener without these features increases the risk of serious injury or death.
Programing HomeLink®
Please note the following:
- When programming a garage door opener, it is advised to park the vehicle outside of the garage.
- It is recommended that a new battery be placed in the hand-held transmitter of the device being programmed to HomeLink® for quicker training and accurate transmission of the radio-frequency signal.
- Some vehicles may require the Engine Start/Stop button to be in the ACC (or “Accessories”) position for programming and/or operation of HomeLink®.
- In the event that there are still programming difficulties or questions after following the programming steps listed below, contact HomeLink® at: www.homelink.com, www.youtube. com/HomeLink Gentex or by calling 1-800-355-3515.
Programming
To program most devices, follow these instructions:
Read all Instructions for Mirrors, Windows and Sunroof Hood, Trunk And Fuel Filler Door User Guide
Hyundai Kona 2023 Exterior Features and Lighting User Guide
Hyundai Kona 2023 Exterior Features and Lighting User Guide
Exterior Lights
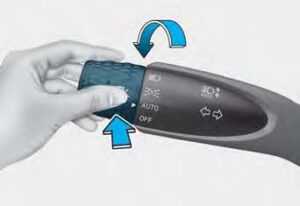
Lighting Control
To operate the lights, turn the knob at the end of the control lever to one of the following positions

- OFF
- AUTO headlight
- Parking lamp
- Headlight
Daytime running light (DRL)
The Daytime Running Lights (DRL) can make it easier for others to see the front of your vehicle during the day, especially after dawn and before sunset.
The DRL system will turn the dedicated lamp OFF when:
- The headlights are ON.
- The parking lamps are ON.
- The vehicle is turned off.
- The parking brake is engaged.
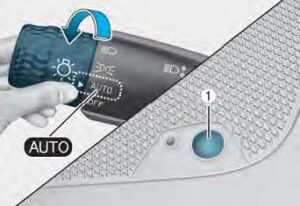
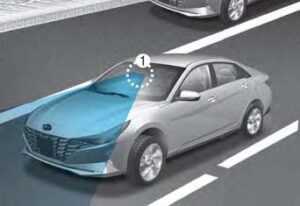
AUTO headlight
The parking lamp and headlight will be turned ON or OFF automatically depending on the amount of daylight as measured by the ambient light sensor on the center dash (1).
Even with the AUTO headlight feature in operation, it is recommended to manually turn ON the headlights when driving at night or in a fog, driving in the rain, or when you enter dark areas, such as tunnels and parking facilities.
NOTICE
- Do not cover or spill anything on the sensor (1) located in front of the instrument panel.
- Do not clean the sensor using a window cleaner, the cleanser may leave a light film which could interfere with sensor operation.
- If your vehicle has window tint or other types of metallic coating on the front windshield, the AUTO headlight system may not work properly.

Parking lamp ()
The parking lamp, license plate lamp and instrument panel lamp are turned ON.

Headlight ()
The headlight, parking lamp, license plate lamp and instrument panel lamp are turned ON.
Information
The ignition switch must be in the ON position to turn on the headlight.
High Beam Operation
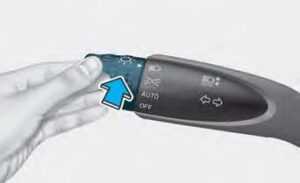
To turn on the high beam headlight, push the lever away from you. The lever will return to its original position.
The high beam indicator will light when the headlight high beams are switched on.
To turn off the high beam headlight, pull the lever towards you. The low beams will turn on.
WARNING
Do not use high beam when there are other vehicles approaching you. Using high beam could obstruct the other driver’s vision.
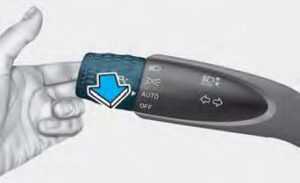
To flash the high beam headlight, pull the lever towards you, then release the lever. The high beams will remain ON as long as you hold the lever towards you.
Turn Signals and Lane Change Signals
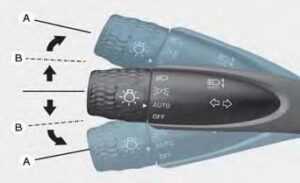
To signal a turn, push down on the lever for a left turn or up for a right turn in position (A). To signal a lane change, move the turn signal lever slightly and hold it in position (B). The lever will return to the OFF position when released or when the turn is completed.
If an indicator stays on and does not flash or if it flashes abnormally, one of the turn signal bulbs may be burned out and will require replacement.
One-touch turn signal function
To activate a one-touch turn signal function, move the turn signal lever slightly and then release it. The lane change signals will blink 3, 5, or 7 times.
You can activate or deactivate the One Touch Turn Signal function or choose the number of blinks (3, 5, or 7) from the User Settings Mode on the LCD display.
For more details, refer to “LCD Display Modes” in Chapter 4. If your vehicle is equipped with additional navigation, please refer to the infotainment system manual separately supplied.
Battery Saver Function
The purpose of this feature is to help prevent the battery from being discharged. The system automatically turns off the parking lamp when the driver turns the vehicle off and opens the driver-side door. With this feature, the parking lamps will turn off automatically if the driver parks on the side of the road at night.
Read all Instructions for Exterior Features and Lighting User Guide
Hyundai Kona 2023 High Beam Assist (HBA), Wipers and Washers User Guide
2023 Hyundai Kona High Beam Assist (HBA) and Washers Guidelines
High Beam Assist (HBA)
High Beam Assist will automatically adjust the headlight range (switches between high beam and low beam) depending on the brightness of detected vehicles and certain road conditions.
Detecting Sensor (Front view camera)
[1] : Front view camera
The front view camera is used as a detecting sensor to help detect ambient light and brightness while driving.
Refer to the picture above for the detailed location of the detecting sensor.
NOTICE
Always keep the front view camera in good condition to maintain optimal performance of High Beam Assist.
For more details on the precautions of the front view camera, refer to
“Forward Collision-Avoidance Assist (FCA)” section in chapter 7.
Function Settings
Beam Assist (or HBA (High Beam Assist))’ from the Settings menu to turn on High Beam Assist and deselect to turn off the system.

WARNING
For your safety, change the Settings after parking the vehicle at a safe location.
Function Operation
Display and control
- After selecting ‘High Beam Assist’ in the Settings menu, High Beam Assist will operate by following the procedure below.
- Place the headlight switch in the AUTO position and push the headlight lever towards the instrument cluster. The High Beam Assist ( ) indicator light will illuminate the cluster and the system will be enabled.
- When the system is enabled, the high beam will turn on when the vehicle speed is above 25 mph (40 km/h). When the vehicle speed is below 15 mph (25 km/h), the high beam will not turn on.
- The High Beam () indicator light will illuminate the cluster when the high beam is on.
- When High Beam Assist is operating, if the headlight lever or switch is used, the system operates as follows:
- If the headlight lever is pulled towards you when the high beam is off, the high beam will turn on without High Beam Assist canceled. When you let go of the headlight lever, the lever will move to the middle and the high beam will turn off.
- If the headlight lever is pulled towards you when the high beam is on by High Beam Assist, the low beam will be on and the system will turn off.
- If the headlight switch is placed from AUTO to another position (headlight/position/off), High Beam Assist will turn off and the corresponding lamp will turn on.
- When High Beam Assist is operating, high beam switches to low beam if any of the following conditions occur:
- When the headlight of an oncoming vehicle is detected.
- When the tail lamp of a vehicle in front is detected.
- When the headlight or tail lamp of a motorcycle or a bicycle is detected.
- When the surrounding ambient light is bright enough high beams are not required.
- When streetlights or other lights are detected.
High Beam Assist Malfunction and Limitations
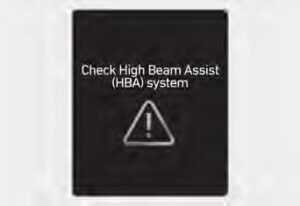
High Beam Assist malfunction

When High Beam Assist is not working properly, the ‘Check High Beam Assist (HBA) system’ or ‘Check HBA (High Beam Assist) system’ warning message will appear, and a warning light will illuminate on the cluster. Take your vehicle to an authorized HYUNDAI dealer and have the function checked..
Limitations of High Beam Assist
High Beam Assist may not work properly in the following situations:
- Light from a vehicle is not detected because of lamp damage, or because it is hidden from sight, etc.
- The headlight of a vehicle is covered with dust, snow, or water.
- A vehicle’s headlights are off but the fog lamps are on etc.
- There is a lamp that has a similar shape to a vehicle’s lamp.
- Headlights have been damaged or not repaired properly.
- Headlights are not aimed properly.
- Driving on a narrow curved road, rough road, uphill or downhill.
- The vehicle in front is partially visible on a crossroad or curved road.
- There is a traffic light, reflecting sign, flashing sign or mirror ahead.
- There is a temporary reflector or flash ahead (construction area).
- The road conditions are bad such as being wet, iced or covered with snow.
- A vehicle suddenly appears from a curve.
- The vehicle is tilted from a flat tire or is being towed.
- Light from a vehicle is not detected because of exhaust fumes, smoke, fog, snow, etc.
For more details on the limitations of the front-view camera, refer to the “Forward Collision-Avoidance Assist (FCA)” section in Chapter 7.
WARNING
- At times, High Beam Assist may not work properly. It is the responsibility of the driver for safe driving practices and always check the road conditions for your safety.
- When High Beam Assist does not operate normally, change the headlight position manually between the high beam and the low beam.
Read all Instructions for High Beam Assist (HBA), Wipers and Washers User Guide
Hyundai Kona 2023 Manual Climate Control System User Guide
2023 Hyundai Kona Manual Climate Guidelines
Manual Climate Control System
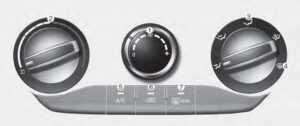
- Fan speed control knob
- Temperature control knob
- Mode selection knob
- Front windshield defroster position
- A/C (Air conditioning) button
- Air intake control (recirculation) button
- Rear window defroster button
Heating and Air Conditioning
- Start the engine.
- Set the mode to the desired position. To improve the effectiveness of heating and cooling, select the mode according to the following:
- Heating:
- Cooling:
- Set the temperature control to the desired position.
- Set the air intake control to the fresh mode or recirculation mode position.
- Set the fan speed control to the desired speed.
- If air conditioning is desired, turn the air conditioning system on.
- When starting the vehicle in cold weather a more efficient way to heat the passenger compartment is to do the following.
- Turn off or lower the blower, right after starting the engine.
- The engine temperature is still low and the airflow from the heater is still cold.
- After a few minutes of engine warm-up, turn on or set the fan to a higher level and adjust the temperature setting to hot.
Mode selection
The mode selection knob controls the direction of the airflow through the ventilation system. Air can be directed to the floor, dashboard outlets, or windshield. Five symbols are used to represent Face, Bi-Level, Floor, Floor-Defrost, and Defrost air position.
Face-Level (B, D)
Air flow is directed toward the upper body and face. Additionally, each outlet can be controlled to direct the air discharged from the outlet.
Bi-Level (B, C, D, E)
Air flow is directed towards the face and the floor.
Floor-Level (A, C, D, E)
Most of the air flow is directed to the floor, with a small amount of the air being directed to the windshield and side window defrosters.
Floor & Defrost (A, C, D, E)
Most of the airflow is directed to the floor and the windshield with a small amount directed to the side window defrosters.
Defrost-Level (A, D)
Most of the airflow is directed to the windshield with a small amount of air directed to the side window defrosters.

MAX A/C-Level (B, D) (if equipped)
The MAX A/C mode is used to cool the inside of the vehicle faster. Air flow is directed toward the upper body and face. In this mode, the A/C button and the Recirculation mode button cannot be selected. Turn the fan speed mode to adjust.
After the interior cabin has cooled sufficiently, move the temperature knob away from the MAX A/C setting and adjust the knob to the desired position. If you wish to continue using A/C ON, make sure the A/C button LED is illuminated.
Instrument panel vents

The outlet vents can be opened or closed ( ) separately using the thumbwheel.
Also, you can adjust the direction of air delivery from these vents using the vent control lever as shown.
Temperature control (2)
The temperature will increase by turning the knob to the right. The temperature will decrease by turning the knob to the left.
Air intake control (6)
The air intake control button is used to select either Fresh mode (outside air) or Recirculation mode (cabin air).
Recirculation mode

When Recirculation mode is selected, air from the passenger compartment will be recirculated through the system and heated or cooled according to the function selected.

When Fresh mode is selected, air enters the vehicle from outside and is heated or cooled according to the function selected.
Information
Using the system primarily in Fresh mode and Recirculation mode only when needed is recommended for best results. Prolonged operation of the heater in Recirculation mode and without the A/C ON can cause fogging of the windshield. In addition, prolonged use of the A/C ON in Recirculation mode may result in excessively dry, dehumidified air in the cabin.
WARNING
- Continued use of the climate control system operation in Recirculation mode for a prolonged period of time may cause drowsiness to the occupants in the cabin. This may lead to loss of vehicle control which may lead to an accident.
- Continued use of the climate control system operation in Recirculation mode with the A/C OFF may allow humidity to increase inside the cabin. This may cause condensation to accumulate on the windshield and obscure visibility.
- Do not sleep in your vehicle or remain parked in your vehicle with the windows up and either the heater or the air conditioning ON for prolonged periods of time. Doing so may increase the levels of carbon dioxide in the cabin which may lead to serious injury or death.
Fan speed control (1)
Turn the knob to the right to increase the fan speed and airflow. Turn the knob to the left to decrease fan speed and airflow.
Setting the fan speed control knob to the “0” position turns off the fan.
NOTICE
Operating the fan speed when the ignition switch is in the ON position could cause the battery to discharge. Operate the fan speed when the engine is running.
Air conditioning A/C (5)
Push the A/C button to turn the system on (the indicator light will illuminate) and off.
System Operation Ventilation
- Set the mode to the position.
- Set the air intake control to the outside (fresh) air position.
- Set the temperature control to the desired position.
- Set the fan speed control to the desired speed.
FAQ
The 2023 Hyundai Kona User Guide is a comprehensive manual that provides information and instructions on how to operate and maintain your Hyundai Kona.
You can typically find the User Guide in the vehicle’s glove compartment or access it digitally through Hyundai’s website or mobile app.
The 2023 Kona typically offers a range of engine options, including gas, hybrid, and electric powertrains.
The specific fuel efficiency ratings may vary depending on the engine type, but the Kona is designed to offer competitive fuel economy.
The User Guide should provide instructions on setting up and using the infotainment system, including features like Bluetooth pairing, navigation, and smartphone integration.
The User Guide typically includes a maintenance schedule with recommendations for regular servicing and care to keep your Kona in optimal condition.
The User Guide should offer guidance on towing capacities and any specific requirements for towing with the Kona.
Yes, the User Guide often includes information on safety features, such as driver assistance systems, airbags, and how to use them effectively.
The User Guide should provide instructions on adjusting seats and mirrors for optimal driving comfort and visibility.
The User Guide may provide an overview of Hyundai’s warranty coverage, including what is covered and for how long.
Yes, many Hyundai models offer voice command functionality for various infotainment system functions. The User Guide should explain how to use it.
Yes, the User Guide often provides tips on driving habits and techniques to help you get the best possible fuel economy from your Kona.
The User Guide should provide step-by-step instructions on how to program and use key features like keyless entry and remote start.
The User Guide should include guidance on how to change a flat tire and what to do in various roadside emergency situations.
Useful Link
Hyundai Kona 2023 Vehicle Information, and Safety Defects User Guide
Download Manuals: https://owners.hyundaiusa.com/us/en/resources/manuals-warranties.html
2023 Hyundai KONA Specs, Price, Features, Milage (Brochure)