Jayco Eagle Fifth Wheels 2023 Winterize with Air Pressure User Manual
Winterize with Air Pressure
This method uses compressed air to blow out any remaining water in the system after initially draining water lines using drain valves. Tools required would be an air compressor and a blowout plug.
WARNING
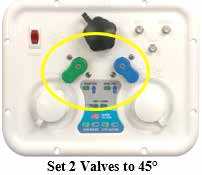
Before applying air pressure to the utility center, the (2) colored valves (GREEN and BLUE) MUST be set to 45° or damage may occur to the utility center.
Never apply air pressure to the water system with any of the valves in the closed position. Air pressure applied to a closed valve, faucet or low-point drain could potentially damage the seals and cause water leaks. If you have questions, consult your RV dealer. Using RV antifreeze is the preferred method of winterization.
Recommended air pressure is 30 PSI MAX. Exceeding this pressure may rupture water line couplings and void your warranty.
- The water heater power should be OFF (ELECTRIC and GAS switches). The switches are located inside the RV at the Command Center panel.
- The water heater bypass valve should be set to NORMAL. Lever pointing to the left as shown.
- Level the RV and drain the fresh water tank, the tank (storage) water heater and the hot and cold water lines. Open all low-point drains and the fresh water tank drain. Faucets inside the RV should be opened to relieve pressure to allow water lines to drain. Refer to Draining the Fresh Water System section.
- If your RV has a Spray Port on the outside of the trailer, this port should be drained at this time. Refer to Winterize the Spray Port section for the procedure.
- Remove the drain plug from the tank (storage) water heater located outside the RV (Fig 1). DO NOT REMOVE THE DRAIN PLUG IF THE WATER HEATER IS HOT OR UNDER PRESSURE. RELEASE PRESSURE AND LET IT COOL DOWN.
- The water filter should be removed for winterizing. See the Water Purification System section. Your RV may have one of two types of filters:
- Full System Canister Filter: Remove the canister lid, take out the filter, and then reattach the lid to the empty canister.
- Cartridge Water Filter: Remove the cartridge filter and replace it with a bypass hose (supplied with your RV).
- NOTE: Filters should be replaced at the beginning of the camping season or if they have been exposed to contaminated water, sanitizer or antifreeze.

- Turn the (color) valve handles to the TANK FILL position.
- Green valve points left
- The blue valve points down
- Low-point drains should be open to removing water from the lines.
- Open all faucets in the RV. If there is an outside shower, attach the shower hose to the shower, and open the shower faucets. If there is a sink at the outside kitchen, open those faucets as well.
- Run the water pump until the pump is dry (approximately 15 to 20 seconds). Do not operate the pump longer than that without water, it can damage the pump.
- After the water is drained from the lines, turn the Green and Blue valves so they are at 45°.
- Attach a blowout plug to the City Water Inlet on the utility center panel.
- Attach the air hose to the blowout plug. Set the compressor to 30 PSI. Green and Blue valves must be set at 45° before applying air pressure 30 PSI Max.
- Blow air into the utility center (30 PSI Max). Water lines should be clear in 5 to 10 minutes.
- Turn off the air supply, remove air hose and blowout plug.
- Close low-point drains, and replace the water heater drain plug.
- Set the water heater bypass valve to the BYPASS position. The red lever points up.
- Set the colored valves to the WINTERIZE positions.
- Green valve points left
- The blue valve points right
- Pour 1 cup of RV antifreeze into any/all drain P traps (sinks and bathtub).
- Wipe any RV antifreeze out of the sinks, shower (or tub), toilet, washing machine tub, and dishwasher tub with a soft, dry cloth.
Refer to the Utility Center manufacturer’s User Guide for additional operating information. Winterize the Black Tank Flush (if so equipped) – See the Black Tank Flush section. Winterize the Macerator system (if so equipped) – See the Macerator Pump System section.
Water Heater
Your RV may be equipped with either a tank (storage) water heater or a tankless water heater. The following is an overview of both systems.
- Hydrogen gas may result if you have not used the water heater for two weeks or more. HYDROGEN GAS IS EXTREMELY FLAMMABLE. To reduce the risk of injury under these conditions, open the hot water faucet for several minutes at the kitchen sink before you use any electrical appliance connected to the hot water system. If hydrogen is present, you may hear what sounds like air escaping through the pipe as the water begins to flow. Hydrogen gas may be present even after the water has been drained from the water heater tank. Open the faucet at the sink and allow the system to vent for five to ten minutes. Do not smoke or have any open flame near the open faucet while venting. On DSI water heater models, make sure the switch is OFF.
- Do not alter the operation or change the design/construction of your water heater. For your safety, only factory-authorized parts should be used on your water heater. Accessories marketed for recreation vehicles, such as an “add-on” electric heating elements, are not recommended by the manufacturer. Such items are not approved to be installed and could create an unsafe condition and will void all warranties.
- If you smell propane gas then STOP! and follow the procedures listed in the Propane System Section before attempting to operate the water heater.
Tank (Storage Water Heater (if so equipped)
The water heater manufacturer has preset the sensing limit to maintain the water temperature when the water heater is activated. Read the safety and operating information in the manufacturer’s user guide before attempting to activate the water heater.
Gas/Electric DSI Tank (Storage) Water Heater System (if so equipped)
Make sure the water heater is filled with water before use as even momentary operation of the water heater without water in it may result in damage to the tank and/or controls. Always open both the hot and cold water faucets when filling the fresh water tank to allow air pockets to be forced out of the water heater. The thermostat on your water heater is not adjustable and is designed to maintain a water temperature of 130°F (54°C). The water heater does not have a pilot. It is equipped with an ignition device that automatically lights the burner. Do not try to light the burner by hand.
Operating instructions
- Turn OFF all electric power to the water heater.
- Turn OFF the propane supply. Wait five minutes for the propane to clear the area. If you smell propane STOP! Follow the safety instructions listed in the manufacturer’s owner’s manual. If you do not smell propane, go to the next step.
- Turn ON the propane supply.
- Turn ON the electrical power to the water heater.
- Turn the switch to the “ON” position. If the burner does not light, the system will automatically attempt two more tries for ignition before lock-out occurs. Each ignition cycle will have a 15-second purge before the spark cycle if the system is a three-try system.
- If lock-out occurs before the main burner lights, turn the water heater control switch to OFF, wait five seconds and turn the switch to the ON position. This will restart the ignition cycle.
- The first start-up of the heater may require several ignition cycles before all the air is purged from the propane lines.
If the burner will not come on, the following items should be checked before calling a service person:
- See if the switch is turned OFF.
- Make sure the propane supply to the water heater is not empty or turned OFF.
- Check to see if the reset button on the water heater ECO is tripped.
Water Heater Switch (if so equipped)
The “propane GAS” switch enables propane operation of the water heater, and the “ELECTRIC” switch enables electric operation.
NOTE: Water heaters in some models will ONLY have a single LP Gas water heater switch. These units will not heat water electrically.
Water Heater Bypass (if so equipped)
Your RV may be equipped with a water heater bypass. This three-valve system is located at either the water heater or on the utility center panel depending on your model. For detailed information refer to the Utility Center or Fresh Water System sections.
The odor from the hot water system
Many water supplies contain sufficient amounts of sulfur to produce an odor, often called “sulfur water”. Sulfur water can be caused by chemical action or by bacteria. Generally, sulfur water is not harmful, only unpleasant to smell. Refer to the water heater manufacturer’s manual for details on eliminating the odor from sulfur water. The odor from sulfur water is not a service problem.
High altitude duration
Operation of the water heater at high altitudes may require derating. If the water heater is not properly derated, a lack of sufficient oxygen for combustion may produce improper burner operation. A pilot outage caused by burner lift-off or sooting from a yellow burner may occur, indicating the possibility of carbon monoxide. You may also notice a lack of efficiency in heating the water because of incomplete combustion of the burner at these higher altitudes. Consult with the local propane company, your dealer or the water heater manufacturer for proper derating of the water heater. Change out of the orifice (derating) should be done by the dealer or a qualified service agency.
NOTE:
It is important that once the RV has returned to a lower elevation (below 4500 feet) any high altitude duration or other adjustments be reversed for proper operation of the water heater.
Pressure and Temperature Relief Valve
WARNING
Do not place a valve between the pressure and temperature (P&T) valve and the tank. Do not remove or plug the relief valve under any circumstances. The temperature and pressure relief valve is designed to open if the temperature of the water within the heater reaches 120° F, or if the water pressure in the heater reaches 150 pounds. When this pressure is reached, the pressure relief valve will open and water will drip from the valve. This “weeping” or dripping will continue until the pressure is reduced to below 150 pounds, and the valve closes. This condition is normal and does not indicate a defective relief valve. One way to reduce the frequency of this occurrence is to maintain an air pocket at the top of the water heater tank. This air pocket will form in the tank by design; however, it will be reduced over time by the everyday use of your water heater.
To replenish this air pocket:
- Turn off the water heater.
- Turn off the cold water supply line.
- Open a faucet in the RV.
- Pull out the handle of the pressure relief (P&T) valve and allow water to flow from the valve until it stops.
- Release the handle on the P&T valve – it should snap closed.
Close the faucet and turn on the cold water supply. As the tank fills, the air pocket will develop. Repeat this procedure as often as needed to reduce the frequency of the weeping P&T valve.
Maintenance
Do not allow the burner to burn with a yellow flame, or continue to operate the water heater with an improper burner flame. Periodically, inspect the water heater vent for soot. Soot is a sign of incomplete combustion and must be corrected before operating the water heater. This is your visual warning that the water heater is operating in an unsafe manner. If soot is present, immediately shut the unit down and contact your dealer or a qualified service agency. Periodically inspect the vent for obstructions. Do not terminate the vent on your water heater inside of add-on rooms, screen porches or patios. Doing so will result in products of combustion being vented into the rooms or occupied areas.
[amalinkspro_table id=”32452″ new-window=”on” nofollow=”on” addtocart=”off” /]
Reference Links
View Full User Guide: Jayco Eagle Fifth Wheels 2023 User Manual
Download Manuals: https://www.jayco.com/manuals