Jayco Embark 2023 Installing the Child Safety Seat User Manual
Installing the Child Safety Seat
NOTE: Be sure to read, understand and apply all child seat information provided by the seat manufacturer. Make sure the tether strap is securely and correctly attached to the child safety seat.
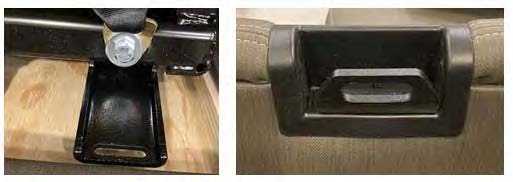
Locate the child seat tether anchors (brackets). The anchors will be marked with a child seat symbol. Attach the snap on the strap of the child restraint seat to the corresponding anchor. Adjust the strap so the seat is securely in place. The seat must have both lower straps securely in place. Repeat the process on the upper straps of the child seat.
Vehicle Dash
WARNING
Do not set anything on, or attach anything to, the instrument panel or dash. Do not attach anything to the steering wheel cover. Failure to follow these warnings may restrict the driver’s visibility or cause an object to strike and injure an occupant in the case of a collision or sudden stop.
Maintenance
To clean the vinyl/ABS dash, soak a soft cloth in a solution of mild detergent and water. Wipe off the dash. To rinse, dip a cloth in fresh water and wring it out well. Wipe off the detergent thoroughly.
Steering Wheel and Column Controls
Left Control Pad
Radio control buttons (arrows)
These buttons cycle the radio station tuning up or down.
Cruise control function
The electronic cruise controls consist of an on/off button, set button, a cancel button, and a resume button. Refer to the Chassis Guide for detailed information on the cruise control operation.
Bluetooth phone disconnect
The red phone button will disconnect the phone to end a hands-free phone call.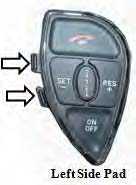
Right Control Pad
Radio control buttons (arrows)
The buttons on the side operate the volume and mute for the radio or phone.
Bluetooth phone call connects
The green phone button will connect a hands free Bluetooth phone call.
Windshield wiper/washer controls
Controls include wiper ON/OFF, HI/LO speed, and washer. To operate the wiper blades press the ON/OFF button (the key in the ignition must be ON.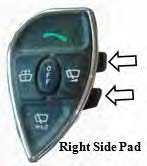
WARNING
Make sure the steering column is firmly locked in place before driving. Never adjust the steering column while the vehicle is moving. Do not use the cruise control when driving conditions do not permit maintaining a constant speed, such as in heavy traffic or on roads that are curvy, icy, snow-covered, slippery, or have a loose driving surface. Failure to follow this precaution could result in a collision or loss of vehicle control, resulting in personal injury or property damage.
Multi-Function Signal Lever
The multi-function signal lever located on the steering column controls the turn signals, and the headlight high/low beam. The headlight high beams are activated by pulling the turn signal lever toward the driver.
Hazard-Warning Flasher
The hazard signal control (emergency flashers) is located on the lower left-hand side of the steering column. Press to activate and press again to turn off.
Pedal Retract/Extend
The pedal Retract/Extend is located on the driver’s side console controls and is operated using a rocker switch.
Steering Wheel Tilt/Telescope
The steering column can be adjusted by using the manual lever located on the left side of the steering column. To adjust the tilt and telescope of the column, push the pedal down, move to the desired location, then release the pedal. For more information, see the Chassis Guide.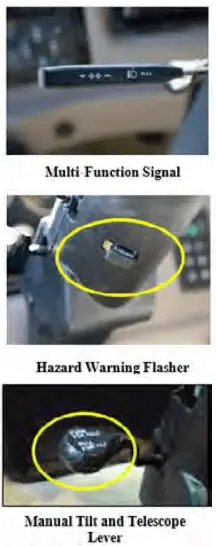
Driver’s Console Control Panel
Horns
The AIR HORN is a switch located on the driver’s side console. To enable the air horn, press the AIR HORN switch to the “ON” position. Press the center of the steering wheel and both the air and electric horns will sound. If the AIR HORN switch is in the “OFF” position, the normal electric horn will sound.
Docking Lights
CAUTION
MAKE SURE THE DOCKING LIGHTS ARE OFF WHEN DRIVING THE VEHICLE! If the lights are activated with the rocker switch the lights will NOT automatically shut off.
NOTE: The two rear docking lights will light when the coach is shifted into reverse (even if switch is turned off). They will go off when the coach is shifted out of reverse. To activate the docking lights Depress the “Docking Light” rocker switch on the headlight switch panel. Six docking lights will come on (2 on left side, 2 on right side, and 2 in rear). The docking lights stay on if they are activated with the rocker switch.
Map Lights
The map light switch is located on the headlight switch panel in the dash. When the control is set on automatic, the lights will automatically turn on when the motor home entrance door is opened. Lights are located above the driver and passenger seats.
Driving (Fog)Lights
Your motor home is equipped with driving lights (fog lights) to increase your driving visibil-ity. To activate these lights, depress the “Fog Lights” control in the front instrument panel to the left of the steering wheel.
Daytime Running Lights (DRL)
The daytime running lights are activated with the following requirements:
- The ignition key is turned ON
- The headlamp control is in the OFF or “parking lamps” position
- The park brake has been released.
WARNING
Always remember to turn ON your headlamps at dusk, nighttime or during inclement weather. The daytime running light system does not activate your tail lamps and generally may not provide adequate lighting during these conditions. Failure to activate the vehicle headlamps under these conditions may result in a collision.
Front In-Dash AM/FM and Navigation System
The front in-dash AM/FM and Navigation system is also Sirius Satellite radio ready. You will need to purchase your own Sirius subscription to activate this feature. Refer to your Comprehensive User Guide, and the manufacturer owner’s manual for detailed operating instructions.
Outside Rearview Mirrors
CAUTION
Adjust the outside rearview mirrors before driving. After adjusting the front driver’s seat, adjust the outside rearview mirrors to your driving preference. Have someone help you adjust the mirrors in the desired direction for maximum rear visibility before driving. During travel, vibration may loosen the fitting holding the mirror(s), causing them to change position. As part of your regular motor home maintenance, check and adjust the mirrors to the desired position.
Power Remote Mirrors (if so equipped)
You can adjust the power remote mirrors when the ignition key is in the ON position.
- Move the control knob to the side you want to adjust.
- Press the control arrows in the direction you want the mirror to move.
- Return the control knob to the center to lock the mirror(s) into place.

The power remote mirrors also contain heating elements to defog or de-ice the mirrored glass if needed. To activate this feature, use the “Mirror Heat” control located on the driver’s side console next to the mirror control joystick.
NOTE: Depending on the models, the mirror control joystick and the Mirror Defrost toggle switch may be separated from each other. The Mirror Defrost switch may be renamed Mirror Heat.
[amalinkspro_table id=”32452″ new-window=”on” nofollow=”on” addtocart=”off” /]
Reference Links
View Full User Guide: https://autouserguide.com/jayco/travel-trailers/jayco-eagle-travel-trailers-2023-user-manual
Download Manuals: https://www.jayco.com/manuals