
Kia Niro EV 2021 Fuses User Manual
Introduction
Fuses are crucial safety components that the Kia Niro EV 2021’s electrical system features. Fuses shield the electrical circuits of a vehicle against damage brought on by overloads or short circuits. They are thoughtfully positioned all throughout the car to protect vital parts like the infotainment system, battery, motor, charging system, and lighting. Maintaining the electrical integrity of the car and ensuring a safe driving experience depend on knowing where and how to use these fuses.
Fuses
A vehicle’s electrical system is protected from electrical overload damage by fuses.
Blade type

Cartridge type

Multi fuse

BFT

* Left side: Normal, Right side: Blown
This vehicle has 2 (or 3) fuse panels, one located in the driver’s side panel bolster, the other in the motor compartment near the battery.
If any of your vehicle’s lights, accessories, or controls do not work, check the appropriate circuit fuse. If a fuse has blown, the element inside the fuse will melt.
If the electrical system does not work, first check the driver’s side fuse panel.
If the replacement fuse blows, this indicates an electrical problem. Avoid using the system involved and immediately consult an authorized Kia dealer.
Three kinds of fuses are used: blade type for lower amperage rating, cartridge type, and multi fuse for higher amperage ratings.
- WARNING
Fuse replacement - Never replace a fuse with anything but another fuse of the same rating.
- A higher capacity fuse could cause damage and possibly a fire.
Never install a wire or aluminum foil instead of the proper fuse – even as a temporary repair. It may cause extensive wiring damage and a possible fire. - Do not arbitrarily modify or add-on electric wiring to the vehicle.
NOTICE
- When replacing a fuse, change the POWER button to the OFF position and turn off switches of all electrical devices; then remove the battery (-) terminal.
- The actual fuse/relay panel label may differ from equipped items.
WARNING
Electrical Fire
Always ensure replacement fuses and relays are securely fastened when installed. Failure to do so can result in a vehicle fire.
Do not remove fuses, relays and terminals fastened with bolts or nuts. The fuses, relays and terminals may be fastened incompletely, and it may cause a possible fire. If fuses, relays and terminals fastened with bolts or nuts are blown, we recommend that you consult with an authorized Kia dealer.
CAUTION
- When replacing a blown fuse or relay, make sure the new fuse or relay fits tightly into the clips. Failure to tightly install the fuse or relay may cause damage to the wiring and electric systems.
CAUTION
- Do not input any other objects except fuses or relays into fuse/relay terminals, such as a screw-driver or wiring. It may cause con-tact failure and system malfunction.
- Do not plug in screwdrivers or aftermarket wiring into the terminal originally designed for fuses and relays only. The electrical system and wiring of the vehicle interior may be damaged or burned due to contact failure.
- If you directly connect the wire on the taillight or replace the bulb which is over the regulated capacity to install trailers etc., the inner junction block can get burned.
WARNING
Electrical wiring repairs
All electrical repairs should be per-formed by an authorized Kia dealer-ship using approved Kia parts. Using other wiring components, especially when retrofitting multimedia or theft alarm system, car phone or radio may cause vehicle damage and increase the risk of a vehicle fire.
NOTICE
Remodeling Prohibited
Do not rewire your vehicle in any way as doing so may affect the performance of several safety features in your vehicle. Rewiring your vehicle may also void your warranty and cause you to be responsible for any subsequent vehicle damage which may result.
Replacing inner panel fuse
- Turn the POWER button and all other switches off.
- Open the fuse panel cover.
 If the switch is located in the “OFF” position, a caution indicator will be displayed in the cluster. To identify the location of a specific fuse, please refer to the inside of the fuse panel cover and the description list in this section.
 - Pull the suspected fuse straight out. Use the removal tool pro-vided on the motor compartment fuse panel cover.

- Check the removed fuse; replace it if it is blown.
Spare fuses are provided in the motor compartment fuse panel. Push in a new fuse of the same rating, and make sure it fits tightly in the clips.
If it fits loosely, consult an authorized Kia dealer.
If you do not have a spare, use a fuse of the same rating from a circuit you may not need for operating the vehicle, such as the power outlet fuse.
If the head lamp, turn signal lamp, stop signal lamp, fog lamp, DRL, tail lamp, HMSL do not work and the fuses are OK, check the fuse panel in the motor compartment. If a fuse is blown, it must be replaced.
NOTICE
If the headlamp, fog lamp, turn signal lamp, or tail lamp malfunctions even without any problem to the lamps, have the vehicle checked by an authorized Kia dealer for assistance.
Fuse switch
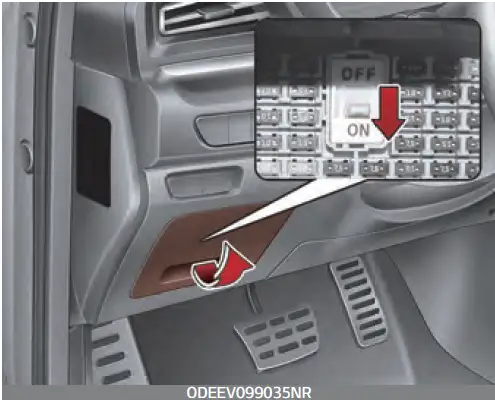
Always set the fuse switch to the ON position before using the vehicle. If you move the switch to the OFF position, some items such as audio and digital clock must be reset and transmitter (or smart key) may not work properly. When the switch is Off, the caution indicator will be dis-played on the instrument cluster.
CAUTION
Fuse Panel Covers
The contact points of the switches may wear out with excessive use. Please refrain from excessive use of the switches (except for long-term parking for over 1 month).
NOTICE
- If the vehicle is going to be unused for over 1 month, set all switches to OFF to prevent the batteries from draining.
Replacing motor compartment fuse
- Turn the POWER button and all other switches off.
- Remove the fuse panel cover by pressing the tab and pulling the cover up.

- Check the removed fuse; replace it if it is blown. To remove or insert the fuse, use the fuse puller in the motor compartment fuse panel.
- Push in a new fuse of the same rating, and make sure it fits tightly in the clips. If it fits loosely, consult an authorized Kia dealer.
CAUTION
Multi fuse

- If the main fuse is blown, it must be removed as follows:
- Turn the POWER button and all other switches off.
- Disconnect the negative battery cable.
- Remove the nuts shown in the picture above.
- Replace the fuse with a new one of the same rating.
- Reverse these steps to reinstall the multi fuse.
NOTICE
The electronic system may not function correctly even when the motor compartment and internal fuse box’s individual fuses are not disconnected. In such a case, the cause of the problem may be dis-connection of the main fuse (BFT type), which is located inside the positive battery terminal (+) cap. Since the main fuse is designed more intricately than other parts, have the vehicle checked by an authorized Kia dealer.
Fuse/relay panel description
Inside the fuse/relay panel covers, you can find the fuse/relay label describing fuse/relay name and capacity.
Driver’s side fuse panel

NOTICE
Not all fuse panel descriptions in this manual may be applicable to your vehicle. It is accurate at the time of printing. When you inspect the fuse panel in your vehicle, refer to the fuse panel label on the inside of the fuse cover. This diagram will provide you with the specific information for your vehicles.

Refer to the following table for a description of the fuse.
| Fuse Name | Fuse rating | Circuit Protected |
|
MODULE 5 |
10 A | Crash Pad Switch, ECM (Electro Chromic Mirror), Audio / Video & Navigation Head Unit, Head Lamp Leveling Device Actuator LH/RH, Front Seat Warmmer Control Module, Rear Seat Warmer Control Module, Auto Head Lamp Leveling Device Module, Front Air Ventilation Seat Control Module, Amp |
|
MODULE 4 |
10 A | Crash Pad Switch, MFC Module, AEB module, Blind Spot Detection Radar Left Handle side / Right Handle side, VESS, console upper EXTN (STR’G WHEEL HEATED) |
| INTERIOR LAMP | 10 A | Luggage Lamp, Front Vanity Lamp LH/RH, Room Lamp, Overhead Console Lamp, Rain Sensor, Wireless Charger |
| A/BAG | 15 A | ACU (Airbag Control Unit), ODS |
| Fuse Name | Fuse rating | Circuit Protected |
| E-SHIFTER 1 | 10 A | Console Upper EXTN (SBW) |
| IG 1 | 25 A | PCB Block (FUSE-IEB2, EPCU2) |
| CLUSTER | 10 A | Cluster |
| MODULE 3 | 10 A | BCM (Body Control Module), Driver/Passenger Door Module, Stop Lamp Switch |
| IG3_2 | 10 A | Fuel Filler Door & Battery Charge Switch, Cluster, Charger Indicator, Air Conditioner Control Module, Audio / Video & Navigation Head Unit, Audio, IG3, PTC Heater, Charger Control Module |
| MEMORY 2 | 7.5 A | VESS, BATT_COOL_EXV |
| A/BAG IND | 7.5 A | Cluster, Air Conditioner Control Module |
| START | 7.5 A | EPCU, Smart Key Control Module |
| MODULE 2 | 10 A | O/S Mirror, Power Outlet Relay, Amp, BCM (Body Control Module), Wireless Charge Unit, USB/Charge Unit, Smart Key Control Module, Audio Unit |
| BUTTON START 3 | 7.5 A | Smart Key Control Module |
| MEMORY 1 | 10 A | Driver/Passenger Door Module, IMS (Driver Integrated Memory System Module), Cluster, Air Conditioner Control Module, ECM (Electro Chromic Mirror), Auto Light & Photo Sensor, BCM (Body Control Module), Active Air Flap Unit |
| MULTI MEDIA | 15 A | Audio / Video & Navigation Head Unit, Keyboard |
| E-SHIFTER 2 | 10 A | SBW Control Unit |
| HEATED STEER- ING | 15 A | BCM (Body Control Module) |
| IG3_1 | 20 A | IG3_1 Relay |
| MDPS | 7.5 A | MDPS Unit |
| TAIL GATE | 10 A | Tail Gate Relay |
| BUTTON START 1 | 15 A | Smart Key Control Module |
| MODULE 7 | 7.5 A | Front Seat Warmer Control Module / Front Air Ventilation Seat Control Module, Rear Seat Warmer Control Module, AC Inverter Module |
| WIPER (REAR) | 15 A | Engine Room Junction Block (Rear Wiper Relay), Rear Wiper Motor |
| Fuse Name | Fuse rating | Circuit Protected |
| SUNROOF | 20 A | Sunroof Motor |
| P/WINDOW RH | 25 A | Power Window Right Handle Side Relay, Passenger Safety Power Window Module (LHD), Driver Safety Power Window Module (RHD) |
| P/WINDOW LH | 25 A | Power Window Right Handle Side Relay, Passenger Safety Power Window Module (LHD), Passenger Safety Power Window Module (RHD) |
| BUTTON START 2 | 7.5 A | Start/Stop Button Switch, Smart Key Control Module |
| BRAKE SWITCH | 7.5 A | Stop Lamp Switch, Smart Key Control Module |
| CHARGER | 10 A | Charge Control Module, Charger Lock/Unlock Relay, C _C_ Lamp |
| A/CON | 7.5 A | Air Conditioner Control Module, Ionizer |
| WASHER | 15 A | Multifunction Switch |
| S/HEATER (FRT) | 25 A | Front Seat Warmer Control Module |
| P/SEAT (DRV) | 30 A | Driver Seat Manual Switch, Driver Integrated Memory System Module |
| AMP | 30 A | AMP |
| MODULE 1 | 10 A | Hazard Switch, BCM (Body Control Module), OBD, Driver Smart Key Outside Handle, Passenger Smart Key Outside Handle, Driver Door Module, Passenger Door Module, Mood Lamp, O/S MIRR FOLDING/ UNFOLDING RLY |
| DOOR LOCK | 20 A | Door Lock/Unlock Relay, ICM Relay Box (T/TURN UNLOCK Relay) |
| WIPER 2 (FRT) | 10 A | BCM (Body Control Module), Wiper Motor, Engine Room Junction Block (Front Wiper (Low) Relay) |
| MODULE 6 | 7.5 A | BCM (Body Control Module), Smart Key Control Module |
| S/HEATER (REAR) | 25 A | Rear Seat Warmer Control Module |
| HEATED MIRROR | 10 A | Driver/Passenger Power Outside Mirror, Air conditioner Control Module, RR HTD, RR HTD RLY |
| WIPER 1 (FRT) | 30 A | Wiper Motor, Engine Room Junction Block (Front Wiper (LOW) Relay) |
| P/SEAT (PASS) | 25 A | Passenger Seat Module |
Motor compartment fuse panel


Refer to the following table for a description of the fuse.
| Fuse Name | Fuse rating | Circuit Protected | |
| MUTL FUSE | B + 5 | 60 A | PCB-Block (Fuse -EPCU1, BMS, B/Alarm Horn, Horn Relay – Main) |
| B + 2 | 60 A | IGPM (Fuse – S/HEATER (REAR), ARISU (4CH), IPS (2CH), IPS (2CH) | |
| B + 3 | 60 A | IGPM (ARISU (4CH), IPS (2CH), IPS (2CH), IPS (2CH), IPS (1CH) | |
| B + 4 | 50 A | IGPM (Fuse – Tail Gate, Sunroof, P/window RH, P/window LH. S/Heater (FRT), P/Seat (DRV), AMP, IG3_1, CHARGER | |
| COOLING FAN 1 |
60 A | Cooling Fan Relay | |
| BLOWER | 40 A | Blower Relay | |
| IG 1 | 40 A | Button Start #2 (IG1) Relay, Button Start #1
(ACC) Relay |
|
| IG 2 | 40 A | Button Start #3 (IG2) Relay | |
| IEB 3 | 60 A | IDB_MTR+2 | |
| IEB 4 | 60 A | IDB_MTR+1 | |
| REAR HEATED | 50 A | Rear Heated Relay | |
| IEB 1 | 40 A | IDB Unit, OBD | |
| MAIN | 150 A | Fuse – Power Outlet 1, AC Inverter Module, Head Lamp (high), Rear Wiper |
|
| Fuse Name | Fuse rating | Circuit Protected | |
| FUSE | MDPS | 80 A | MDPS Unit |
| E-SHIFTER 2 | 10 A | E-SHIFTER Relay | |
| POWER OUT- LET 3 |
20 A | P/OUTLET Relay | |
| POWER OUT- LET 2 |
20 A | P/OUTLET Relay | |
| OBC | 10 A | OBC Unit | |
| AMS | 10 A | Battery SNSR | |
| B/UP LAMP | 10 A | B/UP LAMP Relay | |
| B + 1 | 40 A | IGPM (Fuse – BUTTON START1, BUTTON START 2, BRAKE SWITCH, MODULE 1 DOOR LOCK leak current Auto cut Device) | |
| E-SHIFTER 1 | 40 A | E-SHIFTER 1 Relay | |
| REAR WIPER | 15 A | Rear Wiper Relay | |
| HEAD LAMP HI | 10 A | H/LAMP HI Relay | |
| INVERTER | 30 A | AC Inverter Module | |
| POWER OUT- LET 1 | 40 A | Power Outlet Relay | |
| IG3_2 | 10 A | OBC Unit | |
| EWP | 15 A | Electric Water Pump (Battery), Electric Water Pump (PE) |
|
| IG3_3 | 10 A | Cooling Fan Relay, E-Compressor, Blow Relay, EPCU | |
| IG3_4 | 10 A | BMS Unit, Active Air Flap Unit, 3 WAY_VALVE (RH/LH), B/UP LP Relay |
|
| IG3_1 | 15 A | IG3_1 Relay | |
| EPCU 1 | 15 A | EPCU | |
| BMS | 15 A | BMS Unit | |
| HORN | 20 A | HORN Relay | |
| IEB 2 | 10 A | IDB Unit, Multipurpose Check Connector | |
| EPCU 2 | 10 A | EPCU | |
Refer to the following table for the relay type.
| Relay Name | Type |
| Button Start #2 (IG1) Relay |
MICRO |
| Rear Wiper Relay | MICRO |
| Button Start #3 (IG2) Relay |
MICRO |
| E-SHIFTER Relay | MICRO |
| Button Start #1 (ACC) Relay |
MICRO |
| Cooling Fan Relay | MINI |
| Rear Heated Relay | MINI |
| B/UP Lamp Relay | MICRO |
| Blower Relay | MICRO |
| HEAD LAMP HI Relay | MICRO |
| Power Outlet Relay | MICRO |
Battery terminal cover

NOTICE
Not all fuse panel descriptions in this manual may be applicable to your vehicle. It is accurate at the time of printing. When you inspect the fuse panel in your vehicle, refer to the fuse panel label.

Light bulbs
Light bulbs are installed in various parts of the vehicle to provide lighting inside and outside the vehicle as well as to alert other vehicles.
Bulb replacement precaution
Please keep extra bulbs on hand with appropriate wattage ratings in case of emergencies.
Refer to “Bulb wattage”
When changing lamps, first turn off the vehicle at a safe place, firmly apply the parking brake and detach the battery’s negative (-) terminal.
WARNING
Working on the lights
Prior to working on the light, firmly apply the parking brake, ensure that the vehicle POWER button is in the OFF position and turn off the lights to avoid sudden movement of the vehicle and burning your fingers or receiving an electric shock.
Use only bulbs of the specified wattage.
CAUTION
Light replacement
Be sure to replace the burned-out bulb with one of the same wattage rating. Otherwise, it may cause
damage to the fuse or electric wiring system.
CAUTION
Headlamp Lens
To prevent damage, do not clean the headlamp lens with chemical sol-vents or strong detergents.
NOTICE
- If the light bulb or lamp connector is removed while the lamp is still on, the fuse box’s electronic system may log it as a malfunction. Therefore, a lamp malfunction incident may be recorded as a Diagnostic Trouble Code (DTC) in the fuse box.
- It is normal for an operating lamp to flicker momentarily. This is due to a stabilization function of the vehicle’s electronic control device. If the lamp lights up normally after momentarily blinking, then it is functioning as normal. However, if the lamp continues to flicker several times or turns off completely, there may be an error in the vehicle’s electronic control device. Please have the vehicle checked by an authorized Kia dealer immediately.
NOTICE
We recommend that the headlight aiming be adjusted by an authorized Kia dealer after an accident or after the headlight assembly is rein-stalled.
NOTICE
You can find moisture inside the lens of lamps after a car wash or driving in the rain. It is a natural event caused by the temperature difference between the inside and the outside of the lamp and does not mean a problem with its functions. The moisture inside the lamp would disappear if you drive the vehicle with the headlamp turned on; how-ever, the level at which the moisture is removed may differ depending on the size/location/condition of the lamp. If the moisture continues to stay inside the lamp, have the vehicle checked by an authorized Kia dealer.
If you don’t have the necessary tools, the correct bulbs and the expertise, consult an authorized Kia dealer. In many cases, it is difficult to replace vehicle light bulbs because other parts of the vehicle must be removed before you can get to the bulb. This is especially true if you have to remove the headlamp assembly to get to the bulb(s).
Removing/installing the headlamp assembly can result in damage to the vehicle. If non-genuine parts or substandard bulbs are used, it may lead to blowing a fuse or other wiring damages.
Do not install extra lamps or LEDs to the vehicle. If additional lights are installed, it may lead to lamp mal-functions and flickering. Additionally, the fuse box and other writing may be damaged.
Light bulb position (Front)
Head lamp – Type A

Head lamp – Type B

Fog lamp

- Headlamp (Low/High) (Bulb type)
- Front turn signal lamp (Bulb type)
- Side marker (Bulb type)
- Headlamp (Low/High) (LED type)
- Headlamp (Low) (LED type)
- Front turn signal lamp (LED type)
- Side marker (LED type)
- Day time running lamp / Position lamp (LED type)
- Front fog lamp (Bulb type)
Light bulb position (Rear)
Rear combination lamp

Back up lamp

High mounted stop lamp

License plate lamp

- Stop/tail lamp (Bulb type)
- Tail lamp (Bulb/LED type)
- Rear turn signal lamp (Bulb type)
- Stop/tail lamp (LED type)
- Stop lamp (LED type)
- Rear side marker (Bulb/LED type)
- Back up lamp (Bulb type)
- High mounted stop lamp (LED type)
- License plate lamp (Bulb type)
Light Bulb Position (Side)

- Side repeater lamp (LED type)
Replacing headlamp (LED type)

If the Low/High beam lamp (1), Low beam lamp (2), Front turn signal lamp (3), or side marker (4) does not operate, have the vehicle checked by an authorized Kia dealer.
The LED lamps cannot be replaced as a single component because they are part of an integrated unit. The LED lamps have to be replaced with the unit.
A skilled technician should check or repair the head lamp (LED), for it may damage related parts of the vehicle.
Replacing Headlamp (high/low beam) bulb

- Open the hood.
- Remove the headlamp bulb cover by turning it counterclockwise.
- Disconnect the headlamp bulb socket-connector.
Remove the bulb-socket from the headlamp assembly by turning the bulb-socket counterclockwise until the tabs on the bulb-socket align with the slots on the head-lamp assembly.- =Install a new bulb-socket assembly in the headlamp assembly by aligning the tabs on the bulb-socket with the slots in the head-lamp assembly.
- Push the bulb-socket into the headlamp assembly and turn the bulb-socket clockwise.
- Install the headlamp bulb cover by turning it clockwise.
Headlamp Bulb
WARNING
Halogen bulbs
Handle halogen bulbs with care.
- Halogen bulbs contain pressurized gas that will produce flying pieces of glass if broken.
- Avoid scratches and abrasions to the halogen bulbs. If the bulbs are lit, avoid contact with liquids.
- Always handle them carefully, and avoid scratches and abrasions. If the bulbs are lit, avoid contact with liquids. Never touch the glass with bare hands. Residual oil may cause the bulb to overheat and burst when lit. A bulb should be operated only when installed in a headlamp.
- If a bulb becomes damaged or cracked, replace it immediately and carefully dispose of it.
Wear eye protection when changing a bulb. Allow the bulb to cool down before handling it.
Replacing front turn signal lamp (Bulb type) bulb

- Open the hood.
- Remove the dust cover (A) from the headlamp assembly then the bulb-socket by turning it counter-clockwise until the tabs on the bulb-socket align with the slots on the headlamp assembly.
- Remove the bulb from the bulb-socket by pressing it in and rotating it counterclockwise until the tabs on the bulb align with the slots in the bulb-socket. Pull the bulb out of the bulb-socket.
- Insert a new bulb by inserting it into the bulb-socket and rotating it until it locks into place.
Install the socket in the headlamp assembly by aligning the tabs on the bulb-socket with the slots in the assembly. Push the bulb-socket into the headlamp assembly and turn the socket clockwise.
Replacing fog lamp (Bulb type) bulb DRL/position lamp (LED type) bulb
If the front fog lamp (Bulb) and DRL bulb (LED) does not operate, have the vehicle checked by an authorized Kia dealer.

The LED lamps cannot be replaced as a single component because they are part of an integrated unit. The LED lamps have to be replaced with the unit.
A skilled technician should check or repair the front fog lamp (Bulb) and DRL bulb (LED), for it may damage related parts of the vehicle.
Replacing stop and tail lamp, rear turn signal lamp (Bulb type) bulb
- Open the liftgate.
- Open the service cover.
- Loosen the light assembly retaining screws with a cross-tip screwdriver.

- Remove the rear combination lamp assembly from the body of the vehicle.

- Disconnect the rear combination lamp connector.
- Remove the socket from the assembly by turning the socket counterclockwise until the tabs on the socket align with the slots on the assembly.

- Remove the bulb from the socket by pressing it in and rotating it counterclockwise until the tabs on the bulb align with the slots in the socket. Pull the bulb out of the socket.
- Insert a new bulb by inserting it into the socket and rotating it until it locks into place.
- Install the socket in the assembly by aligning the tabs on the socket with the slots in the assembly. Push the socket into the assembly and turn the socket clockwise.
- Install the rear combination lamp assembly to the body of the vehicle.
- Install the service cover.
Replacing tail lamp (inside) (Bulb type) bulb
- Open the liftgate.
- Remove the service cover.

- Remove the socket from the assembly by turning the socket counterclockwise until the tabs on the socket align with the slots on the assembly.

- Remove the bulb from the socket by pressing it in and rotating it counter-clockwise until the tabs on the bulb align with the slots in the socket. Pull the bulb out of the socket.
- Insert a new bulb by inserting it into the socket and rotating it until it locks into place.
- Install the socket in the assembly by aligning the tabs on the socket with the slots in the assembly. Push the socket into the assembly and turn the socket clockwise.
- Install the service cover by putting it into the service hole.
Replacing stop and tail lamp (LED type) bulb

If the stop and tail lamp (LED type)
(1) does not operate, have the vehicle checked by an authorized Kia dealer.
The LED lamp cannot be replaced as a single component because it is an integrated unit. The LED lamp has to be replaced with the unit.
A skilled technician should check or repair the stop and tail lamp (LED type), for it may damage related parts of the vehicle.
Replacing rear side marker (LED type) bulb replacement

If the rear side marker (LED type)
(1) does not operate, have the vehicle checked by an authorized Kia dealer.
The LED lamp cannot be replaced as a single component because it is an integrated unit. The LED lamp has to be replaced with the unit.
A skilled technician should check or repair the rear side marker (LED type), for it may damage related parts of the vehicle.
Replacing back-up lamp (Bulb type) bulb
If the back-up lamp does not operate, have the vehicle checked by an authorized Kia dealer.

Replacing high mounted stop lamp (LED type) bulb
If the high mounted stop lamp (LED) does not operate, have the vehicle checked by an authorized Kia dealer.

The LED lamps cannot be replaced as a single component because they are part of an integrated unit. The LED lamps have to be replaced with the unit.
A skilled technician should check or repair the high mounted stop lamp (LED), for it may damage related parts of the vehicle.
Replacing license plate lamp (Bulb type) bulb

- Using a flat-blade screwdriver, gently pry the lens cover from lamp housing.
- Remove the socket from the assembly by turning the socket counterclockwise until the tabs on the socket align with the slots on the assembly.
- Remove the bulb from bulb-socket by pulling it out.
- Insert a new bulb by inserting it into the bulb-socket.
- Install the socket in the assembly by aligning the tabs on the socket with the slots in the assembly.
- Push the socket into the assembly and turn the socket clockwise.
- Align the lens cover tabs with the lamp housing notches and snap the lens into place.
Replacing side repeater lamp (LED type) bulb
If the side repeater lamp (LED) does not operate, have the vehicle checked by an authorized Kia dealer.
The LED lamps cannot be replaced as a single component because they are part of an integrated unit. The LED lamps have to be replaced with the unit.
A skilled technician should check or repair the side repeater lamp (LED), for it may damage related parts of the vehicle.
Replacing map lamp (bulb type) bulb

- Using a flat-blade screwdriver, gently pry the lens cover from lamp housing.
Remove the bulb by pulling it straight out. - Install a new bulb in the socket.
- Align the lens cover tabs with the lamp housing notches and snap the lens into place.
NOTICE
Be careful not to dirty or damage
the lens, lens tab, and plastic housings.
Replacing map lamp (LED type) bulb
If the map lamp (LED) does not operate have the vehicle checked by an authorized Kia dealer.

The LED lamps cannot be replaced as a single component because they are part of an integrated unit. The LED lamps have to be replaced with the unit.
A skilled technician should check or repair the map lamp (LED), for it may damage related parts of the vehicle.
Replacing vanity mirror lamp bulb

WARNING
Interior lamps
Prior to working on the Interior lamps, ensure that the “OFF” button is depressed to avoid burning your fingers or receiving an electric shock.
- Using a flat-blade screwdriver, gently pry the lamp assembly from interior.
- Remove the bulb by pulling it straight out.
- Install a new bulb in the socket.
- Install the lamp assembly to interior.
NOTICE
Be careful not to dirty or damage the lens, lens tab, and plastic housings.
Replacing room lamp (bulb type) bulb
WARNING
Interior lamps
Prior to working on the Interior lamps, ensure that the “OFF” button is depressed to avoid burning your fingers or receiving an electric shock.
- Using a flat-blade screwdriver, gently pry the lens cover from lamp housing.
- Remove the bulb by pulling it straight out.
- Install a new bulb in the socket.
- Align the lens cover tabs with the lamp housing notches and snap the lens into place.
NOTICE
Be careful not to dirty or damage the lens, lens tab, and plastic housings.
Replacing room lamp (LED type) bulb
If the Room lamp (LED) does not operate, have the vehicle checked by an authorized Kia dealer.

The LED lamps cannot be replaced as a single component because they are part of an integrated unit. The LED lamps have to be replaced with the unit.
A skilled technician should check or repair the Room lamp (LED), for it may damage related parts of the vehicle.
Replacing liftgate room lamp bulb

- Using a flat-blade screwdriver, gently pry the lens cover from lamp housing.
- Remove the bulb by pulling it straight out.
- Install a new bulb in the socket.
- Align the lens cover tabs with the lamp housing notches and snap the lens into place.
If the Liftgate room lamp (LED) does not operate, have the vehicle checked by an authorized Kia dealer.
The LED lamps cannot be replaced as a single component because they are part of an integrated unit. The LED lamps have to be replaced with the unit.
A skilled technician should check or repair the Liftgate room lamp (LED), for it may damage related parts of the vehicle.
NOTICE
Be careful not to dirty or damage the lens, lens tab, and plastic housings.
Appearance care
Use the information in the following sections to keep the exterior and interior of your vehicle clean.
Exterior care
Use the information in the following sections to maintain the exterior of your vehicle. Keeping the exterior clean is not only aesthetically pleasing, but it also helps to prolong the life of the vehicle.
NOTICE
If you park the vehicle around a stainless signboard or windshield building etc., the plastic exterior trim (bumper, spoiler, garnish, lamp, outside mirror etc.) may be dam-aged by reflected sunlight from the external structure. To avoid damaging the plastic exterior trim, park the vehicle away from the areas where the reflected light may occur or use a vehicle cover (Depending on the vehicle, the type of exterior trim applied such as spoiler may differ).
Exterior general caution
It is very important to follow the label directions when using any chemical cleaner or polish. Read all warning and caution statements that appear on the label.
Finish maintenance
Washing
To help protect your vehicle’s finish from rust and deterioration, wash it thoroughly and frequently at least once a month with lukewarm or cold water.
If you use your vehicle for off-road driving, you should wash it after each off-road trip. Pay special attention to the removal of any accumulation of salt, dirt, mud, and other foreign materials. Make sure the drain holes in the lower edges of the doors and rocker panels are kept clear and clean.
Insects, tar, tree sap, bird droppings, industrial pollution and similar deposits can damage your vehicle’s finish if not removed immediately. Even prompt washing with plain water may not completely remove all these deposits. A mild soap, safe for use on painted surfaces, may be used.
After washing, rinse the vehicle thoroughly with lukewarm or cold water. Do not allow soap to dry on the finish.
After washing the vehicle, test the brakes while driving slowly to see if they have been affected by water. If braking performance is impaired, dry the brakes by applying them lightly while maintaining a slow forward speed.
CAUTION
- Do not use strong soap, chemical detergents or hot water, and do not wash the vehicle in direct sunlight or when the body of the vehicle is warm.
- Be careful when washing the side windows of your vehicle, especially with high-pressure water.
Water may leak through the windows and wet the interior. - To prevent damage to the plastic parts and lamps, do not clean with chemical solvents or strong detergents.
High-pressure washing
When using high-pressure washers, make sure to maintain sufficient distance from the vehicle. Insufficient clearance or excessive pressure can lead to component damage or water penetration.
Do not spray the camera, sensors or its surrounding area directly with a high pressure washer. Shock applied from high pressure water may cause the device to not operate normally.
Do not bring the nozzle tip close to boots (rubber or plastic covers) or connectors as they may be dam-aged if they come into contact with high pressure water.
WARNING
After washing the vehicle, test the brakes while driving slowly to see if they have been affected by water. If braking performance is impaired, dry the brakes by applying them lightly while maintaining a slow for-ward speed.
CAUTION
Wetting motor compartment

- Water washing in the motor compartment including high pressure water washing may cause the failure of electrical circuits located in the motor compartment.
- Never allow water or other liquids to come in contact with electrical/electronic components inside the vehicle as this may damage them.
- To prevent damage to the charging door, make sure to close and lock the vehicle doors when washing (high-pressure washing, automatic car washing, etc.) the vehicle.
Waxing
Wax the vehicle when water will no longer bead on the paint.
Always wash and dry the vehicle before waxing. Use a good quality liquid or paste wax, and follow the manufacturer’s instructions. Wax all metal trim to protect it and to maintain its luster.
Removing oil, tar, and similar materials with a spot remover will usually strip the wax from the finish. Be sure to rewax these areas even if the rest of the vehicle does not yet need waxing.
CAUTION
Drying vehicle
- Wiping dust or dirt off the body with a dry cloth will scratch the finish.
Do not use steel wool, abrasive cleaners, acid detergents or strong detergents containing high alkaline or caustic agents on chrome-plated or anodized aluminum parts. This may result in damage to the protective coating and cause discoloration or paint deterioration.
Finish damage repair
Deep scratches or stone chips in the painted surface must be repaired promptly. Exposed metal will quickly rust and may develop into a major repair expense.
NOTICE
If your vehicle is damaged and requires any metal repair or replacement, be sure the body shop applies anti-corrosion materials to the parts repaired or replaced.
Bright-metal maintenance
To remove road tar and insects, use a tar remover, not a scraper or other sharp object.
To protect the surfaces of bright metal parts from corrosion, apply a coating of wax or chrome preservative and rub to a high luster.
During winter weather or in coastal areas, cover the bright metal parts with a heavier coating of wax or preservative. If necessary, coat the parts with non-corrosive petroleum jelly or other protective compound.
- Underbody maintenance
Road salt and other corrosive chemicals are used in cold weather states to melt snow and prevent ice accumulation. If these chemicals are not regularly removed, they will corrode the vehicle underbody and over time damage fuel lines, the fuel tank retention system, the vehicle suspension, the exhaust system, and even the body frame.
The National Highway Traffic Safety Administration has warned all vehicle owners of all brands of the need to take the following steps:
Wash the undercarriage of your vehicle regularly during the winter and whenever your vehicle has been exposed to such salts or chemicals.
Do a thorough washing of the undercarriage at the end of the winter.
Use professional service technicians or governmental inspection stations to annually inspect for corrosion. - Immediately seek an inspection of your vehicle if you become visually aware of corrosion flaking or scaling or if you become aware of a change in vehicle performance, such as soft or spongy brakes, fluids leaking, impairment of directional control, suspension noises or rattling metal straps.
Aluminum wheel maintenance
The aluminum wheels are coated with a clear protective finish.
- Do not use any abrasive cleaner, polishing compound, solvent, or wire brushes on aluminum wheels. They may scratch or damage the finish.
- Clean the wheel when it has cooled.
Use only a mild soap or neutral detergent, and rinse thoroughly with water. Also, be sure to clean the wheels after driving on salted roads. This helps prevent corrosion. - Avoid washing the wheels with highspeed vehicle wash brushes.
- Do not use any alkaline or acid detergents It may damage and corrode the aluminum wheels coated with a clear protective finish.
Corrosion protection
Protecting your vehicle from corrosion
By using the most advanced design and construction practices to com-bat corrosion, we produce vehicles of the highest quality. However, this is only part of the job. To achieve the long-term corrosion resistance your vehicle can deliver, the owner’s cooperation and assistance is also required.
Common causes of corrosion
The most common causes of corrosion on your vehicle are:
- Road salt, dirt and moisture that is allowed to accumulate underneath the vehicle.
Removal of paint or protective coatings by stones, gravel, abrasion or minor scrapes and dents which leave unprotected metal exposed to corrosion.
High-corrosion areas
If you live in an area where your vehicle is regularly exposed to corrosive materials, corrosion protection is particularly important. Some of the common causes of accelerated corrosion are road salts, dust control chemicals, ocean air and industrial pollution.
Moisture breeds corrosion
Moisture creates the conditions in which corrosion is most likely to occur. For example, corrosion is accelerated by high humidity, particularly when temperatures are just above freezing. In such conditions, the corrosive material is kept in contact with the vehicle’s surface by moisture that evaporates slowly. Mud is particularly corrosive because it dries slowly and holds moisture in contact with the vehicle. Although the mud appears to be dry, it can still retain the moisture and promote corrosion.
High temperatures can also accelerate corrosion of parts that are not properly ventilated so the moisture can be dispersed. For all these rea-sons, it is particularly important to keep your vehicle clean and free of mud or accumulations of other materials. This applies not only to the visible surfaces but particularly to the underside of the vehicle.
To help prevent corrosion
You can help prevent corrosion from beginning by observing the following:
Keep your vehicle clean
The best way to prevent corrosion is to keep your vehicle clean and free of corrosive materials. Attention to the underside of the vehicle is particularly important.
If you live in a high-corrosion area where road salts are used, near the ocean, areas with industrial pollution, acid rain, etc., you should take extra care to prevent corrosion. In winter, hose off the underside of your vehicle at least once a month and be sure to clean the underside thoroughly when winter is over.
When cleaning underneath the vehicle, give particular attention to the components under the fenders and other areas that are hidden from view. Do a thorough job; just dampening the accumulated mud rather than washing it away will accelerate corrosion rather than prevent it. Water under high pressure and steam are particularly effective in removing accumulated mud and corrosive materials.
When cleaning lower door panels, rocker panels and frame members, be sure that drain holes are kept open so that moisture can escape and not be trapped inside to accelerate corrosion.
Keep your garage dry
Don’t park your vehicle in a damp, poorly ventilated garage. This creates a favorable environment for corrosion. This is particularly true if you wash your vehicle in the garage or drive it into the garage when it is still wet or covered with snow, ice or mud. Even a heated garage can con-tribute to corrosion unless it is well ventilated so moisture is dispersed.
Keep paint and trim in good condition
Scratches or chips in the finish should be covered with “touch-up” paint as soon as possible to reduce the possibility of corrosion. If bare metal is showing through, the attention of a qualified body and paint shop is recommended.
Bird droppings: Bird droppings are highly corrosive and may damage painted surfaces in just a few hours. Always remove bird droppings as soon as possible.
Don’t neglect the interior
Moisture can collect under the floor mats and carpeting and cause corrosion. Check under the mats peri-odically to be sure the carpeting is dry. Use particular care if you carry fertilizers, cleaning materials or chemicals in the vehicle.
These should be carried only in proper containers and any spills or leaks should be cleaned up, flushed with clean water and thoroughly dried.
Interior care
Use the information in the following sections to maintain the interior of your vehicle.
Interior general precautions
Prevent chemicals such as perfume, cosmetic oil, sun cream, hand cleaner, and air freshener from contacting the interior parts because they may cause damage or discoloration. If they do contact the interior parts, wipe them off immediately. If necessary, use a vinyl cleaner, see product instructions for correct usage.
CAUTION
Electrical components
Never allow water or other liquids to come in contact with electrical/electronic components inside the vehicle as this may damage them.
CAUTION
Leather
When cleaning leather products
(steering wheel, seats etc.), use neutral detergents or low alcohol content solutions. If you use high alcohol content solutions or acid/alkaline detergents, the color of the leather may fade or the surface may get stripped off.
Taking care of leather seats
- Vacuum the seat periodically to remove dust and sand on the seat. It will prevent abrasion or damage of the leather and maintain its quality.
- Wipe the natural leather seat cover often with dry or soft cloth.
- Sufficient use of a leather protective may prevent abrasion of the cover and helps maintain the color. Be sure to read the instructions and consult a specialist when using leather coating or protective agents.
- Leather with bright colors (beige, cream beige) is easily contaminated and clear in appearance. Clean the seats frequently.
- Avoid wiping with wet cloth. It may cause the surface to crack.
Cleaning the leather seats
Remove all contaminations instantly. Refer to instructions below for removal of each contaminant.
- Cosmetic products (sunscreen, foundation, etc.)
- Apply cleansing cream on a cloth and wipe the contaminated point. Wipe off the cream with a wet cloth and remove water with a dry cloth.
- Beverages (coffee, soft drink, etc.)
- Apply a small amount of neutral detergent and wipe until contaminations do not smear.
- Oil
- Remove oil instantly with absorbable cloth and wipe with stain remover for natural leather only.
- Chewing gum
- Harden the gum with ice and remove gradually.
Fabric seat cover (if equipped)
Please clean the fabric seats regularly with a vacuum cleaner in consideration of fabric material characteristics. If they are heavily soiled with beverage stains, etc., use a suitable interior cleaner. To pre-vent damage to seat covers, wipe off the seat covers down to the seams with a large wiping motion and moderate pressure using a soft sponge or microfiber cloth.
Velcro closures on clothing or sharp objects may cause snagging or scratches on the surface of the seats.
Make sure not to rub such objects against the surface.
Cleaning the upholstery and interior trim
Vinyl
Remove dust and loose dirt from vinyl with a whisk broom or vacuum cleaner. Clean vinyl surfaces with a vinyl cleaner.
Fabric
Remove dust and loose dirt from fabric with a whisk broom or vacuum cleaner. Clean with a mild soap solution recommended for upholstery or carpets. Remove fresh spots immediately with a fabric spot cleaner. If fresh spots do not receive immediate attention, the fabric can be stained and its color can be affected. Also, its fire-resistant properties can be reduced if the material is not properly maintained. Using anything but recommended cleaners and procedures may affect the fabric’s appearance and fire-resistant properties.
Cleaning the lap/shoulder belt webbing
Clean the belt webbing with any mild soap solution recommended for cleaning upholstery or carpet. Fol-low the instructions provided with the soap. Do not bleach or re-dye the webbing because this may weaken it.
Cleaning the interior window glass
If the interior glass surfaces of the vehicle become fogged (that is, covered with an oily, greasy or waxy film), they should be cleaned with a glass cleaner. Follow the directions on the glass cleaner container.
CAUTION
Rear window
Do not scrape or scratch the inside of the rear window. This may result in damage of the rear window defroster grid.
California perchlorate notice
Perchlorate Material-special handling may apply, See
https://dtsc.ca.gov/perchlorate
Notice to California Vehicle Dismantlers: Perchlorate containing materials, such as air bag inflators, seatbelt pre-tensioners and key-less remote entry batteries, must be disposed of according to Title 22 California Code of Regulations Section 67384.10 (a).
FAQs
The fuse boxes are normally found in the vehicle’s inner cabin or engine compartment.
The Kia Niro EV 2021 typically has two fuse boxes, one in the inside cabin and one in the engine area.
Fuses shield the car’s electrical circuits against overloads and short circuits, keeping vital parts from being harmed.
A broken wire or a darker appearance inside the fuse might both be signs of a blown fuse. A multimeter can be used to check the fuse’s continuity as well.
Yes, changing a blown fuse is often a straightforward process. For information on the proper fuse rating and replacement techniques, consult the owner’s manual or fuse box cover.
Using a fuse with the wrong rating can potentially harm the electrical system, so be careful. Fuse replacements must always match the originals’ ratings.
The owner’s manual or a label on the fuse box cover will usually provide the proper fuse rating. In order to get reliable information, it is crucial to consult these sources.
A fuse that constantly blowing suggests a problem with the circuit or a component. It is advised to have the car examined by a trained mechanic.
To ensure proper protection and compatibility with the vehicle’s electrical system, it is advised to use genuine OEM fuses or fuses of equal quality.
A set of spare fuses that can be used to replace the damaged ones when necessary typically comes with the car.
Replace any blown fuses immediately. They aren’t meant to be reset, after all.
No, various circuits can need fuses of various sizes or ratings. The particular sizes and ratings are listed on the fuse box cover or in the owner’s manual.
A fuse can be removed in order to momentarily shut off a circuit. It’s crucial to keep in mind nevertheless that removing a fuse could also have an impact on other circuits.
No, changing a fuse for one with a higher rating can result in excessive current flow, which may harm the electrical system or possibly provide a fire risk.
Yes, a blown fuse can cause the power to several electrical systems or components linked to the affected circuit to be cut off.
Useful Links
View Full User Guide: Kia Niro EV 2021| Auto User Guide
Download Manuals: Owner’s Manuals and Documents | Kia