
Kia Sedona 2020 Climate Control System User Manual
Introduction
The Kia Sedona 2020’s climate control system is designed to provide maximum comfort and convenience for both the driver and passengers. It enables you to keep the ideal temperature inside the vehicle regardless of the weather outside. The climate control system, with its advanced features and simple controls, ensures that all occupants have a pleasant driving experience. The Kia Sedona 2020 climate control system will keep you cool on a hot summer day or warm during the cold winter months. Let’s take a closer look at the system’s features and functions.
Parking Distance Warning
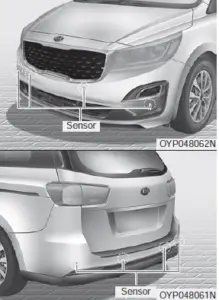
The parking distance warning assists the driver during movement of the vehicle by chiming if any object is sensed within the distance of 39 in (100 cm) in front or behind the vehicle.
The sensing range and objects detectable by the sensors are limit-ed. Whenever moving, pay as much attention to what is in front and behind of you as you would in a vehicle without a parking distance warning.
WARNING
Parking distance warning
- The parking distance warning is not a substitute for proper and safe parking and backing-up procedures. Always drive safely and use caution when parking. The parking distance warning may not detect every object behind or in front of the vehicle.
Never rely solely on the parking distance warning. Always perform a visual inspection to make sure the vehicle is clear of all obstructions before moving the vehicle in any direction. Stop immediately if you are aware of a child anywhere near your vehicle. Some objects may not be detected by the sensors, due to the object’s size or material.
Operation of the parking distance warning
Operating condition
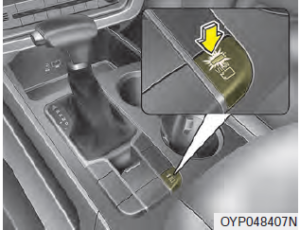
- This system activates when the parking assist button is pressed with the Engine Start/Stop Button ON.
The parking assist button turns on automatically and activates the parking distance warning when you shift the gear to the R (Reverse) position. - The sensing distance while backing up is approximately 39 in. (100
cm) when you are driving less than 6.2 mph (10 km/h).
The sensing distance while moving forward is approximately 39 in.(100 cm) when you are driving less than 6.2 mph (10 km/h).
When more than two objects are sensed at the same time, the closest one will be recognized first.
NOTICE
The system may not detect an object if the distance from the object is already less than approximately 10 in. (25 cm) when the system is turned ON.
Types of warning sound and indicator
| Distance from object | Warning indicator |
Warning sound |
||
| When driving forward | When driving rearward | |||
| 39 in. ~ 24 in. (100cm, ~ 61cm) | Front | |
– | Buzzer beeps intermittently |
| 47 in. ~ 24in. (120cm, ~ 61cm) | Rear | – |  |
Buzzer beeps intermittently |
| 24 in. ~ 12 in. (60cm ~ 31cm) | Front |  |
 |
Buzzer beeps frequently |
| Rear | – | Buzzer beeps frequently | ||
| 12 in. (30cm) | Front |  |
 |
Buzzer sounds continuously |
| Rear | – | Buzzer sounds continuously | ||
NOTICE
- The actual warning sound and indicator may differ from the illustration according to objects or sensor status.
Do not wash the vehicle’s sensor with high pressure water.
Non-operational conditions of parking distance warning
Parking distance warning may not operate normally when:
- Moisture is frozen to the sensor. (It will operate normally when moisture melts.)
- Sensor is covered with foreign matter, such as snow or water, or the sensor cover is blocked. (It will operate normally when the material is removed or the sensor is no longer blocked.)
- Sensor is stained with foreign matter such as snow or water. (Sensing range will return to normal when removed.)
- The parking assist button is off.
There is a possibility of parking distance warning malfunction when:
- Driving on uneven road surfaces such as unpaved roads, gravel, bumps, or gradient.
- Objects generating excessive noise such as vehicle horns, loud motor-cycle engines, or truck air brakes can interfere with the sensor.
- The weather conditions produce heavy rain or water spray.
- Wireless transmitters or mobile phones are present near the sensor.
- Sensor is covered with snow.
Detecting range may decrease when:
- Outside air temperature is extremely hot or cold.
- Undetectable objects smaller than 39 in (1 m) and narrower than 5.5 in (14 cm) in diameter.
The following objects may not be recognized by the sensor:
- Sharp or slim objects such as ropes, chains or small poles.
- Objects, which tend to absorb sensor frequency such as clothes, spongy material or snow.
NOTICE
- The warning may not sound depending on the speed and shapes of the objects detected.
- The parking distance warning may malfunction if the vehicle bumper height or sensor installation has been modified. Any non-factory installed equipment or accessories may also interfere with the sensor performance.
- Sensor may not recognize objects less than 12 in (30 cm) from the sensor, or it may sense an incorrect distance. Use with caution.
- When the sensor is frozen or stained with snow or water, the sensor may be inoperative until the stains are removed using a soft cloth.
- Do not push, scratch or strike the sensor with any hard objects that could damage the surface of the sensor. Sensor damage could occur.
WARNING
This system can only sense objects within the range and location of the sensors, it can-not detect objects in other areas where sensors are not installed. Also, small or slim objects, or objects located between sensors may not be detected.
Always visually check in front and behind the vehicle when driving.
Be sure to inform any drivers in the vehicle that may be unfamiliar with the system regarding the system’s capabilities and limitations.
Self-diagnosis
If you don’t hear an audible warning sound or if the buzzer sounds intermittently when shifting the shift lever into the R (Reverse) position, this may indicate a malfunction in the parking distance warning. If this occurs, have the system checked by an authorized Kia dealer.
NOTICE
Your new vehicle warranty does not cover any accidents or damage to the vehicle or injuries to its occupants related to a parking distance warning. Always drive safely and cautiously.
REAR VIEW MONITOR (IF EQUIPPED)
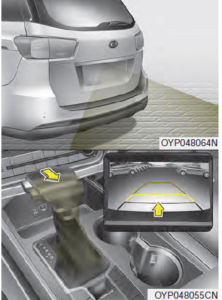
The rear view monitor will activate with the ignition switch ON and the shift lever in the R (Reverse) position.
This system is a supplemental system that shows behind the vehicle through an AVN monitor while backing up.
Operating conditions
-
- When the Engine Start/Stop Button is ON position
- When the automatic transmission is on D, N or R
- When the vehicle speed is not over 12.4 mph (20 km/h)
- When the vehicle speed is over 12.4 mph (20 km/h), the SVM system is turned off. If the vehicle speed is not over 12.4 mph (20 km/h) after turn-ing off the SVM by over speed, the SVM is not turned on. To operate again, push the button.
When the trunk and driver/passenger door are opened and the out-side mirror is folded, the warning is illuminated in SVM system.
If the SVM system is not operating normally, the system should be checked by an authorized Kia dealer.
When the vehicle moves over 6.2 mph (10 km/h) forward after moving backward, the SVM screen will be turned off.
WARNING
This system is a supplementary function only. It is the responsibility of the driver to always check the area around the vehicle before and while moving.
LIGHTING
Battery saver function
- The purpose of this feature is to prevent the battery from being discharged if the lights are left in the ON position. The system automatically shuts off the parking lights 30 seconds after the ignition key is removed and the driver’s door is opened and closed.
With this feature, the parking lights will turn off automatically if the driver parks on the side of the road at night and - opens the driver’s side door. If necessary, to keep the parking lights on when the ignition key is removed, perform the following:
- Open the driver-side door.
- Turn the parking lights OFF and ON again using the light switch on the steering column.
Headlight escort function
If you turn the ignition switch to the ACC or OFF position with the head-lights ON, the headlights remain on for about 5 minutes. However, if the driver’s door is opened and closed, the headlights are turned off after 15 seconds.
The headlights can be turned off by pressing the lock button on the transmitter (or smart key) twice or turning the light switch to the OFF position.
If the driver gets out of the vehicle through other doors (except driver’s door), the battery saver function does not operate and the headlight escort function does not turn off automatically. Therefore, it can cause the battery to be discharged. In this case, make sure to turn off the lamp before getting out of the vehicle.
Lighting control
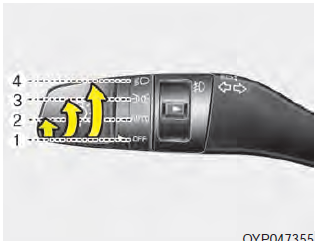
The light switch has a Headlight and a Parking light position.
To operate the lights, turn the knob at the end of the control lever to one of the following positions:
- OFF position
- Auto light position (if equipped)
- Position & Tail light
- Headlight position
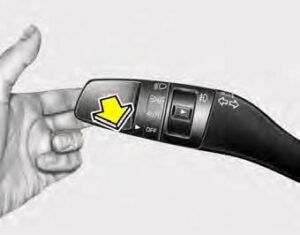
Position & Tail light ()
When the light switch is in the parking light position, the tail, license and instrument panel lights will turn ON.
Headlight position ()
When the light switch is in the head-light position, the head, tail, license lights will turn ON.
NOTICE
The ignition switch must be in the ON position to turn on the headlights.
Auto light position (if equipped)
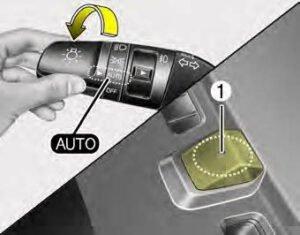
When the light switch is in the AUTO light position, the taillights and head-lights will turn ON or OFF automatically depending on the amount of light outside the vehicle.
When the light switch is positioned at an auto light position, at first, the wiper will turn on and then, after 5 seconds the head lamp will turn on automatically.
If the head lamp has been turned on due to this function of the vehicle, the head lamp will turn off 60 seconds after the wiper has been turned off.
Headlights On with Wipers
(Available With Auto lights Only)
- When the light switch is in the AUTO light position, the headlights will turn ON automatically the next 5 seconds with wiper is ON.
If this feature causes the headlights to turn On, the headlights will be turned off on the next 60 seconds with wiper is off.
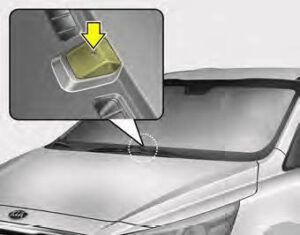
CAUTION
- Never place anything over the sensor (1) located on the
instrument panel. This will ensure better auto-light system control. - Don’t clean the sensor using a window cleaner. The cleaner may leave a light film which could interfere with sensor operation.
If your vehicle has window tint or other types of metallic coating on the front windshield, the Auto light system may not work properly.
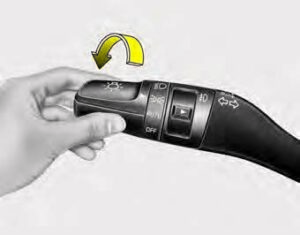
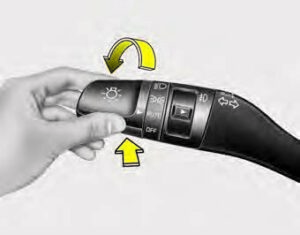
High beam operation

To turn on the high beam headlights, push the lever away from you. The lever will return to its original position.
The high beam indicator will light when the headlight high beams are switched on.
To turn off the high beam headlamp, pull the lever to you when the high beam is on. The lever will return to its original position.
To prevent the battery from being discharged, do not leave the lights on for a prolonged time while the engine is not running.
WARNING
High beams
Do not use high beam when there are other vehicles. Using high beam could obstruct the other driver’s vision.
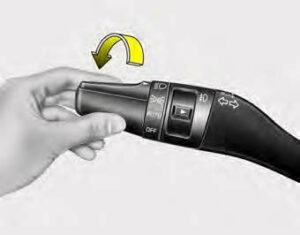
To flash the headlights, pull the lever towards you. It will return to the nor-mal (low beam) position when released. The headlight switch does not need to be on to use this flashing feature.
High Beam Assist (if equipped)
The High Beam Assist is a system that automatically adjusts the head-lamp range (switches between high beam and low beam) according to the brightness of other vehicles and road conditions.
Operating condition
- Place the light switch in the AUTO position.
- Turn on the high beam by pushing the lever away from you.
The High Beam Assist ( ) indicator will illuminate. - The High Beam Assist will turn on when vehicle speed is above 25 mph (40 km/h).
The details of operation with the light switch while the High Beam Assist is on are below.- If the light switch is pushed away, the High Beam Assist will turn off and the high beam will be on continuously.
- If the light switch is pulled towards you when the high beam is off, the high beam will be on without canceling the High Beam Assist. (When you release the lever, the lever will move to the middle and the high beam will turn off.)
- If the light switch is pulled towards you when the high beam is on by the High Beam Assist, the low beam will be on and the High Beam Assist will turn off.
- If the light switch is turned to the headlamp position ( ) from AUTO position, the High Beam Assist will turn off and the low beam will be on continuously.
When the High Beam Assist is operating, the high beam switches to low beam in the below conditions.
- When the headlamp is detected from an oncoming vehicle.
When the tail lamp is detected from the front vehicle.
When headlamp/tail lamp of bicycle/motorcycle is detected.
When the surrounding is so bright that high beams are not needed.
When streetlights or other lights are detected.
When the light switch is not in the AUTO position.
When the High Beam Assist is off.
When vehicle speed is below 15 mph (24 kph).
Warning message
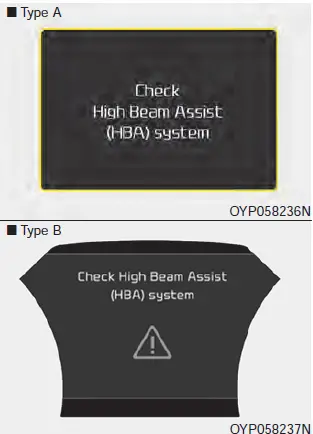
When the High Beam Assist is not working properly, the warning message will come on for a few second. After the message disappears, the master warning light ( ) will illuminate.
Take your vehicle to an authorized Kia dealer and have the system checked.
CAUTION
The system may not operate normally in the below situations:
When the light from a vehicle is poor
- When the light from a vehicle is not detected because of
lamp damage, hidden from sight, etc.
When the lamp of a vehicle is covered with dust, snow or water.
When a vehicle’s headlamps are off but the fog lamps on and etc.
When external conditions intervene
- When there is a similar shape lamp with the front vehicle’s lamps.
- When the headlamp is not repaired or replaced at authorized Kia dealer.
- When headlamp aiming is not properly adjusted.
When driving on a narrow curved road, rough road, downhill or uphill.
When only part of the vehicle in front is visible on a cross-road or curved road.
When there is a traffic light, reflecting sign, flashing sign or mirror ahead.
When there is a temporary reflector or flash ahead (construction area).
When the road conditions are bad such as being wet, iced or covered with snow. - When a vehicle suddenly appears from a curve.
When the vehicle is tilted from a flat tire or being towed. - When the LDW (Lane Departure Warning) system warning light illuminates (if equipped) and etc.
When front visibility is poor
- When the front window is covered with foreign matters.
When it is hard to see because of fog, heavy rain or snow and etc.
When you replace or reinstall the windshield glass, front view camera, take your vehicle to an authorized Kia dealer and have the system checked.
Be careful that water doesn’t get into the High Beam Assist unit and do not remove or damage related parts of the High Beam Assist system. - Do not place objects on the dashboard that reflect light such as mirrors, white paper, etc. The system may not function properly if sunlight is reflected.
At times, the High Beam Assist may not operate due to system limitations. The system is for your convenience only. It is the responsibility of the driver for safe driving practices and always check the road conditions for your safety.
When the system does not operate normally, change the lamp position manually between the high beam and low beam.
Turn signals and lane change signals
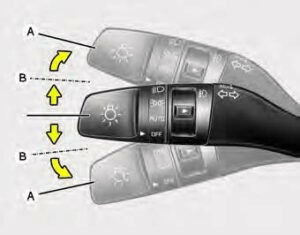
The ignition switch must be on for the turn signals to function. To turn on the turn signals, move the lever up or down (A). The green arrow indicators on the instrument panel indicate which turn signal is operating. They will self-cancel after a turn is completed. If the indicator continues to flash after a turn, manually return the lever to the OFF position.
To signal a lane change, move the turn signal lever slightly and hold it in position (B). The lever will return to the OFF position when released.
If an indicator stays on and does not flash or if it flashes abnormally, one of the turn signal bulbs may be burned out and will require replacement.
One touch turn signal
When changing lanes, move the lane change switch to the direction you want briefly. The lane change switch will move back to the original position but the turn signal will flash three times. This function assists the driver when changing lanes without pressing down on the lane change signal.
Depending on the vehicle, the driver may select or deselect the one touch turn signal function. For more details, please refer to “vehicle settings” in chapter 4.
NOTICE
If an indicator flash is abnormally quick or slow, a bulb may be burned out or have a poor electrical connection in the circuit.
Front fog light (if equipped)
Fog lights are used to provide improved visibility when visibility is poor due to fog, rain or snow, etc. The fog lights will turn on when the fog light switch (1) is turned to the on position after the headlight is turned on.
To turn off the fog lights, turn the fog light switch (1) to the OFF position.
When in operation, the fog lights consume large amounts of vehicle electrical power. Only use the fog lights when visibility is poor.
Headlight leveling device (if equipped)
Automatic type
To ensure the proper headlight beam is used under various conditions, the headlight beam levels are automatically adjusted depending on the number of passengers, the weight in the trunk, and other driving conditions.
NOTICE
If it does not work properly even though your car is inclined backward according to passenger’s posture, or the headlight beam is irradiated to the high or low position, have the system be inspected by an authorized Kia dealer.
Do not attempt to inspect or replace the wiring yourself.
Dynamic Bending Light (DBL)(if equipped)

Dynamic bending light uses the steering angle and vehicle speed, to keep your field of vision wide by swiveling the headlamp.
Change the switch to the AUTO position when the engine is running. The dynamic bending light will operate when the headlamp is ON. To turn off the DBL, change the switch to other positions. After turning the DBL off, headlamp swiveling no longer occurs.
If the DBL malfunction indicator comes on, the DBL is not working properly. Drive to the nearest safe location and restart the engine. If the indicator continuously remains on, have system be checked by an authorized Kia dealer.
WIPERS AND WASHERS
Windshield wiper/washer
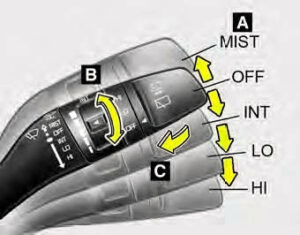
A : Wiper speed control (front)
- MIST – Single wipe
OFF – Off
INT – Intermittent wipe
LO – Low wiper speed - HI – High wiper speed
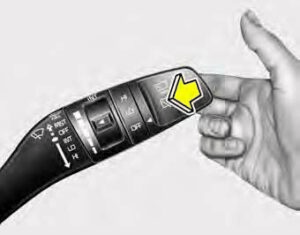
Rear window wiper/washer
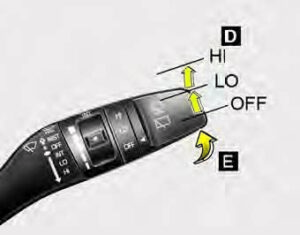
D : Rear wiper/washer control
- HI – Continuous wipe
LO – Intermittent wipe*
OFF – Off
E : Wash with brief wipes (rear)
* if equipped
Windshield wipers
Operates as follows when the ignition switch is turned ON.
MIST : For a single wiping cycle, move the lever to this (MIST/ ) position and release it. The wipers will operate continuously if the lever is held in this position.
OFF : Wiper is not in operation
INT : Wiper operates intermittently at the same wiping intervals. Use this mode in light rain or mist. To vary the speed setting, turn the speed control knob.
LO : Normal wiper speed
HI : Fast wiper speed
NOTICE
If there is heavy accumulation of snow or ice on the windshield, defrost the windshield for about 10 minutes, or until the snow and/or ice is removed before using the windshield wipers to ensure proper operation. If you do not remove the snow and/or ice before using the wiper and washer, it may damage the wiper and washer system.
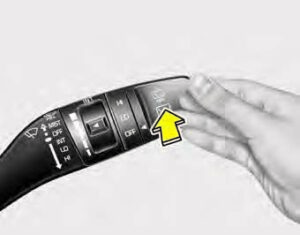
Front windshield washers
In the OFF position, pull the lever gently toward you to spray washer fluid on the windshield and to run the wipers 1-3 cycles.
Use this function when the wind-shield is dirty.
The spray and wiper operation will continue until you release the lever.
If the washer does not work, check the washer fluid level. If the fluid level is not sufficient, you will need to add appropriate non-abrasive windshield washer fluid to the washer reservoir.
The reservoir filler neck is located in the front of the engine compartment on the passenger side.
CAUTION
Washer pump
To prevent possible damage to the washer pump, do not operate the washer when the fluid reservoir is empty.
WARNING
Obscured visibility
Do not use the washer in freezing temperatures without first warming the windshield with the defrosters; the washer solution could freeze on the wind-shield and obscure your vision.
CAUTION
Wipers & windshields
- To prevent possible damage to the wipers or windshield, do not operate the wipers when the windshield is dry.
- To prevent damage to the wiper blades, do not use gasoline, kerosene, paint thinner, or other solvents on or near them. To prevent damage to the wiper arms and other components, do not attempt to move the wipers manually.
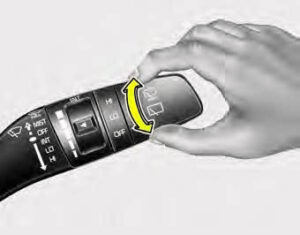
Rear window wiper and washer switch
The rear window wiper and washer switch is located at the end of the wiper and washer switch lever. Turn the switch to the desired position to operate the rear wiper and washer.
HI : Continuous wipe
LO : Intermittent wipe
OFF : OFF
The rear window wiper is switched on automatically when the ignition is in OFF and the gear is shifted to R (Reverse) while the wiper is in motion.
The automatic rear wiper function can be turned on or off in ‘User set-ting mode’ on the cluster display.
Push the lever away from you to spray rear washer fluid and to run the rear wipers 1~3 cycles. The spray and wiper operation will continue until you release the lever
INTERIOR LIGHTS
Do not use the interior lights for extended periods when the engine is not running.
It may cause battery discharge.
WARNING
Interior lights
Do not use the interior lights when driving in the dark. Accidents could happen because the view may be obscured by interior lights.
Automatic turn off function (if equipped)
The interior lights automatically turn off approximately 20 minutes after the ignition switch is turned off, if the lights are in the ON position.
If your vehicle is equipped with the theft alarm system, the interior lights automatically turn off approximately 5 seconds after the system in armed stage.
Room lamp
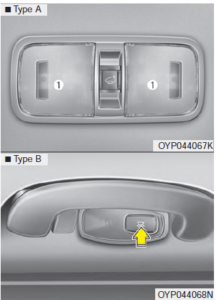
Press the button(1) or lens(1) to turn the light on or off.
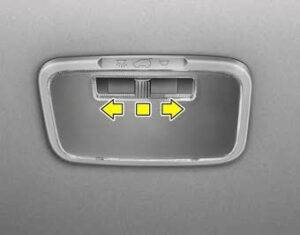
Map lamp
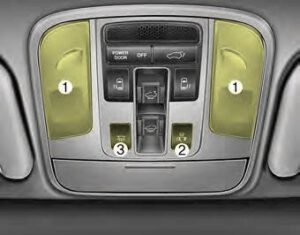
Press the lens (1) to turn the map lamp on or off.
- The light comes on when any door (or liftgate) is opened regardless of the ignition switch position. When doors are unlocked by the transmitter (or smart key) or the key is removed from the ignition switch, the light comes on for approximately 30 seconds as long as any door is not opened. The light goes out gradually after approximately 30 seconds if the door is closed.
However, if the ignition switch is ON or all doors are locked, the light will turn off immediately. If a door is opened with the ignition switch in the ACC or LOCK position, the light stays on for about 20 minutes. However, if a door is opened with the ignition switch in the ON position, the light stays on continuously. - The light stays on at all times.
NOTICE
- The mode and mode cannot be selected at the same time.
- When the lamp is turned on by pressing the lens (1), the lamp does not turn off even if the mode or mode is not selected (not pressed).
Luggage lamp (if equipped)
- DOOR : The light comes on when the liftgate is opened.
- OFF :The light stays off at all times.
ON : The light stays on at all times .
Vanity mirror lamp (if equipped)
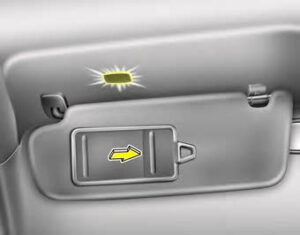
Opening the lid of the vanity mirror will automatically turn on the mirror light.
Glove box lamp (if equipped)
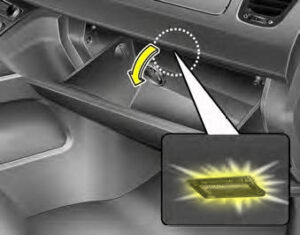
The glove box lamp comes on when the glove box is opened.
To prevent unnecessary charging system drain, close the glove box securely after using a the glove box.
DEFROSTER
CAUTION
Conductors
To prevent damage to the conductors bonded to the inside surface of the rear window, never use sharp instruments or window cleaners containing abrasives to clean the window.
If you want to defrost and defog the front windshield, refer to “Windshield defrosting and defogging” in this section.
Rear window defroster
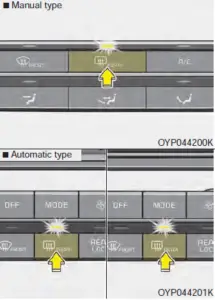
The defroster heats the window to remove frost, fog and thin ice from the rear window, while the engine is running.
To activate the rear window defroster, press the rear window defroster button located in the center facia switch panel. The indicator on the rear window defroster button illuminates when the defroster is ON.
If there is heavy accumulation of snow on the rear window, brush it off before operating the rear defroster.
The rear window defroster automatically turns off after approximately 20 minutes or when the ignition switch is turned off. To turn off the defroster, press the rear window defroster button again.
Outside rearview mirror defroster (if equipped)
If your vehicle is equipped with the outside rearview mirror defrosters, they will operate at the same time you turn on the rear window defroster.
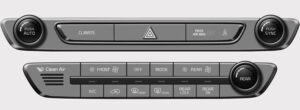
MANUAL CLIMATE CONTROL SYSTEM (IF EQUIPPED)
- Front fan speed control knob
- Front window defroster button
- Rear window defroster button
- Air conditioning button
- Air intake control button
- Front temperature control knob
- Front mode selection button
- Rear fan speed control knob
- Rear temperature control knob
- Rear control lock button
- Rear control on button
* if equipped
Heating and air conditioning
- Start the engine.
- Set the mode to the desired position.
For improving the effectiveness of heating and cooling;- Heating:
- Cooling:
- Set the temperature control to the desired position.
- Set the air intake control to the outside (fresh) air position (if equipped).
- Set the fan speed control to the desired speed.
- If air conditioning is desired, turn the air conditioning system (if equipped) on.
Mode selection
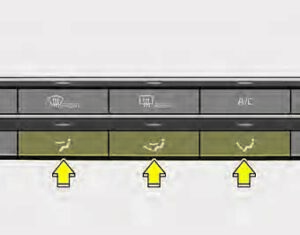
The mode selection button controls the direction of the air flow through the ventilation system.
Air can be directed to the floor, dash-board outlets, or windshield. Six symbols are used to represent MAX A/C, Face, Bi-Level, Floor, Floor-Defrost and Defrost air position.
The MAX A/C mode is used to cool the inside of the vehicle faster.
Face-Level (B, D)
Air flow is directed toward the upper body and face. Additionally, each outlet can be controlled to direct the air discharged from the outlet.
Bi-Level (A, B, C, D, E)
Air flow is directed towards the face and the floor.
Floor-Level (A, C, D, E)
Most of the air flow is directed to the floor, with a small amount of the air being directed to the windshield and side window defrosters.
Floor/Defrost-Level (A, C, D, E)
Most of the air flow is directed to the floor and the windshield with a small amount directed to the side window defrosters.

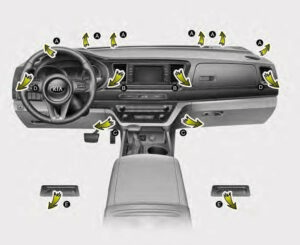
Instrument panel vents
The outlet vents can be opened or closed separately using the thumb-wheel (if equipped).
Also, you can adjust the direction of air delivery from these vents using the vent control lever as shown.
Temperature control
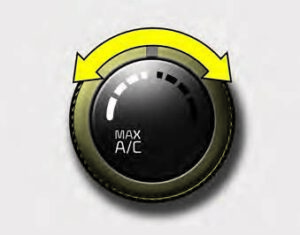
The temperature control knob allows you to control the temperature of the air flowing from the ventilation system. To change the air temperature in the passenger compartment, turn the knob to the right position for warm and hot air or left position for cooler air.
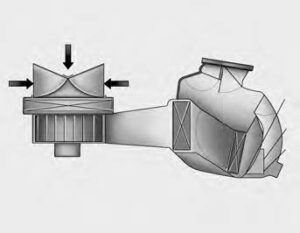
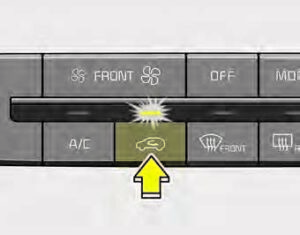
Air intake control
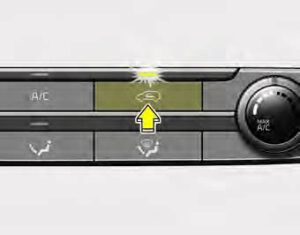
The air intake control is used to select the outside (fresh) air position or recirculated air position.
To change the air intake control position, press the control button.
![]() Recirculated air position
Recirculated air position
With the recirculated air position selected, air from the passenger compartment will be drawn through the heating system and heated or cooled according to the f
unction selected.
 Outside (fresh) air position
If the recirculated air position button is not selected, air enters the vehicle from outside and is heated or cooled according to the function selected.
Prolonged operation of the heater in the recirculated air position (without air conditioning selected) may cause fogging of the windshield and side windows and the air within the passenger compartment may become stale.
In addition, prolonged use of the air conditioning with the recirculated air position selected will result in excessively dry air in the passenger compartment.
Sunroof inside air recirculation (if equipped)
The outside (fresh) air position is automatically selected, when the sunroof is opened.
When you select the recirculated air position, the system maintains the recirculated air position for 3 minutes and then automatically converts to the outside (fresh) air position.
When the sunroof is closed, the air intake position will return to the original position that was selected.
WARNING
Reduced visibility
Continued use of the climate control system in the recirculated air position may allow humidity to increase inside the vehicle which may fog the glass and obscure visibility.
WARNING
Sleeping with A/C on
Do not sleep in a vehicle with the air conditioning or heating system on as this may cause serious harm or death due to a drop in the oxygen level and/or body temperature.
WARNING
Recirculated air
Continued use of the climate control system in the recirculated air position can cause drowsiness or sleepiness, and loss of vehicle control. Set the air intake control to the outside (fresh) air position as much as possible while driving.
Fan speed control

The ignition switch must be in the ON position for fan operation.
The fan speed control knob allows you to control the fan speed of the air flowing from the ventilation system. To change the fan speed, turn the knob to the right for higher speed or left for lower speed.
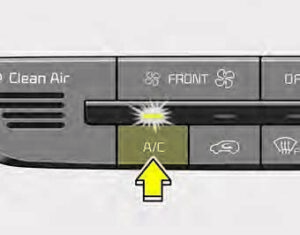
Air conditioning
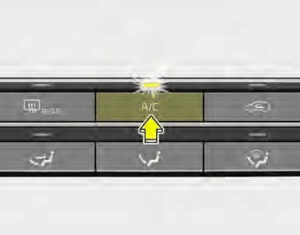
Press the A/C button to turn the air conditioning system on (indicator light will illuminate). Press the button again to turn the air conditioning system off.
Rear
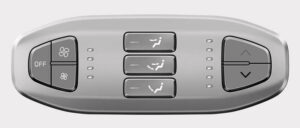
- Rear air conditioning OFF button
- Rear fan speed control button
- Rear mode selection button
- Rear temperature control button
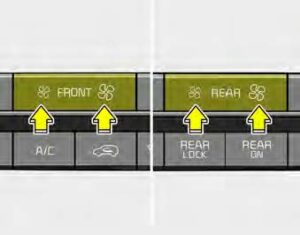
Rear climate control (if equipped)
To turn on the rear climate control system :
From the front seat
- Set the rear climate control selection (REAR ON) button in the front climate control panel to the ON position.
- Set the rear fan speed control knob in the front climate control panel to the desired position.
- Set the rear temperature control knob in the front climate control panel to the desired position.
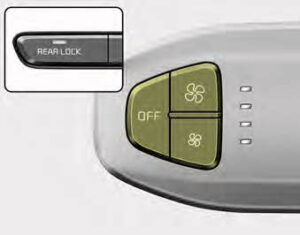
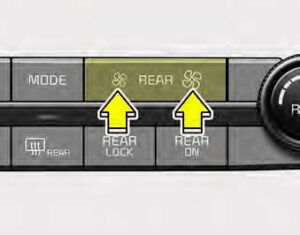
From the rear seat
- Set the rear climate control selection (REAR ON) button in the front climate control panel to the ON position.
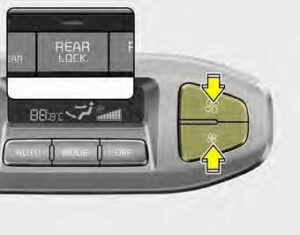
- Set the rear climate control selection (REAR LOCK) button in the front climate control panel to the OFF position.
- Set the rear fan speed control but-ton on the rear climate control panel to the desired position.
- Set the rear temperature control button on the rear climate control panel to the desired position.
- Select the desired rear mode button on the rear climate control panel.
- To turn off the rear air conditioning system, press the off button in the rear climate control panel.
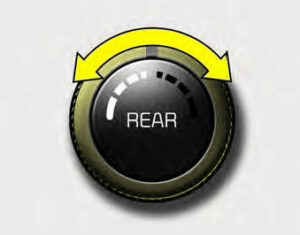
Rear fan speed control
From front seat
Set the rear climate control selection (REAR ON) button to the ON position and turn the rear fan speed control (REAR) knob in the front climate control panel to the desired position.
To change the rear fan speed, turn the knob to the right for higher speed or left for lower speed.
From rear seat
Set the rear climate control selection (REAR ON) button in the front cli-mate control panel to the ON posi-tion and set the rear climate control selection(REAR LOCK) button in the front climate control panel to the OFF position and press the rear fan speed control button on the rear control panel to the desired position.
To turn off the rear air conditioning system press the off button in the rear climate control panel.
Rear temperature control
From front seat
Set the rear climate control selection (REAR ON) button to the ON position and turn the rear temperature control (REAR TEMP) knob in the front climate control panel to the desired position.
To change the rear air temperature, turn the knob to the right position for warm and hot air or left position for cooler air.

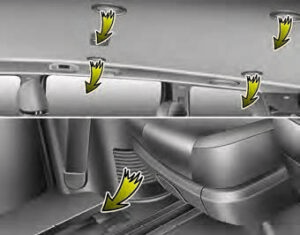
- Rear air blows from the upper vents on the rear ceiling.
Rear air blows from the upper vents on the rear ceiling and the lower vents on the right rear trim together. - Rear air blows from the lower vents on the right rear trim.
Rear vents (if equipped)
NOTICE
If all the vents are closed, it may cause some noise. Always open 2 vents or more.
System operation Ventilation
- Set the mode to the position.
- Set the air intake control to the outside (fresh) air position.
- Set the temperature control to the desired position.
- Set the fan speed control to the desired speed.
Heating
- Set the mode to the position.
- Set the air intake control to the outside (fresh) air position.
- Set the temperature control to the desired position.
- Set the fan speed control to the desired speed.
- If dehumidified heating is desired, turn the air conditioning system (if equipped) on.
- If the windshield fogs up, set the mode to the or position.
Operation Tips
- To keep dust or unpleasant fumes from entering the vehicle through the ventilation system, temporarily set the air intake control to the recirculated air position. Be sure to return the control to the fresh air position when the irritation has passed to keep fresh air in the vehicle. This will help keep the driver alert and comfortable.
Air for the heating/cooling system is drawn in through the grilles just ahead of the windshield. Care should be taken that these are not blocked by leaves, snow, ice or other obstructions.
To prevent interior fog on the wind-shield, set the air intake control to the fresh air position and fan speed to the desired position, turn on the air conditioning system, and adjust the temperature control to desired temperature.
Air conditioning
Kia Air Conditioning Systems are filled with refrigerant*.
- Start the engine. Push the air conditioning button.
- Set the mode to the position.
- Set the air intake control to the outside air or recirculated air position.
- Adjust the fan speed control and temperature control to maintain maximum comfort.
- The refrigerant system should only be serviced by trained and certified technicians to insure proper and safe operation.
The refrigerant system should be serviced in a well-ventilated place.
The air conditioning evaporator (cooling coil) shall never be repaired or replaced with one removed from a used or salvaged vehicle and new replacement MAC evaporators shall be certified (and labeled) as meeting SAE Standard J2842.
CAUTION
Excessive A/C
- When using the air conditioning system, monitor the temperature gauge closely while driving up hills or in heavy traffic when outside temperatures are high. Air conditioning system operation may cause engine overheating. Continue to use the blower fan but turn the air conditioning system off if the temperature gauge indicates engine overheating.
When opening the windows in humid weather air conditioning may create water droplets inside the vehicle. Since excessive water droplets may cause damage to electrical equipment, air conditioning should only be used with the windows closed.
Air conditioning system operation tips
- If the vehicle has been parked in direct sunlight during hot weather, open the windows for a short time to let the hot air inside the vehicle escape.
- To help reduce moisture inside of the windows on rainy or humid days, decrease the humidity inside the vehicle by operating the air conditioning system.
- During air conditioning system operation, you may occasionally notice a slight change in engine speed as the air conditioning com-pressor cycles. This is a normal system operation characteristic.
Use the air conditioning system every month only for a few minutes to ensure maximum system performance. - When using the air conditioning system, you may notice clear water dripping (or even puddling) on the ground under the passenger side of the vehicle. This is a normal system operation characteristic.
- Operating the air conditioning system in the recirculated air position provides maximum cooling, how-ever, continual operation in this mode may cause the air inside the vehicle to become stale.
During cooling operation, you may occasionally notice a misty air flow because of rapid cooling and humid air intake. This is a normal system operation characteristic.
Climate control air filter
The climate control air filter installed behind the glove box filters the dust or other pollutants that come into the vehicle from the outside through the heating and air conditioning system. If dust or other pollutants accumulate in the filter over a period of time, the air flow from the air vents may decrease, resulting in moisture accumulation on the inside of the wind-shield even when the outside (fresh) air position is selected. If this hap-pens, we recommend that the cli-mate control air filter be replaced by an authorized Kia dealer.
NOTICE
- Replace the filter according to the Maintenance Schedule.
If the vehicle is being driven in severe conditions such as dusty or rough roads, more frequent cli-mate control air filter inspections and changes are required.
When the air flow rate suddenly decreases, we recommend that the system should be checked at an authorized Kia dealer.
Air Conditioning refrigerant label
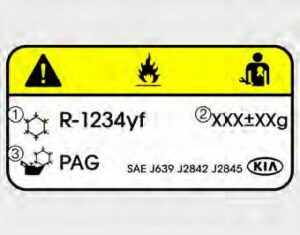
The actual Air Conditioning refrigerant label in the vehicle may differ from the illustration.
Each symbol and specification on the air conditioning refrigerant label is represented below :
- Classification of refrigerant
- Amount of refrigerant
- Classification of Compressor lubricant
You can find out which air conditioning refrigerant is applied to your vehicle on the label inside of the engine room.
Refer to section 8 for more detail on the location of air conditioning refrigerant label.
WARNING
Vehicles equipped with R-1234yf

Because the refrigerant is mildly inflammable and at very high pressure, the air conditioning system should only be serviced by trained and certified technicians.
Checking the amount of air conditioner refrigerant and compressor lubricant
When the amount of refrigerant is low, the performance of the air conditioning is reduced. Overfilling also has a negative influence on the air conditioning system.
Therefore, if abnormal operation is found, have the system inspected by an authorized Kia dealer.
WARNING
The oil and refrigerant in your vehicle’s air conditioning system is under very high pressure. If proper service procedures are not followed an explosion may result. To reduce the risk of serious injury or death, the air conditioning system in your vehicle should only be serviced by trained and certified technicians.
CAUTION
A/C Repair
It is important that the correct type and amount of oil and
refrigerant is used, otherwise damage to the vehicle may occur. To prevent damage, the air conditioning system in your vehicle should only be serviced by trained and certified technicians.
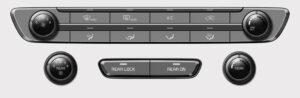
AUTOMATIC CLIMATE CONTROL SYSTEM (IF EQUIPPED)
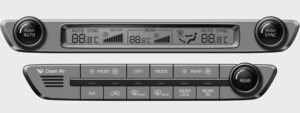
- Driver`s temperature control knob
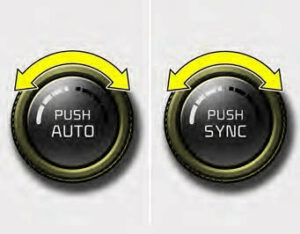
- AUTO(automatic control) button
- A/C display
- Passenger’s temperature control knob
- SYNC temperature control selection button
- Front fan speed control button
- Front blower off button
- Front mode selection button
- Rear fan speed control button
- A/C on button
- Air intake control button
- Front windshield defroster button
- Rear window defroster button
- Rear control lock button
- Rear control on button
- Rear temperature control knob
- Climate information screen selection button
Automatic heating and air conditioning

- Press the AUTO button. The modes, fan speeds, air intake and air-conditioning will be controlled automatically by setting the temperature.

- Turn the temperature control knob to the desired temperature.
NOTICE
- To turn the automatic operation off, select any button or switch of the following:
- Mode selection button
- Air conditioning button
- Front windshield defroster button (Press the button one more time to deselect the front windshield defroster function. The AUTO sign will illuminate on the information display once again.)
- Air intake control button
- Fan speed control switch
The selected function will be controlled manually while other functions operate automatically.
- For your convenience and to improve the effectiveness of the climate control, use the AUTO button and set the temperature to 73°F (23°C).
NOTICE
Never place anything over the sensor located on the instrument panel to ensure better control of the heating and cooling system.
Manual heating and air conditioning
The heating and cooling system can be controlled manually by pressing buttons or turning knob(s) other than the AUTO button. In this case, the system works sequentially according to the order of buttons or knob(s) selected.
- Start the engine.
- Set the mode to the desired position.
For improving the effectiveness of heating and cooling;- Heating:
- Cooling:
- Set the temperature control to the desired position.
- Set the air intake control to the outside (fresh) air position.
- Set the fan speed control to the desired speed.
- If air conditioning is desired, turn the air conditioning system on.
Press the AUTO button in order to convert to full automatic control of the system.
Mode selection
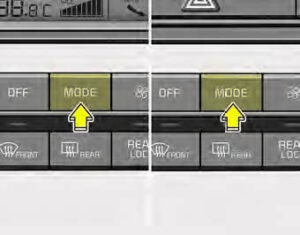
The mode selection button controls the direction of the air flow through the ventilation system.
The air flow outlet port is converted as follows:

Refer to the illustration in the “Manual climate control system”.
Face-Level
Air flow is directed toward the upper body and face. Additionally, each outlet can be controlled to direct the air discharged from the outlet.
Bi-Level
Air flow is directed towards the face and the floor.
Floor-Level
Most of the air flow is directed to the floor, with a small amount of the air being directed to the windshield and side window defrosters.
Floor/Defrost-Level
Most of the air flow is directed to the floor and the windshield with a small amount directed to the side window defrosters.
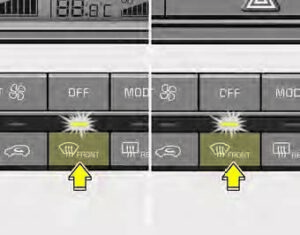 Defrost-Level
Most of the air flow is directed to the windshield with a small amount of air directed to the side window defrosters.

Instrument panel vents
The outlet vents can be opened or closed separately using the thumb-wheel (if equipped).
Also, you can adjust the direction of air flow from these vents using the vent control lever as shown.
Temperature control
The temperature will increase to the maximum (HI) by turning the knob to the extreme right.
The temperature will decrease to the minimum (Lo) by turning the knob to the extreme left.
When turning the knob, the temperature will increase or decrease by 1°F/0.5°C. When set to the lowest temperature setting, the air conditioning will operate continuously.
Adjusting the driver and passenger side temperature equally
- Press the SYNC button to activate SYNC mode. The passenger side temperature will be set to the same temperature as the driver side.
- Operate the driver side temperature control knob. The driver and passenger side temperature will be adjusted equally.
Adjusting the driver and passenger side temperature individually
- Press the SYNC button again to operate the driver and passenger side temperature individually. Also, if the passenger side temperature control knob is operated, it will individually.
- Turn the driver side temperature control knob. The driver and passenger side temperature will be adjusted equally.
When the driver side temperature is set to the highest (HI) or lowest (Lo) temperature setting, the SYNC mode is deactivated for maximum heating or cooling.
Temperature conversion
You can switch the temperature mode from Centigrade to Fahrenheit as follows:
While pressing the OFF button, press the AUTO button for 3 seconds or more.
The display will change from Centigrade to Fahrenheit, or from Fahrenheit to Centigrade.
If the battery has been discharged or disconnected, the temperature mode display will reset to Fahrenheit.
Outside thermometer
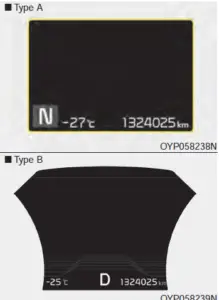
The current outside temperature is displayed in 1°F (1°C) increments. The temperature range is between -40°F ~ 140°F (-40°C ~ 60°C).
- The outside temperature on the display may not change immediately like a general thermometer to prevent the driver from being distracted.
Air intake control
This is used to select the outside (fresh) air position or recirculated air position.
To change the air intake control position, push the control button.
Recirculated air position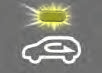
With the recirculated air position selected, air from the passenger compartment will be drawn through the heat-ing system and heated or cooled according to the function selected.
Outside (fresh) air position
If the recirculated air position button is not selected, air enters the vehicle from outside and is heated or cooled according to the function selected.
Prolonged operation of the heater in the recirculated air position (without air conditioning selected) may cause fogging of the windshield and side windows and the air within the passenger compartment may become stale.
In addition, prolonged use of the air conditioning with the recirculated air position selected will result in excessively dry air in the passenger compartment.
Sunroof inside air recirculation (if equipped)
The outside (fresh) air position is automatically selected, when the sunroof is opened.
When you select the recirculated air position, the system maintains the recirculated air position for 3 minutes and then automatically converts to the outside (fresh) air position.
When the sunroof is closed, the air intake position will return to the original position that was selected.
WARNING
Reduced visibility
Continued use of the climate control system in the recirculated air position may allow humidity to increase inside the vehicle which may fog the glass and obscure visibility.
WARNING
Sleeping with A/C on
Do not sleep in a vehicle with the air conditioning or heating system on as this may cause serious harm or death due to a drop in the oxygen level and/or body temperature.
WARNING
Recirculated air
Continued use of the climate control system in the recirculated air position can cause drowsiness or sleepiness, and loss of vehicle control. Set the air intake control to the outside (fresh) air position as much as possible while driving.
Fan speed control
The fan speed can be set to the desired speed by operating the fan speed control button.
To change the fan speed, press ( ) the button for higher speed, or push ( ) the button for lower speed. To turn the fan speed control off, press the front blower OFF button.
Air conditioning
Press the A/C button to turn the air conditioning system on (indicator light will illuminate).
Press the button again to turn the air conditioning system off.
OFF mode
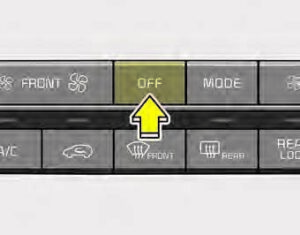
Press the front blower OFF button to turn off the front air climate control system. However, you can still operate the mode and air intake buttons as long as the ignition switch is in the ON position.
Climate information screen selection (for Type B)
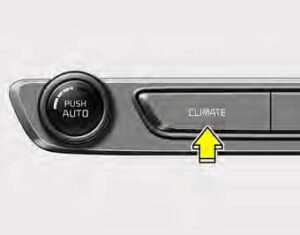
Press the climate information screen selection button to display climate information on the screen.
Rear
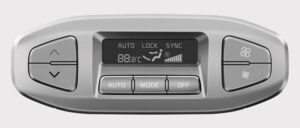
- Rear temperature control button
- Rear AUTO button
- Rear mode selection button
- Rear air conditioning OFF button
- Rear fan speed control button
Rear climate control (if equipped)
To turn on the rear climate control system:
From the front seat
- Set the rear climate control selection (REAR ON) button in the front climate control panel to the ON position.
- Set the rear fan speed control but-ton in the front climate control panel to the desired position.
- Set the rear temperature control knob in the front climate control panel to the desired position. (if equipped)
From the rear seat
- Set the rear climate control selection (REAR ON) button in the front climate control panel to the ON position.
Set the rear climate control selection(REAR LOCK) button in the front climate control panel to the OFF position. - Set the rear fan speed control but-ton on the rear climate control panel to the desired position. Set the rear temperature control button on the rear climate control panel to the desired position.
- Select the desired rear mode but-ton on the rear climate control panel. (if equipped)
- To turn off the rear air conditioning system press the off button in the rear climate control panel.
Rear fan speed control
From front seat
Set the rear climate control selection (REAR ON) button to the ON position and press the rear fan speed control button in the front climate control panel to the desired position.
To change the fan speed, press ( ) the button for higher speed, or press the ( ) the button for lower speed. To turn the fan speed control off, press the REAR ON button.
From rear seat (if equipped)
Set the rear climate control selection (REAR ON) button in the front cli-mate control panel to the ON position and set the rear climate control selection(REAR LOCK) button in the front climate control panel to the OFF position and press the rear fan speed control button on the rear control panel to the desired position.
To change the fan speed, press ( ) the button for higher speed, or press the ( ) the button for lower speed. To turn the fan speed control off, press the rear blower OFF button.
From front seat
Set the rear climate control selection (REAR ON) button to the ON position and press the rear fan speed control button in the front climate control panel to the desired position.
To change the rear air temperature, turn the knob to the right position for warm and hot air or left position for cooler air.
From rear seat
Set the rear climate control selection (REAR ON) button in the front cli-mate control panel to the ON position and set the rear climate control selection(REAR LOCK) button in the front climate control panel to the OFF position and press the rear fan speed control button on the rear control panel to the desired position.
To change the rear air temperature, press the button ( ) for warmer air or press the button ( ) for cooler air.
Rear mode selection (if equipped)
- Front climate control is : Rear air blows from the upper vents on the rear ceiling.
Front climate control is : Rear air blows from the upper vents on the rear ceiling and the lower vents on the right rear trim together.
Front climate control is , : Rear air blows from the lower vents on the right rear trim together.
When the rear climate control selection (REAR ON) button in the front climate control panel is in the ON position and set the rear climate control selection (REAR LOCK) button in the front climate control panel to the OFF position and the rear mode is selected by pushing the rear mode selection button on the rear control panel as follows:
- Rear air blows from the upper vents on the rear ceiling.
Rear air blows from the upper vents on the rear ceiling and the lower vents on the right rear trim together. - Rear air blows from the lower vents on the right rear trim.
Rear vents
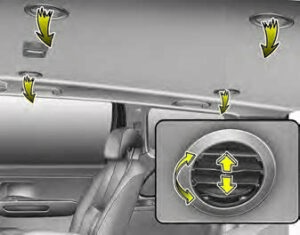
The vent can be adjusted by rotating the blade.
NOTICE
If all the vents are closed, it may cause some noise. Always open 2 vents or more.
System operation Ventilation
- Set the mode to the position.
- Set the air intake control to the outside (fresh) air position.
- Set the temperature control to the desired position.
- Set the fan speed control to the desired speed.
Heating
- Set the mode to the position.
- Set the air intake control to the outside (fresh) air position.
- Set the temperature control to the desired position.
- Set the fan speed control to the desired speed.
- If dehumidified heating is desired, turn the air conditioning system (if equipped) on.
- If the windshield fogs up, set the mode to the or position.
Operation Tips
- To keep dust or unpleasant fumes from entering the vehicle through the ventilation system, temporarily set the air intake control to the recirculated air position. Be sure to return the control to the fresh air position when the irritation has passed to keep fresh air in the vehicle. This will help keep the driver alert and comfortable.
Air for the heating/cooling system is drawn in through the grilles just ahead of the windshield. Care should be taken that these are not blocked by leaves, snow, ice or other obstructions.
To prevent interior fog on the wind-shield, set the air intake control to the fresh air position and fan speed to the desired position, turn on the air conditioning system, and adjust the temperature control to desired temperature.
Air conditioning
Air Conditioning System in this vehicle is filled with R-134a refrigerant.
- Start the engine. Press the air conditioning button.
- Set the mode to the position.
- Set the air intake control to the out-side air or recirculated air position.
- Adjust the fan speed control and temperature control to maintain maximum comfort.
- When maximum cooling is desired, set the temperature control to the extreme left position, set the mode control to the MAX A/C position, then set the fan speed control to the highest speed.
CAUTION
Excessive A/C
When using the air conditioning system, monitor the engine coolant closely while driving up hills or in heavy traffic when out-side temperatures are high. Air conditioning system operation may cause engine overheating and potential engine damage. Continue to use the blower fan but turn the air conditioning system off if the engine coolant
temperature gauge indicates engine overheating.
NOTICE
When opening the windows in humid weather, air conditioning may create water droplets inside the vehicle. Since excessive water droplets may cause damage to electrical equipment, air conditioning should only be used with the windows closed.
Air conditioning system operation tips
- If the vehicle has been parked in direct sunlight during hot weather, open the windows for a short time to let the hot air inside the vehicle escape.
- To help reduce moisture inside of the windows on rainy or humid days, decrease the humidity inside the vehicle by operating the air conditioning system.
During air conditioning system operation, you may occasionally notice a slight change in engine speed as the air conditioning com-pressor cycles. This is a normal system operation characteristic. - Use the air conditioning system every month only for a few minutes to ensure maximum system performance.
- When using the air conditioning system, you may notice clear water dripping (or even puddling) on the ground under the passenger side of the vehicle. This is a normal system operation characteristic.
- Operating the air conditioning system in the recirculated air position provides maximum cooling, how-ever, continual operation in this mode may cause the air inside the vehicle to become stale.
During cooling operation, you may occasionally notice a misty air flow because of rapid cooling and humid air intake. This is a normal system operation characteristic.
Climate control air filter
The climate control air filter installed behind the glove box filters the dust or other pollutants that come into the vehicle from the outside through the heating and air conditioning system. If dust or other pollutants accumulate in the filter over a period of time, the air flow from the air vents may decrease, resulting in moisture accumulation on the inside of the windshield even when the outside (fresh) air position is selected. If this happens, have the cli-mate control air filter replaced by an authorized Kia dealer.
NOTICE
- Replace the filter every 15,000 miles or once a year.
If the vehicle is being driven in severe conditions such as dusty or rough roads, more frequent air conditioner filter inspections and changes are required.
When the air flow rate suddenly decreases, the system should be checked at an authorized Kia dealer.
Air Conditioning refrigerant label
The actual Air Conditioning refrigerant label in the vehicle may differ from the illustration.
Each symbol and specification on the air conditioning refrigerant label is represented below ;
- Classification of refrigerant
- Amount of refrigerant
- Classification of Compressor lubricant
You can find out which air conditioning refrigerant is applied to your vehicle on the label inside of the engine room.
Refer to section 8 for more detail on the location of air conditioning refrigerant label.
WARNING
Vehicles equipped with R-1234yf
Because the refrigerant is mildly inflammable and at very high pressure, the air conditioning system should only be serviced by trained and certified technicians.
It is important that the correct type and amount of oil and refrigerant is used.
Otherwise, it may cause damage to the vehicle and bodily injury.
Checking the amount of air conditioner refrigerant and compressor lubricant
When the amount of refrigerant is low, the performance of the air conditioning is reduced. Overfilling also has a negative influence on the air conditioning system.
Therefore, if abnormal operation is found, have the system inspected by an authorized Kia dealer.
WARNING
The oil and refrigerant in your vehicle’s air conditioning system is under very high pressure. If proper service procedures are not followed an explosion may result. To reduce the risk of serious injury or death, the air conditioning system in your vehicle should only be serviced by trained and certified technicians.
CAUTION
A/C Repair
It is important that the correct type and amount of oil and
refrigerant is used, otherwise damage to the vehicle may occur. To prevent damage, the air conditioning system in your vehicle should only be serviced by trained and certified technicians.
Automatic intake control system (if equipped)
When the heater or the air conditioner is operated, if the recirculated air position is maintained at low temperature for a certain time, the outside (fresh) air position will be selected automatically for ventilation of the vehicle.
To cancel/return to the Automatic intake control system
Select the vent mode ( ) at the ignition ON to cancel or be returned to the automatic intake control system. Then while pressing the air conditioning button (A/C), press the air intake control button at least 5 times within 3 seconds.
The indicator in the intake control button blinks 3 times with 0.5 second of interval. It indicates that the automatic intake logic is canceled. In the other case, the indicator blinks 6 times with 0.25 second of interval. It also indicates that the automatic intake logic is returned to programmed status.
If the battery has been discharged or disconnected, it is reset to the defog logic status.
FAQs
The Kia Sedona 2020’s climate control system regulates the temperature, airflow, and distribution of air inside the vehicle’s cabin.
The Kia Sedona 2020 has a dual-zone automatic climate control system, which allows the driver and front passenger to set different temperature preferences.
The Kia Sedona 2020 does have manual controls for temperature, fan speed, and airflow direction.
Yes, the Kia Sedona 2020 has rear-seat climate control, which allows passengers in the back rows to independently adjust the temperature and airflow.
Yes, the Kia Sedona 2020 has air vents in each row, ensuring that each passenger receives the desired amount of airflow.
Yes, the Kia Sedona 2020 has a temperature control for both the driver and front passenger zones.
Yes, the Kia Sedona 2020’s climate control system includes a cabin air filter that helps remove dust, pollen, and other airborne particles.
No, there is no remote climate control on the Kia Sedona 2020. The system is operable from within the vehicle.
Yes, the Kia Sedona 2020 has a defrost function that aids in the removal of frost, ice, and condensation from the windshield and side windows.
For your convenience, the Kia Sedona 2020 allows you to sync the temperature settings between the driver and passenger sides.
The Kia Sedona 2020 has an automatic mode in which the system adjusts the temperature and fan speed based on the temperature set
No, there is no voice command feature for controlling the climate control system in the Kia Sedona 2020.
Yes, the Kia Sedona 2020 has a rear window defroster that assists in the removal of ice and fog from the rear window.
Yes, the Kia Sedona 2020 has controls that allow you to change the direction of the airflow.
The Kia Sedona 2020 has separate temperature control for the rear seats, allowing passengers to set their preferred temperature.
Useful Links
View Full User Guide: Kia Sedona User Manual | Auto User Guide
Download Manuals: Owner’s Manuals and Documents | Kia