Kia Sportage PHEV 2023 Flat Tire (With Spare Tire), (With Tire Mobility Kit) and Towing
Understanding flat tire and towing directions in the 2023 Kia Sportage PHEV is essential for maintaining safety and delivering a pleasant driving experience. While towing instructions describe the right steps and precautions to take when towing the vehicle, whether as a result of a breakdown or other circumstances, flat tire instructions provide guidance on properly changing a flat tire using the vehicle’s spare. Owners of the 2023 Kia Sportage PHEV can feel safer and have more peace of mind by following these guidelines, which are outlined in the owner’s manual. These instructions give drivers the knowledge they need to handle unforeseen events on the road. Understanding the flat tire and towing requirements in the 2023 Kia Sportage PHEV is crucial for guaranteeing safety and being ready for unforeseen road mishaps. The flat tire recommendations offer detailed advice on how to securely replace a flat tire with the spare, enabling drivers to quickly handle unforeseen punctures. While focusing on safety and limiting potential damage, the towing rules provide essential information on the right steps and safeguards to take when the car needs to be towed due to breakdowns or other emergency situations. These instructions, which are easily accessible in the owner’s manual, give Kia Sportage PHEV drivers the knowledge and assurance they need to appropriately handle unexpected roadside situations, encouraging safety and peace of mind on their travels.
2023 KIA SPORTAGE Specs, Price, Features and Mileage (Brochure)
If you have a flat tire (with a spare tire) (if equipped)
If you have a flat tire, you can change the flat tire to a spare tire using tools.
WARNING
Driving on a flat tire will cause permanent damage to the tire. Re-inflating a tire after it has been driven on while severely underinflated or flat may cause a blowout and a serious crash. Never attempt to re-inflate a tire that has been driven on while severely underinflated or flat. In this case, repair or replace the flat tire as soon as possible.
WARNING
Changing a tire can be dangerous. Follow the instructions in this section when changing a tire to reduce the risk of serious injury or death.
CAUTION
Be careful as you use the jack handle to stay clear of the flat end. The flat end has sharp edges that could cause cuts.
Jack and tools
The jack, jack handle, and wheel lug nut wrench are stored in the luggage compartment.
Pull up the luggage box cover to reach this equipment.
- Jack handle
- Jack
Wheel lug nut wrench
Jacking instructions
The jack is provided for emergency tire changing only.
- To prevent the jack from “rattling” while the vehicle is in motion, store it properly.
- Follow jacking instructions to reduce the possibility of personal injury.
WARNING
Changing tires
- Never attempt vehicle repairs in the traffic lanes of a public road or highway.
- Always move the vehicle completely off the road and onto the shoulder before trying to change a tire. The jack should be used on firm level ground. If you cannot find a firm level place off the road, call a towing service company for assistance.
- Be sure to use the correct front and rear jacking positions on the vehicle; never use the bumpers or any other part of the vehicle for jacking support.
- The vehicle can roll off the jack causing serious injury or death.
- Do not go under a vehicle that is supported by a jack.
- Do not start or run the engine while the vehicle is on the jack.
- Do not allow anyone to remain in the vehicle while it is on the jack.
- Make sure any children present are in a secure place, away from the road and from the vehicle to be raised with the jack.
WARNING
Tire jack
Do not place any portion of your body under a vehicle that is only supported by a jack since the vehicle can easily roll off the jack. Use vehicle support stands.
WARNING
Changing tires
Never attempt vehicle repairs in the traffic lanes of a public road or highway.
WARNING
Running a vehicle on jack
Do not start or run the engine of the vehicle while the vehicle is on the jack as this may cause the vehicle to fall off the jack.
To prevent the jack from “rattling” while the vehicle is in motion, store it properly.
NOTICE
Retreaded tires
Possibly substantial variations in the design and age of the tire casing structures can limit service life and have a negative impact on road safety.
Removing and storing the spare tire
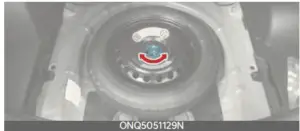
Your spare tire is stored in the cargo area.
- Turn the tire hold-down wing bolt counterclockwise to remove.
- Store the tire in the reverse order of removal.
- To prevent the spare tire and tools from “rattling” while the vehicle is in motion, store them properly.
WARNING
Touching surface of the luggage room floor
Do not touch the metal surface of the luggage room floor while the engine is operating or hot. Doing so could result in serious bodily injury.
Turn the engine off and wait until it cools down or wear gloves to remove the spare tire from the luggage room.
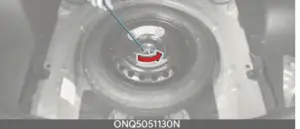
If it is hard to loosen the tire hold-down wing bolt by hand, you can loosen it easy

- Put the jack inside of the tire hold- down wing bolt.
- Turn the tire hold-down wing bolt counterclockwise with the jack handle.
Use caution when utilizing the sharp jack handle.
Changing tires
WARNING
A vehicle can slip or roll off of a jack causing serious injury or death to you or those nearby. Take the following safety precautions:
- Never place any portion of your body under a vehicle that is supported by a jack.
- NEVER attempt to change a tire in the lane of traffic. ALWAYS move the vehicle completely off the road on level, firm ground away from traffic before trying to change a tire. If you cannot find a level, firm place off the road, call a towing service for assistance.
- Be sure to use the jack provided with the vehicle.
- ALWAYS place the jack on the designated jacking positions on the vehicle and NEVER on the bumpers or any other part of the vehicle for jacking support.
- Do not start or run the engine while the vehicle is on the jack.
- Do not allow anyone to remain in the vehicle while it is on the jack.
- Keep children away from the road and the vehicle.
- Park on a level surface and apply the parking brake firmly.
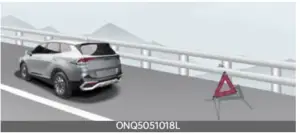
- Shift the gear to P (Park), apply the parking brake, and turn the engine OFF.
- Activate the hazard warning flasher.
- Remove the wheel lug nut wrench, jack, jack handle, and spare tire from the vehicle.
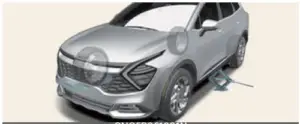
- Block both the front and rear of wheel that is diagonally opposite the jack position.
 WARNING
Jack location
To reduce the possibility of injury, be sure to only use the jack provided with the vehicle in the correct jack position; never use any other part of the vehicle for jack support.
WARNING
Changing a tire
- To prevent vehicle movement while changing a tire, always set the park-ing brake fully, and always block the wheel diagonally, opposite the wheel being changed.
- We recommend that the wheels of the vehicle be blocked, and that no per-son remain in a vehicle that is being jacked.
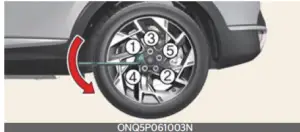
- Loosen the wheel lug nuts counterclockwise one turn each, but do not remove any nut until the tire has been raised off the ground.
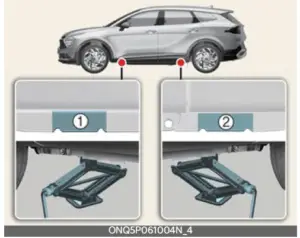
- Place the jack at the front (1) or rear (2) jacking position closest to the tire you are changing. Place the jack at the designated locations under the frame. The jacking positions are plates welded to the frame with two tabs and a raised dot to index with the jack.
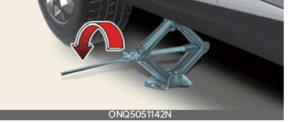
- Insert the jack handle into the jack and turn it clockwise, raising the vehicle until the tire just clears the ground. This measurement is approximately 1.2 inches (30 mm). Before removing the wheel lug nuts, make sure the vehicle is stable and that there is no chance for movement or slippage.
- Loosen the wheel nuts and remove them with your fingers. Slide the wheel off the studs and lay it flat so it cannot roll away. To put the wheel on the hub, pick up the spare tire, line up the holes with the studs and slide the wheel onto them.
If this is difficult, tip the wheel slightly and get the top hole in the wheel lined up with the top stud. Then jiggle the wheel back and forth until the wheel can be slid over the other studs. - To reinstall the wheel, hold it on the studs, put the wheel nuts on the studs and tighten them finger tight. Jiggle the tire to be sure it is completely seated, then tighten the nuts as much as possible with your fingers again.
- Lower the vehicle to the ground by turning the wheel nut wrench counterclockwise
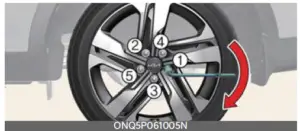
Then position the wrench as shown in the drawing and tighten the wheel nuts. Be sure the socket is seated completely over the nut. Do not stand on the wrench handle or use an extension pipe over the wrench handle. Go around the wheel tightening every other nut until they are all tight. Then double-check each nut for tight-ness. After changing wheels, have the system checked by an authorized Kia dealer.
WARNING
Installing a wheel
- When you install a wheel, always remove any corrosion, dirt or foreign materials present on the mounting surfaces of the wheel or the surface of the wheel hub, brake drum or brake disc that contacts the wheel. Make sure to secure any fasteners that attach the rotor to the hub so they do not interfere with the mounting sur-faces of the wheel. Installing wheels without correct metal-to-metal con-tact at the wheel mounting surfaces can cause the wheel nuts to loosen and the wheel to come off while your vehicle is in motion, resulting in loss of vehicle control, personal injury or death.
- Make sure the wheel makes good contact with the hub when installed. If the contact of the mounting surface between the wheel and hub is not good, the wheel nuts could come loose and cause the loss of a wheel. Loss of a wheel may result in loss of control of the vehicle.
Wheel nut tightening torque:
Steel wheel & aluminum alloy wheel:
79 ~ 94 lbf·ft (11 ~ 13 kgf·m)
If you have a tire gauge, remove the valve cap and check the air pressure. If the pressure is lower than recom-mended, drive slowly to the nearest service station and inflate to the correct pressure. If it is too high, adjust it until it is correct. Always reinstall the valve cap after checking or adjusting tire pressure. If the cap is not replaced, air may leak from the tire. If you lose a valve cap, buy another and install it as soon as possible.
After you have changed wheels, always secure the flat tire in its place and return the jack and tools to their proper storage locations.
CAUTION
Reusing lug nuts
Make certain during wheel removal that the same nuts that were removed are reinstalled – or, if replaced, that nuts with metric threads and the same chamfer configuration are used. Your vehicle has metric threads on the wheel studs and nuts. Installation of a non-metric thread nut on a metric stud will not secure the wheel to the hub properly and will dam-age the stud so that it must be replaced.
Note that most lug nuts do not have metric threads. Be sure to use extreme care in checking for thread style before installing aftermarket lug nuts or wheels. If in doubt, consult an authorized Kia dealer.
WARNING
Wheel studs
If the studs are damaged, they may lose their ability to retain the wheel. This could lead to the loss of the wheel and a collision resulting in serious injuries.
WARNING
Never use oil or grease on bolts or nuts because the nuts might come loose. The vehicle’s wheel could fall off, causing a crash.
Important – use of compact spare tire (if equipped)
Your vehicle is equipped with a compact spare tire. This compact spare tire takes up less space than a regular-size tire. This tire is smaller than a conventional tire and is designed for temporary use only.
- You should drive carefully when the compact spare is in use. The compact spare should be replaced by the proper conventional tire and rim at the first opportunity.
- The operation of this vehicle is not recommended with more than one compact spare tire in use at the same time.
WARNING
Spare tire
The compact spare tire is for emergency use only. Do not operate your vehicle on this compact spare at speeds over 50 mph (80 km/h). The original tire should be repaired or replaced as soon as possible to avoid failure of the spare, possibly leading to bodily injury or death.
The compact spare tire should be inflated to 60 psi (420 kPa).
NOTICE
Check the inflation pressure after installing the spare tire. Adjust it to the specified pressure, as necessary.
When using a compact spare tire, observe the following precautions:
- Under no circumstances should you exceed 50 mph (80 km/h); a higher speed could damage the tire.
- Ensure that you drive slowly enough for the road conditions to avoid all hazards. Any road hazard, such as a pothole or debris, could seriously damage the compact spare.
- Any continuous road use of this tire could result in tire failure, loss of vehicle control, and possible personal injury.
- Do not exceed the vehicle’s maximum load rating or the load-carrying capacity shown on the sidewall of the compact spare tire.
- Avoid driving over obstacles. The compact spare tire diameter is smaller than the diameter of a conventional tire and reduces the ground clearance approximately 1 inch (25 mm), which could result in damage to the vehicle.
- Do not take this vehicle through an automatic vehicle wash while the compact spare tire is installed.
- Do not use tire chains on the compact spare tire. Because of the smaller size, a tire chain will not fit properly. This could damage the vehicle and result in loss of the chain.
- Do not use the compact spare tire on any other vehicle because this tire has been designed especially for your vehicle.
- The compact spare tire’s tread life is shorter than a regular tire. Inspect your compact spare tire regularly and replace worn compact spare tires with the same size and design, mounted on the same wheel.
- The compact spare tire should not be used on any other wheels, nor should standard tires, snow tires, wheel covers or trim rings be used with the compact spare wheel. If such use is attempted, damage to these items or other vehicle components may occur.
- Do not use more than one compact spare tire at a time.
- Do not tow a trailer while the compact spare tire is installed.
2023 KIA SPORTAGE Specs, Price, Features and Mileage (Brochure)
Jack label
Type A
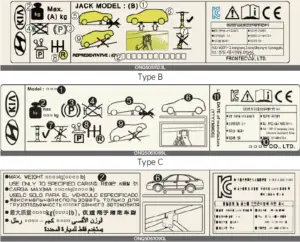
The actual Jack label in the vehicle may differ from the illustration. For more detailed specifications, refer to the label attached to the jack.
- Model Name
- Maximum allowable load
- When using the jack, set your parking brake.
- When using the jack, stop the engine.
- Do not get under a vehicle that is supported by a jack.
- The designated locations under the frame
- When supporting the vehicle, the base plate of the jack must be vertical under the lifting point.
- Move the shift position to the P (Park) position on vehicles.
- The jack should be used on the firm-level ground.
- Jack manufacturer
- Production date
- Representative company and address
If you have a flat tire (with tire mobility kit) (if equipped)
For safe operation, carefully read and follow the instructions in this manual before use.
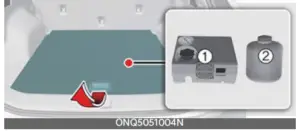
- Compressor
- Sealant bottle
The Tire Mobility Kit is a temporary fix to the tire and have your vehicle inspected by an authorized Kia dealer.
CAUTION
One sealant for one tire
When two or more tires are flat, do not use the tire mobility kit because the supported sealant of Tire Mobility Kit is only used for one flat tire.
WARNING
Do not use the Tire Mobility Kit to repair punctures in the tire walls. This can result in an accident due to tire failure.
WARNING
Have your tire repaired as soon as possible? The tire may lose air pressure at any time after inflating with the Tire Mobility Kit.
Introduction
With the Tire Mobility Kit you stay mobile even after experiencing a tire puncture.
The system of compressor and sealing compound effectively and comfortably seals most punctures in a passenger car tire caused by nails or similar objects and reflates the tire.
After you ensured that the tire is properly sealed you can drive cautiously on the tire (distance up to 120 miles (200 km)) at a max. speed of 50 mph (80 km/h) in order to reach a service station or tire dealer to have the tire replaced.
It is possible that some tires, especially with larger punctures or damage to the sidewall, cannot be sealed completely.
Air pressure loss in the tire may adversely affect tire performance.
For this reason, you should avoid abrupt steering or other driving maneuvers, especially if the vehicle is heavily loaded or if a trailer is in use.
The Tire Mobility Kit is not designed or intended as a permanent tire repair method and is to be used for one tire only. This instruction shows you step by step how to temporarily seal the puncture simply and reliably.
Read the section “Notes on the safe use of the Tire Mobility Kit” on page 7-26.
WARNING
Do not use the TMK if a tire is severely damaged by driving run flat or with insufficient air pressure.
Only punctured areas located within the tread region of the tire can be sealed using the TMK.
Components of the Tire Mobility Kit
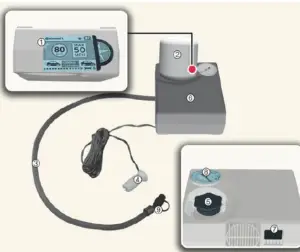
- Speed-restriction label
- Sealant bottle
- Filling hose from sealant bottle to wheel
- Connectors and cable for the power outlet direct connection
- Holder for the sealant bottle
- Compressor
- ON/OFF switch
- Pressure gauge for displaying the tire inflation pressure
- Valve for reducing the tire inflation pressure
Connectors, cable and connection hose are stored in the compressor housing.
Strictly follow the specified sequence, otherwise the sealant may escape under high pressure.
WARNING
Expired sealant
Do not use the Tire sealant after the sealant has expired (i.e. past the expiration date on the sealant container). This can increase the risk of tire failure.
WARNING
Sealant
- Keep out of reach of children.
- Avoid contact with eyes.
- Do not swallow.
Using the Tire Mobility Kit
CAUTION
Detach the speed restriction label from the sealant bottle, and place it in a highly visible place inside the vehicle such as on the steering wheel to remind the driver not to drive too fast.
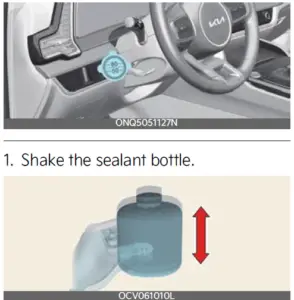
- Remove the cap of the sealant bottle and screw connection hose onto the connector of the sealant bottle.
- . Ensure that valve on the compressor is locked.
- Unscrew the valve cap from the valve of the defective tire and screw the fill-ing hose of the sealant bottle onto the tire valve.
CAUTION
Securely install the sealant filling hose on the valve. If not, sealant may flow backward, possibly clogging the filling hose. - Ensure that the compressor is switched off, position 0.
- Connect between the compressor and the vehicle power outlet using the cable and connectors.
- Make the ENGINE START/STOP but-ton position on or the ignition switch position on.
- Switch on the compressor and let it run for approximately 5 ~ 7 minutes to fill the sealant up to proper pressure. (refer to “Tires and wheels” on page 8-31). The inflation pressure of the tire after a filling is unimportant and will be checked/corrected later. Be careful not to overinflate the tire and stay away from the tire when filling it. When the tire and wheel are damaged, do not use Tire Mobility Kit for your safety.
WARNING
If the tire pressure is below 26psi(180kPa), do not drive the vehicle. The tire may cause an accident. - Switch off the compressor.
- Detach the sealant filling hoses from the sealant bottle connector and from the tire valve. After using, leave the sealant bottle and the compressor attached together.
Return the TMK to its storage location in the vehicle.
WARNING
Carbon monoxide
Do not leave your vehicle running in a poorly ventilated area for extended periods of time. Carbon monoxide poisoning and suffocation can occur.
Distributing the sealant
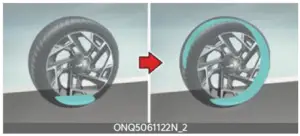
- Immediately drive approximately 4 ~ 6 miles (7 ~ 10 km or, about 10min) to evenly distribute the sealant in the tire.
CAUTION
Do not exceed a speed of 50 mph (80 km/h). If possible, do not fall below a speed of 12 mph (20 km/h).
While driving, if you experience any unusual vibration, ride disturbance or noise, reduce your speed and drive with caution until you can safely pull off of the side of the road. Call for road side service or towing.
When you use the Tire Mobility Kit, the wheel may be stained by a sealant. Therefore, remove the wheel stained by sealant and have the vehicle inspected at an authorized Kia dealer.
Checking the tire inflation pressure
- After driving approximately 4 ~ 6 miles (7 ~ 10 km or about 10 min), stop at a safe location.
- Connect the filling hose of the compressor directly to the tire valve.
- Connect between the compressor and the vehicle power outlet using the cable and connectors.
- Adjust the tire inflation pressure to the recommended tire inflation.
With the ignition switched on, proceed as follows.
- To increase the inflation pressure:
Switch on the compressor. To check the current inflation pressure setting, briefly switch off the com-pressor. - To reduce the inflation pressure:
Turn the valve on the compressor.
WARNING
Do not let the compressor run for more than 10 minutes, otherwise the device will overheat and may be damaged.
CAUTION
If the inflation pressure is not maintained, drive the vehicle a second time, refer to “Distributing the sealant” on page 7-25. Then repeat steps 1 to 4.
Use of the TMK may be ineffectual for tire damage larger than approximately 0.16 of an inch (4 mm).
Please contact the nearest Kia dealer-ship if the tire cannot be made roadworthy with the Tire Mobility Kit.
WARNING
The tire inflation pressure must be at least 180 kPa (26 psi). If it is not, do not continue driving. Call for roadside service or towing.
NOTICE
When reinstalling the repaired or replaced tire and wheel on the vehicle, tighten the wheel lug nut to 79 ~ 94 lbf·ft (11 ~ 13 kgf·m).
Notes on the safe use of the Tire Mobility Kit
- Park your car at the side of the road so that you can work with the TMK away from moving traffic. Place your warning triangle in a prominent place to make passing vehicles aware of your location.
- To be sure your vehicle will not move, even when you’re on fairly level ground, always set your parking brake.
- Only use the TMK for sealing/inflation passenger car tires. Do not use it on motorcycles, bicycles, or any other type of tires.
- Do not remove any foreign objects such as nails or screws -that have penetrated the tire.
- Before using the TMK, read the precautionary advice printed on the sealant bottle!
- Provided the car is outdoors, leave the engine running. Otherwise operating the compressor may eventually drain the car battery.
- Never leave the TMK unattended while it is being used.
- Do not leave the compressor running for more than 10 min. at a time or it may overheat.
- Do not use the TMK if the ambient temperature is below -22°F (-30°C).
- When the tire and wheel are damaged, do not use Tire Mobility Kit for your safety.
Technical Data
- System voltage: DC 12 V
- Working voltage: DC 12 V
- Amperage rating: max. 15 A
- Suitable for use at temperatures: -22 to 158 °F (-30 to 70 °C)
- Max. working pressure: 101 psi (7 bar
- Size
- Compressor: 150 x 130 x 60 mm (5.9 x 5.1 x 2.4 in.)
- Sealant bottle: 115.3 x 87.3 ø mm (4.5 x 3.4 ø in.)
- Compressor weight: 620 g (1.36 lbs) Sealant volume: 400 ml (24.4 cu. in.)
Sealant and spare parts can be obtained and replaced at an authorized vehicle or tire dealer. Empty seal-ant bottles may be disposed of at home. Liquid residue from the sealant should be disposed of by your vehicle or tire dealer or in accordance with local waste disposal regulations.
Towing
Towing service
If emergency towing is necessary, have it done by an authorized Kia dealer or a commercial tow-truck service.
Proper lifting and towing procedures are necessary to prevent damage to the vehicle. The use of wheel dollies (1) or flatbeds is recommended.
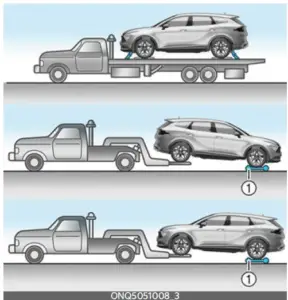
CAUTION
The AWD vehicle should never be towed with the wheels on the ground. This can cause serious damage to the transmission or the AWD system.
WARNING
Side and curtain air bag
If your vehicle is equipped with side and curtain air bag, set the ENGINE START/STOP button to ACC position when the vehicle is being towed.
The side and curtain air bag may deploy when the ENGINE START/STOP button to ON position and the rollover sensor detects the situation as a rollover.
NOTICE
If the EPB does not release normally, take your vehicle to an authorized Kia dealer by loading the vehicle on a flat-bed tow truck and have the system checked.
When flatbed is unavailable
2-wheel drive vehicle can be towed with the opposite tires on the ground (without dollies) and parking brake released.
2-wheel drive vehicle (front wheel drive)
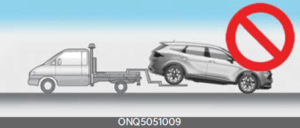
Shift to N (Neutral) to tow a vehicle with the tires on the ground. For more details, refer to “Stay in N (Neutral) position when engine is Off” on page 6-15.
WARNING
Side and curtain air bag
If your vehicle is equipped with side and curtain air bag, set the ENGINE START/STOP button to ACC position when the vehicle is being towed.
The side and curtain air bag may deploy when the ENGINE START/STOP button to ON position and the rollover sensor detects the situation as a rollover.
CAUTION
Towing gear position
Failure to shift to N (Neutral) may cause internal damage to the vehicle.
CAUTION
- If any of the loaded wheels or suspension components are damaged or the vehicle is being towed with the front wheels on the ground, use a towing dolly under the front wheels.
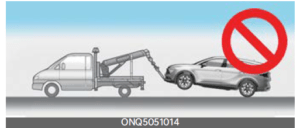
- Do not tow the vehicle backwards with the front wheels on the ground, as this may cause damage to the transmission.
2-wheel drive vehicle (front wheel drive) - Attaching straps to the chassis, suspension or other parts of the body can cause damage.
- Do not tow with sling-type equipment.
Use wheel lift or flatbed equipment. - Do not tow the vehicle with four wheels in contact with the ground if it is the vehicle equipped with Automatic Transmission. Otherwise, the transmission will be seriously dam-aged. Also, make sure not to tow the vehicle connecting it with other vehicles including camper vans.
WARNING
- If you tow the vehicle while the front wheels are touching the ground, the vehicle motor may generate electricity and the motor components may be damaged or a fire may occur.
- When a vehicle fire occurs due to the battery, there is a risk of a second fire. Contact the fire department when towing the vehicle.
Towing without wheel dollies when using a towing service
When towing your vehicle in an emergency without wheel dollies:
- Set the ignition switch or ENGINE START/STOP button to ACC position.
- Place the shifter dial in N (Neutral).
- Release the parking brake.
2-wheel drive vehicle (front wheel drive)
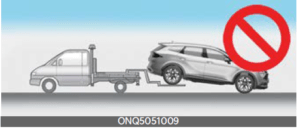
CAUTION
Towing gear position
Failure to shift to N (Neutral) may cause internal damage to the vehicle.
CAUTION
- If any of the loaded wheels or suspension components are damaged or the vehicle is being towed with the front wheels on the ground, use a towing dolly under the front wheels.
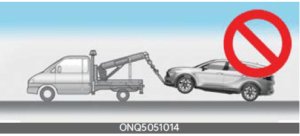
- Do not tow the vehicle backwards with the front wheels on the ground, as this may cause damage to the transmission.
2-wheel drive vehicle (front wheel drive)
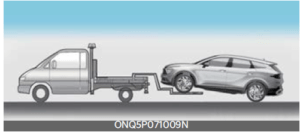
- Attaching straps to the chassis, suspension or other parts of the body can cause damage.
- Do not tow with sling-type equipment.
Use wheel lift or flatbed equipment. - Do not tow the vehicle with four wheels in contact with the ground if it is the vehicle equipped with Automatic Transmission. Otherwise, the transmission will be seriously dam-aged. Also, make sure not to tow the vehicle connecting it with other vehicles including camper vans.
WARNING
- If you tow the vehicle while the front wheels are touching the ground, the vehicle motor may generate electricity and the motor components may be damaged or a fire may occur.
- When a vehicle fire occurs due to the battery, there is a risk of a second fire. Contact the fire department when towing the vehicle.
Emergency towing.
Front
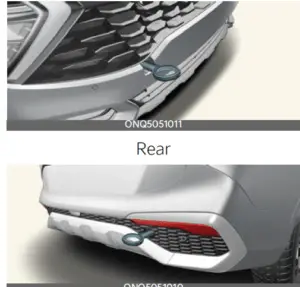
If towing is necessary, we recommend you have it done by an authorized Kia dealer or a commercial tow truck ser-vice.
If a towing service is not available in an emergency, your vehicle may be tempo-rarily towed using a cable or chain secured to the emergency towing hook at the front (or rear) of the vehicle.
Use extreme caution when towing the vehicle with a cable or chain. A driver must be in the vehicle to steer it and operate the brakes.
Towing in this manner may be done only on hard-surfaced roads for a short distance and at low speeds. Also, the wheels, axles, power train, steering and brakes must all be in good condition.
CAUTION
The driver must be in the vehicle for steering and braking operations when the vehicle is being towed. Passengers other than the driver must not be in the vehicle.
Always follow these emergency towing precautions:
- Place the ignition switch in the ACC position so the steering wheel is not locked.
- Place the shift button in N (Neutral).
- Release the parking brake.
- Depress the brake pedal with more force than normal as you will have reduced braking performance.
- More steering effort will be required because the power steering system will be disabled.
- Use a vehicle heavier than your own to tow your vehicle.
- The drivers of both vehicles should communicate with each other frequently.
- Before emergency towing, check that the hook is not broken or damaged.
- Fasten the towing cable or chain securely to the hook.
- Do not jerk the hook. Apply steady and even force.
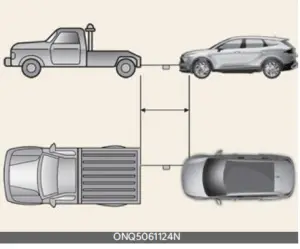
- Use a towing cable or chain less than 16 feet (5 m) long. Attach a white or red cloth (about 12 inches (30 cm) wide) in the middle of the cable or chain for easy visibility.
- Drive carefully so the towing cable or chain remains tight during towing.
- Before towing, check the automatic transmission for fluid leaks under your vehicle. If the automatic trans-mission fluid is leaking, flatbed equip-ment or a towing dolly must be used.
NOTICE
- Accelerate or decelerate the vehicle in a slow and gradual manner while maintaining tension on the tow rope or chain to start or drive the vehicle, otherwise tow hooks and the vehicle may be damaged.
- To avoid damage to your vehicle and vehicle components when towing:
- Always pull straight ahead when using the towing hooks. Do not pull from the side or at a vertical angle.
- Do not use the towing hooks to pull a vehicle out of mud, sand or other conditions from which the vehicle cannot be driven out under its own power.
- Limit the vehicle speed to 10 mph (15 km/h) and drive less than 1 mile (1.5 km) when towing to avoid serious damage to the automatic trans-mission.
FAQ
The flat tire guidelines provide step-by-step instructions on how to safely change a flat tire using the spare tire.
The location of the spare tire may vary, but it’s typically found in the trunk or cargo area of the vehicle.
Basic tools such as a jack, lug wrench, and the spare tire itself are required to change a flat tire.
Repairing a flat tire is possible if the damage is minor and within specific guidelines. Consult the owner’s manual for details.
Ensure that the vehicle is on a flat, stable surface, engage the parking brake, and follow the provided instructions carefully to avoid accidents.
The spare tire is typically designed for temporary use and should be replaced with a full-size tire as soon as possible.
Check the spare tire’s inflation pressure regularly, and ensure it is in good condition by inspecting it visually.
The towing guidelines provide information on how to properly tow the vehicle, including recommended towing methods and precautions.
It’s essential to follow the recommended towing methods and use appropriate equipment designed for towing vehicles.
The maximum towing capacity can be found in the owner’s manual, and it’s crucial not to exceed this limit.
Yes, safety measures include ensuring proper hitching, checking the towed vehicle’s brakes, and adhering to speed limits and local towing regulations.
Refer to the towing guidelines in the owner’s manual, and consider contacting roadside assistance for professional towing services.
The towing guidelines specify the recommended towing methods, which may involve using a tow dolly or flatbed trailer.
It’s advisable to review the vehicle’s warranty and consult with Kia’s customer service regarding towing-related warranty concerns.
For further guidance or assistance, refer to the owner’s manual, contact Kia’s customer support, or consider enrolling in a roadside assistance program for prompt help in emergency situations.
Useful Link
View Full User Guide: Kia Sportage PHEV 2023 User Guide
Download Manuals: https://owners.kia.com/content/owners/en/manuals.html
2023 KIA SPORTAGE Specs, Price, Features and Mileage (Brochure)


