
Kia Stinger 2022 Road Warning
In the fast-paced world of driving, accidents can happen at any time. Being ready is the best way to stay safe and get things fixed quickly. With its mix of speed and usefulness, the 2022 Kia Stinger is no different from other cars on the road when it comes to unexpected problems. We go over a lot of different emergency situations in this detailed guide, giving you useful information and step-by-step steps on how to handle them well. We give Stinger owners important advice on what to do in a variety of situations, such as a flat tire, a dead battery, running out of gas, or more serious ones like accidents or extreme weather. This helps them handle emergencies with confidence and protects their safety and the safety of their vehicle.
2023 Kia Stinger Specs, Price, Features and Mileage (Brochure)
Road warning
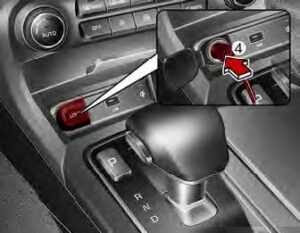
Hazard warning flasher
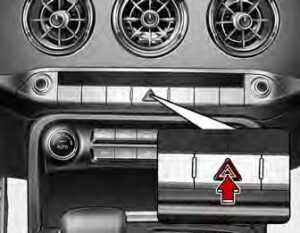
The hazard warning flasher serves as a warning to other drivers to exercise extreme caution when approaching, overtaking, or passing your vehicle.
It should be used whenever emergency repairs are being made or when the vehicle is stopped near the edge of a roadway.
Depress the flasher switch with the ENGINE START/STOP button in any position. The flasher switch is located in the center facia panel. All turn signal lights will flash simultaneously.
- The hazard warning flasher operates whether your vehicle is running or not.
- The turn signals do not work when the hazard flasher is on.
- Care must be taken when using the hazard warning flasher while the vehicle is being towed.
In case of an emergency while driving
If the engine stalls at a crossroad or crossing
If the engine stalls at a crossroad or crossing set the shift lever in the N (Neutral) position and then push the vehicle to a safe place.
If you have a flat tire while driving
If you have a flat tire while driving
- Take your foot off the accelerator pedal and let the vehicle slow down while driving straight ahead. Do not apply the brakes immediately or attempt to pull off the road as this may cause a loss of control. When the vehicle has slowed to such a speed that it is safe to do so, brake carefully and pull off the road. Drive off the road as far as possible and park on firm level ground. If you are on a divided highway, do not park in the median area between the two traffic lanes.
- When the vehicle is stopped, turn on your emergency hazard flashers, set the parking brake and put the transmission in P.
- Have all passengers get out of the vehicle. Be sure they all get out on the side of the vehicle that is away from traffic.
- When changing a flat tire, follow the instruction provided later in this section.
If the engine stalls while driving
- Reduce your speed gradually, keeping a straight line. Move cautiously off the road to a safe place.
- Turn on your emergency flashers. 3. Try to start the engine again. If your vehicle will not start, contact an authorized Kia dealer or seek other qualified assistance.
NOTICE If there was a check engine light and loss of power or stall and if safe to do so, wait at least 10 seconds to restart the vehicle after it stalls. This may reset the car so it will no longer run at low power (limp home) condition.
If the engine will not start
If engine doesn’t turn over or turns over slowly
- Be sure the shift lever is in N (Neutral) or P (Park) and the emergency brake is set.
- Check the battery connections to be sure they are clean and tight.
- Turn on the interior light. If the light dims or goes out when you operate the starter, the battery is discharged.
- Check the starter connections to be sure they are securely tightened.
- Do not push or pull the vehicle to start it. Refer to “Jump starting” on page 6-6.
WARNING
Push/pull start
Do not push or pull the vehicle to start it. Push or pull starting may cause the catalytic converter to overload and create a fire hazard.
If the engine turns over normally but does not start
- Check the fuel level.
- With the ENGINE START/STOP button in the OFF position, check all connectors at the ignition coils and spark plugs. Reconnect any that may be disconnected or loose.
- Check the fuel line in the engine compartment.
- If the engine still does not start, call an authorized Kia dealer or seek other qualified assistance.
Emergency starting

Connect cables in numerical order and disconnect in reverse order.
Jump starting
Jump starting can be dangerous if done incorrectly. Therefore, to avoid harm to yourself or damage to your vehicle or battery, follow these jump-starting procedures. If in doubt, we strongly recommend that you have a competent technician or towing service jump start your vehicle.
CAUTION
Push/pull start to 12 Volt Battery Use only a 12-volt jumper system. You can damage a 12-volt starting motor, ignition system, and other electrical parts beyond repair by use of a 24-volt power supply (either two 12-volt batteries in series or a 24-volt motor generator set).
WARNING
Battery
Never attempt to check the electrolyte level of the battery as this may cause the battery to rupture or explode.
WARNING
Frozen batteries
Do not attempt to jump start the vehicle if the discharged battery is frozen or if the electrolyte level is low as the battery may rupture or explode.
WARNING
Battery
Keep all flames or sparks away from the battery. The battery produces hydrogen gas which will explode if exposed to flame or sparks.
WARNING
Sulfuric acid risk
When jump-starting your vehicle, be careful not to get acid on yourself, your clothing or on the vehicle. Automobile batteries contain sulfuric acid. This is poisonous and highly corrosive.
Jump starting procedure
- Make sure the booster battery is 12-volt and that its negative terminal is grounded.
- If the booster battery is in another vehicle, do not allow the vehicles to come in contact.
- Turn off all unnecessary electrical loads.
- Connect the jumper cables in the exact sequence shown in the illustration. First connect one end of a jumper cable to the positive terminal of the discharged battery (1), then connect the other end to the positive terminal of the booster battery (2).
Proceed to connect one end of the other jumper cable to the negative terminal of the booster battery (3), then the other end to a solid, stationary, metallic point
(for example, the engine lifting bracket) away from the battery (4). Do not connect it to or near any part that moves when the engine is cranked.
Do not allow the jumper cables to contact anything except the correct battery terminals or the correct ground. Do not lean over the battery when making connections.
WARNING
Battery cables
Do not connect the jumper cable from the negative terminal of the booster battery to the negative terminal of the discharged battery. This can cause the discharged battery to overheat and crack, releasing battery acid. Make sure to connect one end of the jumper cable to the negative terminal of the booster battery, and the other end to a metallic point, far away from the battery. - Start the engine of the vehicle with the booster battery and let it run at 2,000 rpm, then start the engine of the vehicle with the dis-charged battery.
If the cause of your battery dis-charging is not apparent, you should have your vehicle checked by an authorized Kia dealer.
Push-starting
Vehicles equipped with automatic transmission lock system cannot be push-started.
Follow the directions in this section for jump-starting.
If the engine overheats
If your temperature gauge indicates overheating, you experience a loss of power, or hear loud pinging or knocking, the engine will probably be too hot. If this happens, you should
- Pull off the road and stop as soon as it is safe to do so.
- Place the shift lever in P and set the parking brake. If the air conditioning is on, turn it off.
- If engine coolant is running out under the vehicle or steam is coming out from underneath the hood, stop the engine. Do not open the hood until the coolant has stopped running or the steaming has stopped. If there is no visible loss of engine coolant and no steam, leave the engine running and check to be sure the engine cooling fan is operating. If the fan is not running, turn the engine off.
- Check to see if the water pump drive belt is missing. If it is not missing, check to see that it is tight. If the drive belt seems to be satisfactory, check for coolant leaking from the radiator, hoses or under the vehicle. (If the air conditioning had been in use, it is normal for cold water to be draining from it when you stop).
WARNING
Under the hood
While the engine is running, keep hair, hands and clothing away from moving parts such as the fan and drive belts to prevent injury. - If the water pump drive belt is broken or engine coolant is leaking out, stop the engine immediately and call the nearest authorized Kia dealer for assistance.
WARNING
Radiator cap
Do not remove the radiator cap when the engine is hot. This may result in coolant being blown out of the opening and cause serious burns. - If you cannot find the cause of the overheating, wait until the engine temperature has returned to normal. If the coolant has been lost, carefully add coolant to the reservoir to bring the fluid level in the reservoir up to the halfway mark.
- Proceed with caution, keeping alert for further signs of overheating. If overheating happens again, call an authorized Kia dealer for assistance. Serious loss of coolant indicates there is a leak in the cooling system and this should be checked as soon as possible by an authorized Kia dealer.
Tire Pressure Monitoring System (TPMS)
- Low tire pressure telltale/TPM Small function indicator
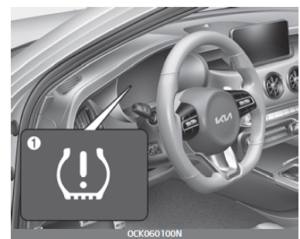
- Low tire pressure position telltale (Shown on the LCD display)
Check tire pressure

- You can check the tire pressure in the information mode on the cluster.
- Tire pressure is displayed 1~2 minutes later after driving.
- If tire pressure is not displayed when the vehicle is stopped,
- Drive to display message displays. After driving, check the tire pressure.
- You can change the tire pressure unit in the user settings mode on the cluster.
NOTICE
- The tire pressure may change due to factors such as parking conditions, driving style, and altitude above sea level.
- Low tire pressure warning may sound when a tires pressure unit is equal or higher than nearby tires. This is a normal occurrence, which is due to the change in tire pressure along with tire temperature.
- sound when a tires pressure unit is equal or higher than nearby tires. This is a normal occurrence, which is due to the change in tire pressure along with tire temperature.
- dashboard may differ from the tire pressure measured by tire pressure gauge.
Each tire, including the spare (if provided), should be checked monthly when cold and inflated to the inflation pressure recommended by the vehicle manufacturer on the vehicle placard or tire inflation pressure label. (If your vehicle has tires of a different size than the size indicated on the vehicle placard or tire inflation pressure label, you should determine the proper tire inflation pressure for those tires.)
As an added safety feature, your vehicle has been equipped with a tire pressure monitoring system (TPMS) that illuminates a low tire pressure telltale when one or more of your tires is significantly under-inflated. Accordingly, when the low tire pressure telltale illuminates, you should stop and check your tires as soon as possible, and inflate them to the proper pressure. Driving on a significantly under-inflated tire causes the tire to overheat and can lead to tire failure. Under-inflation also reduces fuel efficiency and tire tread life, and may affect the vehicles handling and stopping ability.
Please note that the TPMS is not a substitute for proper tire maintenance, and it is the drivers responsibility to maintain correct tire pressure, even if under-inflation has not reached the level to trigger illumination of the TPMS low tire pressure telltale.
Your vehicle has also been equipped with a TPMS malfunction indicator to indicate when the system is not operating properly. The TPMS mal-function indicator is combined with the low tire pressure telltale. When the system detects a malfunction, the telltale will flash for approximately one minute and then remain continuously illuminated. This sequence will continue upon subsequent vehicle start-ups as long as the malfunction exists. When the malfunction indicator is illuminated, the system may not be able to detect or signal low tire pressure as intended. TPMS malfunctions may occur for a variety of reasons, including the installation of replacement or alternate tires or wheels on the vehicle that prevents the TPMS from functioning properly.
Always check the TPMS malfunction telltale after replacing one or more tires or wheels on your vehicle to ensure that the replacement or alternate tires and wheels allow the TPMS to continue to function properly.
NOTICE
If the TPMS, Low Tire Pressure indicator does not illuminate for 3 seconds when the ENGINE START/STOP button is turned to the ON, or engine is running, or if they remain illuminated after coming on for approximately 3 seconds, take your vehicle to your nearest authorized Kia dealer and have the system checked.
Low tire pressure telltale
Low tire pressure position information
When the tire pressure monitoring system warning indicators are illuminated, one or more of your tires is significantly under-inflated.
If the telltale illuminates, immediately reduce your speed, avoid hard cornering and anticipate increased stopping distances. You should stop and check your tires as soon as possible.
Inflate the tires to the proper pressure as indicated on the vehicles placard or tire inflation pressure label located on the drivers side center pillar outer panel. If you can-not reach a service station or if the tire cannot hold the newly added air, replace the low pressure tire with the spare tire.
Then the TPMS malfunction indicator and the Low Tire Pressure tell-tale may turn on and illuminate after restarting and about 20 minutes of continuous driving before you have the low-pressure tire repaired and replaced on the vehicle.
In winter or cold weather, the low tire pressure may be illuminated if the tire pressure was adjusted to the recommended tire inflation pressure in warm weather. It does not mean your TPMS is malfunctioning because the decreased temperature leads to a proportional lowering of tire pressure.
When you drive your vehicle from a warm area to a cold area or from a cold area to a warm area, or the outside temperature is greatly higher or lower, you should check the tire inflation pressure and adjust the tires to the recommended tire inflation pressure.
When filling tires with more air, conditions to turn off the low tire pressure telltale may not be met. This is because a tire inflator has a margin of error in performance. The low tire pressure telltale will be turned off if the tire pressure is above the recommended tire inflation pressure.
WARNING
Low-pressure damage
Do not drive on low-pressure tires. Significantly low tire pressure can cause the tires to overheat and fail making the vehicle unstable resulting in increased braking distances and a loss of vehicle control.
TPMS (Tire Pressure Monitoring System) malfunction indicator
The low tire pressure telltale will illuminate after it blinks for approximately one minute when there is a problem with the Tire Pressure Monitoring System. If the system is able to correctly detect an underinflation warning at the same time as system failure then it will illuminate both the TPMS malfunction and low tire pressure position telltales e.g. if Front Left sensor fails, the TPMS malfunction indicator illuminates, but if the Front Right, Rear Left, or Rear Right tire is under-inflated, the low tire pressure position telltales may illuminate together with the TPMS malfunction indicator.
Have the system checked by an authorized Kia dealer as soon as possible to determine the cause of the problem.
- The TPMS malfunction indicator may be illuminated if the vehicle is moving around electric power supply cables or radios transmitters such as at police stations, government and public offices, broadcasting stations, military
installations, airports, or transmitting towers, etc. This can interfere with the normal operation of the Tire Pressure Monitoring System (TPMS). - The TPMS malfunction indicator may be illuminated if snow chains are used or some separate electronic devices such as notebook computer, mobile charger, remote starter or navigation etc., are used in the vehicle. This can interfere with the normal operation of the Tire Pressure Monitoring System (TPMS).
Changing a tire with TPMS
If you have a flat tire, the Low Tire Pressure telltale will come on. Have the flat tire repaired by an authorized Kia dealer as soon as possible or replace the flat tire with the spare tire.
CAUTION
Repair Agents
Never use a puncture-repairing agent not approved by Kia to repair and/or inflate a low-pressure tire. The sealant not approved by Kia may damage the tire pressure sensor.
Each wheel is equipped with a tire pressure sensor mounted inside the tire behind the valve stem. You must use TPMS-specific wheels. It is recommended that you always have your tires serviced by an authorized Kia dealer.
Even if you replace the low-pressure tire with the spare tire, the Low Tire Pressure telltale will remain on until the low-pressure tire is repaired and placed on the vehicle.
After you replace the low-pressure tire with the spare tire, the TPMS malfunction indicator may illuminate after a few minutes because the TPMS sensor mounted on the spare wheel is not initiated.
Once the low-pressure tire is inflated again to the recommended pressure and installed on the vehicle or the TPMS sensor mounted on the replaced spare wheel is initiated by an authorized Kia dealer, the TPMS malfunction indicator and the low tire pressure telltale will turn off within a few minutes of driving.
If the indicator has not disappeared after a few minutes of driving, please visit an authorized Kia dealer.
If an original mounted tire is replaced with the spare tire, the TPMS sensor on the replaced spare wheel should be initiated and the TPMS sensor on the original mounted wheel should be deactivated. If the TPMS sensor on the original mounted wheel located in the spare tire carrier still activates, the tire pressure monitoring system may not operate properly. Have the tire with TPMS serviced or replaced by an authorized Kia dealer?
You may not be able to identify a low tire by simply looking at it. Always use a good quality tire pressure gauge to measure the tire’s inflation pressure. Please note that a tire that is hot (from being driven) will have a higher pressure measurement than a tire that is cold (from sitting stationary for at least 3 hours and driven less than 1 mile (1.6 km) during that 3 hour period).
Allow the tire to cool before measuring the inflation pressure. Always be sure the tire is cold before inflating to the recommended pressure.
A cold tire means the vehicle has been sitting for 3 hours and driven for less than 1 mile (1.6 km) in that 3-hour period.
Never use tire sealant if your vehicle is equipped with a Tire Pressure Monitoring System. The liquid sealant not approved by Kia may damage the tire pressure sensors.
- The TPMS cannot alert you to If you feel any vehicle instability, If you feel any vehicle instability, immediately take your foot off the accelerator, apply the brakes gradually and with light force, and slowly move to a safe position off the road.
NOTICE
Protecting TPMS
Tampering with, modifying, or disabling the Tire Pressure Monitoring System (TPMS) components may interfere with the system’s ability to warn the driver of low tire pressure conditions and/or TPMS malfunctions. Tampering with, modifying, or disabling the Tire Pressure Monitoring System (TPMS) components may void the warranty for that portion of the vehicle.
This device complies with Part 15 of the FCC rules.
Operation is subject to the following two conditions:
- . This device may not cause harmful interference, and
- This device must accept any interference received, including interference that may cause undesired operation.
2023 Kia Stinger Specs, Price, Features and Mileage (Brochure)
If you have a flat tire (with a spare tire)
Jack and tools
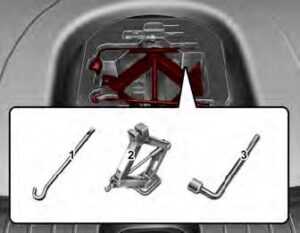 The jack and wheel lug nut wrench are stored in the luggage compartment.
Remove the panel indicated in the illustration.
- Jack handle
- Jack
- Wheel lug nut wrench
Jacking instructions
The jack is provided for emergency tire changing only.
To prevent the jack from “rattling” while the vehicle is in motion, store it properly.
Follow jacking instructions to reduce the possibility of personal injury.
WARNING
Tire Jack
Do not place any portion of your body under a vehicle that is only supported by a jack since the vehicle can easily roll off the jack. Use vehicle support stands.
WARNING
Changing tires
Never attempt vehicle repairs in the traffic lanes of a public road or high-way.
- Always move the vehicle completely off the road and onto the shoulder before trying to change a tire. The jack should be used on a firm level ground. If you cannot find a firm, level place off the road, call a towing service company for assistance.
- Be sure to use the correct front and rear jacking positions on the vehicle; never use the bumpers or any other part of the vehicle for jack support.
- Do not allow anyone to remain in the vehicle while it is on the jack.
- Make sure any children present are in a secure place away from the road and from the vehicle to be raised with the jack.
WARNING
Running vehicle on jack
Do not start or run the engine of the vehicle while the vehicle is on the jack as this may cause the vehicle to fall off the jack.
Removing and storing the spare tire
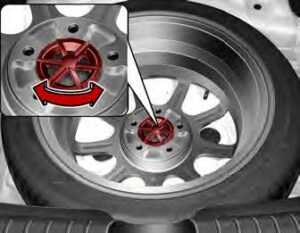 Turn the tire hold-down wing bolt counterclockwise.
Store the tire in the reverse order of removal.
To prevent the spare tire and tools from rattling while the vehicle is in motion, store them properly.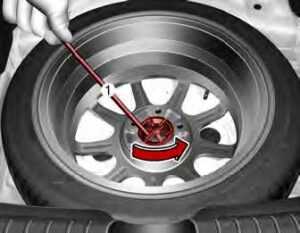 If it is hard to loosen the tire hold-down wing bolt by hand, you can loosen it easily using the jack handle.
- Put the jack handle (1) inside of the tire hold-down wing bolt.
- Turn the tire hold-down wing bolt counterclockwise with the jack handle.
Use caution when utilizing the sharp jack handle.
WARNING
Touching luggage room floor surface
Do not touch luggage room metal surface while the engine is operating or hot. Doing so could result in serious personal injury.
Turn the engine off and wait until it cools down or wear gloves to remove the spare tire from the lug-gage room.
Changing tires
- Park on a level surface and apply the parking brake firmly.
- Place the transmission shift lever in P (Park).
- Activate the hazard warning flashers.
- Remove the wheel lug nut wrench, jack and spare tire from the vehicle.
- Block both the front and rear of the wheel that is diagonally opposite from the jack position.

WARNING
Jack location
To reduce the possibility of injury, be sure to use only the jack provided with the vehicle in the correct jack position; never use any other part of the vehicle for jack support.
WARNING
Changing a tire
- To prevent vehicle movement while changing a tire, always set the parking brake fully, and always block the wheel diagonally opposite the wheel being changed.
- We recommend that the wheels of the vehicle be blocked and that no person remain in a vehicle that is being jacked.
- Loosen the wheel lug nuts counterclockwise one turn each, but do not remove any nut until the tire has been raised off the ground.
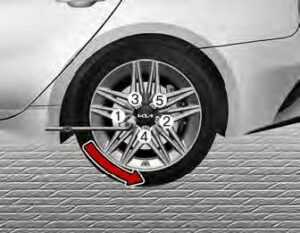
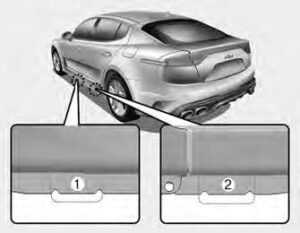
- Place the jack at the front (1) or rear (2) jacking position closest to the tire you are changing. Place the jack at the designated locations under the frame. The jacking positions are plates welded to the frame with two tabs and a raised dot to line up with the jack.
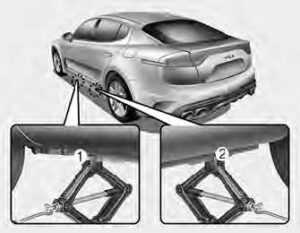
- Insert the wheel lug nut wrench into the jack and turn it clockwise, raising the vehicle until the tire just clears the ground. This measurement is approximately 1 in (30 mm).
Before removing the wheel lug nuts, make sure the vehicle is stable and that there is no chance for movement or slippage.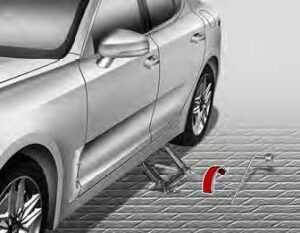
- Loosen the wheel nuts and remove them with your fingers. Slide the wheel off the studs and lay it flat so it cannot roll away. To put the wheel on the hub, pick up the spare tire, line up the holes with the studs and slide the wheel onto them. If this is difficult, tip the wheel slightly and get the top hole in the wheel lined up with the top stud. Jiggle the wheel back and forth until the wheel can slide over the other studs.
Wheels may have sharp edges. Handle them carefully to avoid possible severe injury. Before putting the wheel into place, be sure that there is nothing on the hub or wheel (such as mud, tar, gravel, etc.) that prevents the wheel from fitting solidly against the hub.
WARNING
Installing a wheel
Make sure the wheel makes good contact with the hub when installed. If the contact of the mounting surface between the wheel and hub is not good, the wheel nuts could come loose and cause the loss of a wheel. Loss of a wheel may result in loss of control of the vehicle. - To install the wheel, hold it on the studs, put the wheel nuts on the studs and tighten them finger tight. Jiggle the tire to be sure it is completely seated, then tighten the nuts as much as possible with your fingers again.
- Insert the wrench into the jack and lower the vehicle to the ground by turning the wheel nut wrench counterclockwise.
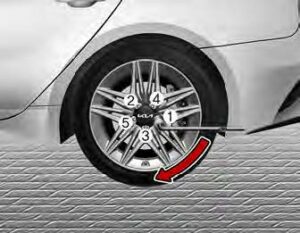
Position the wrench as shown in the drawing and tighten the wheel nuts. Be sure the socket is seated completely over the nut. Do not stand on the wrench handle or use an extension pipe over the wrench handle. Go around the wheel, tightening every nut following the numerical sequence shown in the image until they are all tight. Double-check each nut for tightness. After changing wheels, have an authorized Kia dealer tighten the wheel nuts to their proper torque as soon as possible.
Wheel nut tightening torque:
79~94 lbf6ft(11~13 kgf6m, 107~127 N6m)
If you have a tire gauge, remove the valve cap and check the air pressure. If the pressure is lower than recommended, drive slowly to the nearest service station and inflate to the correct pressure. If it is too high, adjust it until it is correct. Always reinstall the valve cap after checking or adjusting the tire pressure. If the cap is not replaced, dust and dirt may get into the tire valve and air may leak from the tire. If you lose a valve cap, buy another and install it as soon as possible.
After you have changed the wheels, always secure the flat tire in its place and return the jack and tools to their proper storage locations.
CAUTION
Reusing lug nuts
Make certain during wheel removal that the same nuts that were removed are reinstalled – or, if replaced, that nuts with metric threads and the same chamfer configuration are used. Your vehicle has metric threads on the wheel studs and nuts. Installation of a non-metric thread nut on a metric stud will not secure the wheel to the hub properly and will damage the stud so that it must be replaced.
Note that most lug nuts do not have metric threads. Be sure to use extreme care in checking for thread style before installing aftermarket lug nuts or wheels. If in doubt, consult an authorized Kia dealer.
WARNING
Wheel studs
If the studs are damaged, they may lose their ability to retain the wheel. This could lead to the loss of the wheel and a collision resulting in serious injuries.
To prevent the jack, wheel lug nut wrench and spare tire from rattling while the vehicle is in motion, store them properly.
Check the inflation pressures as soon as possible after installing the spare tire. Adjust it to the specified pressure, if necessary. Refer to “Tires and Wheels” on pages 7-43.
Important – use of the compact spare tire
Your vehicle is equipped with a compact spare tire. This compact spare tire takes up less space than a regular-size tire. This tire is smaller than a conventional tire and is designed for temporary use only.
- You should drive carefully when the compact spare is in use. The compact spare should be replaced by the proper conventional tire and rim at the first opportunity.
- The operation of this vehicle is not recommended with more than one compact spare tire in use at the same time.
WARNING
Spare tire
The compact spare tire is for emergency use only. Do not operate your vehicle on this compact spare at speeds over 50 mph (80 km/h). The original tire should be repaired or replaced as soon as possible to avoid failure of the spare possibly leading to personal injury or death.
The compact spare should be inflated to 60 psi (420 kPa).
NOTICE
Check the inflation pressure after installing the spare tire. Adjust it to the specified pressure, as necessary.
When using a compact spare tire, observe the following precautions:
- Under no circumstances should you exceed 50 mph (80 km/h); a higher speed could damage the tire.
- Ensure that you drive slowly enough for the road conditions to avoid all hazards. Any road hazard, such as a pothole or debris, could seriously damage the com-pact spare.
- Any continuous road use of this tire could result in tire failure, loss of vehicle control, and possible personal injury.
- Do not exceed the vehicle’s maximum load rating or the load-carrying capacity shown on the sidewall of the compact spare tire.
- Avoid driving over obstacles. The compact spare tire diameter is smaller than the diameter of a conventional tire and reduces the ground clearance approximately 1 inch (25 mm), which could result in damage to the vehicle.
- Do not take this vehicle through an automatic vehicle wash while the compact spare tire is installed.
- Do not use tire chains on the compact spare tire. Because of the smaller size, a tire chain will not fit properly. This could dam-age the vehicle and result in loss of the chain.
- Do not use the compact spare tire on any other vehicle because this tire has been designed especially for your vehicle.
- The compact spare tire’s tread life is shorter than a regular tire. Inspect your compact spare tire regularly and replace worn com-pact spare tires with the same size and design, mounted on the same wheel.
- The compact spare tire should not be used on any other wheels, nor should standard tires, snow tires, wheel covers or trim rings be used with the compact spare wheel. If such use is attempted, damage to these items or other vehicle components may occur.
- Do not use more than one compact spare tire at a time.
- Do not tow a trailer while the compact spare tire is installed.
Jack label
Example
Type A Type B
Type C
* The actual Jack label in the vehicle may differ from the illustration. For more detailed specifications, refer to the label attached to the jack.
- Model Name
- Maximum allowable load
- When using the jack, set your parking brake. 4. When using the jack, stop the engine.
- Do not get under a vehicle that is supported by a jack.
- The designated locations under the frame
- When supporting the vehicle, the base plate of the jack must be vertical under the lifting point.
- Move the shift lever to the P position on vehicles with automatic transmission.
- The jack should be used on firm level ground.
- Jack manufacturer
- Production date
- Representative company and address
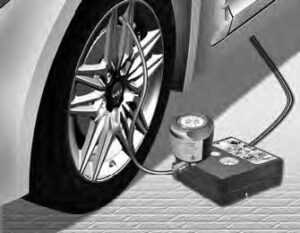
If you have a flat tire (with Tire Mobility Kit)
 Please read the instructions before using the Tire Mobility Kit.
- Compressor
- Sealant bottle
The Tire Mobility Kit is a temporary fix to the tire and the tire should be inspected by an authorized Kia dealer as soon as possible.
CAUTION
One sealant for one tire
When two or more tires are flat, do not use the Tire Mobility Kit because the canister of sealant in the Tire Mobility Kit only contains enough sealant for one flat tire.
WARNING
Speed with a temporary fix
Do not exceed a speed of 50 mph (80 km/h) when driving with a tire sealed with the Tire Mobility Kit. While driving, if you experience any unusual vibration, ride disturbance or noise, reduce your speed and drive with caution until you can safely pull off of the side of the road.
WARNING
Tire wall
Do not use the Tire Mobility Kit to repair large punctures or damage to the tire sidewalls. In these situations, the tire cannot be sealed completely and air will leak from the tire. This can result in tire failure.
WARNING
Temporary fix
Have your tire repaired as soon as possible. The tire may lose air pressure at any time after inflating with the Tire Mobility Kit.
CAUTION
- When replacing or repairing the tire after using tire sealant, make certain to remove the sealant attached to the inner part of the tire and wheel. If the sealant is not removed, noise and vibration may occur.
- If the TPMS warning light illuminates after using the Tire Mobility Kit, have your vehicle inspected by an authorized Kia dealer.
- When repairing a flat tire with the Tire Mobility Kit (TMK), quickly remove the sealant on the tire pressure sensor and wheel. When installing the repaired tire and wheel, tighten the wheel nut to a torque value of 79~94 lbf6ft (11~13 kgf6m).
Introduction
With the Tire Mobility Kit (TMK) you stay mobile even after experiencing a tire puncture.
The system compressor and sealing compound effectively seal most punctures in a passenger car tire caused by nails or similar objects and reinflate the tire.
After you ensure that the tire is properly sealed, you can drive cautiously on the tire (up to 120 miles (200 km)) at a max. speed of 50 mph (80 km/h) in order to reach the vehicle or tire dealer to have the tire replaced.
It is possible that some tires, especially with larger punctures or damage to the sidewall, cannot be sealed completely.
Air pressure loss in the tire may adversely affect tire performance.
For this reason, you should avoid abrupt steering or other driving manoeuvres, especially if the vehicle is heavily loaded or if a trailer is in use.
The Tire Mobility Kit is not designed or intended as a permanent tire repair method and is to be used for one tire only.
This instruction shows you step by step how to temporarily seal the puncture.
Refer to “Notes on the safe use of the Tire Mobility Kit” on pages 6-27.
WARNING
Do not use the Tire Mobility Kit if a tire is severely damaged.
Only punctured areas located within the tread region of the tire can be sealed using the Tire Mobility Kit.
Notes on the safe use of the Tire Mobility Kit
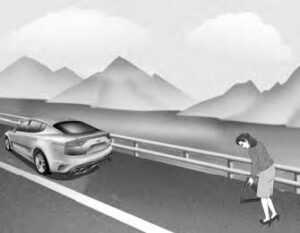
- Park your car at the side of the road so that you can work with the Tire Mobility Kit away from moving traffic. Place your warning triangle in a prominent place to make passing vehicles aware of your location.
- To be sure your vehicle will not move, even when you’re on fairly level ground, always set your parking brake.
- Only use the Tire Mobility Kit for sealing/inflation of passenger car tires. Do not use on motorcycles, bicycles or any other type of tires.
- Do not remove any foreign
objects such as nails or screws -that have penetrated the tire. - Before using the Tire Mobility Kit, read the precautionary advice printed on the sealant bottle!
- Provided the car is outdoors, leave the engine running. Otherwise operating the compressor may eventually drain the car battery.
- Never leave the Tire Mobility Kit unattended while it is being used.
- Do not leave the compressor running for more than 10 min. at a time or it may overheat.
- Do not use the Tire Mobility Kit if the ambient temperature is below -22/F (-30/C).
- When the tire and wheel are damaged, do not use Tire Mobility Kit for your safety.
WARNING
- If sealant comes into contact with skin, wash the affected areas thoroughly. Seek medical attention if irritation develops and persists.
- If sealant comes into contact with the eyes, flush eyes with water for at least 15 minutes. Seek medical attention if irritation persists.
- If the sealant is swallowed, call a physician or poison control centre immediately.
Exposure to the sealant for a long time may cause damage to the bodily tissues.
Components of the Tire Mobility Kit (TMK)

- Speed restriction label
- Sealant bottle and label with speed restriction
- Filling hose from sealant bottle to wheel
- Connectors and cable for the power outlet direct connection
- Holder for the sealant bottle
- Compressor
- On/off switch
- Pressure gauge for displaying the tire inflation pressure
- Button for reducing tire inflation pressure
Connectors and cable are stored in the compressor housing.
WARNING
Expired sealant
Do not use the tire sealant after the sealant has expired (after the expiration date on the sealant container). This can increase the risk of tire failure.
WARNING
Sealant
- Keep out of reach of children.
- Avoid contact with eyes.
- Do not swallow.
NOTICE
The sealant container and insert hose (3) cannot be reused. Purchase an extra after use.
Using the Tire Mobility Kit
- Detach the speed restriction label (1) from the sealant bottle (2), and place it in a highly visible place inside the vehicle such as on the steering wheel to remind the driver not to drive too fast.
- Filling the sealant Strictly follow the specified sequence, the sealant may escape under high pressure.

CAUTION
Before using the Tire Mobility Kit, please read carefully the instructions attached on the sealant case.
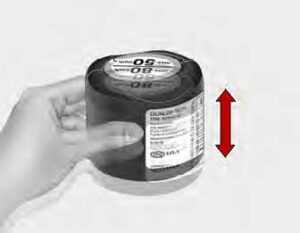
Detach the speed limit label on the sealant case and put it on a highly visible place. Always drive within the speed limit. - Shake the sealant bottle.
- Connect the filling hose (3) onto the connector of the sealant bottle.
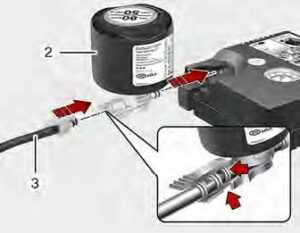
- Ensure that button (7) on the compressor is not pressed.
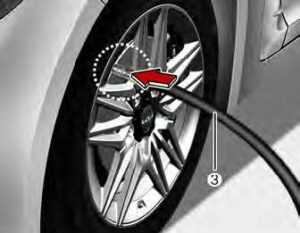
- Unscrew the valve cap from the valve of the defective wheel and screw filling hose (3) of the seal-ant bottle onto the valve.
- Insert the sealant bottle into the housing (5) of the compressor so that the bottle is upright.
- Ensure that the compressor is switched off.
- Connect between the compressor and the vehicle power outlet using the cable and connectors (4).
- With the ENGINE START/STOP 10.With the ENGINE START/STOP the sealant up to proper pressure (refer to the “Tires and wheels” on page 8-4). Be careful not to overinflate the tire and stay away from the tire when filling it. When the tire and wheel are damaged, do not use Tire Mobility Kit for your safety.
WARNING
Tire pressure
Do not attempt to drive your vehicle if the tire pressure is below 29 psi (200 kPa, 2 bar).
This could result in an accident due to sudden tire failure. - Switch off the compressor.
- Detach the hose from the sealant bottle connector and from the tire valve.
Return the Tire Mobility Kit to its storage location in the vehicle.
WARNING
Carbon monoxide poisoning and suffocation is possible if the engine is left running in a poorly ventilated or unventilated location (such as inside a building).Distributing the sealant
- Immediately drive approximately 4 ~ 6 miles (7 ~ 10 km or, about 10 min) to evenly distribute the sealant in the tire.
CAUTION
Do not exceed a speed of 50 mph (80 km/h). If possible, do not fall below a speed of 12 mph (20 km/h). While driving, if you experience any unusual vibration, ride disturbance or noise, reduce your speed and drive with caution until you can safely pull off of the side of the road. Call for roadside service or towing.
When you use the Tire Mobility Kit, the wheel may be stained by sealant. Therefore, remove the tire pressure sensors and have your vehicle inspected by an authorized Kia dealer.
Checking the tire inflation pressure
- After driving approximately 4 ~ 6 miles (7 ~ 10 km or about 10 minutes), stop at a suitable location.
- Connect the filling hose (3) of the compressor (clip-mounted side) directly and then connect the filling hose (3) (opposite side) to the tire valve.
- Connect between the compressor and the vehicle power outlet using the cable and connectors.
- Adjust the tire inflation pressure to 29 psi (200 kPa). With the ENGINE START/STOP button ON position, proceed as follows.
- To increase the inflation pressure: Switch on the compressor, position I. To check the current inflation pressure setting, briefly switch off the compressor.
WARNING
Do not let the compressor run for more than 10 minutes, otherwise, the device will overheat and may be damaged.
- To reduce the inflation pressure: Press the button (9) on the compressor.
WARNING
The tire inflation pressure must be at least 29 psi (200 kPa, 2 bar). If it is not, do not continue driving. Call for roadside service or towing.
Technical Data
- System voltage: DC 12 V
- Working voltage: DC 10 – 15 V
- Amperage rating: max. 15 A 0 1A (at DC 12V operation)
- Suitable for use at temperatures: -22 ~ +158/F (-30 ~ +70/C)
- Max. working pressure: 87 psi (6 bar)
- Size
- Compressor: 6.3 x 5.9 x 2.2 in (161 x 150 x 55.8 mm)
- Sealant bottle: 4.1 x 3.3 w in (104 x 85 w mm)
- Compressor weight: 1.77 lbs 0 0.07 lbs (805 g 0 30 g)
- Sealant volume: 18.3 cu. in (300 ml)
* Sealant and spare parts can be obtained and replaced at an authorized vehicle or tire dealer. Empty sealant bottles may be disposed of at home. Liquid residue from the sealant should be disposed of by your vehicle or tire dealer or in accordance with local waste disposal regulations.
Towing
Towing service
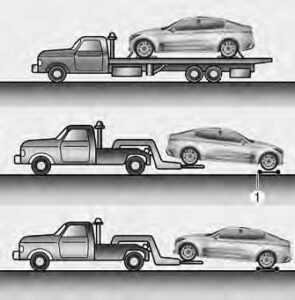
If emergency towing is necessary, we recommend having it done by an authorized Kia dealer or a commercial tow-truck service. Proper lifting and towing procedures are necessary to prevent damage to the vehicle. The use of wheel dollies(1) or flatbeds is recommended.
On AWD vehicles, your vehicle must be towed with a wheel lift and dollies or flatbed equipment with all the wheels off the ground.
CAUTION
The AWD vehicle should never be towed with the wheels on the ground. This can cause serious damage to the transmission or the AWD system.
If any of the loaded wheels or suspension components are damaged or the vehicle is being towed with the front wheels on the ground, use a towing dolly under the front wheels.
When being towed by a commercial tow truck and wheel dollies are not used, the rear of the vehicle should always be lifted, not the front.
NOTICE
If the EPB does not release normally, take your vehicle to an authorized Kia dealer by loading the vehicle on a flatbed tow truck and have the system checked.

- Ensure any metal parts on the tiedown straps do not contact with painted surfaces or the face of the wheels.
- Do not place straps over the body panels or through the wheels.
CAUTION
Attaching straps to the chassis, suspension or other parts of the body can cause damage.
WARNING
Side and curtain Airbag
If your vehicle is equipped with side and curtain airbag, set the the ENGINE START/STOP button to ACC position when the vehicle is being towed.
The side and curtain air bag may deploy when the ignition is ON, and the rollover sensor detects the situation as a rollover.
CAUTION
Towing


- Do not tow the vehicle backwards with the rear wheels on the ground as this may cause damage to the vehicle.
- Do not tow with sling-type equipment. Use wheel lift or flatbed equipment.
When towing your vehicle in an emergency without wheel dollies :
- Set the ENGINE START/STOP button to ACC position.
- Place the transmission shift lever in N (Neutral).
- Release the parking brake.
CAUTION
Towing gear position
Failure to place the transmission shift lever in N (Neutral) may cause internal damage to the transmission.
Removable towing hook

- Open the liftgate, and remove the towing hook from the tool case.
- Remove the hole cover pressing the right side part or lower part of the cover on the bumper.
- Install the towing hook by turning it clockwise into the hole until it is fully secured.
- Remove the towing hook and install the cover after use.
Emergency towing

Rear
If towing is necessary, have it done by an authorized Kia dealer or a commercial tow truck service.
If towing service is not available in an emergency, your vehicle may be temporarily towed using a cable or chain secured to the emergency towing hook under the front (or rear) of the vehicle. Use extreme caution when towing the vehicle. A driver must be in the vehicle to steer it and operate the brakes.
Towing in this manner may be done only on hard-surfaced roads for a short distance and at low speed. Also, the wheels, axles, power train, steering and brakes must all be in good condition.
- Do not use the tow hooks to pull a vehicle out of mud, sand or other conditions from which the vehicle cannot be driven out under its own power.
- Avoid towing a vehicle heavier than the vehicle doing the towing.
- The drivers of both vehicles should communicate with each other frequently.
- Attach a towing strap to the tow hook.
- Use only a cable or chain specifically intended for use in towing vehicles. Securely fasten the cable or chain to the towing hook provided.
- Accelerate or decelerate the vehicle in a slow and gradual manner while maintaining tension on the tow rope or chain to start or drive the vehicle, otherwise, tow hooks and the vehicle may be damaged.
- Before emergency towing, check if the hook is not broken or damaged.
- Fasten the towing cable or chain securely to the hook.
- Do not jerk the hook. Apply it steadily and with even force.
- To avoid damaging the hook, do not pull from the side or at a vertical angle. Always pull straight ahead.
CAUTION
Using a portion of the vehicle other than the tow hooks for towing may damage the body of your vehicle.
WARNING
Emergency Towing Precautions Use extreme caution when towing the vehicle.
- Avoid sudden starts or erratic driving manoeuvres which would place excessive stress on the emergency towing hook and towing cable or chain. The hook and towing cable or chain may break and cause serious injury or damage.
- If the disabled vehicle is unable to be moved, do not forcibly continue the towing. In this case, contact an authorized Kia dealer or a commercial tow truck service for assistance.
- Tow the vehicle as straight ahead as possible.
- Keep away from the vehicle during towing.
- Use a towing strap less than 16 feet (5 m) long. Attach a white or red cloth (about 12 inches (30 cm) wide) in the middle of the strap for easy visibility.
- Drive carefully so that the towing strap is not loosened during towing.
- The driver must be in the vehicle for steering and braking operations when the vehicle is towed and passengers other than the driver must not be allowed to be on board.
Emergency towing precautions
- Turn the ENGINE START/STOP button to ACC position so the steering wheel isn’t locked.
- Place the transmission shift lever in N (Neutral).
- Release the parking brake.
- Press the brake pedal with more force than normal since you will have reduced brake performance. More steering effort will be required because the power steering system will be disabled.
- If you are driving down a long hill, the brakes may overheat and brake performance will be reduced. Stop often and let the brakes cool off.
- To avoid serious damage to the automatic transmission, limit the vehicle speed to 10 mph (15 km/h) and drive less than 1 mile (1.5 km) when towing. (for Automatic transmission vehicle)
- If the car is being towed with all four wheels on the ground, it can be towed only from the front. Be sure that the transmission is in neutral. Be sure the steering is unlocked by placing the ENGINE START/STOP button to the ACC position. A driver must be in the towed vehicle to operate the steering and brakes.
CAUTION
Automatic transmission
Before towing, check the automatic transmission for fluid leaks under your vehicle. If the automatic transmission fluid is leaking, flatbed equipment or a towing dolly must be used.
FAQ
In the event of a flat tire, safely pull over to the side of the road, activate your hazard lights, and use your vehicle’s spare tire and jack to replace the flat tire. Make sure to follow the instructions in your owner’s manual for changing the tire.
Yes, the 2022 Kia Stinger typically comes with a spare tire and a jack for tire changes.
If you run out of fuel, safely move your vehicle to the side of the road and call for roadside assistance or use a portable gas can to refuel your car. Keep in mind that running out of fuel can damage the fuel system, so it’s best to avoid this situation.
To jump-start your Stinger, you’ll need jumper cables and a booster vehicle with a charged battery. Connect the cables following the correct procedure outlined in your owner’s manual, and then start your Stinger.
The 2022 Kia Stinger may not come with a standard emergency kit, but you can assemble your own emergency kit with items like a first-aid kit, flashlight, reflective vest, and basic tools.
If you experience an electrical failure, try to safely pull over to the side of the road and turn on your hazard lights. Consult your owner’s manual or contact a Kia service center for assistance.
Some Stinger models may be equipped with an SOS or emergency contact feature that can be used to request assistance in case of an emergency. Consult your owner’s manual for details.
Be prepared by keeping an emergency kit, a charged mobile phone, and a list of emergency contacts in your vehicle. Familiarize yourself with the vehicle’s safety features and how to use them in case of an emergency.
If you’re locked out of your Stinger, you can contact a locksmith or Kia roadside assistance to assist with unlocking the vehicle.
In the event of an accident, prioritize safety by moving to a safe location if possible. Check for injuries and call 911 if needed. Exchange information with the other party involved and document the accident scene with photos if you can do so safely. Contact your insurance company and follow their instructions.
Equip your Stinger with winter essentials like a snow shovel, ice scraper, warm clothing, blankets, and non-perishable snacks. Additionally, maintain proper winter tires and stay informed about weather conditions before your journey.
Safely pull over to the side of the road and turn on your hazard lights. Contact Kia roadside assistance or a local towing service to arrange for a tow to a nearby service center.
Kia often provides a roadside assistance service that can be reached through a toll-free number in case of emergencies. Check your owner’s manual or contact your Kia dealership for details on the specific coverage and services available.
Regularly schedule maintenance and inspections at a Kia service center to ensure that your Stinger’s safety features, including the emergency braking system, are functioning properly.
Detailed emergency procedures and contact information can typically be found in the owner’s manual, which is included with your Stinger. Familiarize yourself with this information to be prepared for various emergency situations.
Useful Link
View Full PDF: Kia Stinger 2022 User Guide
Download Manuals: https://owners.kia.com/content/owners/en/manuals.html
2023 Kia Stinger Specs, Price, Features and Mileage (Brochure)