
Kia Telluride 2023 Fuses and Light Bulbs
The 2023 Kia Telluride has a complex electrical system with many fuses and light bulbs that are very important to the safety and usefulness of this highly regarded SUV. The fuse box is safekeeping the electrical parts of the car from overloads and short circuits. It is located in the engine compartment and under the dashboard. The light bulbs illuminate the road ahead and send important messages to drivers and pedestrians. Understanding how to use, maintain, and replace these fuses and light bulbs is essential for a smooth driving experience in
the 2023 Kia Telluride, whether you’re driving at night with the powerful headlights, making precise turns with the turn signal bulbs, or keeping everyone safe with the brake lights that flash behind you.
2023 Kia Telluride Specs, Price, Features and Mileage (Brochure)
Fuses
A vehicle’s electrical system is protected from electrical overload damage by fuses.
Blade type

Cartridge type
Multi fuse

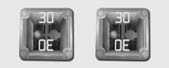
BFT
* Left side: Normal, Right side: Blown
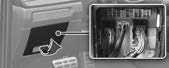
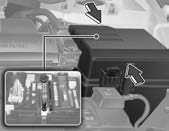
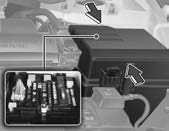
This vehicle has 2 (or 3) fuse panels, one located in the driver’s side panel bolster, the other in the engine compartment near the battery.
If any of your vehicle’s lights, accessories, or controls do not work, check the appropriate circuit fuse. If a fuse has blown, the element inside the fuse will melt.
If the electrical system does not work, first check the driver’s side fuse panel.
If the replacement fuse blows, this indicates an electrical problem. Avoid using the system involved and immediately consult an authorized Kia dealer.
Three kinds of fuses are used: blade type for lower amperage rating, cartridge type, and multi fuse for higher amperage ratings.
WARNING
Fuse replacement
- Never replace a fuse with anything but another fuse of the same rating.
- A higher capacity fuse could cause damage and possibly a fire.
- Never install a wire or aluminium foil instead of the proper fuse – even as a temporary repair. It may cause extensive wiring damage and a possible fire.
- Do not arbitrarily modify or add electric wiring to the vehicle.
NOTICE
- When replacing a fuse, Turn ENGINE START/STOP button to the OFF position and turn off the switches of all electrical devices then remove the battery (-) terminal.
- The actual fuse/relay panel label may differ from the equipped items.
WARNING
Electrical Fire
Always ensure replacement fuses and relays are securely fastened when installed. Failure to do so can result in a vehicle fire.
Do not remove fuses, relays and terminals fastened with bolts or nuts. The fuses, relays and terminals may be fastened incompletely, and it may cause a possible fire. If fuses, relays and terminals fastened with bolts or nuts are blown, consult with an authorized Kia dealer.
CAUTION
When replacing a blown fuse or relay, make sure the new fuse or relay fits tightly into the clips. Failure to tightly install the fuse or relay may cause damage to the wiring and electric systems.
CAUTION
- Do not input any other objects except fuses or relays into fuse/relay terminals such as a screwdriver or wiring. It may cause contact failure and system malfunction.
- Do not plug in screwdrivers or after-market wiring into the terminal originally designed for fuse and relays only. The electrical system and wiring of the vehicle interior may be damaged or burned due to contact failure.
- If you directly connect the wire on the taillight or replace the bulb which is over the regulated capacity to install trailers etc., the inner junction block can get burned.
WARNING
Electrical wiring repairs
All electrical repairs should be performed by authorized Kia dealerships using approved Kia parts. Using other wiring components, especially when retrofitting multimedia or theft alarm systems, car phones or radios may cause vehicle damage and increase the risk of a vehicle fire.
NOTICE
Remodeling Prohibited
Do not rewire your vehicle in any way as doing so may affect the performance of several safety features in your vehicle. Rewiring your vehicle may also void your warranty and cause you to be responsible for any subsequent vehicle damage which may result.
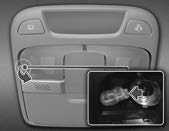
Replacing the inner panel fuse
- Turn the ENGINE START/STOP button to the OFF position and all other switches off.
- Open the fuse panel cover.
- Pull the suspected fuse straight out. Use the removal tool provided on the engine fuse panel cover.
- Check the removed fuse; replace it if it is blown. Spare fuses are provided in the engine compartment fuse panel.
- Push in a new fuse of the same rating, and make sure it fits tightly in the clips.
If it fits loosely, consult an authorized Kia dealer.
If you do not have a spare, use a fuse of the same rating from a circuit you may not need for operating the vehicle, such as the power outlet fuse.
If the headlamp, turn signal lamp, stop signal lamp, fog lamp, DRL, tail lamp or High Mounted Stop Lamp (HMSL) do not work and the fuses are OK, check the fuse panel in the engine compartment. If a fuse is blown, it must be replaced.
NOTICE
If the headlamp, fog lamp, turn signal lamp, or tail lamp malfunctions even without any problem to the lamps, have the vehicle checked by an authorized Kia dealer for assistance.
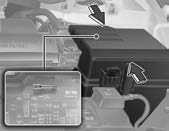
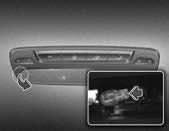
Replacing the engine compartment fuse
- Turn the ENGINE START/STOP button to the OFF position and all other switches off.
- Remove the fuse panel cover by pressing the tab and pulling the cover-up.

- Check the removed fuse; replace it if it is blown. To remove or insert the fuse, use the fuse puller in the engine compartment fuse panel.
- Push in a new fuse of the same rating, and make sure it fits tightly in the clips. If it fits loosely, consult an authorized Kia dealer.
CAUTION
Always securely install the fuse panel cover in the engine compartment to protect against electrical failure which may occur from water contact. Listen for the audible clicking sound to ensure fuse panel cover is securely fastened.
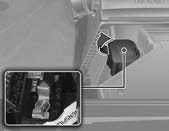
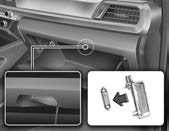
Multi fuse
If the multi fuse is blown, it must be removed as follows:
- Turn the ENGINE START/STOP button to the OFF position and all other switches off.
- Disconnect the negative battery cable.
- Remove the nuts shown in the picture above.
- Replace the fuse with a new one of the same rating.
- Reverse these steps to reinstall the multi-fuse.
NOTICE
Do not disassemble or assemble the multi-fuse when it is secured with nuts and bolts. Incorrect or partial assembly torque may cause a fire. Have the vehicle checked by an authorized Kia dealer.
Main fuse
If the main fuse is blown, it must be removed as follows:
- Turn the ENGINE START/STOP button to the OFF position and all other switches off.
- Disconnect the negative battery cable.
- Remove the nuts shown in the picture above.
- Replace the fuse with a new one of the same rating.
- Reverse these steps to reinstall the multi-fuse.
NOTICE
The electronic system may not function correctly even when the engine compartment and internal fuse box’s individual fuses are not disconnected. In such case the cause of the problem may be the disconnection of the main fuse (BFT type), which is located inside the positive battery terminal (+) cap.
Since the main fuse is designed more intricately than other parts, have the vehicle checked by an authorized Kia dealer.
NOTICE
Do not disassemble or assemble the multi-fuse when it is secured with nuts and bolts. Incorrect or partial assembly torque may cause a fire. Have the vehicle checked by an authorized Kia dealer.
Battery fuse
If the battery fuse is blown, it must be removed as follows:
- Disconnect the negative battery cable.
- Remove the nuts shown in the picture below.
- Replace the fuse with a new one of the same rating.
- Reinstall in the reverse order of removal.
NOTICE
If the battery fuse is blown, have the vehicle checked by an authorized Kia dealer.
CAUTION
Visually inspect the battery cap to ensure it is securely closed. If the battery cap is not securely closed, moisture may enter the system and damage the electrical components.
Fuse/relay panel description
Inside the fuse/relay panel covers you can find the fuse/relay label describing fuse/relay name and capacity.
Driver’s side fuse panel
NOTICE
Not all fuse panel descriptions in this manual may be applicable to your vehicle. It is accurate at the time of printing. When you inspect the fuse panel in your vehicle, refer to the fuse panel label on the inside of the fuse cover. This diagram will provide you with the specific information for your vehicles.
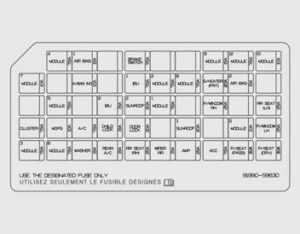
Refer to the following table for a description of the fuse.
| Description | Fuse rating | Protected component |
| MODULE 4 | 7.5 A | ATM (Auto Transmission) Shift Lever Switch, Stop Lamp Switch, Driver Door Module |
| AIR BAG 1 | 15 A | SRS (Supplemental Restraint System) Control Module, Passenger Occupant Detection Sensor |
| BRAKE SWITCH | 7.5 A | IBU (Integrated Body Control Unit), Stop Lamp Switch |
|
MODULE 9 |
15 A |
Front Air Conditioner Control Module, Low DC-DC Converter (Audio), Power Tail Gate Module, Driver IMS (Integrated memory system)
Control Module, Driver Door Module, Driver/Passenger Power Out- side Mirror, Rear Air Conditioner Control Module |
| MODULE 12 | 7.5 A | Head-Up Display |
| MODULE 10 | 10 A | Rear Corner Radar LH/RH, Electro Chromic Mirror, Console Switch |
| AIR BAG IND | 10 A | Front Air Conditioner Control Module, Instrument Cluster |
| IBU 1 | 7.5 A | IBU (Integrated Body Control Unit) |
|
MODULE 2 |
7.5 A |
Surround View Monitor Unit, AC Inverter Outlet, AC Inverter Unit, Front Air Ventilation Seat Control Module, Front Seat Warmer Control Module,2ND Air Ventilation Seat Control Module LH/RH,2ND Seat Warmer Control Module LH/RH |
| MODULE 8 | 7.5 A | Hazard Switch, Rain Sensor, Driver/Passenger Smart Key Outside Handle, Mood Lamp Control Unit, Driver/Passenger Mood Lamp, Driver/Passenger Door Mood Lamp, Rear Door Mood Lamp LH/RH |
| S/HEATER (FRT) | 20 A | Front Air Ventilation Control Module, Front Seat Warmer Control Module, Data Link Connector |
| AIR BAG 2 | 15 A | SRS (Supplemental Restraint System) Control Module |
|
MODULE 5 |
7.5 A |
Front View Camera, Crash Pad Switch, IBU (Integrated Body Control Unit), Front Radar, ATM (Auto Transmission) Shift Lever Indicator,
4WD ECM (Engine Control Module), Console Switch, Electronic Park- ing Brake Switch |
| IBU 2 | 15 A | IBU (Integrated Body Control Unit) |
| SUNROOF 2 | 20 A | Rear Sunroof Controller |
| MODULE 1 | 7.5 A | IBU (Integrated Body Control Unit) |
| P/WINDOW RH | 25 A | Passenger Safety Power Window Module, Rear Safety Power Window Module RH |
| RR SEAT (LH) | 25 A | 2ND Air Ventilation Seat Control Module LH, 2ND Seat Warmer Control, Module LH, 2ND Seat LH Reclining Folding Actuator |
| CLUSTER | 7.5 A | Instrument Cluster, Head-Up Display |
| MDPS*1 | 10 A | MDPS (Motor Driven Power Steering) Unit |
| A/C | 7.5 A | Engine Room Junction Block (Blower FRT Relay, Blower RR Relay, PTC Heater 1/2 Relay), Front A/C Control Module, Rear A/C Control Module |
| CHILD LOCK | 15 A | ICM (Integrated Circuit Module) Relay Box (Child Lock/Unlock Relay) |
| DOOR LOCK | 20 A | Door Lock Relay, Door Unlock Relay, Tail Gate Relay, T/Turn Unlock Relay |
| SUNROOF 1 | 20 A | Front Sunroof Controller |
| MODULE 11 | 10 A | Rear Occupant Detection Sensor |
| Description | Fuse rating | Protected component |
| P/WINDOW LH | 25 A | Driver Safety Power Window Module, Rear Safety Power Window
Module LH |
| MODULE 3 | 7.5 A | IBU (Integrated Body Control Unit) |
|
MODULE 6 |
7.5 A |
Audio, Audio/Video & Navigation Head Unit, Low DC-DC Converter (Audio/AMP (Amplifier)), Front Air Conditioner Control Module, Electro Chromic Mirror, Center fascia Keyboard, Driver/Passenger Seat Warmer Switch, Driver/Passenger Seat Warmer LIN Switch, Driver IMS (Integrated memory system) Control Module, Front Air Ventilation Control Module, Front Seat Warmer Control Module,2ND Air Ventilation Seat Control Module LH/RH,2ND Seat Warmer Control
Module LH/RH |
| WASHER | 15 A | Multifunction Switch, Front Washer Motor, Rear Washer Motor, Washer Level Sensor |
| RR SEAT (RH) | 25 A | 2ND Air Ventilation Seat Control Module RH, 2ND Seat Warmer Con- trol, Module RH, 2ND Seat RH Reclining Folding Actuator |
| WIPER RR | 15 A | Rear Wiper Relay, Rear Wiper Motor |
| AMP | 25 A | Low DC-DC Converter (AMP (Amplifier)) |
| ACC | 7.5 A | IBU (Integrated Body Control Unit), Low DC-DC Converter (Audio/ AMP) |
| P/SEAT (PASS) | 30 A | Passenger Seat Manual Switch |
| P/SEAT (DRV) | 30 A | Driver IMS (Integrated memory system) Control Module, Driver Seat Manual Switch |
*1 : MDPS (Motor Driven Power Steering) is the same as EPS (Electric Power Steering).
Engine compartment fuse panel

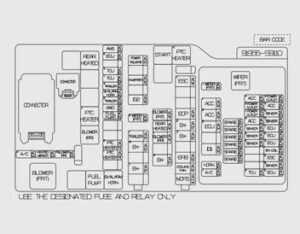
Refer to the following table for a description of the fuse.
| Fuse Name | Fuse rating | Circuit Protected |
| MDPS*1 | 80 A | MDPS (Motor Driven Power Steering) Unit |
| COOLING FAN | 80 A | Cooling Fan Controller |
| EPB | 60 A | ESC (Electronic Stability Control) Module |
| B+2 | 50 A | ICU Junction Block (IPS 8/IPS 10/IPS 11/IPS 12/IPS 13/IPS 14/IPS 15) |
| B+3 | 50 A | ICU Junction Block (Fuse – P/WINDOW LH, RR SEAT (LH), P/SEAT (DRV), P/SEAT (PASS), MODULE 11) |
| B+4 | 50 A | ICU Junction Block (Fuse – MODULE 8, S/HEATER (FRT), P/WINDOW RH, AMP, SUNROOF 1) |
| ESC 1 | 40 A | ESC (Electronic Stability Control) Module |
| Fuse Name | Fuse rating | Circuit Protected |
| ESC 2 | 40 A | ESC (Electronic Stability Control) Module |
| PTC HEATER 1 | 50 A | PTC Heater 1 Relay |
| PTC HEATER 2 | 50 A | PTC Heater 2 Relay |
| ECU 6 | 15 A | ECM (Engine Control Module) |
| TCU 1 | 15 A | TCM (Transmission Control Module) |
| TCU 3 | 15 A | TCM (Transmission Control Module) |
| B+5 | 50 A | ICU Junction Block (Fuse – DOOR LOCK, IBU (Integrated Body Control Unit) 1, IBU (Integrated Body Control Unit) 2, BRAKE SWITCH, CHILD LOCK, RR SEAT (RH), SUNROOF 2) |
| TRAILER 3 | 30A | Trailer Connector |
| BLOWER FRT 1 | 40 A | Blower FRT Relay |
| OIL PUMP | 40 A | Electric Oil Pump Inverter |
| REAR HEATED | 40 A | Rear Heated Relay |
| B+1 | 50 A | ICU Junction Block (IPS 1/IPS 2/IPS 3/IPS 5/IPS 6/IPS 7, Long/Short
Term Load Latch Relay) |
| BLOWER RR 1 | 40 A | Blower RR Relay |
| 4WD | 20 A | 4WD ECM (Engine Control Module) |
| AMS | 10 A | Battery Sensor |
| H/LAMP HI | 15 A | H/Lamp HI Relay |
| IG2 | 40 A | Start Relay, PCB Block (IG2 Relay) |
| TRAILER 2 | 30A | Trailer Connector |
| INVERTER | 30 A | AC Inverter Unit |
| POWER TAILGATE | 30 A | Power Tail Gate Module |
| TRAILER 1 | 30 A | Trailer Connector |
| HEATED MIRROR | 10 A | Driver/Passenger Power Outside Mirror, Front Air Conditioner Control Module |
| BLOWER RR 2 | 10 A | Rear Air Conditioner Control Module |
| WIPER FRT 2 | 10 A | IBU (Integrated Body Control Unit) |
| BLOWER FRT 2 | 10 A | Front Air Conditioner Control Module |
| WIPER FRT 1 | 30 A | Wiper FRT Relay |
| B/ALARM HORN | 15 A | Burglar Alarm Horn Relay |
| FUEL PUMP | 20 A | Fuel Pump Relay |
| ACC 1 | 40 A | ACC 1 Relay |
| ACC 2 | 40 A | ACC 2 Relay |
| ECU 5 | 30 A | Engine Control Relay |
| IG1 | 40 A | IG1 Relay |
| A/C | 10 A | Air Conditioner Relay |
| HORN | 15 A | Horn Relay |
| POWER OUTLET 2 | 20 A | Front Power Outlet |
| ACC 3 | 15 A | Rear USB Charger, Luggage USB Charger, Driver/Passenger Seat Cushion USB Charger |
| Fuse Name | Fuse rating | Circuit Protected |
| ACC 4 | 10 A | Front USB Charger, Rear USB Charger RH |
| ICU | 10 A | ICU Junction Block (Fuse – ACC) |
| SENSOR 1 | 10 A | Fuel Pump Relay |
| SENSOR 4 | 15 A | Canister Close Valve, Oxygen Sensor #1/#2/#3/#4 |
| ESC 3 | 10 A | Data Link Connector, ESC (Electronic Stability Control) Module |
| TCU 2 | 10 A | TCM (Transmission Control Module), Transaxle Range Switch |
| SENSOR 6 | 10 A | Electric Oil Pump Inverter |
| ECU 4 | 10 A | ECM (Engine Control Module) |
| POWER OUTLET 1 | 20 A | Luggage Power Outlet |
| POWER OUTLET 3 | 20 A | Rear Power Outlet |
| SENSOR 5 | 10 A | Oil Pump Solenoid |
| SENSOR 2 | 10 A | A/C Relay, Purge Control Solenoid Valve, Oil Control Valve #1/#2/ #3/#4 (Intake/Exhaust), Variable Intake Solenoid Valve #1/#2, Electronic Thermostat |
| SENSOR 3 | 20 A | Cooling Fan Controller |
| ECU 1 | 20 A | ECM (Engine Control Module) |
| ECU 2 | 20 A | ECM (Engine Control Module) |
| ECU 3 | 20 A | ECM (Engine Control Module) |
| IGN COIL | 20 A | Ignition Coil #1/#2/#3/#4/#5/#6 |
*1 : MDPS (Motor Driven Power Steering) is the same as EPS (Electric Power Steering). Refer to the following table for the relay type.
| Relay Name | Type |
| Blower FRT Relay | MINI |
| Rear Heated Relay | MINI |
| Start Relay | MICRO |
| PTC Heater 1 Relay | MICRO |
| PTC Heater 2 Relay | MICRO |
| H/LAMP HI Relay | MICRO |
| Blower RR Relay | MICRO |
| Wiper Lo Relay | MICRO |
| Wiper Hi Relay | MICRO |
| Wiper FRT Relay | MICRO |
| FUEL PUMP Relay | MICRO |
Battery terminal cover
NOTICE
Not all fuse panel descriptions in this manual may be applicable to your vehicle. It is accurate at the time of printing. When you inspect the fuse panel in your vehicle, refer to the fuse panel label.
Light bulbs
Light bulbs are installed in various parts of the vehicle to provide lighting inside and outside the vehicle as well as to alert other vehicles.
Bulb replacement precaution
Please keep extra bulbs on hand with appropriate wattage ratings in case of emergencies.
When changing lamps, first turn off the vehicle at a safe place, firmly apply the parking brake and detach the battery’s negative (-) terminal.
WARNING
Working on the lights
Prior to working on the light, firmly apply the parking brake, ensure that the vehicle start/stop button is in OFF position and turn off the lights to avoid sudden movement of the vehicle and burning your fingers or receiving an electric shock.
Use only bulbs of the specified wattage.
CAUTION
Light replacement
Be sure to replace the burned-out bulb with one of the same wattage rating. Otherwise, it may cause damage to the fuse or electric wiring system.
Fully install light bulbs and any parts used to secure them. Failure to do so may result in heat damage, fire, or water entering the headlight unit. This may damage the headlights or cause condensation to build up on the lens. To prevent damage or fire, make sure bulbs are fully seated and locked.
CAUTION
Headlamp Lens
To prevent damage, do not clean the headlamp lens with chemical solvents or strong detergents.
NOTICE
- If the light bulb or lamp connector is removed while the lamp is still on, the fuse box’s electronic system may log it as a malfunction. Therefore, a lamp malfunction incident may be recorded as a Diagnostic Trouble Code (DTC) in the fuse box.
- It is normal for an operating lamp to flicker momentarily. This is due to the stabilization function of the vehicle’s electronic control device. If the lamp lights up normally after momentarily blinking, then it is functioning as nor-mal.
However, if the lamp continues to flicker several times or turns off completely, there may be an error in the vehicle’s electronic control device. Please have the vehicle checked by an authorized Kia dealer immediately.
NOTICE
We recommend that the headlight aiming be adjusted by an authorized Kia dealer after an accident or after the headlight assembly is reinstalled.
NOTICE
You can find moisture inside the lens of lamps after a car wash or driving in the rain. It is a natural event caused by the temperature difference between the inside and the outside of the lamp and does not mean a problem with its functions. The moisture inside the lamp would disappear if you drive the vehicle with the headlamp turned on, however, the level at which the moisture is removed may differ depending on the size/location/condition of the lamp. If the moisture continues to stay inside the lamp, have the vehicle checked by an authorized Kia dealer.
If you don’t have the necessary tools, the correct bulbs and the expertise, consult an authorized Kia dealer. In many cases, it is difficult to replace vehicle light bulbs because other parts of the vehicle must be removed before you can get to the bulb. This is especially true if you have to remove the headlamp assembly to get to the bulb(s).
Removing/installing the headlamp assembly can result in damage to the vehicle. If non-genuine parts or substandard bulbs are used, it may lead to blowing a fuse or other wiring damages. Kia Genuine Parts we guarantees for quality and performance.
Do not install extra lamps or LEDs to the vehicle. If additional lights are installed, it may lead to lamp malfunctions and flickering. Additionally, the fuse box and other wiring may be damaged.
2023 Kia Telluride Specs, Price, Features and Mileage (Brochure)
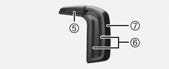
Light bulb position (Front)
Headlamp
Fog lamp
- Headlamp (Low) (LED Type)
- Headlamp (High) (LED Type)
- Position lamp / Daytime running lamp / Front turn signal lamp (LED Type)
- Side marker (LED Type)
- Front fog lamp (LED Type)
Light bulb position (Rear)
Rear combination lamp – Type A

Rear combination lamp – Type B
Rear lamps
- Tail lamp (Bulb Type)
- Tail lamp / Stop lamp / Rear turn signal lamp (Bulb Type)
- Back up lamp (Bulb Type)
- Side marker (Bulb Type)
- Tail lamp (LED Type)
- Tail lamp/Stop lamp/Rear turn signal lamp (LED Type)
- Side marker (LED Type)
- Back up lamp (For Rear combination lamp type B) (Bulb Type)
- High Mounted Stop Lamp (LED Type)
- License plate lamp (Bulb Type)
Light bulb position (Side)
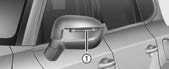
Side repeater lamp (LED type)
Replacing lights (LED type)
If the LED lamp does not operate, have your vehicle checked by an authorized Kia dealer. The LED lamp cannot be replaced as a single component because it is an integrated unit. The LED lamp has to be replaced with the unit.
A skilled technician should check or repair the LED lamp, for it may damage related parts of the vehicle.
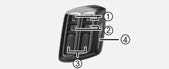
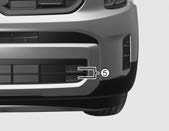
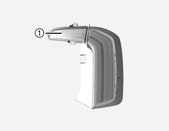
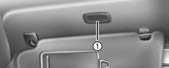
Replacing front fog lamp (LED type)
If the front fog lamp (1) does not operate, have the vehicle checked by an authorized Kia dealer.
Replacing stop lamp, tail lamp, and rear turn signal lamp (Bulb type) (Rear combination lamp Type A)
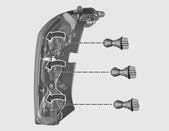
- Open the liftgate.
- Loosen the lamp assembly retaining screws with a screwdriver.
- Remove the rear combination lamp assembly from the body of the vehicle.
- Remove the socket from the assembly by turning the socket counterclockwise until the tabs on the socket align with the slots on the assembly.
- Remove the bulb from the socket by pressing it in and rotating it counter-clockwise until the tabs on the bulb align with the slots in the socket.
- Insert a new bulb by inserting it into the socket and rotating it until it locks into place.
- Install the socket in the assembly by aligning the tabs on the socket with the slots in the assembly and turning the socket clockwise.
- Reinstall the lamp assembly to the body of the vehicle.
Replacing backup lamp (Bulb type) (Rear combination lamp Type A)
If the Back Up lamp bulb (Bulb Type) (1) does not operate, have your vehicle checked by an authorized Kia dealer.
Replacing high mounted stop lamp (LED type)
If the High Mounted Stop Lamp (LED) (1), does not operate, have the vehicle checked by an authorized Kia dealer.
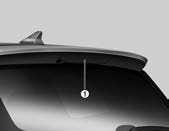
The LED lamps cannot be replaced as a single component because it is an integrated unit. The LED lamps have to be replaced with the unit. A skilled technician should check or repair the High Mounted Stop Lamp (LED), for it may damage related parts of the vehicle.
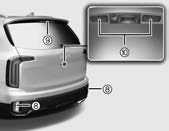
Replacing license plate lamp (Bulb type)
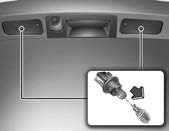
- Using a flat-blade screwdriver, gently pry the lamp assembly from the interior.
- Remove the bulb by pulling it straight out.
- Install a new bulb in the socket.
- Install the lamp assembly to the interior.
Replacing map lamp (Bulb type)
- Using a flat-blade screwdriver, gently pry the lens cover from lamp housing.
- Remove the bulb by pulling it straight out.
- Install a new bulb in the socket.
- Align the lens cover tabs with the lamp housing notches and snap the lens into place.
NOTICE
Be careful not to damage the lens, lens tab, and plastic housings or get them dirty.
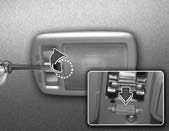
Replacing vanity mirror lamp bulb (Bulb type)
- Using a flat-blade screwdriver, gently pry the lens cover from lamp housing.
- Remove the bulb by pulling it straight out.
- Install a new bulb in the socket.
- Align the lens cover tabs with the lamp housing notches and snap the lens into place.
NOTICE
Be careful not to damage the lens, lens tab, and plastic housings or get them dirty.
Replacing room lamp (bulb type) bulb
- Using a flat-blade screwdriver, gently pry the lens cover from lamp housing.
- Remove the bulb by pulling it straight out.
- Install a new bulb in the socket.
- Align the lens cover tabs with the lamp housing notches and snap the lens into place.
NOTICE
Be careful not to damage the lens, lens tab, and plastic housings or get them dirty.
Replacing glove box lamp (Bulb type)
- Using a flat-blade screwdriver, gently pry the lamp assembly from the interior.
- Remove the bulb by pulling it straight out.
- Install a new bulb in the socket.
- Install the lamp assembly to the interior.
CAUTION
Be careful not to damage the lens, lens tab, and plastic housings or get them dirty.
Replacing luggage lamp bulb (Bulb type)
- Using a flat-blade screwdriver, gently pry the lens cover from lamp housing.
- Remove the bulb by pulling it straight out.
- Install a new bulb in the socket.
- Align the lens cover tabs with the lamp housing notches and snap the lens into place.
FAQ
A: The fuse box in the 2023 Kia Telluride is usually located in the engine compartment or under the dashboard on the driver’s side.
A: You can visually inspect the fuse to see if the metal wire inside is broken. If it’s broken, the fuse is blown.
A: The size of the fuses can vary depending on the specific electrical component. Check the owner’s manual or the fuse box cover for information on fuse sizes.
A: To replace a blown fuse, turn off the vehicle, locate the blown fuse, use a fuse puller or needle-nose pliers to remove the old fuse, and replace it with a new one of the same amperage rating.
A: Fuses protect the electrical system by breaking the circuit if too much current flows through it, preventing damage to components and preventing fires.
A: Blown fuses can result from electrical overloads, short circuits, or faulty components.
A: No, using a higher amperage fuse can cause electrical damage or fires. Always replace a blown fuse with one of the same amperage rating.
A: It’s a good practice to check your fuses whenever you encounter electrical problems in your vehicle. Regular inspections can help you catch issues early.
A: The 2023 Kia Telluride may use various types of bulbs, including halogen, LED, and incandescent bulbs for different lighting functions.
A: The process for replacing a headlight bulb can vary depending on the type of bulb and the specific model. Consult your owner’s manual for step-by-step instructions.
A: Yes, you can often upgrade your headlights to LED bulbs, but it may require modifications and compatibility checks. Be sure to follow the manufacturer’s recommendations.
A: Check the bulb, the brake light switch, and the fuses related to the brake lights. If the bulb is burnt out, replace it. If other issues exist, consult a mechanic.
A: Activate your turn signal and visually inspect the front and rear lights. If one isn’t blinking, it likely needs a replacement bulb.
A: Keep your lights clean, replace bulbs promptly when they burn out, and regularly inspect and clean the connections to prevent corrosion.
A: Yes, you can replace interior cabin lights with LED bulbs to improve illumination. Check the owner’s manual for bulb specifications and replacement instructions.
Useful Link
View Full User Guide: Kia Telluride 2023 User Guide
Download Manuals: https://owners.kia.com/content/owners/en/manuals.html
2023 Kia Telluride Specs, Price, Features and Mileage (Brochure)