
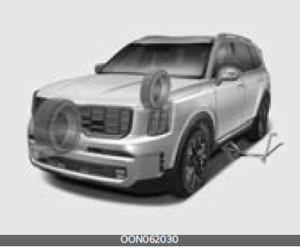
Kia Telluride 2023 Engine Overheats, Tire Pressure Monitoring System, If You Have a Flat Tire (With Spare Tire) and Towing
The Kia Telluride 2023 is designed with several features to help drivers deal with unexpected situations such as engine overheating, flat tires, and towing. In case of engine overheating, Telluride has a warning system that will alert the driver through a warning light on the instrument panel, accompanied by an audible warning. The driver should immediately pull over to a safe location and turn off the engine to prevent any further damage. After the engine cools down, the coolant level should be checked and refilled if necessary before continuing the journey. The Telluride is also equipped with a Tire Pressure Monitoring System (TPMS) that continuously monitors the air pressure in each tire. If the pressure in any tire drops below the recommended level, the TPMS will signal a warning light on the instrument panel. If a flat tire occurs, the vehicle has a spare tire and jack that can be used to replace the damaged tire. The owner’s manual should be followed when changing a tire, and it is crucial to ensure that the spare tire is inflated to the correct pressure. Regarding towing, the Telluride can tow up to 5,000 pounds when appropriately equipped. It also has Trailer Sway Control to prevent swaying and instability while towing. Drivers should ensure that the trailer’s weight and cargo do not exceed the recommended limits and that the trailer is correctly secured to the vehicle before towing. Using a trailer brake controller is recommended for additional safety and control.
2023 Kia Telluride Specs, Price, Features, Milage (brochure)
If the engine overheats
If your temperature gauge indicates overheating, you experience a loss of power, or hear loud pinging or knocking, the engine will probably be too hot.
If this happens, you should:
- Pull off the road and stop as soon as it is safe to do so.
- Place the shift lever in P and set the parking brake.
- If the air conditioning is on, turn it off.
- If engine coolant is running out under the vehicle or steam is coming out from underneath the hood, stop the engine. Do not open the hood until the coolant has stopped running or the steaming has stopped.
- If there is no visible loss of engine coolant and no steam, leave the engine running and check to be sure the engine cooling fan is operating.
- If the fan is not running, turn the engine off.
- Check to see if the water pump drive belt is missing.
- If it is not missing, check to see that it is tight.
- If the drive belt seems to be satisfactory, check for coolant leaking from the radiator, hoses or under the vehicle. (If the air conditioning had been in use, it is normal for cold water to be draining from it when you stop).
WARNING
Under the hood
- While the engine is running, keep hair, hands and clothing away from moving parts such as the fan and 7. If the water pump drive belt is broken or engine coolant is leaking out, stop the engine immediately and call the nearest authorized Kia dealer for assistance.
- If you cannot find the cause of the overheating, wait until the engine temperature has returned to normal. If coolant has been lost, carefully add coolant to the reservoir to bring the fluid level in the reservoir up to the halfway mark.
- Proceed with caution, keeping alert for further signs of overheating. If overheating happens again, call an authorized Kia dealer for assistance. drive belts to prevent injury.
WARNING
Radiator cap
Do not remove the radiator cap when the engine is hot. This may result in coolant being blown out of the opening and cause serious burns.
Serious loss of coolant indicates there is a leak in the cooling system and this should be checked as soon as possible by an authorized Kia dealer.
Tire Pressure Monitoring System (TPMS) (if equipped)
The Tire Pressure Monitoring System (TPMS) detects the pressure of vehicle’s tires and displays it on the LCD display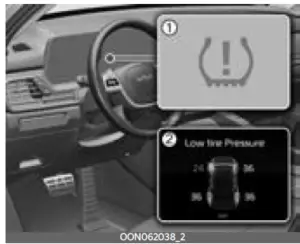
- Low tire pressure telltale / TPMS malfunction indicator
- Low tire pressure position telltale (Shown on the LCD display)
Tire Pressure Indicator
- You can check the tire pressure in the assist mode on the cluster.
- Tire pressure is displayed 1~2 minutes later after driving.
- If tire pressure is not displayed when the vehicle is stopped, “Drive to display” message displays. After driving, check the tire pressure.
- You can change the tire pressure unit in the Settings from the infotainment system screen.
- psi, kPa, bar.
NOTICE
- The tire pressure may change due to factors such as parking conditions, driving style, and altitude above sea level.
- The tire pressure shown on the dashboard may differ from the tire pressure measured by tire pressure gauge.
Effective use of the TPMS
WARNING
Over-inflation or under-inflation can reduce tire life, adversely affect vehicle handling, and lead to sudden tire failure that may cause loss of vehicle control resulting in an accident Each tire, including the spare (if pro-vided), should be checked monthly when cold and inflated to the inflation pressure recommended by the vehicle manufacturer on the vehicle placard or tire inflation pressure label.
(If your vehicle has tires of a different size than the size indicated on the vehicle placard or tire inflation pressure label, you should determine the proper tire inflation pressure for those tires.)
As an added safety feature, your vehicle has been equipped with a tire pressure monitoring system (TPMS) that illuminates a low tire pressure telltale when one or more of your tires is significantly under-inflated. Accordingly, when the low tire pressure telltale illuminates, you should stop and check your tires as soon as possible, and inflate them to the proper pressure. Driving on a significantly under-inflated tire causes the tire to overheat and can lead to tire failure. Under-inflation also reduces fuel efficiency and tire tread life, and may affect the vehicle’s handling and stopping ability.
Please note that the TPMS is not a substitute for proper tire maintenance, and it is the driver’s responsibility to maintain correct tire pressure, even if under-inflation has not reached the level to trigger illumination of the TPMS low tire pressure telltale.
Your vehicle has also been equipped with a TPMS malfunction indicator to indicate when the system is not operating properly. The TPMS malfunction indicator is combined with the low tire pressure telltale. When the system detects a malfunction, the telltale will flash for approximately one minute and then remain continuously illuminated. This sequence will continue upon subsequent vehicle start-ups as long as the malfunction exists. When the malfunction indicator is illuminated, the system may not be able to detect or signal low tire pressure as intended. TPMS malfunctions may occur for a variety of reasons, including the installation of replacement or alternate tires or wheels on the vehicle that prevent the TPMS from functioning properly.
Always check the TPMS malfunction tell-tale after replacing one or more tires or wheels on your vehicle to ensure that the replacement or alternate tires and wheels allow the TPMS to continue to function properly.
If any of the below happens, have the system checked by an authorized Kia dealer.
- The low tire pressure telltale / TPMS malfunction indicator does not appear for 3 seconds when the ENGINE START/STOP button is turned to the ON position or the engine is running.
- The TPMS malfunction indicator remains illuminated after blinking for approximately 1 minute.
- The Low tire pressure position telltale remains illuminated.
Low tire pressure telltale
Low tire pressure position telltale
When the TPMS warning indicators appear, one or more of your tires is significantly under-inflated.
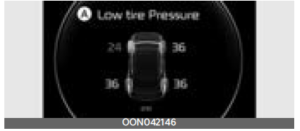
A: Low tire pressure
If the telltale appears, immediately reduce your speed, avoid hard cornering and anticipate increased stopping distances. You should stop and check your tires as soon as possible.
Inflate the tires to the proper pressure as indicated on the vehicle’s placard or tire inflation pressure label located on the driver’s side center pillar outer panel. If you cannot reach a service station or if the tire cannot hold the newly added air, replace the low-pressure tire with the spare tire.
Then the TPMS malfunction indicator and the Low Tire Pressure telltale may turn on and appear after restarting and about 20 minutes of continuous driving before you have the low-pressure tire repaired and replaced on the vehicle.
In winter or cold weather, the low tire pressure telltale may appear if the tire pressure was adjusted to the recommended tire inflation pressure in warm weather. It does not mean your TPMS is malfunctioning because the decreased temperature leads to a proportional lowering of tire pressure.
You should check the tire inflation pressure and adjust the tires to the recommended tire inflation pressure when driving your vehicle in the following conditions.
- from a warm area to a cold area
- from a cold area to a warm area
- the outside temperature is extremely high or low
When filling tires with more air, conditions to turn off the low tire pressure tell-tale may not be met. This is because a tire inflator has a margin of error in performance. The low tire pressure telltale will be turned off if the tire pressure is above the recommended tire inflation pressure.
WARNING
Low-pressure damage
Do not drive on low-pressure tires. Significantly low tire pressure can cause the tires to overheat and fail making the vehicle unstable and resulting in increased braking distances and a loss of vehicle control.
TPMS malfunction indicator
The low tire pressure telltale will illuminate after it blinks for approximately one minute when there is a problem with the TPMS.
If the system is able to correctly detect an underinflation warning at the same time as system failure, it will illuminate both the TPMS malfunction and the low ire pressure position telltales. For example, if the Front Left sensor fails, the TPMS malfunction indicator appears, but if the Front Right, Rear Left, or Rear Right tire is underinflated, the low tire pressure position telltales may illuminate together with the TPMS malfunction indicator.
Have the system checked by an authorized Kia dealer as soon as possible to determine the cause of the problem.
- The TPMS malfunction indicator may appear if the vehicle is moving around electric power supply cables or radio transmitters such as at police stations, government and public offices, broadcasting stations, military installations, airports, or transmitting towers, etc. This can interfere with the normal operation of the TPMS.
- The TPMS malfunction indicator may appear if the vehicle is equipped with snow chains or some personal electronic devices (such as a laptop computer, mobile charger, remote starter or navigation) are being used in the vehicle. This can interfere with the normal operation of the TPMS.
Tire replacement with TPMS
If you have a flat tire, the Low Tire Pressure telltale will come on. Have the flat tire repaired by an authorized Kia dealer as soon as possible or replace the flat tire with a spare tire.
CAUTION
Repair Agents
Never use a puncture-repairing agent not approved by Kia to repair and/or inflate a low-pressure tire. The sealant not approved by Kia may damage the tire pressure sensor.
Each wheel is equipped with a tire pressure sensor mounted inside the tire behind the valve stem. You must use TPMS-specific wheels. It is recommended that you always have your tires serviced by an authorized Kia dealer.
Even if you replace the low-pressure tire with the spare tire, the Low Tire Pressure telltale will remain on until the low-pressure tire is repaired and placed on the vehicle.
After you replace the low-pressure tire with the spare tire, the TPMS malfunction indicator may appear after a few minutes. This is because the TPMS sensor mounted on the spare wheel is not yet activated.
Once the low-pressure tire is inflated again to the recommended pressure and installed on the vehicle or the TPMS sensor mounted on the replaced spare wheel is initiated by an authorized Kia dealer, the TPMS malfunction indicator and the low tire pressure telltale will turn off within a few minutes of driving.
If the indicator has not disappeared after a few minutes of driving, please visit an authorized Kia dealer.
If an original mounted tire is replaced with the spare tire, the TPMS sensor on the replaced spare wheel should be initiated and the TPMS sensor on the original mounted wheel should be deactivated. If the TPMS sensor on the original mounted wheel located in the spare tire carrier still activates, the Tire Pressure Monitoring System may not operate properly. Have the tire with TPMS serviced or replaced by an authorized Kia dealer.
You may not be able to identify a low tire by simply looking at it. Always use a good quality tire pressure gauge to measure the tire’s inflation pressure. Please note that a tire that is hot (from being driven) will have a higher pressure measurement than a tire that is cold (from sitting stationary for at least 3 hours and driving less than 1 mile (1.6 km) during that 3 hour period).
Allow the tire to cool before measuring the inflation pressure. Always be sure the tire is cold before inflating to the recommended pressure.
A cold tire means the vehicle has been sitting for 3 hours and driven for less than 1 mile (1.6 km) in that 3-hour period.
Never use tire sealant if your vehicle is equipped with a TPMS. The liquid sealant can damage the tire pressure sensors.
- The TPMS cannot alert you to severe and sudden tire damage caused by external factors such as nails or road debris.
- If you feel any vehicle instability, immediately take your foot off the accelerator, apply the brakes gradually and with light force, and slowly move to a safe position off the road.
NOTICE
Protecting TPMS
Tampering with, modifying, or disabling the Tire Pressure Monitoring System
(TPMS) components may interfere with the system’s ability to warn the driver of low tire pressure conditions and/or TPMS malfunctions. Tampering with, modifying, or disabling the Tire Pressure Monitoring System (TPMS) components may void the warranty for that portion of the vehicle.
This device complies with Part 15 of the FCC rules.
Operation is subject to the following two conditions:
- This device may not cause harmful interference, and
- This device must accept any interference received, including interference that may cause undesired operation.
- Changes or modifications not expressly approved by the party responsible for compliance could void the user’s authority to operate the device.
If you have a flat tire (with a spare tire)
If you have a flat tire, you can change the flat tire to a spare tire using tools.
WARNING
Driving on a flat tire will cause permanent damage to the tire. Re-inflating a tire after it has been driven on while severely underinflated or flat may cause a blowout and a serious crash. Never attempt to re-inflate a tire that has been driven on while severely underinflated or flat. In this case, repair or replace the flat tire as soon as possible.
WARNING
Changing as tire can be dangerous. Follow the instructions in this section when changing a tire to reduce the risk of serious injury or death.
CAUTION
Be careful as you use the jack handle to stay clear of the flat end. The flat end has sharp edges that could cause cuts.
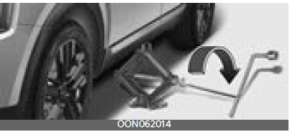
Jack and tools
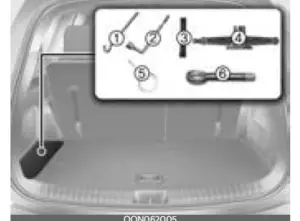
- Jack handle
- Wheel nut wrench
- Socket
- Jack
- Wheel cap remover
- Towing hook
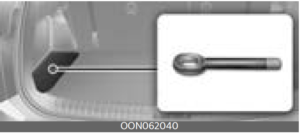
The jack and tools are stored in the luggage side trim.
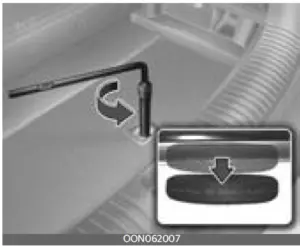
Remove the tray cover indicated in the illustration.
Jacking instructions
The jack is provided for emergency tire changing only.
- To prevent the jack from “rattling” while the vehicle is in motion, store it properly.
- Follow jacking instructions to reduce
WARNING
Changing tires
- Never attempt vehicle repairs in the traffic lanes of a public road or highway.
- Always move the vehicle completely off the road and onto the shoulder before trying to change a tire. The jack should be used on firm-level ground. If you cannot find a firm-level place off the road, call a towing service company for assistance.
- Be sure to use the correct front and rear jacking positions on the vehicle; never use the bumpers or any other part of the vehicle for jacking support.
- The vehicle can roll off the jack causing serious injury or death.
- Do not get under a vehicle that is supported by a jack.
- Do not start or run the engine while the vehicle is on the jack.
- Do not allow anyone to remain in the vehicle while it is on the jack.
- Make sure any children present are secure place away from the road and from the vehicle to be raised with the jack.
WARNING
Tire jack
Do not place any portion of your body under a vehicle that is only supported by a jack since the vehicle can easily roll off the jack. Use vehicle support stands.
WARNING
Running a vehicle on jack
Do not start or run the engine of the vehicle while the vehicle is on the jack as this may cause the vehicle to fall off the jack.
NOTICE
Retreaded tires
Substantial design variations and the age of the retreaded tire casing structure can limit service life and have a negative impact on road safety.
Removing the spare tire
Your spare tire is stored underneath the back of your vehicle, directly below the right sliding door.
To remove the spare tire:
- Open the luggage floor cover and find the plastic hex bolt cover on the floor.
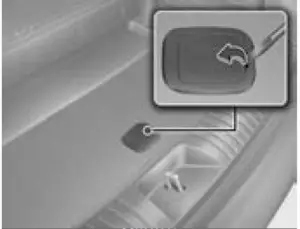
- Remove the cover.
- Use the tool to loosen the bolt enough to lower the spare tire.
Turn the tool counterclockwise until the spare tire reaches the ground.
- After the spare tire reaches the ground, continue to turn the tool counterclockwise, and draw the spare tire outside. Never rotate the tool excessively, otherwise, the spare tire carrier may be damaged.
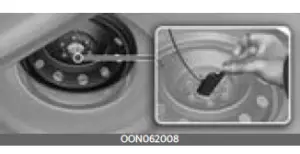
- Remove the retainer from the center of the spare tire.
2023 Kia Telluride Specs, Price, Features and Mileage (Brochure)
Storing the spare tire
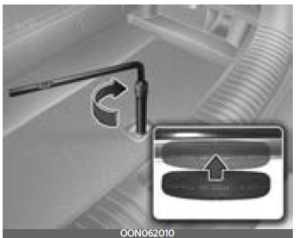
- Place the wheel under the vehicle and install the retainer through the wheel centre.
- Turn the tool clockwise until it clicks.
Ensure the spare tire retainer is properly aligned with the center of the spare tire to prevent the spare tire from “rattling”. Otherwise, it may cause the spare tire to fall off the carrier and lead to an accident.
Changing tires
WARNING
A vehicle can slip or roll off of a jack causing serious injury or death to you or those nearby. Take the following safety precautions:.
- Never place any portion of your body under a vehicle that is supported by a jack.
- NEVER attempt to change a tire in the lane of traffic. ALWAYS move the vehicle completely off the road on level, firm ground away from traffic before trying to change a tire. If you cannot find a level, firm place off the road, call a towing service for assistance.
- Be sure to use the jack provided with the vehicle.
- ALWAYS place the jack on the designated jacking positions on the vehicle and NEVER on the bumpers or any other part of the vehicle for jacking support
- Do not start or run the engine while the vehicle is on the jack.
- Do not allow anyone to remain in the vehicle while it is on the jack.
- Keep children away from the road and the vehicle.
- Park on a level surface and apply the parking brake firmly.
- Place the transmission shift lever in P (Park).
- Activate the hazard warning flashers.
- Remove the jack and tools from the vehicle.
- Block both the front and rear of
 the wheel that is diagonally opposite from the jack position.
WARNING
Jack location
To reduce the possibility of injury, be sure to use only the jack provided with the vehicle in the correct jack position; never use any other part of the vehicle for jack support.
WARNING
Changing a tire
- To prevent vehicle movement while changing a tire, always set the parking brake fully, and always block the wheel diagonally opposite the wheel being changed.
- We recommend that the wheels of the vehicle be blocked and that no person remain in a vehicle that is being jacked
- Insert the tool (Wheel cap remover) into the hole and pull out the wheel cover. (if equipped)

- Loosen the wheel lug nuts counterclockwise one turn each, but do not remove any nut until the tire has been raised off the ground.
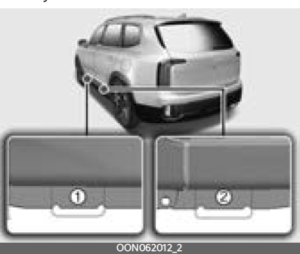
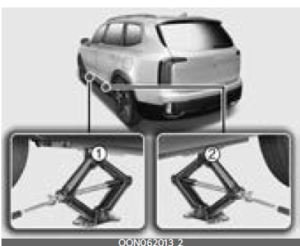
- Place the jack at the front (1) or rear (2) jacking position closest to the tire you are changing. Place the jack at the designated locations under the frame. The jacking positions are plates welded to the frame with two tabs and a raised dot to line up with the jack.
- Insert the wheel lug nut wrench into the jack and turn it clockwise, raising the vehicle until the tire just clears the ground. This measurement is approximately 1 inch (30 mm).
Before removing the wheel lug nuts, make sure the vehicle is stable and that there is no chance for movement or slippage.
- Loosen the wheel nuts and remove them with your fingers.
- Slide the wheel off the studs and lay it flat so it cannot roll away.
- To put the wheel on the hub, pick up the spare tire, line up the holes with the studs and slide the wheel onto them. If this is difficult, tip the wheel slightly and get the top hole in the wheel lined up with the top stud.
- Jiggle the wheel back and forth until the wheel can slide over the other studs.
Wheels may have sharp edges. Handle them carefully to avoid possible severe injury. Before putting the wheel into place, be sure that there is nothing on the hub or wheel (such as mud, tar, gravel, etc.) that prevents the wheel from fitting solidly against the hub.
WARNING
Installing a wheel- When you install a wheel, always remove any corrosion, dirt or foreign materials present on the mounting surfaces of the wheel or the surface of the wheel hub, brake drum or brake disc that contacts the wheel. Make sure to secure any fasteners that attach the rotor to the hub so they do not interfere with the mounting sur-faces of the wheel. Installing wheels without correct metal-to-metal con-tact at the wheel mounting surfaces can cause the wheel nuts to loosen and the wheel to come off while your vehicle is in motion, resulting in loss of vehicle control, personal injury or death.
- Make sure the wheel makes good contact with the hub when installed. If the contact of the mounting surface between the wheel and hub is not good, the wheel nuts could come loose and cause the loss of a wheel. Loss of a wheel may result in loss of control of the vehicle.
WARNING
Wheel covers will not fit on the vehicle’s compact spare. If you try to put a wheel cover on the compact spare, the cover or the spare could be damaged.
- To install the wheel, hold it on the studs, put the wheel nuts on the studs and tighten them finger tight.
- Jiggle the tire to be sure it is completely seated, then tighten the nuts as much as possible with your fingers again.
- Insert the wrench into the jack and lower the vehicle to the ground by turning the wheel nut wrench counterclockwise.
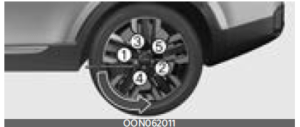
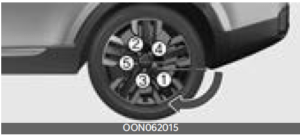
- Position the wrench as shown in the drawing and tighten the wheel nuts. Be sure the socket is seated completely over the nut. Do not stand on the wrench handle or use an extension pipe over the wrench handle.
- Go around the wheel, tightening every nut following the numerical sequence shown in the image until they are all tight. Double-check each nut for tightness.
 After changing tires, have an authorized Kia dealer tighten the lug nuts to their proper torque as soon as possible. The wheel lug nut should be tightened to 79~94 lbf·ft (11~13 kgf·m).
Wheel nut tightening torque:
79~94 lbf·ft (11~13 kgf·m) - After changing wheels, have an authorized Kia dealer tighten the wheel nuts to their proper torque as soon as possible.
- To prevent the jack, wheel lug nut wrench and spare tire from rattling while the vehicle is in motion, store them properly.
- Check the inflation pressures as soon as possible after installing the spare tire. Adjust it to the specified pressure, if necessary.
If you have a tire gauge, remove the valve cap and check the air pressure. If the pressure is lower than recommended, drive slowly to the nearest service station and inflate to the correct pressure. If it is too high, adjust it until it is correct. Always reinstall the valve cap after checking or adjusting the tire pressure. If the cap is not replaced, dust and dirt may get into the tire valve and air may leak from the tire. If you lose a valve cap, buy another and install it as soon as possible.
After you have changed the wheels, always secure the flat tire in its place and return the jack and tools to their proper storage locations.
CAUTION
Reusing lug nuts
Make certain during wheel removal that the same nuts that were removed are reinstalled – or, if replaced, that nuts with metric threads and the same chamfer configuration are used. Your vehicle has metric threads on the wheel studs and nuts. Installation of a non-metric thread nut on a metric stud will not secure the wheel to the hub properly and will dam-age the stud so that it must be replaced.
Note that most lug nuts do not have metric threads. Be sure to use extreme care in checking for thread style before installing aftermarket lug nuts or wheels. If in doubt, consult an authorized Kia dealer.
WARNING
Wheel studs
If the studs are damaged, they may lose their ability to retain the wheel. This could lead to the loss of the wheel and a collision resulting in serious injuries.
WARNING
Never use oil or grease on bolts or nuts because the nuts might come loose. The vehicle’s wheel could fall off, causing a crash.
Important – use of compact spare tire
Your vehicle is equipped with a compact spare tire. This compact spare tire takes up less space than a regular-size tire. This tire is smaller than a conventional tire and is designed for temporary use only.
- You should drive carefully when the compact spare is in use. The compact spare should be replaced by the proper conventional tire and rim at the first opportunity.
- The operation of this vehicle is not recommended with more than one compact spare tire in use at the same time.
WARNING
Spare tire
The compact spare tire is for emergency use only. Do not operate your vehicle on this compact spare at speeds over 50 mph (80 km/h). The original tire should be repaired or replaced as soon as possible to avoid failure of the spare possibly leading to bodily injury or death.
The compact spare should be inflated to 60 psi (420 kPa).
NOTICE
Check the inflation pressure after installing the spare tire. Adjust it to the specified pressure, as necessary.
When using a compact spare tire, observe the following precautions:
- Under no circumstances should you exceed 50 mph (80 km/h); a higher speed could damage the tire.
- Ensure that you drive slowly enough for the road conditions to avoid all hazards. Any road hazard, such as a pothole or debris, could seriously damage the compact spare.
- Any continuous road use of this tire could result in tire failure, loss of vehicle control, and possible personal injury.
- Do not exceed the vehicle’s maximum load rating or the load-carrying capacity shown on the sidewall of the compact spare tire.
- Avoid driving over obstacles. The compact spare tire diameter is smaller than the diameter of a conventional tire and reduces the ground clearance by approximately 1 inch (25 mm), which could result in damage to the vehicle.
- Do not take this vehicle through an automatic vehicle wash while the compact spare tire is installed.
Do not use tire chains on the compact spare tire. Because of the smaller size, a tire chain will not fit properly. This could damage the vehicle and result in loss of the chain. - Do not use the compact spare tire on any other vehicle because this tire has been designed especially for your vehicle.
- The compact spare tire’s tread life is shorter than a regular tire. Inspect your compact spare tire regularly and replace worn compact spare tires with the same size and design, mounted on the same wheel.
- The compact spare tire should not be used on any other wheels, nor should standard tires, snow tires, wheel covers or trim rings be used with the compact spare wheel. If such use is attempted, damage to these items or other vehicle components may occur.
- Do not use more than one compact spare tire at a time.
- Do not tow a trailer while the compact spare tire is installed.
- Do not suddenly accelerate or decelerate (0 ↔ 25 mph) in any driving mode. It may cause leakage of transfer oil.
Jack label
Type A
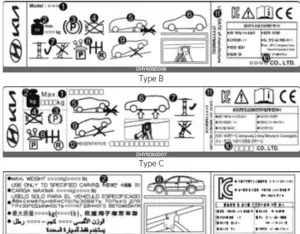
* The actual jack label in the vehicle may differ from the illustration. For more detailed specifications, refer to the label attached to the jack.
- Model Name
- Maximum allowable load
- When using the jack, set your parking brake.
- When using the jack, stop the engine.
- Do not get under a vehicle that is supported by a jack.
- The designated locations under the frame
- When supporting the vehicle, the base plate of jack must be vertical under the lifting point.
- Move the shift position to the P (Park) position on vehicles.
- The jack should be used on firm level ground.
- Jack manufacturer
- Production date
- Representative company and address
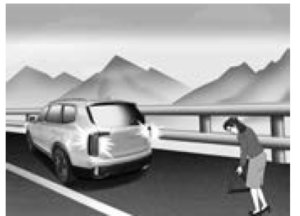
Towing
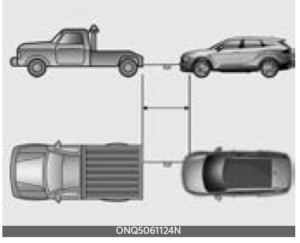
If emergency towing is necessary, we recommend having it done by an authorized Kia dealer or a commercial tow-truck service.
Towing service
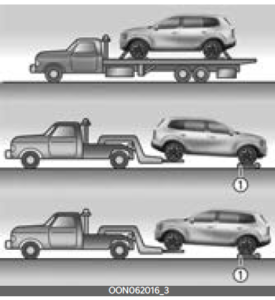
Proper lifting and towing procedures are necessary to prevent damage to the vehicle. The use of wheel dollies (1) or flatbeds is recommended.
On Front Wheel Drive (FWD) vehicles, it is acceptable to tow the vehicle with the rear wheel on the ground (without dollies) and the front wheels off the ground. If any of the loaded wheels or suspension components are damaged or the vehicle is being towed with the front wheels on the ground, use a towing dolly under the front wheels. When being towed by a commercial tow truck and wheel dollies are not used, the front of the vehicle should always be lifted, not the rear.
On All Wheel Drive (AWD) vehicles, your vehicle must be towed with a wheel lift and dollies or flatbed equipment with all the wheels off the ground.
WARNING
Side and curtain Airbag
If your vehicle is equipped with side and curtain airbag, set the ENGINE START/STOP button to ACC position when the vehicle is being towed.
The side and curtain air bag may deploy when the ENGINE START/STOP button to ON position and the rollover sensor detects the situation as a rollover.
NOTICE
If the EPB does not release normally, take your vehicle to an authorized Kia dealer by loading the vehicle on a flatbed tow truck and have the system checked.
CAUTION
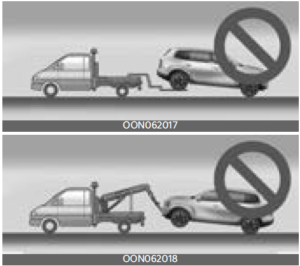
- Do not tow the vehicle backwards with the front wheels on the ground as this may cause damage to the transmission.
- Do not tow with sling-type equipment. Use wheel lift or flatbed equipment.
WARNING
- If you tow the vehicle while the front wheels are touching the ground, the vehicle motor may generate electricity and the motor components may be damaged or a fire may occur.
- When a vehicle fire occurs due to the battery, there is a risk of a second fire. Contact the fire department when towing the vehicle.
Towing without wheel dollies when using a towing service
When towing your vehicle in an emergency without wheel dollies:
- Set the ENGINE START/STOP button to ACC position.
- Place the transmission shift lever in N (Neutral).
- Release the parking brake.
CAUTION
Towing gear position
Failure to shift to N (Neutral) may cause internal damage to the vehicle.
Removable towing hook
- Open the liftgate, and remove the towing hook from the tool case.
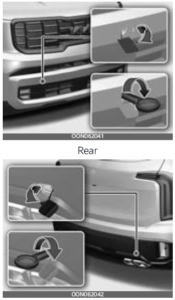
- Remove the hole cover pressing the upper part of the cover on the front or rear bumper. Install the towing hook by turning it
clockwise into the hole until it is fully secured.Front
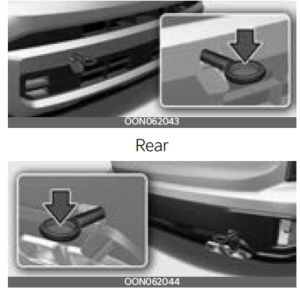
- Remove the towing hook and install the cover after use.
Emergency towing
Front
If towing is necessary, we recommend you have it done by an authorized Kia dealer or a commercial tow truck service.
If a towing service is not available in an emergency, your vehicle may be temporarily towed using a cable or chain secured to the emergency towing hook at the front (or rear) of the vehicle.
Use extreme caution when towing the vehicle with a cable or chain. A driver must be in the vehicle to steer it and operate the brakes.
Towing in this manner may be done only on hard-surfaced roads for a short distance and at low speeds. Also, the wheels, axles, power train, steering and brakes must all be in good condition.
CAUTION
The driver must be in the vehicle for steering and braking operations when the vehicle is being towed. Passengers other than the driver must not be in the vehicle.
Always follow these emergency towing precautions:
- Place the ignition switch in the ACC position so the steering wheel is not locked.
- Place the shift button in N (Neutral).
- Release the parking brake.
- Depress the brake pedal with more force than normal as you will have reduced braking performance.
- More steering effort will be required because the power steering system will be disabled.
- Use a vehicle heavier than your own to tow your vehicle.
- The drivers of both vehicles should communicate with each other frequently.
- Before emergency towing, check that the hook is not broken or damaged.
- Fasten the towing cable or chain securely to the hook.
- Do not jerk the hook. Apply steady and even force.
- Use a towing cable or chain less than 16 feet (5 m) long. Attach a white or red cloth (about 12 inches (30 cm) wide) in the middle of the cable or chain for easy visibility.
- Drive carefully so the towing cable or chain remains tight during towing.
- Before towing, check the automatic transmission for fluid leaks under your vehicle. If the automatic transmission fluid is leaking, flatbed equipment or a towing dolly must be used.
NOTICE
- Accelerate or decelerate the vehicle in a slow and gradual manner while maintaining tension on the tow rope or chain to start or drive the vehicle, otherwise, tow hooks and the vehicle may be damaged.
- To avoid damage to your vehicle and vehicle components when towing:
- Always pull straight ahead when using the towing hooks. Do not pull from the side or at a vertical angle.
- Do not use the towing hooks to pull a vehicle out of mud, sand or other conditions from which the vehicle cannot be driven out under its own power.
- Limit the vehicle speed to 10 mph (15 km/h) and drive less than 1 mile (1.5 km) when towing to avoid serious damage to the automatic transmission.
Q&A
What should I do if the engine of my Kia Telluride 2023 overheats?
If the engine overheats, the Telluride is equipped with a warning system that will alert the driver to the issue. The system will display a warning light on the instrument panel and may also issue an audible warning. If this occurs, the driver should pull over to a safe location as soon as possible and turn off the engine to prevent any further damage. Once the engine has cooled down, the coolant level should be checked and topped up if necessary before continuing on the journey.
Does the Kia Telluride 2023 come with a Tire Pressure Monitoring System (TPMS)?
Yes, the Kia Telluride 2023 comes with a Tire Pressure Monitoring System (TPMS) that constantly monitors the air pressure in each tire.
What happens if the air pressure in one of my tires drops below the recommended level?
If the air pressure in any tire drops below the recommended level, the TPMS will issue a warning light on the instrument panel.
Does the Kia Telluride 2023 come with a spare tire?
Yes, the Kia Telluride 2023 comes with a spare tire and jack that can be used to replace a flat tire.
What should I do if I have a flat tire?
In the event of a flat tire, it is important to follow the instructions provided in the owner’s manual when changing a tire and to ensure that the spare tire is inflated to the correct pressure.
What is the maximum towing capacity of the Kia Telluride 2023?
The Kia Telluride 2023 has a maximum towing capacity of up to 5,000 pounds when properly equipped.
Does the Kia Telluride 2023 come with Trailer Sway Control?
Yes, the Kia Telluride 2023 is equipped with Trailer Sway Control, which can help to prevent swaying and instability while towing.
Can I exceed the recommended weight limits when towing with my Kia Telluride 2023?
It is important to ensure that the weight of the trailer and its cargo do not exceed the recommended limits to avoid potential safety hazards.
What should I do to ensure that the trailer is properly secured to my Kia Telluride 2023 before towing?
It is important to properly secure the trailer to the vehicle using the appropriate equipment and techniques as recommended in the owner’s manual.
Should I use a trailer brake controller when towing with my Kia Telluride 2023?
Yes, it is recommended to use a trailer brake controller for additional safety and control while towing.
Can I tow a trailer with my Kia Telluride 2023 if it is not properly equipped for towing?
No, it is important to ensure that your vehicle is properly equipped for towing before attempting to tow a trailer.
What type of fuel should I use in my Kia Telluride 2023?
The Kia Telluride 2023 is designed to run on regular unleaded gasoline with an octane rating of 87 or higher.
How many people can the Kia Telluride 2023 seat?
The Kia Telluride 2023 can seat up to eight people.
What is the fuel economy of the Kia Telluride 2023?
The fuel economy of the Kia Telluride 2023 varies depending on factors such as driving conditions and vehicle configuration. The EPA estimated fuel economy for the 2023 Telluride is 20 mpg in the city and 27 mpg on the highway.
What is the warranty for the Kia Telluride 2023?
The Kia Telluride 2023 comes with a 5-year/60, years of warranty.
Useful Link
View Full User Guide: Kia Telluride 2023 User Guide
Download Manuals: https://owners.kia.com/content/owners/en/manuals.html
2023 Kia Telluride Specs, Price, Features and Mileage (Brochure)