Maserati GranTurismo 2024 Internal Equipment User Manual
Introduction
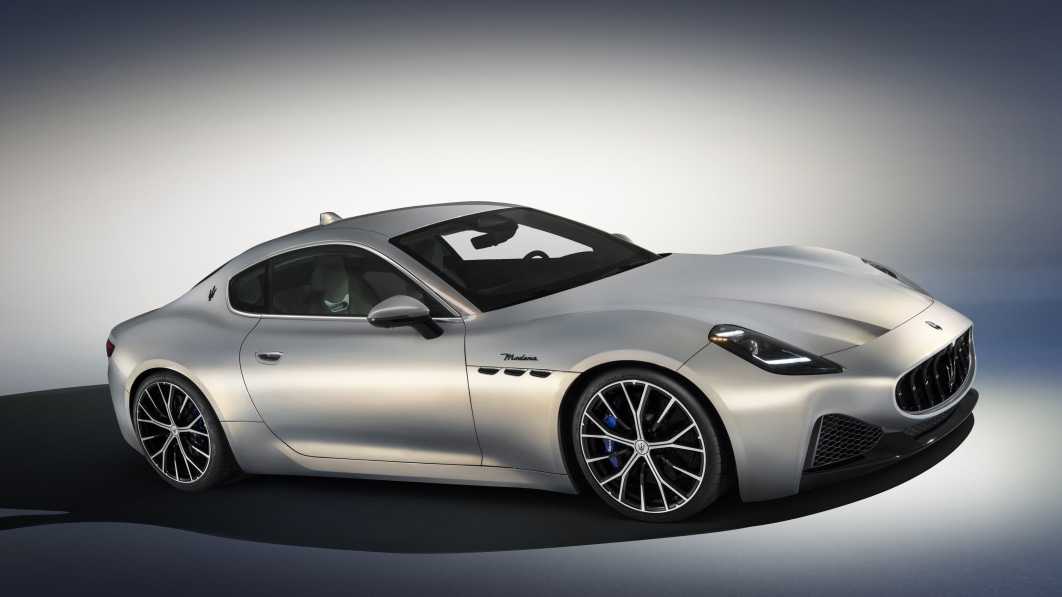
A high-performance luxury sports automobile that oozes style, strength, and sophistication is the Maserati GranTurismo 2024. The GranTurismo is equipped with a variety of cutting-edge internal features that improve the driving experience and surround occupants with comfort and cutting-edge technology in addition to its gorgeous outward design and exceptional driving performance.
The Maserati GranTurismo 2024, in conclusion, blends astonishing performance with opulent comfort and cutting-edge technology. For those looking for the ideal blend of power, elegance, and innovation, the GranTurismo offers a genuinely outstanding driving experience with its painstakingly designed cabin, cutting-edge infotainment system, premium audio experience, and extensive safety features.
Internal Equipment
Electric Power Outlets
The vehicle is equipped with two 12 Volt (13 Amp) electric power outlets, one inside the rear central tunnel compartment and one fitted in the boot. In vehicles equipped with “Smoking Kit” the electric power outlet inside the cup holder is replaced with a specific socket. All power outlets are supplied only when the engine is started or the ignition device is set to ON.
Power outlets are protected by a fuse. Insert a cigar lighter or accessory plug into the power outlets to ensure proper operation. Otherwise, check the matching fuse integrity, see “If a Fuse Blows” in section “In an Emergency” for further information.
CAUTION
- Do not plug in accessories that exceed the maximum power of 160 Watts (13 Amps) at 12 Volts.
- Power outlets are designed for accessory plugs only. Do not insert any other object in the power outlets as this will damage the outlet and blow the fuse. Damages caused by improper use of the power outlet are not covered by the New Vehicle Limited Warranty.
WARNING!
To avoid serious injury or death:
- Only devices designed for use in this type of outlet should be inserted into any 12 Volt outlet.
- Replacing the fuses that protect power outlets with others of higher amperage, there is the risk of fire.
- Do not touch with wet hands.
- Close the lids when the plug is not used and while driving the vehicle.
- If this outlet is mishandled, it may cause an electric shock and failure.
Power Outlet for Cigarette Lighter inside the Rear Central Tunnel Compartment
To access the 12 V power outlet inside the rear central tunnel compartment behind the cup holders, press the button as indicated to completely open the armrest.
NOTE:
This outlet is specifically dedicated to powering the cigarette lighter. It is not recommended to use it as an outlet to charge devices: use the other power outlets for this function.
WARNING!
High-power consumption items plugged into this outlet for long periods may discharge the battery and/or prevent the engine from starting.
Inside the rear central tunnel compartment, under the armrest, there is a storage area for storing the key fob.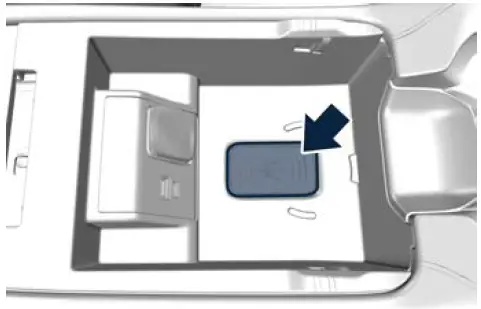
Power Outlet inside the Boot
The 12 V power outlet is positioned on the left side of the boot compartment.
Storage Compartments
The vehicle is equipped with various storage compartments.
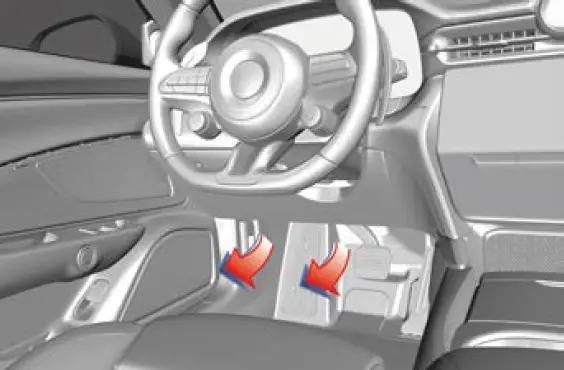
On the passenger side of the dashboard there is a glove box compartment with a lock (see “Access the Glove Box Compartment” in section “Before Driving”). Underneath the armrest on the central tunnel, in addition to the phone compartment and cup holder, there is a storage area for storing the key fob (see “Power Outlet for Cigarette Lighter inside the Rear Central Tunnel Compartment”).
In the front end of the central tunnel, there is an additional small compartment for storing small items (keys, coins, etc.); lift to the side the two half lids as indicated.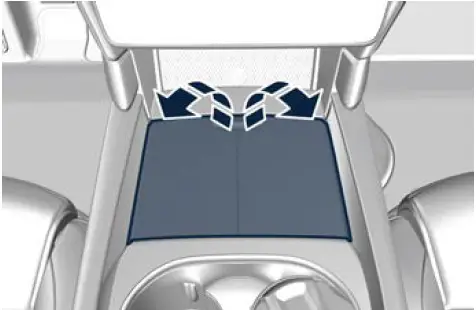
Cup Holders
The vehicle is equipped with several cup holders.
CAUTION
- Use light and shatterproof containers.
- Do not forcefully push unsuitable containers into the cup holders to prevent damage to the containers.
- Do not store hot drinks.
Cup Holders for Front Passengers
The front cup holders are located between the front and rear central tunnel compartments.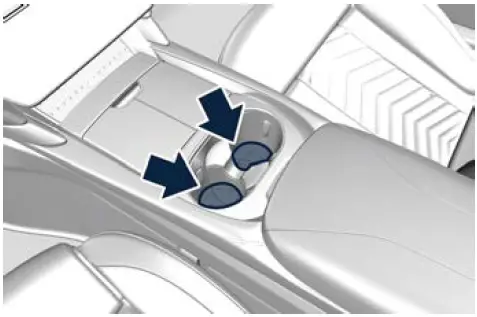
NOTE:
The central part of the front cup holder can be removed and stowed away in the rear central tunnel compartment, to enlarge the space.
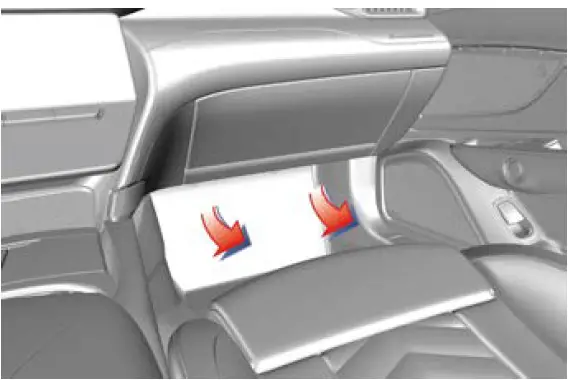
Cup Holders for Rear Passengers
Two cup holders are available between the rear seats, on the central console.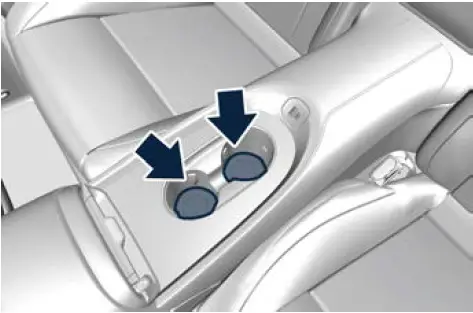
Multimedia Ports
The ports are located inside the compartment underneath the armrest.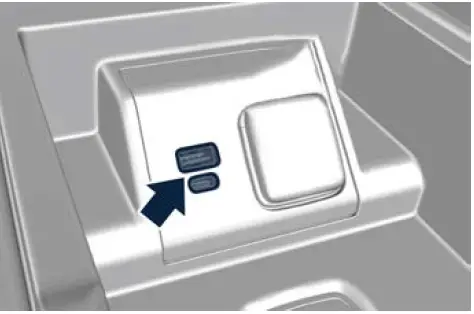
The USB ports (Type-A and Type-C) can be used for data exchange (refer to the “Maserati Intelligent Assistant™ (MIA)” guide for further details) and charge of the connected source.
For rear seat passengers, there are two ports (Type-A and Type-C) inputs on the central console, behind the two cup holders. This USB ports allow charging (CHARGE ONLY label) the connected source.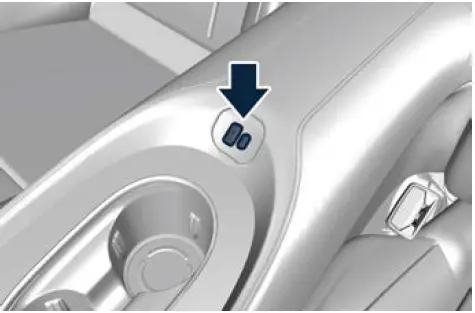
The following conditions can create USB inputs damage or malfunction:
- Usage of non-original lighting cables.
- Usage of defective rechargeable devices (smartphone, tablet, mass storage devices or other generic USB devices).
- ONLY insert media, into your vehicle if it came from a trusted source.
- Usage of damaged or defective cables.
Wireless Charger ![]()
The Wireless Charger is located in a dedicated phone box compartment on the central tunnel, under the Comfort Display.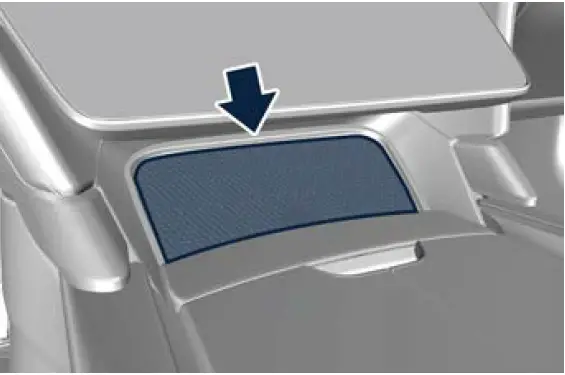
The Wireless Charger allows you to recharge your mobile phone (if it support this technology) without have to connect it to the charging port through a cable. The Wireless Charger system is designed to wirelessly charge mobile phones (maximum power available 15 W) compatible with the Qi ® standard. The system is activated in automatic mode when the mobile phone is placed in its compartment. If the mobile phone is removed from the Wireless Charger compartment during the wireless charging phase, this will automatically be interrupted. The Wireless Charger system enables charging when all doors are closed properly and the engine is ON .
CAUTION
- Key fob must not be placed on or close to the Wireless Charger compartment. This could cause excessive overheating and damage to the key fob. Placing the key fob in the Wireless Charger compartment may prevent the engine from starting. In this case, a dedicated message will be shown on the MIA screen to alert the driver of the need to remove the key fob from this compartment.
- Do not place any other type of metal or magnetized object (e.g. credit cards, coins, badge, etc.) inside the Wireless Charger compartment.
- Make sure that you place the mobile phone correctly (display facing upward) in the phone drawer: charging may not be enabled if it is in the wrong position.
- To avoid interference with the key fob search, the Wireless Charger system stops the charge for a moment when any door is opened.
- Make sure that there are no metal objects between the mobile phone and the wireless charger system during charging. Any such objects could overheat.
NOTE
- The wireless charger device is equipped with an NFC antenna, so the “Apple Pay Wallet” function could be activated on iPhone phones: in any case, this will not involve any economic transaction or charging interruptions.
- Some smartphones, due to their specific construction characteristics (e.g. internal metal body), could show charging problems in some driving conditions. In this case, the message “Foreign Object Detection (FOD)” may appear.
- According to driving style, brief interruptions in the charging process (with the related message popup activation) generated by the movement of the smartphone within the charging area may occur. This is not an anomalous behavior and the charging process will resume regularly as soon as driving conditions permit.
- When using smartphone cases, the wireless charging efficiency may be reduced or not possible. In this case, it will be sufficient to remove the smartphone case and verify the restoration of the correct charging conditions, keeping in mind the conditions and exceptions described in the previous paragraphs.
- During the charging process, the mobile phone can overheat and stop charging because of open applications or functions used. This is not anomalous behavior. The charging process will resume as soon as the device’s temperature drops to normal conditions.
- It is possible to deactivate the pop-ups related to the wireless charger by removing the flag on the MIA screen (see “Wireless Charger Status Popups” in chapter “Functions of Settings Menu on MIA” in section “Dashboard and Controls”).
- In all disconnection cases, to restore normal charging conditions, simply place the telephone in the drawer central position.
The charge status icon of the mobile phone housed in the Wireless Charger compartment is always visible on the MIA in the “Home” (if the Phone widget is visible or the icon is on the status bar) and “Phone” screen. This icon becomes blue if the mobile phone is charging, green if it is fully charged and blinking red for system fail or foreign object in the compartment. The blink ends after a timeout of 5 seconds and the icon becomes solid until the fail is solved. You can also drag and drop the Wireless Charger icon from the shortcut page to insert it in the upper status bar.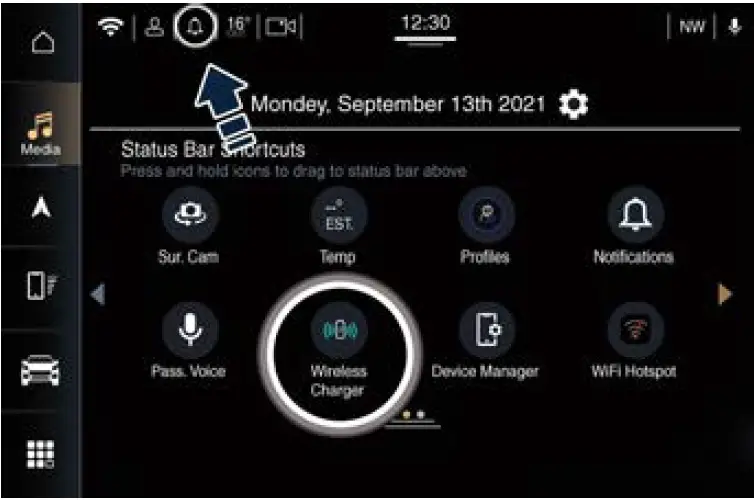
iPod ® Connection
An iPod ® can be connected to the system via USB ports.
The MIA will then control the following functions: play, pause, fast forward, rewind, next track, previous track, random or repeat mode, selection and navigation of playlist/genre/singer/album/Podcast.
CAUTION!
Do not leave your USB device, iPod® or an external audio source in the vehicle for extended periods of time: extreme temperatures and humidity can occur in the vehicle.
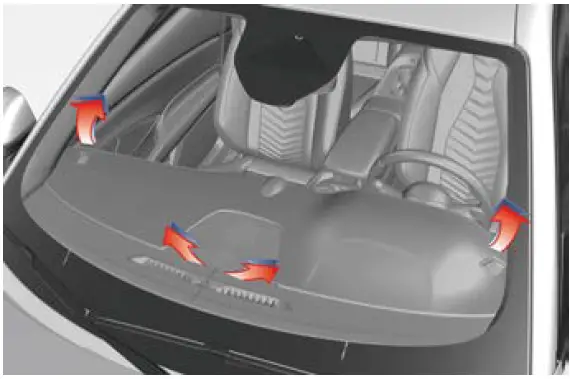
Sun Visors
Sun visors can be folded to the front and to the side of the vehicle. To move the sun visor laterally, lower and release it from its catch as indicated.
In this condition, the sun visor can be extended by sliding the sun visor end backward.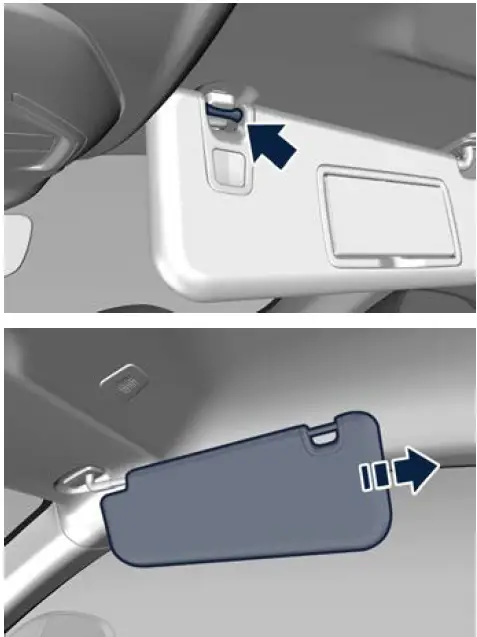
By lowering the sun visor you can access the courtesy mirror and, by opening the mirror protective cover, a LED light will automatically light up (with the ignition device in ON).
NOTE:
The light on the sun visor turns on only when it is in non-extended position and pushed towards the end stop of the sliding rod support.
Before raising the sun visor, close the mirror cover: the light will turn off. A business card holder is fitted inside each sun visor.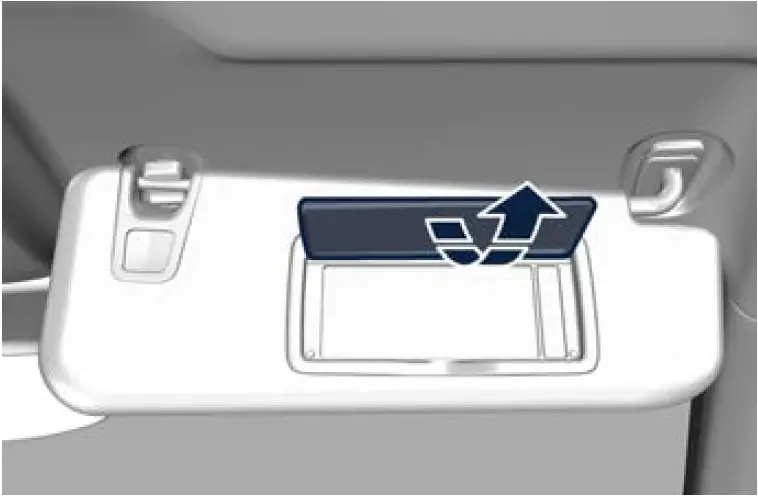
Smoking Kit ![]()
The kit includes a lighter and a removable ashtray with cover.
The Smoking kit for front seats passengers is located inside the cup holders, between the front and rear central tunnel compartments.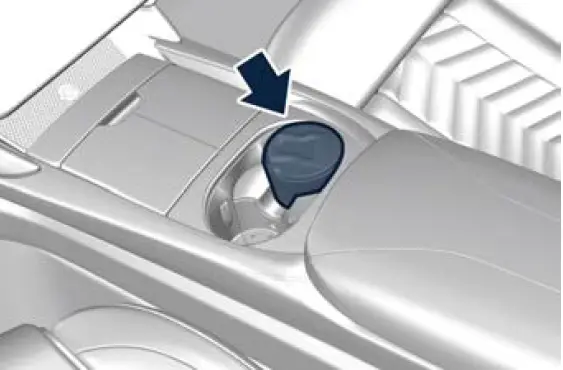
The rear seat passengers can use the removable ashtray by inserting it into the rear cup holders.
Press the central button to activate the cigarette lighter. After about 20 seconds the button returns automatically to the initial position and stops the heating: from this time the cigarette lighter is ready for use.
NOTE:
The Maserati Service Network can provide you with any information about the Maserati-approved Ashtray dedicated to the Smoker Kit, available in the “Genuine Accessories” range.
CAUTION!
After use, always make sure that the cigarette lighter is switched off.
WARNING
- The cigarette lighter reaches high temperatures. Handle it carefully and do not allow children to use it so as to avoid risk of fire and injury!
- The cigarette lighter may not be used as a power outlet.
Wi-Fi Hotspot ![]()
For further information about this service, see the “Maserati Intelligent Assistant™ (MIA)” guide.
Lifter System
This device acts on the suspensions and raises the the car by approximately 25 mm (0.98 in) to make access to garages or steep ramps easier and avoid damaging the car.
Each time the lifter is activated, the headlights will automatically point downwards. The system may be activated, when the engine is running and at vehicle speeds below 50 km/h (31 mph), by pressing briefly the indicated soft-key on the bottom bar of the screen of the Comfort Display.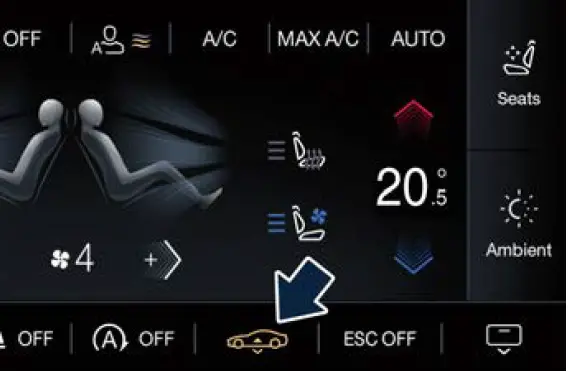
System Operation
After soft-key pressure, the lifter starts to rising the vehicle. Rise up indicator light is shown on the bottom left side of the instrument cluster.
The indicator light blinks until the maximum height is reached. When maximum height is reached, the indicator light stays on steadily on the instrument cluster.
With lifter function active and with vehicle at the maximum height, press briefly the lifter soft-key in order to lower the vehicle at the normal height. The lifter starts to lower the vehicle. The lower indicator light takes the place of the rise up indicator light . The indicator light blinks until the lower height is reached.
When normal height is reached the instrument cluster does not show the lifter indicator light.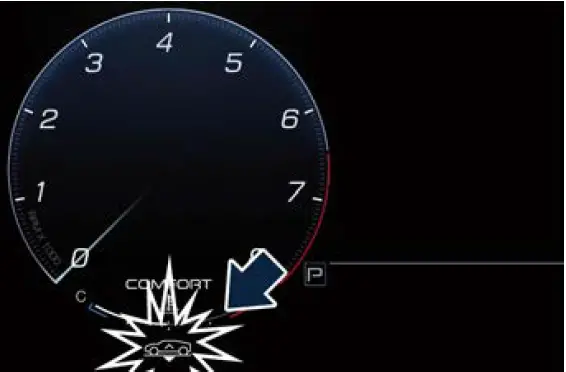
If the vehicle overcome the 50 km/h (31 mph) maximum speed, the lifter lowers automatically the vehicle to the normal height and a pop-up with the lowering description is shown on the instrument cluster. If the user try to activate the lifter, a pop-up will display in order to warn him that the lifter is not available at this speed.
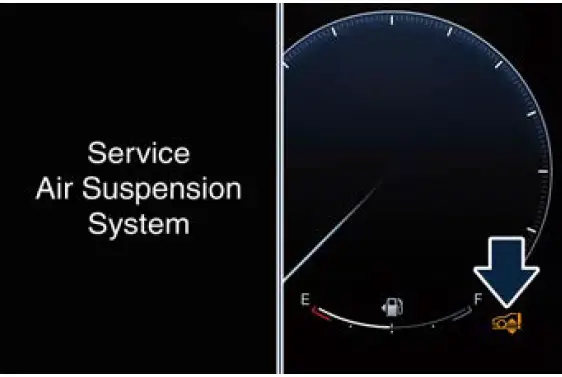
System in Failure or not Available
A pop-up on the instrument cluster is shown for the following cases:
- fail of the lifter system (see example in picture). In this case, contact the
Service Network; - lifter is not available;
- engine is off;
- speed overcome the 50 km/h (31 mph).
- The lifter should only be used for the purposes described above and not to drive over speed control systems (e.g. traffic calmers) more quickly.
- If the air suspensions are deflated, do not turn completely the steering wheel. Maximum 90° turns are allowed.
Cargo Area
WARNING!
To help protect against personal injury, passengers should not be seated in the rear cargo area. The rear cargo space is intended for load carrying purposes only, not for passengers, who should sit in seats and use seat belts.
Vehicle Load Carrying Capacity
The load-carrying capacity of your vehicle is shown on the vehicle homologation label positioned on the rear driver door’s ledge.
The information indicated on the label concerns passengers and luggage loading operations.
Do not exceed the specified Gross Vehicle Weight Rating (GVWR) or the Gross Axle Weight Rating (GAWR), both front and rear. The GVWR is the total allowable weight of your vehicle. This includes driver, passengers, and cargo. The total load must be limited so that you do not exceed the GVWR indicated on the label.
WARNING
- Improper weight distribution can have an adverse effect on the way the vehicle steers, handles and the way the brakes operate.
- Never drive with the boot lid open. Exhaust gases can enter the passenger compartment.
The boot is the most suitable place to load bulky and heavy objects onboard the vehicle. To load your vehicle properly, store heavier items below and be sure you distribute their weight as evenly as possible.
Stow all loose items securely before start driving as they could move during the trip.
NOTE:
The rear parcel shelf is not to be considered a support surface, except for minimum loads (see chapter “Weights” in section “Technical Specifications” for further details) which if applied above the speakers could damage the audio system. The Maserati Service Network can provide you with any information about the items dedicated to the usage of the boot (luggage compartment mat, …), available in the “”Genuine Accessories”” range.
Ski and Snowboard Bag Compartment
To stow and safely fasten a ski fold down the central trim between the rear seats pulling the indicated strap.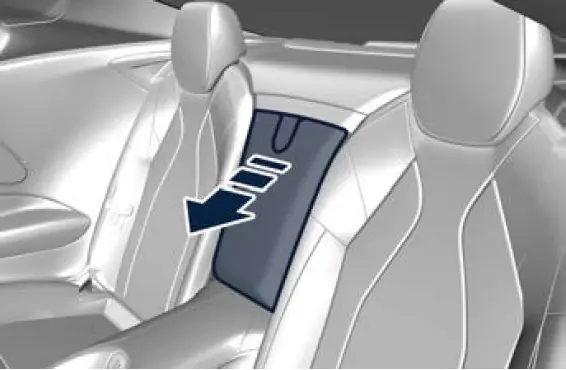
NOTE:
The central trim can be left hooked to the structure and laid on the central console. Otherwise it can be detached unhooking the indicated button, lifting it; then place the central trim in the boot compartment.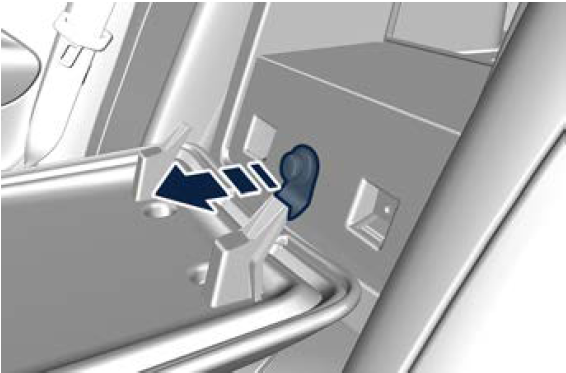
CAUTION!
When ski or snowboard bag is fitted into the vehicle, make sure that no object is inside the rear cup holder. This can cause damage to the objects and potential damage to the seat itself.
Insert the bag end without an anchor hook between the rear seats.
If you follow these instructions, the bag will be securely fastened to the vehicle structure and will thus remain in place also in case of collision or unexpected braking.
Audio System
The vehicle is equipped with an audio system that offers superior sound quality, higher sound pressure levels and reduced energy consumption.
The system maximizes the amplifier and speaker technology delivering substantially higher components and system efficiency.
Sonus Faber Premium Audio System
The vehicle can be equipped with a “Premium” sound system which features 14 speakers and can develop a sound output of 860 W.
This system includes:
- Two 152×229 mm (6×9 in) diameter Woofers, one on each door.
- Three 100 mm (3.9 in) diameter Midrange: one on the top of the dashboard, one on each door panel.
- Four 80 mm (3.1 in) diameter Midrange: two on each rear panel and two on the rear parcel shelf.
- Four 25 mm (1 in) diameter Tweeters: one at the base of the windshield side pillars and one on each rear panel.
- One 250 mm (9.8 in) Fresh Air Subwoofer (Dual Voice Coil) in the boot, behind the left side wall.
- 17-channel amplifier positioned under the rear part of the floor.
Sonus Faber Additional Features:
- Media expander: application of algorithm for processing MP3 files or low resolution / compressed sources to improve sound quality.
- Specific tuning: 2 different set-up that can be chosen by the customer for characterizing their listening experience:
GUARNERI: precise soundstage with extreme openness, clarity and speed;
AMATI: full and balanced sound perception with enhanced bass. - Sound On/Off: 2D surround delivers a spatial experience which is achieved with a proprietary surround sound algorithm.
Sonus Faber High Premium Audio System
The vehicle can be equipped with a “High Premium” audio system including 19 speakers and 1195 W of sound power, available upon request.
The “High Premium” system includes:
- Two 152×229 mm (6×9 in) diameter Woofers, one on each door.
- Five 100 mm (3.9 in) diameter Midrange: one on the top of the dashboard, one on each door panel, one on each rear panel.
- Two 80 mm (3.1 in) diameter Midrange: on the rear parcel shelf.
- Two 50 mm (2 in) diameter Height-Midrange: on the roof panel, above the front dome console.
- Seven 25 mm (1 in) diameter Tweeters: one on centre dashboard, one at the base of the windshield side pillars, one on each rear panel and two on the rear parcel shelf.
- One 250 mm (9.8 in) Fresh Air Subwoofer (Dual Voice Coil) in the boot, behind the left side wall.
- 24-channel amplifier positioned under the rear part of the floor.
Sonus Faber Additional Features:
- Separate Subwoofer control: the subwoofer dB level can be selected according to customer preference.
- Media expander: application of algorithm for processing MP3 files or low resolution / compressed sources to improve sound quality.
- Specific tuning: 2 different set-up that can be chosen by the customer for characterizing their listening experience:
EX3MA: full and balanced sound perception with enhanced bass; REFERENCE: precise soundstage with extreme openness, clarity and speed. - 2D and 3D Surround, with intensity level (for 3D Surround only): customer can select 2D and 3D Surround achieved with a proprietary surround sound algorithm.
Sonus faber has a natural sound delivered by consistent application of key technologies and philosophy design approach. Signature ‘Voice of Sonus faber’ sound is achieved by optimising the phase and amplitude alignment between midrange and tweeter. Natural materials and proprietary loudspeaker design and construction are used to deliver unique tonal balance throughout the vehicle cabin.
Each speaker is driven by a dedicated power tailored Class-D Dual DSP amplifier stage. This surround effect is available from any audio source – AM/FM/Satellite Radio or USB input and is activated through the MIA system controls (see “Functions of Settings Menu on MIA” in section “Dashboard Instruments and Controls”). All information on the current operational mode can be found in the specific booklet visible on the MIA screen. Fader control is available in surround mode but it should be set to the centre position for optimal surround performance.
Air Conditioning Distribution
Adjustable and fixed air vents allow passengers to achieve the optimal comfort conditions.
NOTE:
The Maserati Service Network can provide you with any information about the Maserati approved Multifunctional Air Filter, available in the “Genuine Accessories” range.
Fixed Air Vents
- The fixed vents, positioned on the upper surface of the dashboard, in the centre and on the sides, are meant to guarantee the demisting and defrosting of the windshield and the side windows.
- The fixed vents under the dashboard are aimed at ventilating the lower part of the front passenger compartment.
Adjustable Air Vents
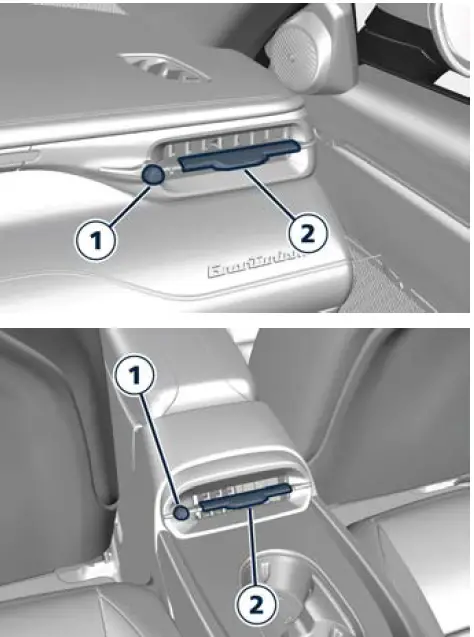
The adjustable vents are located at the centre of the dashboard, above the MIA display and at the side ends of the dashboard. They have the purpose of ventilating the upper part of the passenger compartment. There are also adjustable vents placed at the rear end of the central tunnel. The rotor 1 , located near each vent, allows to control the quantity of the air flow from fully closed to fully open, and vice versa.
The grill of these vents can be oriented by operating on the central handle 2.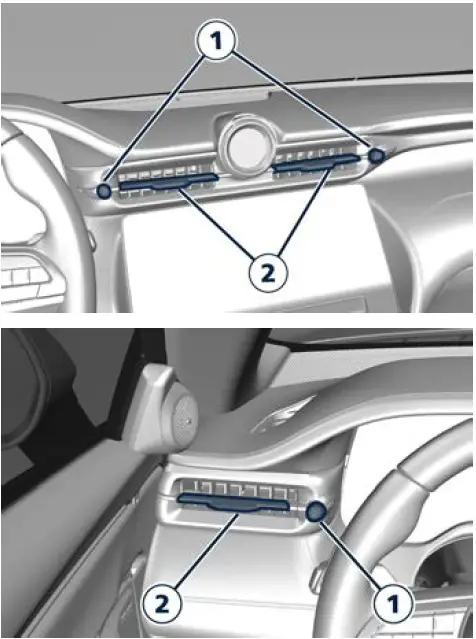
NOTE:
In order not to obstruct the air conditioning inlet, the defrosting or the demisting function of the glass surfaces, avoid covering vents with clothing or other items.
HomeLink 
HomeLink ® replaces up to three hand-held transmitters operating the automatic devices that open garage doors and gates, enable/disable the lighting or security systems. The HomeLink ® unit is powered by your vehicle’s 12 Volt battery. The HomeLink ® buttons that are located on the driver sun visor designate the three different HomeLink ® channels. The HomeLink ® warning light is located behind the buttons.
NOTE:
HomeLink ® is disabled when the vehicle security alarm is active (see chapter “Anti-theft Alarm Systems” in this section).
WARNING
- Your motorized door or gate will open and close while you are programming the universal transceiver. Do not program the transceiver if people, pets or other objects are in the path of the door or gate. Only use this transceiver with a garage door opener that has a “stop and reverse” function. Do not use a garage door opener without these safety functions. Call toll-free 1–800–355–3515 or, on the Internet at www.HomeLink.com for safety information or assistance.
- Vehicle exhaust contains carbon monoxide, a dangerous gas. Do not run your vehicle in the garage while programming the transceiver. Exhaust gas can cause serious injury or death.
Before You Start Programming HomeLink®
Be sure that your vehicle is parked outside of the garage before you begin programming. For more efficient programming and accurate transmission of the radio-frequency signal it is recommended that a new battery be placed in the hand-held transmitter of the device that is being programmed to the HomeLink® system. Before starting programming it is necessary to erase the standard codes memorized on the HomeLink® device during the production phase. To erase such codes:
- place the ignition device in the ON position without starting the engine;
- Press and hold the two outside HomeLink® buttons (I and III) until the warning light starts flashing (after approximately 20 seconds);
- release the buttons.
NOTE:
- Erasing the standard codes should only be performed when programming HomeLink® for the first time. Do not perform this operation to program additional buttons.
- If you have any problems or require assistance, please call toll-free 1–800–355–3515 or, on the Internet at www.HomeLink.com for information or assistance.
A system with Devices Provided with Rolling Codes
Programming the Hand-held Transmitters Manufactured after 1995 These devices can be identified by the “LEARN” or “TRAIN” setting button located where the hanging antenna is attached to the garage door/gate opener. It is NOT the button that is normally used to open and close the door. The name and color of the button may vary by manufacturer.
- Place the ignition device to ON position without starting the engine.
- Place the garage door opener transmitter 3 – 8 cm (1 to 3 inches) away from the Homelink® button you wish to program.
- Push and hold the Homelink® button you want to program while you push and hold the garage door opener transmitter button you are trying to replicate.
The quick flashing light indicates that the channel with the new frequency has been acquired and programmed correctly by the HomeLink® system.
NOTE:
The distance necessary between the portable hand-held transmitter and the HomeLink® in the vehicle depends on the system you wish to program. Probably it will be necessary to try several times. Upon every attempt, keep the setting position for at least 15 seconds before trying again.
Synchronizing the Rolling Codes
At the end of the previously-described programming, if the HomeLink® has been programmed for a rolling code system, it will be necessary to synchronise it to ensure its correct operation.
- Locate the “LEARN” or “TRAINING” setting button of the opening motor. Firmly press it and then release it. On some garage door openers/devices there may be a light that blinks when the garage door opener/device is in the LEARN/TRAIN mode.
NOTE:
You have 30 seconds to initiate the next step after the setting button has been pressed.
- Return to the vehicle and press the programmed HomeLink® button for two seconds and then release it.
- Repeat this operation a second time. If the garage door opening device activates, the programming/synchronization phase is complete.
NOTE:
If the garage door opening device does not activate, press the button a third time for two seconds and then release it to complete the programming/synchronization phase.
- To program the remaining two HomeLink® buttons, repeat the same step for the same remaining button. DO NOT erase the channels.
Reprogramming a Single HomeLink® Button
To reprogramme a channel that has been previously trained, follow these steps:
- Place the ignition device to ON position without starting the engine.
- Press and hold the desired HomeLink® button.
- Without releasing the button proceed with “Programming the hand-held transmitters” from second step and follow all remaining steps.
System with Devices Without Rolling Code
Programming the Hand-held Transmitters Manufactured before 1995
- Turn the ignition device to ON position without starting the engine.
- Place the hand-held transmitter 3 to 8 cm (1 to 3 inches) away from the HomeLink® button you wish to program.
- Simultaneously press and hold both buttons until the warning light starts flashing quickly; then release both buttons.
The quick flashing light indicates that the channel with the new frequency has been acquired and programmed correctly by the HomeLink® system.
NOTE:
The distance necessary between the portable hand-held transmitter and the HomeLink® in the vehicle depends on the system you wish to program. Probably it will be necessary to try several times. Upon every attempt, keep the setting position for at least 15 seconds before trying again.
- Press and hold the programmed HomeLink® button.
If the garage door opener/device activates, programming is complete. To program the remaining two HomeLink® buttons, repeat each step for each remaining button. Do not erase the channels.
Reprogramming a Single HomeLink® Button
To reprogram a channel that has been previously trained, follow these steps:
- Place the ignition device to the ON position without starting the engine.
- Press and hold the desired HomeLink® button.
- Without releasing the button proceed with “Programming the hand-held transmitters” from the second step and follow all remaining steps.
Using HomeLink
To operate, press and release the programmed HomeLink® button. Activation will now occur for the programmed device (i.e., garage door opener, gate operator, security system, entry door lock, home/office lighting, etc.). The hand-held transmitter of the device may also be used at any time.
Security
It is advisable to erase all channels before you sell or turn in your vehicle. To erase the channels press and hold the two outside HomeLink® buttons (I and III) until the warning light starts flashing (after approximately 20 seconds). The HomeLink® Universal Transceiver is disabled when the vehicle security alarm is active (see chapter “Anti-theft Alarm Systems” in this section).
Troubleshooting Tips
If you are having trouble while programming HomeLink®, here are some of the most common solutions:
- Replace the battery in the original hand-held transmitter.
- Press the LEARN button on the garage door opener to complete the training for a rolling code.
- Did you unplug the device for programming and forgot to plug it back in?
If you have any problems or require assistance, please call toll-free 1–800–355–3515 or, on the Internet at www.HomeLink.com for information or assistance.
NOTE:
You can consult the list of compatible devices with the HomeLink ®, and their level of compatibility, on the website www.HomeLink.com.
Radio Frequency RKE Transmitter – Regulatory Information
The “Regulatory Information” for all the radio frequency and radar devices can be consulted by accessing the section “Services” on the website www.maserati.com.
FAQs
- What is the seating capacity of the Maserati GranTurismo 2024?
There are four seats available in the Maserati GranTurismo 2024. - What type of upholstery is used in the interior of the GranTurismo 2024?
The GranTurismo 2024 comes standard with luxury leather seating, offering an opulent and relaxing driving experience. - Does the GranTurismo 2024 have a touchscreen infotainment system?
The GranTurismo 2024 does have a modern infotainment system with a high-resolution touchscreen that offers a variety of connectivity choices. - Can I connect my smartphone to the car’s infotainment system?
Definitely! When using the GranTurismo 2024, you may link your smartphone using Apple CarPlay or Android Auto. - Does the GranTurismo 2024 have a built-in navigation system?
The GranTurismo 2024 does include an integrated navigation system that gives you turn-by-turn directions and updates on the current traffic situation. - What audio system is available in the GranTurismo 2024?
The GranTurismo 2024 features a high-end audio system with excellent sound quality, like as the optional Harman Kardon or Bowers & Wilkins sound system. - Are the seats in the GranTurismo 2024 heated and ventilated?
The GranTurismo 2024 does have seats that can be heated and ventilated to provide the utmost comfort in a variety of weather conditions. - Can I control the car’s functions using voice commands?
The GranTurismo 2024 does include voice control capabilities that let you perform some tasks while driving hands-free. - Are there any driver assistance features in the GranTurismo 2024?
The GranTurismo 2024 does have a number of driver aids, including adaptive cruise control, lane-keeping assist, and blind-spot monitoring. - Does the GranTurismo 2024 have a panoramic sunroof?
The GranTurismo 2024 does have an optional panoramic sunroof, which gives the inside a feeling of openness and space. - Is wireless charging available in the GranTurismo 2024?
The GranTurismo 2024 does support wireless charging, making it possible to charge compatible cellphones conveniently and without the use of cords. - Can I adjust the driving settings in the GranTurismo 2024?
The GranTurismo 2024 does have multiple driving modes that let you tailor the car’s performance to your tastes. - Are there rear-seat entertainment options in the GranTurismo 2024?
The GranTurismo 2024 provides rear-seat entertainment screens as an optional feature, keeping passengers amused. - Does the GranTurismo 2024 have a hands-free power liftgate?
Since the GranTurismo 2024 is a coupe, a power liftgate is not available. - What is the cargo capacity of the GranTurismo 2024?
The GranTurismo 2024 has a respectable trunk with a load capacity of about 9 cubic feet, enabling you to transport necessities on your excursions.
Useful Links
View Full User Guide: Maserati GranTurismo 2024 User Manual | Auto User Guide
Download Manuals: On-Board Owner Documentation | Maserati