![]()
2023 Mitsubishi Outlander PHEV LCD Display Guidelines
The LCD monitor system in the 2023 Mitsubishi Outlander PHEV is state-of-the-art and makes driving a lot more enjoyable. Its sleek and stylish design makes the LCD look like it belongs in the modern interior of the car. It also gives drivers an easy way to access a lot of different functions. The icons on the LCD screen make it easy to access different features, such as information about how much energy is used, how charged the battery is, and the electric drive range. This high-tech screen not only gives the inside a futuristic look but also makes the Outlander PHEV more fuel-efficient and easier to use by giving drivers the information they need to make the best hybrid driving choices. With its new LCD rules, the 2023 Mitsubishi Outlander PHEV raises the bar for how technology should be integrated into plug-in hybrid cars.
MULTI-INFORMATION DISPLAY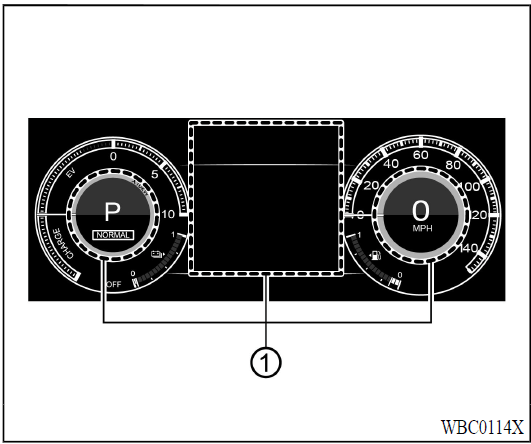
The multi-information display is located as shown above, and it displays the warnings and information. The following items are also displayed if the vehicle is equipped with them:
- Tachometer
- Speedometer
- Vehicle settings
- Trip computer information
- Driver Assistance
- Cruise control system information
- MI-PILOT Assist
- F.A.S.T.-key operation information
- Audio information
- Navigation – turn by turn
- Indicators and warnings
- Tire pressure information
- Other information
CHANGING THE METER SCREEN VIEW
The meter screen view can be changed to expand the multi-information display area. See “Changing the meter screen view” for how to transform.
HOW TO USE THE MULTI-INFORMATION DISPLAY
The multi-information display can be changed using the buttons scroll dial
- Scroll dial – rotate to navigate through the items and push to change or select an item in the multi-information display
- go back to the previous menu
- change from one display screen to the next (i.e. trip, Fuel economy)
STARTUP DISPLAY
When the power switch is placed in the ON position, the multi-information display may display the following screens if the vehicle is equipped with them:
- Home
- Drive Computer
- Energy flow
- S-AWC
- Compass or Navigation
- Audio
- MI-PILOT Assist
- Driving Aids
- Tire Pressures
- Warning
- Settings
Warnings will only be displayed if there are any present. For more information on warnings and indicators, see “Multi-information display warnings and indicators
To control what items are displayed in the multi-information display
Example
PERSONAL DISPLAY
The personal display shows several information items. To select an information item:
- Push the control switch on the left side of the steering wheel.
- Shortcut Menu” appears on the multi-information display area.
- Select “Personal Display” by rotating the scroll dial and pushing the scroll dial to confirm.
The information item can be selected from below:
- Blank (nothing is displayed)
- Navigation (including compass)
- Time to Destination
- Fuel Economy
- Trip
- Gear position
- Average speed
- Brake Light
The personal display will move when the meter screen view is changed. For additional information, refer to “Changing the meter screen view
SETTINGS
The setting mode allows you to change the information displayed in the multi-information display. The following items are available if the vehicle is equipped with them:
- ASC Setting
- Driver Assistance
- Personal Display
- Head-Up Display
- ECO Mode Setting
- TPMS Setting
- Clock
- Vehicle Settings
- Maintenance
- Customize Display
- Unit/Language
- Key- Linked Settings
- Factory Reset
ASC Setting
To change the setting, use the scroll dial to select and push it.
- System
This allows you to turn the Active stability control [ASC] ON or OFF. By default, the ASC will be turned ON. If the ASC is turned off, the ASC OFF indicator light will illuminate.
NOTE:
The vehicle should be driven with the Active stability control [ASC] ON for most driving conditions. (See “Active stability control ASC
Driver Assistance
To change the status, or warnings or turn on or off any of the systems/warnings displayed in the “Driver Assistance” menu, use the scroll dial to select and change a menu item. The displayed menu items vary depending on the vehicle’s equipment.
- Steering Assist
- Lane
- Blind Spot
- Emergency Brake
- Traffic Sign
- Speed Adjust by Route
- Spd.Limit Assist
- Parking sensors
- Rear Cross Traffic Alert
- Driver Attention Alert
- Timer Alert
- Low Temp. Alert
Steering Assist:
- Allows the user to turn the Lane Keep Assist [LKA] ON/OFF. (See “MI-PILOT Assist” (P.7-91).)
Lane:
- Warning [LDW] Allows the user to turn the Lane Departure Warning [LDW] system ON/OFF.
- Prevention [LDP] Allows users to turn the Lane Departure Prevention [LDP] system ON/OFF.
(See “Lane Departure Warning LDW” (P.7-41) and “Lane Departure Prevention LDP
Blind Spot:
- Warning [BSW] Allows users to turn the Blind Spot Warning [BSW] system ON/OFF.
- Active Assist [ABSA] Allows the user to turn the Active Blind Spot Assist [ABSA] system ON/OFF.
(See “Blind Spot Warning BSW/LCA1Active Blind Spot Assist ABSA
Emergency Brake:
Models without Rear Automatic Emergency Braking [Rear AEB] :
Allows users to turn the Forward Collision Mitigation System [FCM] system and the Predictive Forward Collision Warning [PFCW] system ON/OFF.
Models with Rear Automatic Emergency Braking [Rear AEB] :
Allows the user to turn the Forward Collision Mitigation System [FCM] system and Predictive Forward Collision Warning [PFCW] system ON/OFF
- Front
Allows the user to turn the Forward Collision Mitigation System [FCM] system and Predictive Forward Collision Warning [PFCW] system ON/OFF - Rear
Allows users to turn the Rear Automatic Emergency Braking [Rear AEB] system ON/OFF.
(See “Forward Collision Mitigation System FCM” (P.7-127), “Predictive Forward Collision Warning PFCW” (P.7-137) and “Rear Automatic Emergency Braking Rear AEB)
Traffic Sign:
This menu allows the customer to turn the Traffic Sign Recognition ON/OFF. (See “Traf-fic Sign Recognition TSR” (P.7-38).)
Speed Adjust by Route:
Allows the user to turn the Speed Adjust by Route (MI-PILOT Assist with Navi-link) function ON/OFF. (See “Speed Adjust by Route – a feature of MI-PILOT Assist with Navi-link” (P.7-111).)
Spd. Limit Assist:
Allows users to customize the Speed Limit Assist (MI-PILOT Assist with Navi-link) options.
- OFF
- Manual
- Auto
(See “Speed Limit Assist – a feature of MI-PILOT Assist with Navi-link” (P.7-109).)
Parking sensors:
To change the status or turn on or off any of the systems displayed in the “Parking sensors” menu, use the scroll dial to select and change a menu item:
- Moving Object
Push the scroll dial to turn the Moving Object Detection (MOD) ON/OFF. - Auto Show Sensor
Allows users to turn the parking sensor system display ON/OFF. - Front
Allows users to turn the front sensor ON/OFF. - Rear
Allows users to turn the rear sensor ON/OFF. - Distance
Allows users to select the sensor range (Long, Medium, or Short). - Volume
Allows users to select sensor volume (High, Medium, or Low).
(See “Moving Object Detection (MOD)” (P.6-23), “Parking sensor system” (P.7-165), and “Rear parking sensor system
Rear Cross Traffic Alert:
Allows users to turn the Rear Cross Traffic Alert system ON/OFF. (See “Rear Cross Traffic Alert RCTA
Driver Attention Alert:
Allows the customer to turn the Driver Attention Alert [DAA] on or off. (See “Driver Attention Alert DAA
Timer Alert: Allows the user to adjust the Timer Alert or reset. Current Time/Set Time
- Reset
Low Temp. Alert:
Allows users to turn the Low Temperature Alert function ON/OFF.
Personal Display
To change the display in the “Personal Display” menu, use the scroll dial to select and change a menu item:
- Blank
- Navigation
- Time to Destination
- Fuel Economy
- Manual Reset1
- Manual Reset2
- Auto Refuel
- Trip
- Manual Reset1
- Manual Reset2
- Auto Refuel
- Gear Position
- Average Speed
- Manual Reset1
- Manual Reset2
- Auto Refuel
- Brake Light
Head-Up Display
To change the status or turn on or off any of the systems displayed in the “Head-Up Display” menu, use the scroll dial to select and change a menu item:
- Brightness
- Height
- Rotation
- Displayed information
- Navigation
- Driving Assist
- Traffic Sign
- Audio
- TEL/SMS
- Reset Setting
ECO Mode Setting
This setting allows you to change the ECO mode system settings.
To change the status or turn on or off any of the systems displayed in the “ECO Mode Setting” menu, use the scroll dial to select and change a menu item:
- ECO Customize
- Cruise Control
- Air Conditioning
- ECO Info Settings
- ECO Indicator
- ECO Drive Report
- View History To reset the View History:
- Select “View History” using the scroll dial and push it.
- Push the scroll dial.
- Select “Yes” by pushing the scroll dial.
- Tire Pres Eco advice
Push the scroll dial to turn the “Tire Pres Eco advice” ON/OFF.
TPMS setting
The settings under the “TPMS setting” menu are related to the Tire Pressure Monitoring System [TPMS]. (See “Tire Pressure Monitoring System TPMS” (P.7-6), “Tire Pressure Monitoring System TPMS” (P.8-4), “Tire Pressure Monitoring System TPMS
- Tire Pressure Unit
Tire Pressure Unit:
The unit for tire pressure that displays in the multi-information display can be changed to:
- psi
- kPa
- bar
- kgf/cm2
Use the scroll dial to select and change the unit. If necessary, refer to the following table to convert between units.
| kPa | 200 | 210 | 220 | 230 | 240 | 250 | 260 | 270 | 280 | 290 | 300 | 310 | 320 | 330 | 340 |
| psi | 29 | 30 | 32 | 33 | 35 | 36 | 38 | 39 | 41 | 42 | 44 | 45 | 46 | 48 | 49 |
| bar | 2.0 | 2.1 | 2.2 | 2.3 | 2.4 | 2.5 | 2.6 | 2.7 | 2.8 | 2.9 | 3.0 | 3.1 | 3.2 | 3.3 | 3.4 |
| kgf/cm2 | 2.0 | 2.1 | 2.2 | 2.3 | 2.4 | 2.5 | 2.6 | 2.7 | 2.8 | 2.9 | 3.0 | 3.1 | 3.2 | 3.3 | 3.4 |
Clock
Allows users to adjust the clock settings and time within the multi-information display. The available items vary depending on the vehicle’s equipment.
- Clock Mode
- Clock Format
- Daylight Saving
- Time Zone
- Set Clock Manually
The clock may also be set in the center (audio) display. For additional information, refer to the separate Smartphone-link Display Audio [SDA] Owner’s Manual.
Vehicle Settings
The vehicle settings allow the customer to change settings for the following settings if the vehicle is equipped with them. The displayed menu items vary depending on the vehicle’s equipment.
- Chg. Connector lock
- Electric Tail Gate
- Lighting
- Locking
- Wiper
- Driving Position
- Rear Seat Alert
- Mirrors
- Drive Battery Cooler
The vehicle settings can be changed using the scroll dial button.
Chg. Connector lock:
Allows the user to set the charge connector lock function.
- LOCK
- UNLOCK
Electric Tail Gate:
This allows the user to turn the Electric Tail Gate ON or OFF.
Lighting:
The “Lighting” menu has the following options:
- Welcome Light The welcome lighting can be set to be ON or OFF. From the “Lighting” menu, select “Welcome Light”. Use the scroll dial to turn this feature ON or OFF.
- Auto Room Lamp The interior light timer can be set to be ON or OFF. From the “Lighting” menu, select “Auto Room Lamp”. Use the scroll dial to turn this feature ON or OFF.
- Accent Lighting The brightness of the Accent Lighting can be adjusted. From the “Lighting” menu, select “Accent Lighting”. Use the scroll dial to select the brightness.
Locking:
There are the following options in the “Lock-ing” menu:
- Ext. Door Switch
When this item is turned on, the request switches on the doors, and the liftgate is activated. From the “Locking” menu, select “Ext. Door Switch”. Use the scroll dial to activate or deactivate this function. - Selective Unlock
When this item is turned on, and the request switch is pushed, only the corresponding door or the liftgate is unlocked. All the doors can be unlocked if the door handle request switch is pushed again within 2 seconds. When this item is turned off, all the doors will be unlocked when the door handle request switch is pushed once. From the “Locking” menu, select “Selective Unlock”. Use the scroll dial to activate or deactivate this function. - Auto Door Unlock
The “Auto Door Unlock” feature allows the customer to customize the auto door unlock
options.- Shift to P
- Power OFF
- OFF
- Horn beeps on lock
When the horn beeps on the lock is on, the horn will chirp and the hazard indicators will flash when locking the vehicle with the F.A. S.T.-key. - Auto Door Lock
The “Auto Door Lock” feature allows the customer to customize the auto door lock options.- Vehicle Speed
- Shift out of Park
- OFF
Wiper:
There are the following options in the “Wiper” menu:
- Speed Sensing
The “Speed-Sensing Wiper” feature can be activated or deactivated. From the “Wiper” menu, select “Speed-Sensing”. Use the scroll dial to turn this feature ON or OFF. - Rain Sensor
The “Rain Sensor” feature can be activated or deactivated. From the “Wiper” menu, select “Rain Sensor”. Use the scroll dial to turn this feature ON or OFF. - Reverse Link
The “Reverse Link” wiper feature can be set to be ON or OFF. From the “Wiper” menu, select “Reverse Link”. Use the scroll dial to turn this feature ON or OFF.
Driving Position:
Displays the available driving position options.
- Exit Seat Slide (Driver) When this item is turned on, this feature will move the driver’s seat backward for an easy exit when the power switch is turned off and the driver’s door is opened. After getting into the vehicle and placing the power switch in the ON position, the driver’s seat will move to the previous set position. (See “Driver and front passenger memory settings
Rear Seat Alert:
The “Rear Seat Alert” feature allows users to customize the Rear Seat Alert options. Use the scroll dial to change the mode.
- Horn & Alert
When selected, the alert is displayed and the horn sounds. - Alert Only
When selected, only the alert is displayed. - OFF
When selected, no alert or horn will be active.
Mirrors:
The Mirror Fold feature allows the user to customize the door mirror’s auto-folding/return-ing feature.
- Auto Fold Off
Turns the door mirror auto-folding/return-ing feature off. - Unfold at Power on
Turns the door mirror auto-folding/return-ing feature on. The door mirror is set to open when the power switch is turned on. - Unfold at Unlock
Turns the door mirror auto-folding/return-ing feature on. When unlocked with the Free-hand Advanced Security Transmitter [F.A.S.T.-key] key or the door handle request switch, the door mirror is set to open. The door mirror also opens when the power switch is turned on.
Drive Battery Cooler:
Allows users to turn ON or OFF the drive battery cooler function.
Maintenance
The maintenance mode allows you to set alerts for the remainder of maintenance intervals. The displayed menu items vary depending on the vehicle’s equipment. To change an item:
Select “Maintenance” using the scroll dial and push it.
- Service (if so equipped)
- Tire
- Other
Service (if so equipped):
This indicator appears when the user sets the distance for changing the engine oil and filter. You can set or reset the distance for checking or replacing these items.
Tire:
This indicator appears when the customer sets a distance for replacing tires. You can set or reset the distance for replacing tires.
WARNING
The tire replacement indicator is not a substitute for regular tire checks, including tire pressure checks. See “Replacing tires and wheels” (P.10-27). Many factors including tire inflation, alignment, driving habits, and road conditions affect tire wear and when tires should be replaced. Setting the tire replacement indicator for a certain driving distance does not mean your tires will last that long. Use the tire replacement indicator as a guide only and always perform regular tire checks. Failure to perform regular tire checks, including tire pressure checks could result in tire failure. Serious vehicle damage could occur and may lead to a collision, which could result in serious personal injury or death.
Other:
This indicator appears when the customer sets a distance for checking or replacing maintenance items other than the engine oil, oil filter, and tires. Other maintenance items can include such things as air filters or tire rotation. You can set or reset the distance for checking or replacing the items.
Customize Display
The display settings allow you to choose from the various meter selections. The displayed menu items vary depending on the vehicle’s equipment.
The display settings can be changed using the scroll dial.
Main Menu Selection:
Displays available screens that can be shown in the multi-information display. The available items vary depending on the vehicle’s equipment.
Route Guidance:
This menu allows the user to turn the Navigation Settings ON or OFF.
Cruise Screen:
The ”Cruise Screen” allows you to turn the cruise screen transition on or off.
Welcome Effect:
The “Welcome Effect” displays the available welcome effect settings.
- Animation
Operation Guidance:
The “Operation Guidance” displays the available light and wiper guidance settings. The available items vary depending on the vehicle’s equipment.
- Lights
- Wiper
- Seat Memory
- Speed Limiter
- Cruise Control
Unit/Language
The units that are shown in the multi-information display can be changed:
- Mileage/Fuel/Energy
- Tire Pressure
- Temperature
- Language
Use the scroll dial to select and change the units of the multi-information display.
Mileage/Fuel/Energy:
The unit for the mileage that displays in the multi-information display can be changed. Use the scroll dial to select and change the unit.
Tire Pressure:
The unit for tire pressures that displays in the multi-information display can be changed.
Temperature:
The temperature displayed in the multi-information display can be changed from:
- °F
- °C
Use the scroll dial to toggle choices.
Language:
The language of the multi-information display can be changed.
Use the scroll dial to select and change the language of the multi-information display.
Key-Linked Settings
The Key-Linked Settings can be turned ON/OFF using the scroll dial. It will display the key synchronized and in use for this vehicle.
Factory Reset
The settings in the multi-information display can be reset back to the factory default. To reset the multi-information display:
- Select “Factory Reset” using the scroll dial and push it.
- Select “YES” and push the scroll dial to return all settings to default.


FAQs
The LCD provides essential information about the vehicle’s performance, energy consumption, battery status, and various driving modes.
The driving modes can typically be selected through the touchscreen interface on the LCD. Look for a dedicated menu or button for mode selection.
The battery status indicator displays the current charge level of the hybrid battery, giving you an idea of how much electric range remains.
Depending on the model, there might be some degree of customization available. Check the settings menu on the display for options to tailor the information according to your preferences.
The regenerative braking system information is typically shown on the display, indicating when the system is active and how much energy is being recovered.
Many modern vehicles come equipped with an integrated navigation system accessible through the LCD. Verify if the 2023 Mitsubishi Outlander PHEV includes this feature.
Yes, the LCD often includes a real-time energy consumption display, showing how power is being utilized and whether the vehicle is running on electric or hybrid power.
The display may offer tips and suggestions for optimizing fuel efficiency, such as recommending when to use electric-only mode or providing feedback on driving habits.
Safety-related notifications, such as collision warnings, lane departure alerts, and parking assistance feedback, may appear on the LCD.
Yes, most modern vehicles support smartphone integration. Check if the 2023 Mitsubishi Outlander PHEV allows for seamless smartphone connectivity via the LCD.
Yes, the display may show icons or alerts indicating when features like adaptive cruise control, forward collision warning, or blind-spot monitoring are active.
The display will likely show the charging status when connected to an external charging station, including the charging rate and estimated time until full charge.
Depending on the manufacturer, software updates for the vehicle’s systems, including the LCD, may be available. Check with Mitsubishi for information on software updates and enhancements.
Many modern vehicles come equipped with an integrated navigation system accessible through the LCD. Verify if the 2023 Mitsubishi Outlander PHEV includes this feature.
Yes, the LCD often includes a real-time energy consumption display, showing how power is being utilized and whether the vehicle is running on electric or hybrid power.
Useful Link
View Full PDF: 2023 Mitsubishi Outlander PHEV Owners Manual | Auto User Guide
2023 Mitsubishi Outlander PHEV Warning and Indicator Lights Instructions