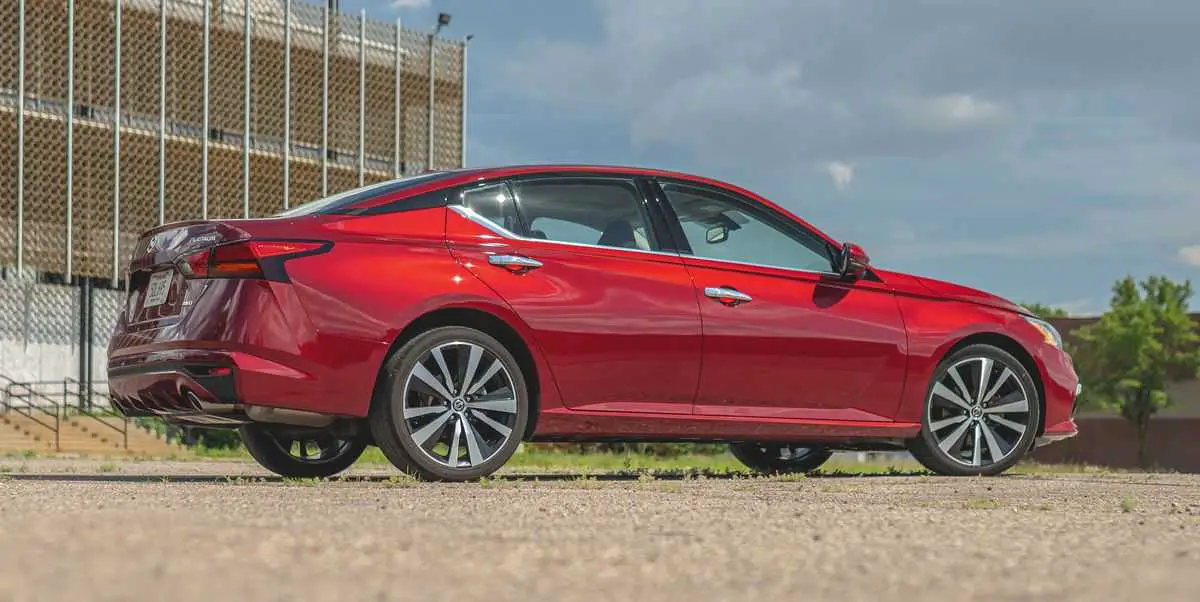
Nissan Altima 2019
offered by Nissan. The 2019 Altima brought several updates and enhancements compared to its predecessors. Here are some key features and improvements:
- Design: The 2019 Altima featured a refreshed exterior design with a more aggressive front grille, sleek headlights, and prominent body lines. It presented a more modern and athletic appearance.
- Engine Options: The 2019 Altima offered a choice of two engine options. The standard engine was a 2.5-liter four-cylinder engine, providing a good balance of power and fuel efficiency. Additionally, there was an available 3.5-liter V6 engine, delivering more performance for those seeking a sportier driving experience.
- Technology: The Altima 2019 came equipped with a range of technology features, including an available 7-inch touchscreen infotainment system with Apple CarPlay and Android Auto integration, Bluetooth connectivity, and NissanConnect services. It also offered optional features such as a Bose premium audio system and a navigation system.
- Safety: The 2019 Altima prioritized safety with its suite of advanced safety features known as Nissan Safety Shield 360. This suite included Automatic Emergency Braking with Pedestrian Detection, Rear Cross Traffic Alert, Blind Spot Warning, Lane Departure Warning, and High Beam Assist.
- ProPILOT Assist: The Altima 2019 introduced available ProPILOT Assist, a driver-assistance system that combined adaptive cruise control with lane-keeping assist to provide a semi-autonomous driving experience on the highway.
These are just a few highlights of the Nissan Altima 2019 model. For more specific details and to explore the available trim levels and options, I recommend visiting Nissan’s official website or contacting a Nissan dealership for the most accurate and comprehensive information.
REAR-FACING CHILD RESTRAINT INSTALLATION USING A LATCH
For additional information, refer to all Warn-ings and Cautions in the “Child safety” and “Child restraints” sections of this manual before installing a child restraint.
Do not use the lower anchors if the combined weight of the child and the child restraint exceeds 65 lbs. (29.5 kg). If the combined weight of the child and the child restraint is greater than 65 lbs. (29.5 kg), use the vehicle’s seat belt (not the lower anchors) to install the child restraint. Be sure to follow the child restraint manufacturer’s instructions for installation.
Follow these steps to install a rear-facing child restraint using the LATCH system:
- 1. Type A (if so equipped):
Remove the plastic covers from the LATCH anchors by pulling the covers straight back. Store the covers in a secure area.
Type B (if so equipped):
Lift the flap of the material to expose the LATCH anchors. - Position the child restraint on the seat. Always follow the child restraint manufacturer’s instructions.
- Secure the child restraint anchor at-
attachments to the LATCH lower an-chors. Check to make sure the LATCH attachment is properly attached to the lower anchors. - For child restraints that are equipped with webbing-mounted attachments, remove any additional slack from the anchor attachments. Press downward and rearward firmly in the center of the child restraint with your hand to compress the vehicle seat cushion and seatback while tightening the webbing of the anchor attachments.
- Tighten the tether strap according to the manufacturer’s instructions to remove any slack.
- After attaching the child restraint, test it before you place the child in it. Push it from side to side while holding the child restraint near the LATCH attachment path. The child restraint should not move more than 1 inch (25 mm), from side to side. Try to tug it forward and check to see if the LATCH attachment holds the restraint in place. If the restraint is not secure, tighten the LATCH attachment as necessary, or put the restraint in another seat and test it again. You may need to try a different child restraint or try installing by using the vehicle seat belt (if applicable). Not all child restraints fit in all types of vehicles.
- Check to make sure the child restraint is properly secured prior to each use. If the child restraint is loose, repeat steps 2 through 6.
- Type A (if so equipped):
If you remove the child restraint, reinstall the plastic LATCH anchor covers after use by pushing the covers straight onto the LATCH anchors. Type B (if so equipped):
If you remove the child restraint, securely replace the flap by pressing the material firmly against the seat.
REAR-FACING CHILD RESTRAINT INSTALLATION USING THE SEAT BELTS
WARNING
The three-point seat belt with Automatic Locking Retractor (ALR) must be used when installing a child restraint. Failure to use the ALR mode will result in the child restraint not being properly secured. The restraint could tip over or be loose and cause injury to a child in a sudden stop or collision.
For additional information, refer to all Warnings and Cautions in the “Child safety” and “Child restraints” sections of this manual before installing a child restraint.
Do not use the lower anchors if the combined weight of the child and the child restraint exceeds 65 lbs. (29.5 kg). If the combined weight of the child and the child restraint is greater than 65 lbs. (29.5 kg), use the vehicle’s seat belt (not the lower anchors) to install the child restraint. Be sure to follow the child restraint manufacturer’s instructions for installation.
Follow these steps to install a rear-facing child restraint using the vehicle seat belts in the rear seats:
- Child restraints for infants must be used in the rear-facing direction and therefore must not be used in the front seat. Position the child restraint on the seat. Always follow the child restraint manufacturer’s instructions.
- Route the seat belt tongue through the child restraint and insert it into the buckle until you hear and feel the latch engage. Be sure to follow the child restraint manufacturer’s instructions for belt routing.
- Pull the shoulder belt until the belt is fully extended. At this time, the seat belt retractor is in the ALR mode (child restraint mode). It reverts to the ELR mode when the seat belt is fully retracted.
- Allow the seat belt to retract. Pull up on the shoulder belt to remove any slack in the belt.
- Remove any additional slack from the seat belt; press downward and rearward firmly in the center of the child restraint to compress the vehicle seat cushion and seatback while pulling up on the seat belt.
- After attaching the child restraint, test it before you place the child in it. Push it from side to side while holding the child restraint near the seat belt path. The child restraint should not move more than 1 inch (25 mm), from side to side. Try to tug it forward and check to see if the belt holds the restraint in place. If the restraint is not secure, tighten the seat belt as necessary, or put the restraint in another seat and test it again. You may need to try a different child restraint. Not all child restraints fit in all types of vehicles.
- Check to make sure that the child restraint is properly secured prior to each use. If the seat belt is not locked, repeat steps 3 through 6.
After the child restraint is removed and the seat belt fully retracted, the ALR mode (child restraint mode) is canceled.
FORWARD-FACING CHILD RESTRAINT INSTALLATION USING A LATCH
For additional information, refer to all Warnings and Cautions in the “Child safety” and “Child restraints” sections of this manual before installing a child restraint.
Do not use the lower anchors if the combined weight of the child and the child restraint exceeds 65 lbs. (29.5 kg). If the combined weight of the child and the child restraint is greater than 65 lbs. (29.5 kg), use the vehicle’s seat belt (not the lower anchors) to install the child restraint. Be sure to follow the child restraint manufacturer’s instructions for installation.
Follow these steps to install a forward-facing child restraint using the LATCH system:
- Type A (if so equipped):
Remove the plastic covers from the LATCH anchors by pulling the covers straight back. Store the covers in a secure area.
Type B (if so equipped):
Lift the flap of the material to expose the LATCH anchors. - Position the child restraint on the seat. Always follow the child restraint manufacturer’s instructions.
- Secure the child restraint anchor attachments to the LATCH lower an-chors. Check to make sure the LATCH attachment is properly attached to the lower anchors.
If the child restraint is equipped with a top tether strap, route the top tether strap and secure the tether strap to the tether anchor point. For additional information, refer to “Installing top tether strap” in this section. Do not install child restraints that require the use of a top tether strap in seating positions that do not have a top tether anchor. - The back of the child restraint should be secured against the vehicle seat-back.
If necessary, adjust or remove the head restraint/headrest to obtain the correct child restraint fit. If the head restraint/headrest is removed, store it in a secure place. Be sure to reinstall the head restraint/headrest when the child restraint is removed. For additional information about head restraint/headrest adjustment, refer to “Head restraints/headrests” in this section.
If the seating position does not have an adjustable head restraint/headrest and it is interfering with the proper child restraint fit, try another seating position or a different child restraint. - For child restraints that are equipped with webbing-mounted attachments, remove any additional slack from the anchor attachments. Press downward and rearward firmly in the center of the child restraint with your knee to compress the vehicle seat cushion and seatback while tightening the webbing of the anchor attachments.
2023 Nissan Altima Specs, Price, Features, Mileage (Brochure)
Reference Link
Download Manuals: https://www.nissanusa.com/owners/ownership/manuals-guides.html