
Nissan ALTIMA 2023 Instrument Panel
The 2023 Nissan Altima’s instrument panel acts as the main center for keeping an eye on and managing several parts of the driving experience. The dashboard is a visible piece of equipment that shows important information at a look. It displays key warning lights like the “Check Engine” and “Low Tyre Pressure” signs, as well as information about the vehicle’s speed and fuel level. The instrument panel also features simple controls for activating cruise control, adjusting the audio, and adjusting the climate. The 2023 Altima’s extensive and intuitive interface improves the driving experience by enabling drivers to remain aware, at ease, and in charge while operating the vehicle.
2023 Nissan Altima Specs, Price, Features, and Mileage (Brochure)
INSTRUMENT PANEL

- Vents
- Steering wheel switches for audio control*
- Vehicle information display controls
- Headlight/turn signal switch, Paddle shifters (if so equipped)
- Driver supplemental air bag, Horn
- Meters and gauges
- Warning and indicator lights, Vehicle information display
- Wiper and washer switch
- Heater and air conditioner
- Heated seat switches (if so equipped)
- Heated steering wheel switch (if so equipped)
- Navigation system* (if so equipped) Audio system*
- Front passenger supplemental airbag
- Front passenger supplemental knee airbag
- Glove box
- Front passenger airbag status light
- Hazard warning flasher switch
- Power outlet
- USB connection port (if so equipped)
- Aux jack*
- Cup holders
- Shift lever
- Electronic parking brake switch
- (if so equipped)
- Automatic brake hold switch
- (if so equipped)
- Push-button ignition switch
- Cruise control switches (if so equipped)
- Bluetooth® Hands-free Phone System* ProPILOT Assist Switch (if so equipped) 19.
- Hood release
- Fuel-filler door release
- Tilt/telescopic steering wheel controls
- Trip computer reset switch, Instrument brightness control, Steering assist switch (for vehicles with ProPILOT Assist) (if so equipped) Trunk opener
- *: For additional information, refer to the separate NissanConnect® Owner’s Manual.
- Refer to the page number indicated in parentheses for operating details.
METERS AND GAUGES

- Tachometer
- Warning and indicator lights
- Vehicle information display
- Speedometer
- Fuel gauge
- Engine coolant temperature gauge
SPEEDOMETER AND ODOMETER
This vehicle is equipped with a speedometer and odometer. The speedometer is located on the right side of the meter cluster. The odometer is located within the vehicle information display.

Speedometer
The speedometer indicates vehicle speed.
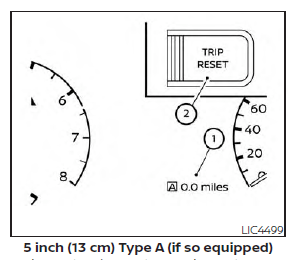 Odometer/Twin trip odometer
The odometer and the twin trip odometer 1O are displayed in the vehicle information display when the ignition switch is placed in the ON position. The odometer records the total distance the vehicle has been driven. The twin trip odometer records the distance of individual trips.
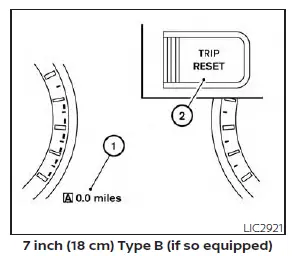
Changing the display
Push the TRIP RESET switch 2O on the left side of the instrument panel to change the display as follows: Odometer Mileage → Trip Trip Odometer Mileage
Resetting the trip odometer
Push the TRIP RESET switch 2O until the desired trip odometer (Trip or Trip ) is displayed. Pushing the TRIP RESET switch 2O for more than 1-second resets the currently displayed trip odometer to zero.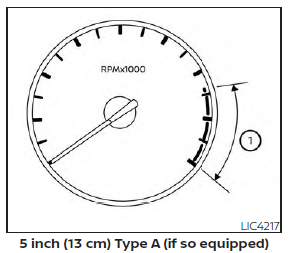
5 inch (13 cm) Type A (if so equipped)
TACHOMETER
The tachometer indicates engine speed in revolutions per minute (rpm). Do not rev the engine into the red zone 1O.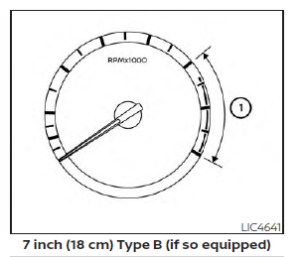
CAUTION
When engine speed approaches the red zone, shift to a higher gear or reduce engine speed. Operating the engine in the red zone may cause serious engine damage.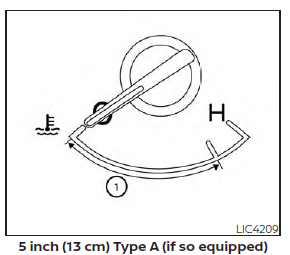
ENGINE COOLANT TEMPERATURE GAUGE
The gauge indicates the engine coolant temperature. The engine coolant temperature is within the normal range of 1O when the gauge needle points within the zone shown in the illustration. The engine coolant temperature varies with the outside air temperature and driving conditions.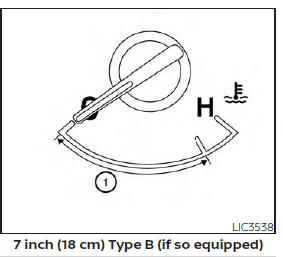
CAUTION
If the gauge indicates coolant temperature near the hot (H) end of the normal range, reduce vehicle speed to decrease temperature. If the gauge is over the normal range, stop the vehicle as soon as safely possible. If the engine is overheated, continued operation of the vehicle may seriously damage the engine. for immediate action required.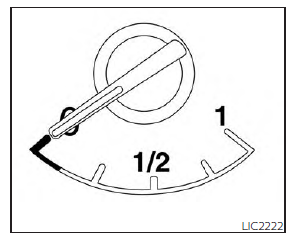
FUEL GAUGE
The gauge indicates the approximate fuel level in the tank. The gauge may move slightly during braking, turning, acceleration, or going up or down hills. The gauge needle returns to 0 (Empty) after the ignition switch is placed in the OFF position. The low fuel warning message shows in the vehicle information display when the amount of fuel in the tank is getting low. 2-8 Instruments and controls
Refill the fuel tank before the gauge registers 0 (Empty).
This indicates that the fuel-filler door is located on the driver’s side of the vehicle.
CAUTION
If the vehicle runs out of fuel, the Malfunction Indicator Light (MIL) may come on. Refuel as soon as possible. After a few driving trips, the light should turn off. If the light remains on after a few driving trips, have the vehicle inspected? It is recommended that you visit a NISSAN dealer for this service. For additional information, see “Malfunction Indicator Light (MIL)”.
DISTANCE TO EMPTY (DTE)
Displays the estimated distance the vehicle can be driven before refueling. The value is calculated based on recent fuel economy, the amount of fuel remaining in the fuel tank, and the actual fuel consumption. Changes in driving patterns or conditions can cause the DTE value to vary. As a result, the value displayed may differ from the actual distance that can be driven. DTE display will change to “—” when the fuel level in the tank is getting low, prior to the fuel gauge reaching 0 (Empty).
NOTE:
The DTE value after refill is estimated based on recent fuel economy and the amount of fuel added. If a small amount of fuel is added, or the ignition is on during refueling, the display may not be updated. Conditions that affect the fuel economy will also affect the estimated DTE value (city/highway driving, idle time, remote start time, terrain, seasonal weather, added vehicle weight, added deflectors, roof racks, etc.).

VARIABLE COMPRESSION TURBO (if so equipped)
Your engine is equipped with a variable compression ratio system called “Variable Compression Turbo”. This system can vary the engine compression ratio continuously. According to driving conditions, the system applies optimum compression ratio automatically to achieve both high output and high fuel economy efficiency. This is not a physical gauge. It is a display option in the vehicle information display that can be selected.
- Compression ratio status display Displays the status of compression ratio controlled by Variable Compression Turbo. The lowest compression ratio (8:1) and the highest (14:1) are displayed as “Power” and ”ECO” respectively.
- The turbocharger boost pressure gauge Displays the turbocharger boost pressure.
NOTE:
Under some conditions, the compression ratio may not change. This is not a malfunction of the system.
CAUTION
If the Variable Compression Turbo becomes faulty, the Malfunction Indicator Light (MIL) may come on.
FAQ
Typically, you can turn on the headlights by using the headlight switch on the instrument panel.
The fuel gauge is usually located on the instrument panel. To check the fuel level, observe the gauge’s position, which indicates the remaining fuel in the tank.
Climate control settings are typically adjusted using the buttons or knobs on the instrument panel. You can select the desired temperature, fan speed, and airflow direction.
The “Check Engine” light typically indicates a potential issue with the vehicle’s engine or emissions system. If it comes on, it’s advisable to have the vehicle inspected by a qualified technician.
To activate cruise control, you can typically use the cruise control buttons on the steering wheel or the instrument panel controls, following the instructions in the owner’s manual.
The vehicle speedometer is typically located on the instrument panel and displays the vehicle’s current speed in miles per hour (mph) or kilometers per hour (km/h).
You can typically access the odometer reading on the instrument panel by cycling through the vehicle information display using the controls provided.
The “Low Tire Pressure” warning light typically indicates that one or more tires have low air pressure. If it comes on, check the tire pressure and add air as needed to the recommended levels.
Audio settings are typically adjusted using the audio system controls on the instrument panel, allowing you to change the volume, select audio sources, and make audio adjustments.
The “Seat Belt” warning light typically indicates that a seat belt is not fastened. Always ensure that all occupants are securely fastened with seat belts when driving.
Turn signal indicators are usually located on the instrument panel, and you can activate them by using the turn signal lever or stalk.
The parking brake is typically engaged by using the parking brake lever or pedal, which is often located on the driver’s side near the instrument panel.
You can typically access and reset vehicle information and warning messages through the vehicle information display controls on the instrument panel.
The “Check Oil” warning light typically indicates low engine oil levels. If it comes on, check the engine oil level and add oil as needed to maintain the recommended level.
You can typically adjust the brightness of the instrument panel’s illumination using the brightness control knob or button provided on the instrument panel.
How to change km to miles on Nissan Altima?
To change from kilometres to miles on a Nissan Altima, press and hold the “Trip Reset” button on the instrument cluster until the units change. Release the button when the display switches to miles.
Useful Link
View Full User Guide: Nissan ALTIMA 2023 User Guide
Download Manuals: https://www.nissanusa.com/owners/ownership/manuals-guides.html
2023 Nissan Altima Specs, Price, Features, and Mileage (Brochure)