Nissan FRONTIER 2023 Air Cleaner and Lights
For the 2023 Nissan Frontier to operate effectively and safely, the air cleaner and lights must be maintained. Engine performance depends on the air cleaner, which should be inspected and changed on a regular basis, particularly while working in dusty environments. The lights on the car, such as the turn signals, tail lights, and headlights, need to be kept clean and inspected frequently to make sure they are mounted securely and operating as intended. The car must have routine maintenance from these parts in order to function properly and continue to be safe to drive.
2023 Nissan Frontier Specs, Price, Features and Mileage (Brochure)
Air cleaner and Lights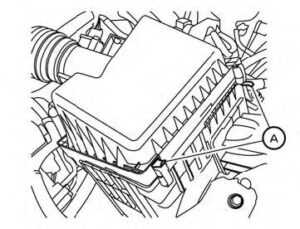
The dry paper-type filter element may be cleaned and reused. Replace it according to the maintenance log shown in the “Maintenance and schedules” section of this manual.
To remove the air cleaner filter:
- Unlatch the clips OA and move the air cleaner cover upward.
- Remove the air cleaner filter.
- Wipe the inside of the air cleaner filter housing and cover it with a damp cloth.
NOTE:
After installing a new air cleaner filter, make sure the air cleaner cover is seated in the housing and latch the clips OA.
WARNING
- Operating the engine with the air cleaner removed can cause you or others to be burned. The air cleaner not only cleans the air, it stops the flame if the engine backfires. If it isn’t there, and the engine backfires, you could be burned. Do not drive with the air cleaner removed, and be careful when working on the engine with the air cleaner removed.
- Never pour fuel into the throttle body or attempt to start the engine with the air cleaner removed. Doing so could result in serious injury.
IN-CABIN MICROFILTER
The cabinet microfilter restricts the entry of airborne dust and pollen particles and reduces some objectionable outside odors. The filter is located behind the glove box. For additional information, see the “Maintenance and schedules” section of this manual for change intervals. If replacement is required, it is recommended that you visit a NISSAN dealer for this service.
WINDSHIELD WIPER BLADES CLEANING
If your windshield is not clear after using the windshield washer or if a wiper blade chatters when running, wax or other material may be on the blade or windshield. Clean the outside of the windshield with a washer solution or a mild detergent. Your windshield is clean if beads do not form when rinsing with clear water. Clean each blade by wiping it with a cloth soaked in a washer solution or a mild detergent. Then rinse the blades with clear water. If your windshield is still not clear after cleaning the blades and using the wiper, replace the blades.
CAUTION
Worn windshield wiper blades can damage the windshield and impair driver vision.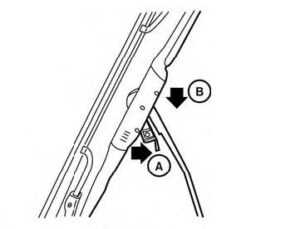
REPLACING
Replace the wiper blades if they are worn.
- Lift the wiper arm away from the windshield.
- Push and hold the release tab OA, and then move the wiper blade down OB the wiper arm to remove.
- Remove the wiper blade.
- Insert the new wiper blade onto the wiper arm until it clicks into place.
CAUTION
- After the wiper blade replacement, return the wiper arm to its original position; otherwise, it may be damaged when the hood is opened.
- Make sure the wiper blades contact the glass; otherwise, the arms may be damaged from wind pressure.
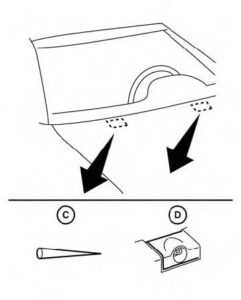
Be careful not to let anything get into the washer nozzle OD. This may cause clogging or improper windshield–wash operation. If something gets into the nozzle, remove it with a needle or small pin OC
BRAKES
If the brakes do not operate properly, have the brakes checked. It is recommended that you visit a NISSAN dealer for this service.
Self-adjusting brakes
Your vehicle is equipped with self-adjusting brakes. The front and rear disc-type brakes self-adjust every time the brake pedal is applied.
WARNING
Has your brake system checked if the brake pedal height does not return to normal? It is recommended that you visit a NISSAN dealer for this service.
Brake pad wear indicators
The disc brake pads on your vehicle have audible wear indicators. When a brake pad requires replacement, a high-pitched scraping or screeching sound will be heard when the vehicle is in motion. The noise will be heard whether or not the brake pedal is depressed. Have the brakes checked as soon as possible if the wear indicator sound is heard. Under some driving or climate conditions, occasional brake squeak, squeal or other noise may be heard. Occasional brake noise during light to moderate stops is normal and does not affect the function or performance of the brake system. Proper brake inspection intervals should be followed. For additional information regarding brake inspections, see the appropriate maintenance schedule information in the “Maintenance and schedules” section of this manual.
FUSES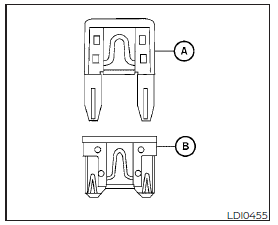
Two types of fuses are used. Type OA is used in the fuse boxes in the engine compartment. Type OB is used in the passenger compartment and engine compartment fuse boxes. Type OA fuses are provided as spare fuses. There are no spare fuses in the engine compartment.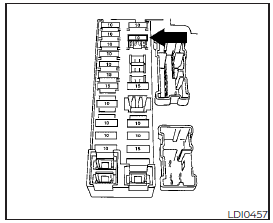
If a type OA fuse is used to replace a type OB fuse, the type OA fuse will not be level with the fuse pocket as shown in the illustration. This will not affect the performance of the fuse. Make sure the fuse is installed in the fuse box securely. Type OB fuses cannot be installed in the underhood fuse boxes. Only use type OA fuses in the underhood fuse boxes.
NOTE:
Your vehicle may not be equipped with all fuses listed on the fuse label.
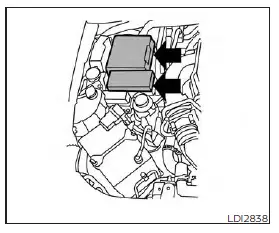
ENGINE COMPARTMENT
Never use a fuse of a higher or lower amperage rating than that specified on the fuse box cover. This could damage the electrical system or electronic control units or cause a fire.
If any electrical equipment does not come on, check for an open fuse.
- Be sure the ignition switch and the headlight switch are OFF.
- Open the engine hood.
- Remove the fuse box cover by pushing the tab and lifting the cover-up.
- Remove the fuse with the fuse puller. The fuse puller is located in the center of the fuse block in the passenger compartment.
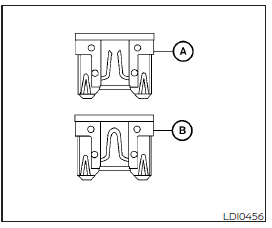
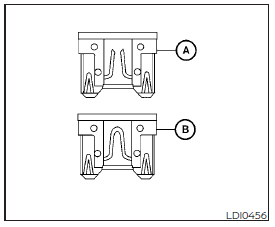
- If the fuse is open OA, replace it with a new fuse OB.
- If a new fuse also opens, have the electrical system checked and repaired. It is recommended that you visit a NISSAN dealer for this service.
Fusible links
If the electrical equipment does not operate and the fuses are in good condition, check the fusible links. If any of these fusible links are melted, replace them with only Genuine NISSAN parts.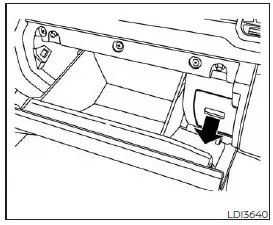
PASSENGER COMPARTMENT
Never use a fuse of a higher or lower amperage rating than that specified on the fuse box cover. This could damage the electrical system or electronic control units or cause a fire.
If any electrical equipment does not operate, check for an open fuse.
- Be sure the ignition switch and the headlight switch are OFF.
- Open the glove box and pull the fuse box cover to remove it.
- Remove the fuse with the fuse puller.

- If the fuse is open OA, replace it with an equivalent good fuse OB.
- Reverse step 2 to reinstall the fuse box cover.
- If a new fuse also opens, have the electrical system checked and repaired. It is recommended that you visit a NISSAN dealer for this service.
NOTE:
Your vehicle may not be equipped with all fuses listed on the fuse label.
BATTERY REPLACEMENT
Be careful not to allow children to swallow the battery or remove parts.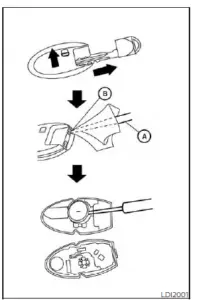
NISSAN INTELLIGENT KEY®
Replace the battery in the Intelligent Key as follows:
- Remove the mechanical key from the Intelligent Key.
- Insert a small flathead screwdriver OA into the slit OB of the corner and twist it to separate the upper part from the lower part. Place a cloth over the screwdriver to protect the casing.
- the battery with a new one. Recommended battery: CR2032 or equivalent.
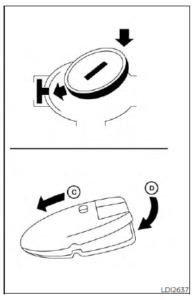
- Do not touch the internal circuit and electric terminals as doing so could cause a malfunction.
- Hold the battery by the edges. Holding the battery across the contact points will seriously deplete the storage capacity.
- Make sure that the + side faces the bottom of the lower part.
- Close the lid securely as illustrated with OC and OD.
- Operate the buttons to check the operation.
If you need assistance with replacement, it is recommended that you visit a NISSAN dealer for this service.
FCC Notice:
This device complies with Part 15 of the FCC Rules. Operation is subject to the following two conditions:
- This device may not cause harmful interference, and
- this device must accept any interference received, including interference that may cause undesired operation.
Note:
Changes or modifications not expressly approved by the party responsible for compliance could void the user’s authority to operate the equipment.
For Canada:
This device contains license-exempt transmitter(s)/receiver(s) that comply with Innovation, Science, and Economic Development Canada’s license-exempt RSS(s). Operation is subject to the following two conditions:
- This device may not cause interference.
- This device must accept any interference, including interference that may cause undesired operation of the device.
 LIGHTS HEADLIGHTS
For additional information on headlight bulb replacement, refer to the instructions outlined in this section.
Replacing the halogen headlight bulb (if so equipped)
The headlight is a semi-sealed beam type that uses a replaceable headlight (halogen) bulb. Because the headlight assembly must be removed from the vehicle for bulb replacement, it is recommended that you visit a NISSAN dealer for this service.
CAUTION
- High-pressure halogen gas is sealed inside the halogen bulb. The bulb may break if the glass envelope is scratched or the bulb is dropped.
- When handling the bulb, do not touch the glass envelope.
- DO NOT TOUCH THE BULB WITH BARE HANDS.
- Use the same number and wattage as shown in the chart.
- Do not leave the bulb out of the head-light reflector for a long period of time as dust, moisture, and smoke may enter the headlight body and affect the performance of the headlight. Aiming is not necessary after replacing the bulb. When aiming adjustment is necessary, it is recommended that you visit a NISSAN dealer for this service.
Fog may temporarily form inside the lens of the exterior lights in the rain or in a car wash. A temperature difference between the inside and the outside of the lens causes the fog. This is not a malfunction. If large drops of water collect inside the lens, it is recommended that you visit a NISSAN dealer for servicing.
Replacing the LED headlight bulb (if so equipped)
If LED headlight bulb replacement is required, it is recommended that you visit a NISSAN dealer for this service.
FOG LIGHTS (if so equipped)
For additional information on fog light bulb replacement, refer to the instructions outlined in this section.
Replacing the fog light bulb (if so equipped)
If fog light bulb replacement is required, it is recommended that you visit a NISSAN dealer for this service.
CAUTION
- High-pressure halogen gas is sealed inside the halogen bulb. The bulb may break if the glass envelope is scratched or the bulb is dropped.
- When handling the bulb, do not touch the glass envelope.
- Use the same number and wattage as originally installed as shown in the chart.
- Do not leave the bulb out of the fog light for a long period of time as dust, moisture, and smoke may enter the fog light body and affect the performance of the fog light.
Replacing the LED fog light bulb(if so equipped)
If LED fog light bulb replacement is required, it is recommended that you visit a NISSAN dealer for this service.
EXTERIOR AND INTERIOR LIGHTS
| Item | Wattage (W) | Bulb No.* |
|
Headlight assembly (Type A) (if so equipped)* Low/High Turn/Park Side marker Headlight assembly (Type B) (if so equipped)* Low High Turn Daytime Running Light (DRL)/Park Side marker Fog light (if so equipped)* Fog light assembly (if so equipped)* Fog Daytime Running Light (DRL) Map light (Type A) (if so equipped) Map light (Type B) (if so equipped)* Vanity mirror light (if so equipped)* Room light (Type A) (if so equipped) Room light (Type B) (if so equipped)* Glove box light (if so equipped)* High-mounted stop light/cargo light* Bed light (if so equipped)* Rear combination light* Tail Stop/turn Backup License plate light* |
55/65 28/8 —
— — — — — —
35 21 8 — 1.4 8 — 1 12.8 —
— — — — |
HB5 7444NA —
— — — — — —
H8 W21W — — — — — — 912 —
— — — — |
* It is recommended that you visit a NISSAN dealer for replacement.
Always check with the Parts Department at a NISSAN dealer for the latest parts information.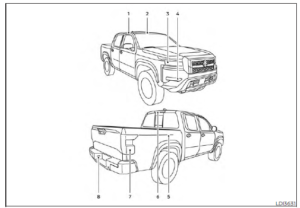
- Room light
- Map light
- Headlight assembly
- Fog light/Fog light assembly (if so equipped)
- Bed light (if so equipped)
- High-mount stop light/cargo light
- Rear combination light
- License plate light
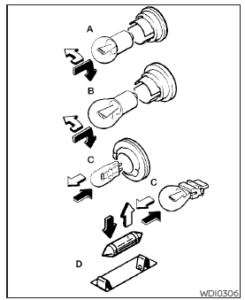
Replacement procedures
All other lights are either type A, B, C, or D. When replacing a bulb, first remove the lens and/or cover using a cloth and a suitable tool.
- Indicates bulb removal
- Indicates bulb installation
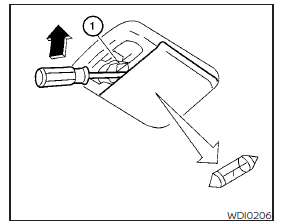
Map light (Type A) (if so equipped)
Use a cloth 1O to protect the housing.
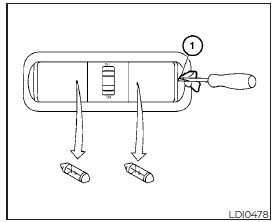
Room light (Type A) (if so equipped)
Use a cloth 1O to protect the housing.
FAQ
It should be replaced regularly, with more frequent replacement needed if operating in dusty conditions.
It’s crucial for optimal engine performance and efficiency.
Yes, clean the headlights regularly to ensure clear visibility.
Check that headlights, tail lights, turn signals, and other lights are operating correctly and securely installed.
Yes, regularly check the headlight and aim for proper alignment.
Yes, but ensure they are installed securely and correctly.
Regularly check them, especially before long trips.
Replace it immediately to ensure safety.
Use the bulb type specified in the vehicle’s manual.
Yes, dirty headlights can reduce visibility and should be cleaned regularly.
Yes, regular checks ensure they are functioning optimally.
Yes, check more frequently in adverse weather or if driving on rough roads.
It can lead to reduced engine efficiency and performance.
Yes, but replace it as per the maintenance schedule or if it’s excessively dirty.
Generally, no special tools are needed for light bulb replacement.
Useful Link
View Full User Guide: Nissan FRONTIER 2023 User Guide
Download Manuals: https://www.nissanusa.com/owners/ownership/manuals-guides.html
2023 Nissan Frontier Specs, Price, Features, and Mileage (Brochure)