Nissan FRONTIER 2023 Driver Alertness and Brake System
The 2023 Nissan Frontier offers a complete driving experience by combining a strong braking system with a variety of driver-related features. Power-adjustable seats, adaptable driving modes, sophisticated driver aid systems, and technological upgrades like head-ups and driver information displays are examples of driver conveniences. Comfort and safety are given top priority in the design of these elements. The Frontier’s hydraulic brake system, which includes electronic brake force distribution (EBD), brake assist, and anti-lock brakes (ABS), provides dependable stopping power. The Frontier guarantees its passengers a comfortable and safe ride with this technology as well as a dedication to driver satisfaction and safety.
2023 Nissan Frontier Specs, Price, Features and Mileage (Brochure)
Intelligent Driver Alertness (I-DA) and Brake system
WARNING
Failure to follow the warnings and instructions for proper use of the I-DA system could result in serious injury or death.
- The I–DA system is only a warning to inform the driver of a potential lack of driver attention or drowsiness. It will not steer the vehicle or prevent loss of control.
- The I–DA system does not detect and provide an alert of the driver’s lack of attention or fatigue in every situation.
- It is the driver’s responsibility to:
- stay alert,
- drive safely,
- keep the vehicle in the traveling lane,
- be in control of the vehicle at all times,
- avoid driving when tired,
- avoid distractions (texting, etc.).
The I–DA system helps alert the driver if the system detects a lack of attention or driving fatigue. The system monitors driving style and steering behavior over a period of time, and it detects changes from the normal pattern. If the system detects that driver attention is decreasing over a period of time, the system uses audible and visual warnings to suggest that the driver take a break.
INTELLIGENT DRIVER ALERTNESS SYSTEM OPERATION
Failure to follow the warnings and instructions for proper use of the I-DA system could result in serious injury or death.
- The I–DA system is only a warning to inform the driver of a potential lack of driver attention or drowsiness. It will not steer the vehicle or prevent loss of control.
- The I–DA system does not detect and provide an alert of the driver’s lack of attention or fatigue in every situation.
- It is the driver’s responsibility to:
- stay alert,
- drive safely,
- keep the vehicle in the traveling lane,
- be in control of the vehicle at all times,
- avoid driving when tired,
- avoid distractions (texting, etc.).
The I–DA system helps alert the driver if the system detects a lack of attention or driving fatigue. The system monitors driving style and steering behavior over a period of time, and it detects changes from the normal pattern. If the system detects that driver attention is decreasing over a period of time, the system uses audible and visual warnings to suggest that the driver take a break.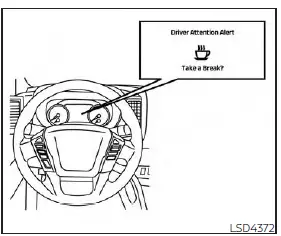
INTELLIGENT DRIVER ALERTNESS SYSTEM OPERATION
If the system detects driver fatigue or that driver attention is decreasing, the message “Take a break?” appears in the vehicle information display and a chime sounds when the vehicle is driven at speeds above 37 mph (60 km/h). The system continuously monitors driver attention and can provide multiple warnings per trip. The system resets and starts reassessing driving style and steering behavior when the ignition switch is cycled from the ON to the OFF position and back to the ON position.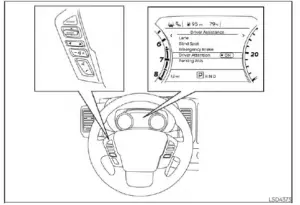
HOW TO ENABLE/DISABLE THE INTELLIGENT DRIVER ALERTNESS (I-DA) SYSTEM
Perform the following steps to enable or disable the I–DA system.
- Press the button until “Settings” displays in the vehicle information display. Use the button to select “Driver Assistance.” Then press the ENTER button.
- Select “Driver Attention” and press the ENTER button to turn the system on or off.
NOTE:
The setting will be retained even if the engine is restarted.
INTELLIGENT DRIVER ALERTNESS (I-DA) SYSTEM LIMITATIONS
Listed below are the system limitations for the I–DA system. Failure to operate the vehicle in accordance with these system limitations could result in serious injury or death.
- The I-DA system may not operate properly and may not provide an alert in the following conditions:
- Poor road conditions such as an uneven road surface or potholes.
- Strong side wind.
- If you have adopted a sporty driving style with higher cornering speeds or higher rates of acceleration.
- Frequent lane changes or changes to vehicle speed.
- The I–DA system will not provide an alert in the following conditions:
- Vehicle speeds lower than 37 mph (60 km/h).
- Short lapses of attention.
- Instantaneous distractions such as dropping an object.
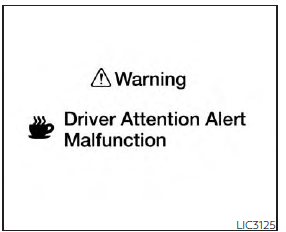
System malfunction
If the Intelligent Driver Alertness system malfunctions, the system warning message will appear in the vehicle information display and the function will be stopped automatically.
Action to take
Stop the vehicle in a safe location, place the vehicle in the P (Park) position, turn the engine off, and restart the engine. If the system warning message continues to appear, have the system checked. It is recommended that you visit a NISSAN dealer for this service.
BREAK-IN SCHEDULE
During the first 1,200 miles (2,000 km), follow these recommendations to obtain maximum engine performance and ensure the future reliability and economy of your new vehicle. Failure to follow these recommendations may result in shortened engine life and reduced engine performance.
- Avoid driving for long periods at a constant speed, either fast or slow, and do not run the engine over 4,000 rpm.
- Do not accelerate at full throttle in any gear.
- Avoid quick starts.
- Avoid hard braking as much as possible.
- Do not tow a trailer for the first 500 miles (805 kilometers). Your engine, axle or other parts could be damaged.
FUEL EFFICIENT DRIVING TIPS
Follow these easy-to-use Fuel Efficient Driving Tips to help you achieve the most fuel economy from your vehicle.
- Use Smooth Accelerator and Brake Pedal Application
- Avoid rapid starts and stops.
- Use a smooth, gentle accelerator and brake application whenever possible.
- Maintain constant speed while commuting and coast whenever possible.
- Maintain Constant Speed
- Look ahead to try and anticipate and minimize stops.
- Synchronizing your speed with traffic lights allows you to reduce your number of stops.
- Maintaining a steady speed can minimize red light stops and improve fuel efficiency.
- Use Air Conditioning (A/C) at Higher Vehicle Speeds
- Below 40 mph (64 km/h), it is more efficient to open windows to cool the vehicle due to reduced engine load.
- Above 40 mph (64 km/h), it is more efficient to use A/C to cool the vehicle due to increased aerodynamic drag.
- Recirculating the cool air in the cabin when the A/C is on reduces the cooling load
- Drive at Economical Speeds and Distances
- Observing the speed limit and not exceeding 60 mph (97 km/h) (where legally allowed) can improve fuel efficiency due to reduced aerodynamic drag.
- Maintaining a safe following distance behind other vehicles reduces unnecessary braking.
- Safely monitoring traffic to anticipate changes in speed permits reduced braking and smooth acceleration changes.
- Select a gear range suitable to road conditions.
- Use Cruise Control
- Using cruise control during highway driving helps maintain a steady speed.
- Cruise control is particularly effective in providing fuel savings when driving on flat terrains.
- Plan for the Shortest Route
- Utilize a map or navigation system to determine the best route to save time.
- Avoid Idling
- Shutting off your engine when safe for stops exceeding 30–60 seconds saves fuel and reduces emissions.
- Buy an Automated Pass for Toll Roads
- Automated passes permit drivers to use special lanes to maintain cruising speed through the toll and avoid stopping and starting.
- Winter Warm Up
- Limit idling time to minimize impact to fuel economy.
- Vehicles typically need no more than 30 seconds of idling at start-up to effectively circulate the engine oil before driving.
- Your vehicle will reach its ideal operating temperature more quickly while driving versus idling.
- Keeping your Vehicle Cool
- Park your vehicle in a covered parking area or in the shade whenever possible.
- When entering a hot vehicle, opening the windows will help to reduce the inside temperature faster, resulting in reduced demand on your A/C system.
INCREASING FUEL ECONOMY
- Keep your engine tuned up.
- Follow the recommended scheduled maintenance.
- Keep the tires inflated to the correct pressure. Low tire pressure increases tire wear and lowers fuel economy.
- Keep the wheels in the correct alignment. Improper alignment increases tire wear and lowers fuel economy.
For vehicles equipped with, use 4H or 4L position only when necessary. 4-Wheel Drive operation lowers fuel economy. - Use the recommended viscosity engine oil.
USING 4–WHEEL DRIVE (4WD)(if so equipped)
- For 4WD-equipped vehicles, do not attempt to raise two wheels off the ground and shift the transmission to any drive or reverse position with the engine running. Doing so may result in drivetrain damage or unexpected vehicle movement which could result in serious vehicle damage or personal injury.
- Do not attempt to test a 4WD-equipped vehicle on a 2-wheel dynamometer (such as the dynamometers used by some states for emissions testing), or similar equipment even if the other two wheels are raised off the ground. Make sure you inform test facility personnel that your vehicle is equipped with 4WD before it is placed on a dynamometer. Using the wrong test equipment may result in drivetrain damage or unexpected vehicle movement which could result in serious vehicle damage or personal injury.
CAUTION
- Do not drive the vehicle in the 4H or 4LO position on dry hard surface roads. Driving on dry, hard surfaces in 4H or 4LO may cause unnecessary noise, tire wear, and increased fuel consumption.
If the 4WD vehicle information display warning message turns on when you are driving on dry hard surface roads:- In the 4H position, shift the 4WD shift switch to 2WD.
- In the 4LO position, stop the vehicle, move the shift lever to the N (Neutral) position with the brake pedal depressed, and shift the 4WD shift switch to 2WD.
- If the vehicle information display warning message is still on after the above operation, have your vehicle checked as soon as possible? It is recommended that you visit a NISSAN dealer for this service.
TRANSFER CASE SHIFTING PROCEDURES
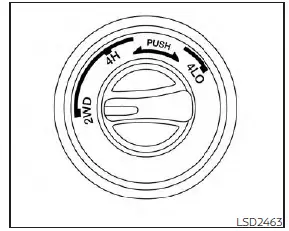
The part-time 4WD system provides 3 positions (2WD, 4H, and 4LO), so you can select the desired drive mode according to the driving conditions.
2WD or 4WD shift procedure:
| 4WD Shift Switch Position |
Wheels Driven |
Indicator |
Use conditions |
4WD shift procedure |
||
| 4WD shift | Transfer 4LO position | |||||
| 2WD |
Rear wheels |
For driving on dry, paved roads (Economy drive) |
Move the 4WD switch. 2WD <—> 4H 4WD shift indicator will indicate that the transfer shift position is engaged. IT IS NOT NECESSARY TO MOVE THE SHIFT LEVER TO THE N (NEUTRAL) POSITION IN THIS OPERATION. PERFORM THIS OPERATION WHEN DRIVING STRAIGHT. |
|||
| 4H |
Four wheels |
For driving on rocky, sandy or snow-covered roads | ||||
|
N (Neutral) |
1 May blink |
N (Neutral) disengages the automatic transmission (A/T) mechanical parking lock, which will allow the vehicle to roll. Do not leave the transfer shift position in N (Neutral).*2 |
1. Stop the vehicle. 2. With the brake pedal depressed, move the shift lever to the N (Neutral) position. 3. With the brake pedal depressed, depress and turn the 4WD shift switch to 4LO or 4H. THE TRANSFER CASE DOES NOT- GAGE BETWEEN 4H AND 4LO (OR 4LO TO 4H) UNLESS YOU HAVE FIRST STOPPED THE VEHICLE, DEPRESSED THE BRAKE PEDAL AND MOVED THE SHIFT LEVER TO N (NEUTRAL).*3 |
|||
| 4LO | ||||||
|
Four wheels |
Illuminated |
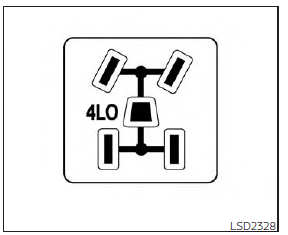
For use when maximum power and traction is required (for example, on steep grades or rocky, sandy, muddy roads) | ||||
- Before moving the shift lever from N (Neutral), wait until the 4LO indicator stays on steady. This indicates that the 4WD shift procedure is completed and the transfer gear is correctly set in the 4LO position. If the vehicle is shifted into gear before the indicator is on steady, the transfer gear may grind, not engage correctly or stay in the N (Neutral) position.
- If the 4WD vehicle information display warning message illuminates, perform the following procedure to return the transfer case to the correct operating condition.
- Turn off the engine by placing the ignition switch in the OFF position.
- Start the engine.
- Check that the 4WD vehicle information display warning message turns off. If the warning message in the vehicle information display stays on, have the system checked. It is recommended that you visit a NISSAN dealer for this service.
- Apply the parking brake, depress the brake pedal, and move the shift lever to the N (Neutral) position With the brake pedal depressed, move the 4WD shift switch to the desired mode.
- If the 4WD vehicle information display warning message illuminates, perform the following procedure to return the transfer case to the correct operating condition.
- While changing in and out of 4LO, the ignition switch must be in the ON position and the vehicle’s engine must be running for a shift to take place and for the 4WD shift and 4LO position indicators to be operable. Otherwise, the shift will not take place and no indicators will be on or flashing.
- Make sure the transfer 4LO position indicator turns on when you shift the 4WD shift switch to 4LO. The transfer case 4WD shift switch is used to select either 2WD or 4WD depending on the driving conditions. There are three types of drive modes available, 2WD, 4H, and 4LO.
The 4WD shift switch electronically controls the transfer case operation. Rotate the switch to move between each mode, 2WD, 4H, and 4LO. To change into or out of 4LO, the vehicle MUST be stationary, move the shift lever to N (Neutral), and depress the brake pedal. The switch must be pushed and turned to select 4LO.
WARNING
- When parking, apply the parking brake before stopping the engine and make sure that the 4WD shift indicator is on and the Automatic Transmission Park (ATP) warning light goes off. Otherwise, the vehicle could unexpectedly move even if the A/T is in the P (Park) position.
- The 4LO indicator must stop blinking and remain illuminated or turned off before shifting the transmission into gear. If the shift lever is shifted from the N (Neutral) position to any other gear when the 4LO indicator is blinking, the vehicle may move unexpectedly.
CAUTION
- Never shift the 4WD shift switch between 4LO and 4H while driving.
- The 4H position provides greater traction. Avoid excessive speed, as it will cause increased fuel consumption and higher oil temperatures, and could damage drivetrain components. Speeds over 62 mph (100 km/h) in 4H is not recommended.
- The 4LO position provides maximum power and traction. Avoid raising vehicle speed excessively, as the maximum speed is approximately 31 mph (50 km/h).
- When driving straight, shift the 4WD shift switch to the 2WD or 4H position. Do not move the 4WD shift switch when making a turn or reversing.
- Do not shift the 4WD shift switch (between 2WD and 4H) while driving on steep downhill grades. Use the engine brake and low A/T gears (M1 or M2) for engine braking.
- Do not operate the 4WD shift switch (between 2WD and 4H) with the rear wheels spinning.
- Do not drive on dry hard surface roads in the 4H or 4LO position. Driving on dry hard surfaces in 4H or 4LO may cause unnecessary noise and tire wear. NISSAN recommends driving in the 2WD position under these conditions.
- The 4WD transfer case may not be shifted between 4H and 4LO at low ambient temperatures and the transfer 4LO position indicator may blink even when the 4WD shift switch is shifted. After driving for a while you can change the 4WD transfer case between 4H and 4LO.
When driving on rough roads:
- Set the 4WD shift switch to 4H or 4LO.
- Drive carefully according to the road surface conditions.
When the vehicle is stuck:
- Set the 4WD shift switch to 4H or 4LO.
Place stones or wooden blocks under the tires to free the vehicle. - Use the Electronic locking rear differential (E-Lock) system (if so equipped).
- If it is difficult to free the vehicle, rock the vehicle back and forth between reverse and drive gears.
- If the vehicle is stuck deep in mud, place stones or wooden blocks under the tires. Then try the recovery procedures above. Tire chains may be effective.
CAUTION
- Do not spin the tires excessively. Tires will sink deep into the mud, making it difficult to free the vehicle.
- Avoid shifting gears with the engine running at high speeds as this may cause malfunction.
4WD shift switch operations
- Shift the 4WD shift switch to either the 2WD, 4H, or 4LO position, depending on driving conditions.
- If the 4WD shift switch is operated while making a turn, accelerating or decelerating, or if the ignition switch is placed in the OFF position while in the 4H or 4LO, you may feel a jolt. This is not abnormal.
- You may hear some noise as the system shifts or engages. This is not abnormal.
CAUTION
- When driving straight, shift the 4WD shift switch to the 2WD or 4H position. Do not move the 4WD shift switch when making a turn or reversing.
- Do not shift the 4WD shift switch while driving on steep downhill grades. Use the engine brake and low automatic transmission gears (M1 or M2) for engine braking.
- Do not operate the 4WD shift switch with the rear wheels spinning. Before placing the 4WD shift switch in the 4H position from 2WD, ensure the vehicle speed is less than 62 mph (100 km/h). Failure to do so can damage the 4WD system.
- Never shift the 4WD shift switch between 4LO and 4H while driving.
4WD shift indicator
The 4WD shift indicator is located in the vehicle information display. The indicator should turn off within one second after placing the ignition switch in the ON position. While the engine is running, the 4WD shift indicator will illuminate the position selected by the 4WD shift switch.
- The 4WD shift indicator may come on while shifting from one drive mode to the other. When the shifting is completed, the 4WD shift indicator will stay on.
- If the 4WD vehicle information display warning message comes on, the 4WD shift indicator goes out.
CAUTION
If the 4WD shift indicator indication changes to 2WD when the 4WD shift switch is shifted to the 4H position at low ambient temperatures, the 2WD mode may be engaged due to a malfunctioning drive system. If the indicator does not return to normal and the 4WD vehicle information display warning message comes on, have the system checked. It is recommended that you visit a NISSAN dealer for this service.
Warning message
| Warning message | Warning message comes on when: |
| Vehicle information display | |
|
4WD Error: See Owner’s Manual |
There is a malfunction in the 4–Wheel Drive system |
| FRT & RR tire size difference: See Owner’s Manual | The difference in wheel rotation is large |
The 4WD warning message is located in the meter. The 4WD warning message comes on when the ignition switch is placed in the ON position. It turns off soon after the engine is started. If any malfunction occurs in the 4WD system when the ignition switch is ON, the warning message will either remain illuminated or blink. If the 4WD warning message comes on, the 4WD shift indicator goes out. A large difference between the diameters of the front and rear wheels will make the warning message blink slowly (about once per two seconds). Shift the 4WD shift switch into 2WD and do not drive fast.
CAUTION
- If the warning message comes on during operation or rapidly after stopping the vehicle for a while, have your vehicle checked as soon as possible. It is recommended that you visit a NISSAN dealer for this service.
- Shifting between 4H and 4LO is not recommended when the 4WD warning message turns on.
- When the warning message comes on, the 2WD mode may be engaged even if the 4WD shift switch is in 4H. Be especially careful when driving. If corresponding parts malfunction, the 4WD mode will not be engaged even if the 4WD shift switch is shifted.
- Do not drive the vehicle in the 4H or 4LO position on dry hard surface roads. Driving on dry, hard surfaces in 4H or 4LO may cause unnecessary noise, tire wear, and increased fuel consumption.
If the 4WD warning message turns on when you are driving on dry hard surface roads:- In the 4H position, shift the 4WD shift switch to 2WD.
- In the 4LO position, stop the vehicle, move the automatic transmission shift lever to the N (Neutral) position with the brake pedal depressed, and shift the 4WD shift switch to 2WD.
- If the warning message is still on after the above operation, have your vehicle checked as soon as possible. It is recommended that you visit a NISSAN dealer for this service.
- The transfer case may be damaged if you continue driving with the warning message on.
ELECTRONIC LOCKING REAR DIFFERENTIAL (E-Lock) SYSTEM (if so equipped)
The E-Lock system can provide additional traction and should only be used when a vehicle has become or is becoming stuck. This system operates by electronically “locking” the two rear drive wheels together, allowing them to turn at the same speed. The system is used when it is not possible to free a stuck vehicle even when using the 4LO position (4-wheel Drive vehicles). When added traction is required, activate the E-Lock system by pushing the switch ON. Once the system fully engages, the indicator light in the instrument panel will remain on. When the system is activated, both rear wheels will engage, providing added traction. The rear wheels may momentarily slip or move to engage the system, and the system will only engage up to approximately 4 mph (7 km/h). Once the vehicle is free, the system should be turned off and driving resumed. The Anti-Lock Braking (ABS) system is disabled and the ABS light illuminates when the E-Lock system is on. Also, the Vehicle Dynamic Control (VDC) system is disabled and the indicator light illuminates when the E-Lock system is on.
WARNING
- Never leave the E-Lock system on when driving on paved or hard-surfaced roads. Turning the vehicle may result in the rear wheels slipping and resulting in an accident and personal injury. After using the E-Lock system to free the vehicle, turn the system off.
- Use the E-Lock system only when freeing a stuck vehicle. Try the 4LO position before using the E-Lock system. Never use the E-Lock system on a slippery road surface such as snow or ice surface. Using the E-Lock system when driving in these road conditions may cause unexpected movement of the vehicle during engine braking, accelerating, or turning, which may result in an accident and serious personal injury.
- Observe the above warnings. Otherwise, loss of normal steering control may result. This may result in an accident and serious personal injury.
CAUTION
- After using the E-Lock system, turn the switch OFF to prevent possible damage to driveline components from extended use.
- Do not drive the vehicle at speeds faster than 12 mph (20 km/h) when the system is engaged. Doing so could damage drivetrain components.
- Do not turn on the E-Lock system while the tires are spinning. Doing so could damage drivetrain components.
PARKING/PARKING ON HILLS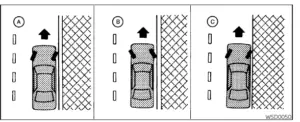
WARNING
- Do not stop or park the vehicle over flammable materials such as dry grass, waste paper, or rags. They may ignite and cause a fire.
- Safe parking procedures require that both the parking brake be set and the transmission placed into P (Park). Failure to do so could cause the vehicle to move unexpectedly or roll away and result in an accident. Make sure the shift lever has been pushed as far forward as it can go and cannot be moved without depressing the foot brake pedal.
- Never leave the engine running while the vehicle is unattended.
- Do not leave children unattended inside the vehicle. They could unknowingly activate switches or controls or make the vehicle move. Unattended children could become involved in serious accidents.
- To help avoid the risk of injury or death through the unintended operation of the vehicle and/or its systems, do not leave children, people who require the assistance of others or pets unattended in your vehicle. Additionally, the temperature inside a closed vehicle on a warm day can quickly become high enough to cause a significant risk of injury or death to people and pets.
- Firmly apply the parking brake.
- Move the shift lever to the P (Park) position.
- To help prevent the vehicle from rolling into traffic when parked on an incline, it is a good practice to turn the wheels as illustrated.
- HEADED DOWNHILL WITH CURB OA: Turn the wheels into the curb and move the vehicle forward until the curb side wheel gently touches the curb.
- HEADED UPHILL WITH CURB OB :
Turn the wheels away from the curb and move the vehicle back until the curb side wheel gently touches the curb. - HEADED UPHILL OR DOWNHILL, NO CURB OC :
Turn the wheels toward the side of the road so the vehicle will move away from the center of the road if it moves.
- Place the ignition switch in the LOCK position
POWER STEERING
Power-assisted steering uses a hydraulic pump, driven by the engine, to assist steering. If the engine stops or the drive belt breaks, you will still have control of the vehicle. However, much greater steering effort is needed, especially in sharp turns and at low speeds.
WARNING
If the engine is not running or is turned off while driving, the power assist for the steering will not work. Steering will be harder to operate.
BRAKE SYSTEM
The brake system has two separate hydraulic circuits. If one circuit malfunctions, you will still have braking at two wheels.
BRAKE PRECAUTIONS
Avoid resting your foot on the brake pedal while driving. This will overheat the brakes, wear out the brake pads faster, and reduce gas mileage. To help reduce brake wear and to prevent the brakes from overheating, reduce speed and downshift to a lower gear before going down a slope or long grade. Overheated brakes may reduce braking performance and could result in loss of vehicle control.
WARNING
- While driving on a slippery surface, be careful when braking, accelerating or downshifting. Abrupt braking or accelerating could cause the wheels to skid and result in an accident.
- If the engine is not running or is turned off while driving, the power assist for the brakes will not work. Braking will be harder.
Wet brakes
When the vehicle is washed or driven through water, the brakes may get wet. As a result, your braking distance will be longer and the vehicle may pull to one side during braking. To dry the brakes, drive the vehicle at a safe speed while lightly pressing the brake pedal to heat up the brakes. Do this until the brakes return to normal. Avoid driving the vehicle at high speeds until the brakes function correctly.
Parking brake break-in
Break in the parking brake shoes whenever the stopping effect of the parking brake is weakened or whenever the parking brake shoes and/or drums/rotors are replaced, in order to ensure the best braking performance. This procedure is described in the vehicle service manual. It is recommended that you visit a NISSAN dealer for this service.
ANTI-LOCK BRAKING SYSTEM (ABS)
- The ABS is a sophisticated device, but it cannot prevent accidents resulting from careless or dangerous driving techniques. It can help maintain vehicle control during braking on slippery surfaces. Remember that stopping distances on slippery surfaces will be longer than on normal surfaces even with ABS. Stopping distances may also be longer on rough, gravel or snow-covered roads, or if you are using tire chains. Always maintain a safe distance from the vehicle in front of you. Ultimately, the driver is responsible for safety.
- Tire type and condition may also affect braking effectiveness.
- When replacing tires, install the specified size of tires on all four wheels.
- When installing a spare tire, make sure that it is the proper size and type as specified on the Tire and Loading Information label.
The ABS controls the brakes so the wheels do not lock during hard braking or when braking on slippery surfaces. The system detects the rotation speed at each wheel and varies the brake fluid pressure to prevent each wheel from locking and sliding. By preventing each wheel from locking, the system helps the driver maintain steering control and helps minimize swerving and spinning on slippery surfaces.
Using the system
Depress the brake pedal and hold it down. Depress the brake pedal with firm steady pressure, but do not pump the brakes. The Anti-lock Braking System will operate to prevent the wheels from locking up. Steer the vehicle to avoid obstacles.
WARNING
Do not pump the brake pedal. Doing so may result in increased stopping distances.
Self-test feature
The Anti-lock Braking System (ABS) includes electronic sensors, electric pumps, hydraulic solenoids, and a computer. The computer has a built-in diagnostic feature that tests the system each time you start the engine and move the vehicle at a low speed in forward or reverse. When the self-test occurs, you may hear a “clunk” noise and/or feel a pulsation in the brake pedal. This is normal and does not indicate a malfunction. If the computer senses a malfunction, it switches the ABS off and illuminates the ABS warning light on the instrument panel. The brake system then operates normally but without anti-lock assistance. If the ABS warning light illuminates during the self-test or while driving, have the vehicle checked. It is recommended that you visit a NISSAN dealer for this service.
Normal operation
The Anti-lock Braking System (ABS) operates at speeds above 3-6 mph(5-10 km/h). The speed varies according to road conditions.
When the ABS senses that one or more wheels are close to locking up, the actuator rapidly applies and releases hydraulic pressure. This action is similar to pumping the brakes very quickly. You may feel a pulsation in the brake pedal and hear a noise from under the hood or feel a vibration from the actuator when it is operating. This is normal and indicates that the ABS is operating properly. However, the pulsation may indicate that road conditions are hazardous and extra care is required while driving.
FAQ
FCW is designed to alert the driver when it detects an impending collision with a vehicle or obstacle in the front.
FCW often provides visual and audible alerts, such as warning lights and beeping sounds.
FCW usually operates at various speeds, including both low and high speeds.
Most vehicles allow the driver to turn FCW on or off through the settings menu.
FCW availability may vary by trim level and optional packages.
Some FCW systems can detect pedestrians and cyclists, adding an extra layer of safety.
Drivers should always remain attentive and not solely rely on FCW. It is an aid, not a replacement for careful driving.
In some vehicles, you can adjust the sensitivity of FCW through the settings.
Some models may have Collision Mitigation, which goes beyond warnings to actively apply the brakes to prevent or mitigate a collision.
If a collision is imminent and the driver does not react, Collision Mitigation can autonomously apply the brakes to reduce the severity of the impact or avoid it altogether.
Collision Mitigation often operates at a range of speeds, including low-speed and high-speed scenarios.
Some vehicles allow the driver to turn off Collision Mitigation through the settings.
Sensitivity adjustments for Collision Mitigation may be available in some vehicles.
If the driver takes evasive action, such as steering or braking, the system may reduce its intervention.
While generally effective, the system’s performance may be influenced by factors like weather conditions and road surfaces.
Useful Link
View Full User Guide: Nissan FRONTIER 2023 User Guide
Download Manuals: https://www.nissanusa.com/owners/ownership/manuals-guides.html
2023 Nissan Frontier Specs, Price, Features and Mileage (Brochure)