Nissan FRONTIER 2023 Wiper, washer, Outside mirror switch, and Horn
To improve convenience and safety, the 2023 Nissan Frontier comes with a complete wiper, washer, and horn system. The steering column lever provides several speed and intermittent settings for the windshield wipers. A rear wiper for the rear window is included with some versions. With changeable spray patterns for efficient cleaning, the windshield washer system is simple to operate by just pulling the wiper control lever. The Frontier also has a horn in the center pad of the steering wheel that can be used in an emergency and for safety alerts. Together, these systems guarantee visibility and notify others when needed, making for a more enjoyable driving experience.
2023 Nissan Frontier Specs, Price, Features and Mileage (Brochure)
Wiper and washer switch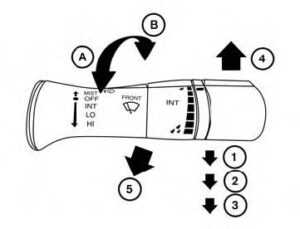
SWITCH OPERATION
The windshield wiper and washer operate when the ignition switch is in the ON position.
Push the lever down to operate the wiper at the following speed:
- Intermittent (INT) — intermittent operation can be adjusted by turning the knob toward OA (slower) or OB (faster)
- Low (LO) — continuous low-speed operation
- High (HI) — continuous high-speed operation
Push the lever up 4O to have one sweep operation (MIST) of the wiper. Pull the lever toward your 5O to operate the washer. The wiper will also operate several times.
WARNING
In freezing temperatures, the washer solution may freeze on the windshield and obscure your vision which may lead to an accident. Warm the windshield with the defroster before you wash the windshield.
CAUTION
- Do not operate the washer continuously for more than 30 seconds.
- Do not operate the washer if the reservoir tank is empty.
OUTSIDE MIRROR DEFROSTER SWITCH (if so equipped)
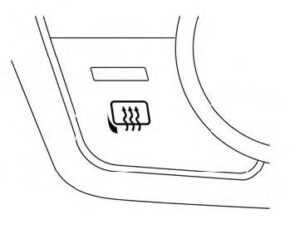
To defrost the outside mirrors, start the engine and push the outside mirror defroster switch on. The indicator light on the switch will illuminate. Push the switch again to turn the defroster off. The defroster automatically turns off after approximately 15 minutes.
HEADLIGHT AND TURN SIGNAL SWITCH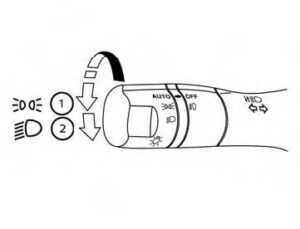
HEADLIGHT CONTROL SWITCH
Rotate the switch to the position,
Type A (if so equipped)
HEADLIGHT CONTROL SWITCH Lighting
- Rotate the switch to the position, and the front parking, tail, license plate, and instrument panel lights will come on.
- Rotate the switch to the position, and the headlights will come on and all the other lights remain on.
Type B (if so equipped)
CAUTION
Use the headlights with the engine running to avoid discharging the vehicle battery.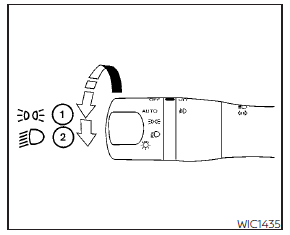
Type C (if so equipped)
Auto light system
The auto light system allows the headlights to be set so they turn on and off automatically.
The auto light system can
- Turn on the headlights, front parking, tail, license plate, and instrument panel lights automatically when it is dark.
- Turn off all the lights when it is light.
- Keep all the lights on for a period of time after you place the ignition switch in the OFF position and all doors are closed.
To turn on the auto light system:
- For the USA: Turn the headlight switch to the AUTO position 1O.
- For CAN: Turn the headlight switch to the AUTO 1O or position.
- Place the ignition switch in the ON position.
- The auto light system automatically turns the headlights on and off.
Initially, if the ignition switch is placed in the OFF position and a door is opened and left open, the headlights remain on for a period of time. If another door is opened while the headlights are on, then the timer is reset.
To turn the auto light system off:
For the USA: Turn the switch to the OFF or position.
For CAN: Turn the switch to the position.
The headlights will turn on automatically at twilight (if so equipped) or in rainy weather (when the windshield wiper is operated continuously).
If the ignition switch is pushed to the OFF position and one of the doors is opened and this condition is continued, the headlights remain on for 5 minutes.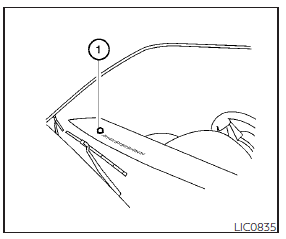
Be sure you do not put anything on top
of the auto light sensor 1O located on the top side of the instrument panel. The auto light sensor controls the auto light; if it is covered, the auto light sensor reacts as if it is dark out and the headlights will illuminate. If this occurs while parked with the engine off and the switch in the ON position, your vehicle’s battery could become discharged.
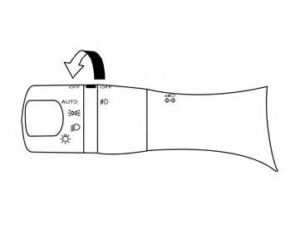
Headlight beam select
- To select the high beam function, engage the headlights, and push the lever forward. The high beam lights come on and the light illuminates.
High Beam Assist (if so equipped)
The High Beam Assist system will operate when the vehicle is driven at speeds of approximately 25 mph (40 km/h) and above. If an oncoming vehicle or leading vehicle appears in front of your vehicle when the headlight’s high beam is on, the headlight will be switched to the low beam automatically.
WARNING
- The High Beam Assist system is a convenience but it is not a substitute for safe driving operation. The driver should remain alert at all times, ensure safe driving practices, and switch the high beams and low beams manually when necessary. The high beam or low beam may not switch automatically under the following conditions. Switch the high beam and low beam manually.
- During bad weather (rain, fog, snow, wind, etc.).
- When a light source similar to a headlight or tail light is in the vicinity of the vehicle.
- When the headlights of the on-coming vehicle or the leading vehicle are turned off, when the color of the light is affected due to foreign materials on the lights, or when the light beam is out of position.
- When there is a sudden, continuous change in brightness.
- When driving on a road that passes over rolling hills or a road that has level differences.
- When driving on a road with many curves.
- When a sign or mirror-like surface is reflecting intense light towards the front of the vehicle.
- When the container, etc., is being towed by a leading vehicle is reflects intense light.
- When a headlight on your vehicle is damaged or dirty.
- When the vehicle is leaning at an angle due to a punctured tire, being towed, etc.
- The timing of switching the low beam and high beam may change under the following situations:
- The brightness of the headlights of the oncoming vehicle or leading vehicle.
- The movement and direction of the oncoming vehicle and the leading vehicle.
- When only one light on the on-coming vehicle or the leading vehicle is illuminated.
- When the oncoming vehicle or the leading vehicle is a two-wheeled vehicle.
- Road conditions (incline, curve, the road surface, etc.).
- The number of passengers and the amount of luggage.
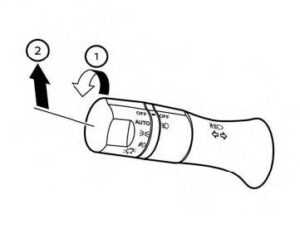
High Beam Assist operation
To activate the High Beam Assist system, turn the headlight switch to the AUTO position 1O and push the lever forward 2O (high beam position). The High Beam Assist indicator light in the meter will illuminate while the headlights are turned on. If the High Beam Assist indicator light does not illuminate in the above condition, it may indicate that the system is not functioning properly. Have the system checked, it is recommended that you visit a NISSAN dealer for this service. When the vehicle speed lowers to less than approximately 16 mph (25 km/h), the headlight uses the low beam. To turn off the High Beam Assist system, turn the headlight switch to the position or select the low beam position by placing the lever in the neutral position.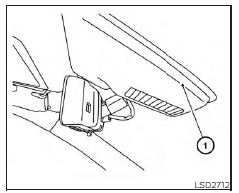
Ambient image sensor maintenance
The ambient image sensor 1Ofor the High Beam Assist system is located in front of the inside mirror. To maintain the proper operation of the high beam assist system and prevent a system malfunction, be sure to observe the following:
- Always keep the windshield clean.
- Do not attach a sticker (including transparent material) or install an accessory near the ambient image sensor.
- Do not strike or damage the areas around the ambient image sensor.
- Do not touch the sensor lens that is located on the ambient image sensor.
If the ambient image sensor is damaged due to an accident, it is recommended that you visit a NISSAN dealer.
Battery saver system
The battery saver system automatically turns off the following lights after a period of time when the ignition switch is placed in the OFF position and the doors are closed:
- Headlights, when the headlight switch is in the position
- Interior lights, when left in the ON position (if so equipped)
After the headlights automatically turn off with the headlight switch in the or position, the headlights will illuminate again if the headlight switch is moved to the OFF position and then turned to the or position.
CAUTION
Even though the battery-saver feature automatically turns off the headlights after a period of time, you should turn the headlight switch to the OFF position when the engine is not running to avoid discharging the vehicle battery.
DAYTIME RUNNING LIGHTS (DRL) SYSTEM (Type A) (if so equipped)
The DRL system automatically illuminates when the engine is started with the parking brake released. The DRL system operates with the headlight switch in the OFF position or in the position, or in the AUTO position when there is bright ambient light. Turn the headlight switch to the position for full illumination when driving at night.
If the parking brake is applied before the engine is started, the DRL system does not illuminate. The DRL system illuminates when the parking brake is released. The DRL system will remain on until the ignition switch is placed in the OFF position.
WARNING
When the DRL system is active, the tail lights on your vehicle are not on. It is necessary at dusk to turn on your headlights. Fail during yourself and others.
LED DAYTIME RUNNING LIGHTS (DRL) SYSTEM (Type B) (if so equipped)
The LED DRL automatically illuminates at 100% intensity when the engine is started and the parking brake is released. The LED DRL operates with the headlight switch in the OFF position or in the position, or in the AUTO position when there is bright ambient light. When you turn the headlight switch to the position for full illumination, the LED lights switch from LED DRL to the park function. If the parking brake is applied before the engine is started, the LED DRL does not illuminate. The LED DRL illuminates when the parking brake is released. The LED DRL will remain on until the ignition switch is placed in the OFF position.
It is necessary at dusk to turn the headlight switch on for interior controls and switches to illuminate, as those remain off while the switch is in the OFF position.
WARNING
When the LED DRL system is active, the tail lights on your vehicle are not on. It is necessary at dusk to turn on your headlights. Failure to do so could cause an accident injuring yourself and others.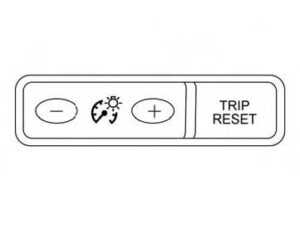
INSTRUMENT BRIGHTNESS CONTROL
Press the “+” button to increase the brightness of instrument panel lights.
Press the “-” button to decrease the brightness of instrument panel lights.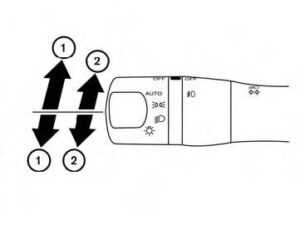
TURN SIGNAL SWITCH
Turn signal
- Move the lever up or down to signal the turning direction. When the turn is completed, the turn signal cancels automatically.
Lane change signal - Move the lever up or down until the turn signal begins to flash, but the lever does not latch, to signal a lane change. Hold the lever until the lane change is complete.
FOG LIGHT SWITCH (if so equipped)
- To turn the fog lights on, turn the headlight switch to the position, then turn the fog light switch to the position.
- To turn the fog lights on with the headlight switch in the AUTO position (if so equipped), the headlights must be on, then turn the fog light switch to the position.
- To turn the fog lights off, turn the fog light switch to the OFF position.
The headlights must be on and the low beams selected for the fog lights to operate. The fog lights automatically turn off when the high-beam headlights are selected.
HORN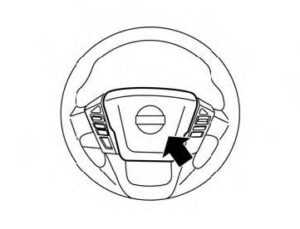
To sound the horn, push the area between the horn icons on the steering wheel.
WARNING
Do not disassemble the horn. Doing so could affect the proper operation of the supplemental front airbag system. Tampering with the supplemental front airbag system may result in serious personal injury.
CARGO LAMP SWITCH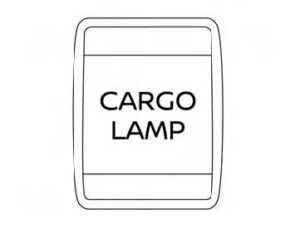
To turn on the cargo lamp, push the switch down to the ON position.
CAUTION
Be sure to turn the light switch to the OFF position when you leave the vehicle for extended periods of time, otherwise, the battery will go dead.
HEATED SEAT SWITCHES (if so equipped)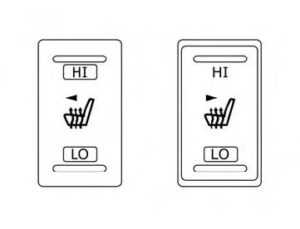
The front seats are warmed by built-in heaters.
- Place the ignition switch in the ON position.
- Push the LO or HI position of the switch, as desired, depending on the temperature. The indicator light in the switch will illuminate.
The heater is controlled by a thermostat, automatically turning the heater on and off. The indicator light will remain on as long as the switch is on. - When the seat is warmed or before you leave the vehicle, be sure to turn the switch off.
WARNING
Do not use or allow occupants to use the seat heater if you or the occupants cannot monitor elevated seat temperatures or have the inability to feel pain in body parts that contact the seat. Use of the seat heater by such people could result in serious injury.
CAUTION
- Do not use the seat heater for extended periods or when no one is using the seat.
- Do not put anything on the seat that insulates heat, such as a blanket, cushion, seat cover, etc. Otherwise, the seat may become overheated.
- Do not place anything hard or heavy on the seat or pierce it with a pin or similar object. This may result in damage to the heater.
- Any liquid spilled on the heated seat should be removed immediately with a dry cloth.
- When cleaning the seat, never use gasoline, benzene, thinner, or any similar materials.
- If any malfunctions are found or the heated seat does not operate, turn the switch off and have the system checked. It is recommended that you visit a NISSAN dealer for this service.
- The battery could run down if the seat heater is operated while the engine is not running.
HEATED STEERING WHEEL SWITCH (if so equipped)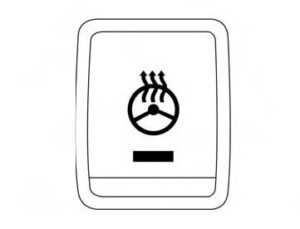
The heated steering wheel system is designed to operate only when the surface temperature of the steering wheel is below 68°F (20°C).
Push the heated steering wheel switch to warm the steering wheel after the engine starts. The indicator light will come on. If the surface temperature of the steering wheel is below 68°F (20°C), the system will heat the steering wheel and cycle off and on to maintain a temperature above 68°F (20°C). The indicator light will remain on as long as the system is on. Push the switch again to turn the heated steering wheel system off manually. The indicator light will go off. The switch will turn off automatically 30 minutes after activation, once this happens the switch will need to be pressed again to restart the cycle.
NOTE:
If the surface temperature of the steering wheel is above 68°F (20°C) when the switch is turned on, the system will not heat the steering wheel. This is not a malfunction.
WARNING SYSTEMS SWITCH (if so equipped)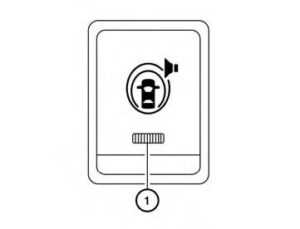
The warning systems switch is used to turn on and off the following systems that are activated using the Settings menu in the vehicle information display:
- Blind Spot Warning (BSW) (if so equipped)
- Lane Departure Warning (LDW) (if so equipped)
When the warning systems switch is turned off, the indicator 1O on the switch is off. The indicator will also be off if all of the warning systems are deactivated using the settings menu. The BSW system will turn on the side indicator lights, located by the outside mirrors if the radar sensors detect a vehicle in the detection zone. If the turn signal is activated in the direction of the detected vehicle, a chime sounds twice and the side indicator light will flash. The LDW system will sound a warning; the steering wheel will vibrate; and the LDW indicator (orange) will blink to alert the driver that the vehicle is traveling close to either the left or the right of a traveling lane with detectable lane markers.
VEHICLE DYNAMIC CONTROL (VDC) OFF SWITCH
The vehicle should be driven with the VDC system on for most driving conditions. If the vehicle is stuck in mud or snow, the VDC system reduces the engine output to reduce wheel spin. The engine speed will be reduced even if the accelerator is depressed to the floor. If maximum engine power is needed to free a stuck vehicle, turn the VDC system off. To turn off the VDC system, push the VDC OFF switch. The indicator light will come on. Push the VDC OFF switch again or restart the engine to turn on the system. For additional information, see “Vehicle Dynamic Control (VDC) system” (To turn off the VDC system, push the VDC OFF switch. The indicator light will come on. Push the VDC OFF switch again or restart the engine to turn on the system.
HILL DESCENT CONTROL SWITCH (if so equipped)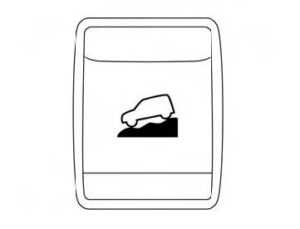
WARNING
- Never rely solely on the hill descent control system to control vehicle speed when driving on steep downhill grades. Always drive carefully when using the hill descent control system and decelerate the vehicle speed by depressing the brake pedal if necessary.
- Be especially careful when driving on frozen, muddy, or extremely steep downhill roads. Failure to control vehicle speed may result in a loss of control of the vehicle and possible serious injury or death.
- The hill descent control may not control the vehicle speed on a hill under all loads or road conditions. Always be prepared to depress the brake pedal to control vehicle speed. Failure to do so may result in a collision or serious personal injury.
CAUTION
- When the hill descent control system operates continuously for a long time, the temperature of the brake pads may increase and the hill descent control system may be temporarily disabled (the indicator light will blink). If the indicator light does not come on continuously after blinking, stop using the system.
The hill descent control system is designed to reduce driver workload when going down steep hills. The hill descent control system helps to control vehicle speed so the driver can concentrate on steering the vehicle.
To activate the hill descent control system:
- The shift lever must be in forward or reverse gear,
- The 4WD switch must be in the 4L position and the vehicle speed must be under 15 mph (25 km/h) or
- The 4WD switch must be in the 4H position and the vehicle speed must be under 21 mph (35 km/h), and
- The hill descent control system switch must be ON.
The hill descent control system ON indicator light will come on when the system is activated. Also, the stop/tail lights illuminate while the hill descent control system applies the brakes to control vehicle speed. If the accelerator or brake pedal is de-pressed while the hill descent control system is on, the system will stop operating temporarily. As soon as the accelerator or brake pedal is released, the hill descent control system begins to function again if the hill descent control operating conditions are fulfilled. The hill descent control system ON indicator light blinks if the switch is on and all conditions for system activation are not met or if the system becomes disengaged for any reason. To turn off the hill descent control system, push the switch to the OFF position.
ELECTRONIC LOCKING REAR DIFFERENTIAL (E-Lock) SYSTEM SWITCH (if so equipped)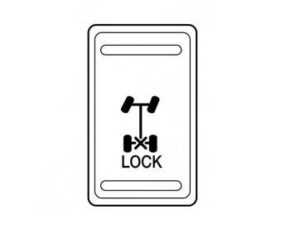
The E-Lock system can help provide added traction if the vehicle is stuck or becoming stuck.
To activate the E-Lock system:
- The 4WD switch must be in the 4LO position (4-Wheel Drive vehicles),
- The vehicle must be stopped or moving at 4 mph (7 km/h) or less, and
- The E-Lock system switch must be turned on.
When the E-Lock switch is turned on, the indicator light will flash until the system engages. However, if all operation conditions listed above are not met or the system becomes disengaged, the indicator light will continue to flash. The Anti-lock Braking System (ABS) is disabled and the ABS light illuminates when the E-Lock system is on. Also, the Vehicle Dynamic Control (VDC) system is disabled and the VDC light illuminates when the E-Lock system is on. For additional information, see “Electronic locking rear differential (E-Lock) system” (P. 5-115) for further explanation and system limitations.
WARNING
- Never leave the E-Lock system on when driving on paved or hard-surfaced roads. Turning the vehicle may result in the rear wheels slipping and resulting in an accident and personal injury. After using the E-Lock system to free the vehicle, turn the system off.
- Use the E-Lock system only when freeing a stuck vehicle. Try the 4LO position before using the E-Lock system. Never use the E-Lock system on a slippery road surface such as snow or ice surface. Using the E-Lock system when driving in these road conditions may cause unexpected movement of the vehicle during engine braking, accelerating, or turning, which may result in an accident and serious personal injury.
CAUTION
- After using the E-Lock system, turn the switch off to prevent possible damage to driveline components from extended use.
- Do not drive over 12 mph (20 km/h) when the system is engaged. Doing so could result in possible damage to the driveline.
- Do not turn on the E-Lock system while the tires are spinning. Doing so could damage drivetrain components.
POWER INVERTER SWITCH (if so equipped)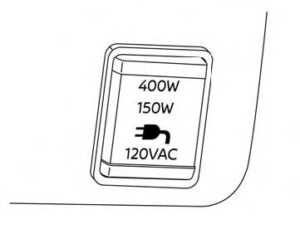
To use the outlets for devices that require up to 120v power, the vehicle must be running and the power inverter switch must be on. When the vehicle is in the P (Park) position, the 400W and the 150W will automatically illuminate. When the vehicle is out of the P (Park) position, only 150W will illuminate.
CAUTION
- Use power outlets with the engine running to avoid discharging the vehicle battery.
- Do not use double adapters or more than one electrical accessory, doing so could significantly drain the battery of your vehicle.
PARKING AIDS SYSTEM SWITCH (if so equipped)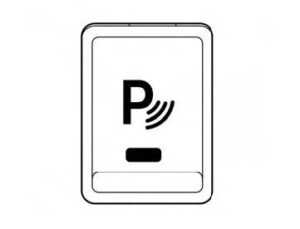
The Parking Aids system switch on the instrument panel allows the driver to turn the following systems (if so equipped) on and off. To turn the systems on and off, the ignition switch must be in the ON position.
- Rear Sonar System (RSS) (if so equipped)
- Moving Object Detection (MOD) (if so equipped)
- Rear Automatic Braking (RAB) (if so equipped)
- Rear Cross Traffic Alert (RCTA) (if so equipped)
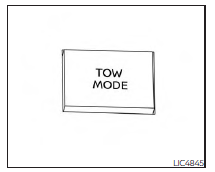
Tow mode should be used when pulling a heavy trailer or hauling a heavy load. Driving the vehicle in the tow mode with no trailer/load or light trailer/light load will not cause any damage. However, fuel economy may be reduced, and the transmission/engine driving characteristics may feel unusual. Push the tow mode switch to activate the tow mode. The TOW mode ON indicator light illuminates when tow mode is selected. Push the tow mode switch again to turn the tow mode off. Tow mode is automatically canceled when the ignition switch is placed in the OFF position.
EMERGENCY CALL (SOS) BUTTON(if so equipped)
EMERGENCY SUPPORT
NissanConnect® Services provides various services to support dealing with emergencies of the subscribed vehicle and the driver. For example, in case of an illness or serious injury, you can seek support by pressing the in-vehicle Emergency Call (SOS) button and connecting to the NissanConnect® Services Response Center. The NissanConnect® Ser-vices Response Center can specify the location of the vehicle via GPS, and the information will be sent to the police or other agencies as needed. For information about other NissanConnect® Services emergency support-related services, contact the NissanConnect® Customer Support line at 1–855–426–6628 or refer to the NissanConnect® Services website www.nissanusa.com/connect (for U.S.) or www.nissan.ca/nissanconnect (English) /www.nissan.ca/nissanconnect/fr (French)(for Canada).
WARNING
- Please note that the Automatic Collision Notification service and Emergency Call function cannot be used in the following conditions:
- Emergency functions and services will not be available without a paid subscription to NissanConnect® Services.
- The NissanConnect® Services network system is disabled.
- The vehicle moves outside the service area where the TCU (Telematics Control Unit) is connected to the system.
- The vehicle is outside the area where the cellular network service is receivable.
- The vehicle is in a location with poor signal reception such as tunnels, underground parking garages, behind buildings, or in mountainous areas.
- The line is busy.
- The TCU (Telematics Control Unit) or other systems of your vehicle are not working properly.
- It may not be possible to make an emergency call depending on the severity of a collision and/or emergency.
- Park the vehicle in a safe location and set the parking brake before operating the Emergency Call (SOS) button.
- Only use this service in case of an emergency. There may be a penalty for inappropriate use of the service.
- Radio waves could adversely affect electric medical equipment. Individuals who use a pacemaker should contact the device manufacturer regarding any possible effects before using the system.
- The TCU (Telematics Control Unit) antenna is installed inside the upper central part of the instrument panel. An occupant should not get any closer to the antenna than specified by the pacemaker manufacturer. The radio waves from the TCU antenna may adversely affect the operation of the pacemaker while using the NissanConnect® Services.
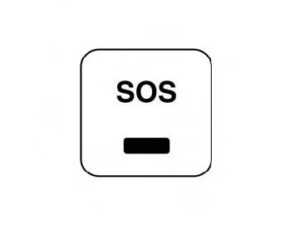
Making an emergency call
- Press the Emergency Call (SOS) button to make an emergency call.
- When the line is connected, speak to the Response Specialist. The Emergency Call (SOS) button is located near the map light.
If you want to cancel the emergency call, press and hold the Emergency Call (SOS) button for a few seconds.
NOTE:
- After the Emergency Call (SOS) button is pressed, it may take some time until the system initiates the connection, depending on the technical environment and whether the TCU (Telematics Control Unit) is being used by the other services.
- An indicator light on the Emergency call (SOS) button shows the readiness of the emergency support system. If the indicator light is not illuminated, pressing the Emergency Call (SOS) button does not connect your vehicle to the Response Specialist. The indicator light blinks while connected to the NissanConnect® Services Response Center.
- Even when the indicator light is illuminated, connection to the NissanConnect® Services Response Center may not be possible. If this occurs in an emergency situation, contact the authorities by other means.
- To avoid disconnecting the line, keep the engine running during an emergency call, if it is safe to do so.
FAQ
Use the wiper control lever on the steering column.
Yes, you can typically select between various wiper speeds and intermittent settings.
Some Frontier models come with a rear wiper for the back window.
Push the wiper control lever towards the steering column.
There is usually a separate control for the rear window washer.
Use a windshield washer solution suitable for your region’s climate.
Some models allow you to adjust the spray pattern for optimal cleaning.
Replace them when they show signs of wear or streaking.
Yes, press the horn pad in the center of the steering wheel.
Typically, there is a single horn tone in most vehicles.
Check the horn fuse and wiring for issues.
It’s possible to install an aftermarket horn for a different sound, but consult the vehicle’s manual for guidelines.
There is usually no user-adjustable volume or sensitivity for the horn.
Use the horn for safety warnings and avoid excessive or unnecessary honking.
No, the horn sound level is typically not adjustable by the driver.
Useful Link
View Full User Guide: Nissan FRONTIER 2023 User Guide
Download Manuals: https://www.nissanusa.com/owners/ownership/manuals-guides.html
2023 Nissan Frontier Specs, Price, Features and Mileage (Brochure)