Tata Punch 2021 SMART KEY BATTERY REPLACEMENT User Manual
SMART KEY BATTERY REPLACEMENT
- The open rear side of the key (battery cover).
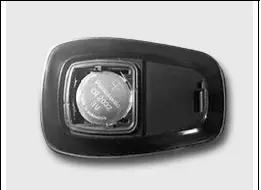
- Replace with new battery in the smart key battery slot.
- Ensure that the “+” symbol on the battery is facing upwards. The correct polarity is shown on the battery cover.
- Close the battery cover.
- Make sure that the key cover is intact properly.
NOTE
Use CR 2032 battery only.
An inappropriately disposed of battery can be harmful to the environment and human health. Dispose of the battery according to your local law(s) and regulations.
ON BOARD DIAGNOSTIC (OBD II) SYSTEM
On board Diagnostics or OBD, is an automotive term referring to a vehicle’s self-diagnostic and reporting capability. The OBD system allows continuous diagnosis of the components of the vehicle correlated with emissions. This system warns the driver, by turning “ON” the Malfunction Indication lamp (MIL) on the instrument cluster when a fault causes emission levels to increase.
The OBD system also has a diagnostic connector that can be interfaced with appropriate diagnostic tools, which makes it possible to read the fault codes stored in the Electronic Control Unit, together with a series of specific parameters for Engine Operation and Diagnosis. This check can also be carried out by the traffic police. On-board diagnostic located in Engine compartment fuse box.
(Refer below image)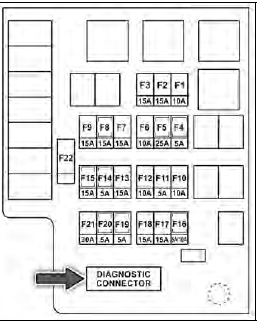
Location of On board diagnostic (OBD II)
SERVICE INSTRUCTIONS
The TATA PUNCH has been manufactured to give you economical and trouble-free performance. To achieve this, please follow the instructions as stated.
Your vehicle is entitled to three free services (labor only). The free service coupons are attached to the sales invoice. Please present these coupons to the servicing dealer while availing free services.
- 1st free service – At 1,000-2,000km. OR 2 months, whichever is earlier.
- 2nd free service – At 7,000-8,000km. OR 6 months, whichever is earlier.
- 3rd free service – At 14,500-15,500km. OR 12 months, whichever is earlier.
- All services other than free services are chargeable.
SERVICE SCHEDULE
|
Sr. No. |
Operation |
Km |
Pdi | 1500k | 7500k | 15000 | 22500 | 30000 | 37500 | 45000 | 52500 | 60000 | 67500 | 75000 | 82500 | 90000 | 97500 | 105000 | 112500 | 120000 | 127500 | 135000 | 142500 | 150000 |
| Months | 0 | 2 | 6 | 12 | 18 | 24 | 30 | 36 | 42 | 48 | 54 | 60 | 66 | 72 | 78 | 84 | 90 | 96 | 102 | 108 | 114 | 120 | ||
| General | ||||||||||||||||||||||||
| 1 | Wash the vehicle & Clean Condenser Fins | Every Service | ● | ● | ● | ● | ● | ● | ● | ● | ● | ● | ● | ● | ● | ● | ● | ● | ● | ● | ● | ● | ● | ● |
|
2 |
Check & Top up Fluids (If required): Transaxle Oil, Coolant, Brake Fluid, Battery Electrolyte, Wind Screen washer fluid |
Every Service |
● |
● |
● |
● |
● |
● |
● |
● |
● |
● |
● |
● |
● |
● |
● |
● |
● |
● |
● |
● |
● |
● |
| 3 | Check Fuel Lines for Leak- ages | Every Service | ● | ● | ● | ● | ● | ● | ● | ● | ● | ● | ● | ● | ● | ● | ● | ● | ● | ● | ● | ● | ● | ● |
|
4 |
Check and Capture all DTC’s Clear all faults and Erase the Codes. | Every Service |
● |
● |
● |
● |
● |
● |
● |
● |
● |
● |
● |
● |
● |
● |
● |
● |
● |
● |
● |
● |
● |
● |
|
5 |
Check condition of rubber bushes/parts in lower control arms, front and rear coil spring seats, front & rear bump stoppers, anti roll bar links, rear twist beam, rub |
7.5K / 6M |
● |
● |
● |
● |
● |
● |
● |
● |
● |
● |
● |
● |
● |
● |
● |
● |
● |
● |
● |
● |
|
Sr. No. |
Operation |
Km |
Pdi | 1500k | 7500k | 15000 | 22500 | 30000 | 37500 | 45000 | 52500 | 60000 | 67500 | 75000 | 82500 | 90000 | 97500 | 105000 | 112500 | 120000 | 127500 | 135000 | 142500 | 150000 |
| Months | 0 | 2 | 6 | 12 | 18 | 24 | 30 | 36 | 42 | 48 | 54 | 60 | 66 | 72 | 78 | 84 | 90 | 96 | 102 | 108 | 114 | 120 | ||
| ber boots/dust cover/bellow in rack & pinion, steering and suspension ball joints, steering column. Replace if necessary. (First at 7.5K / 6M then at every service) (For severe usage, above checks to be done at every 5,000 km or after every se vere usage event) | ||||||||||||||||||||||||
| 6 | Check & Replace if found damaged – Exhaust hanger | 30K/24 M | ● | ● | ● | ● | ● | |||||||||||||||||
|
7 |
Check All door latch & striker operations Adjust & Apply grease If required | 15K/12 M |
● |
● |
● |
● |
● |
● |
● |
● |
● |
● |
||||||||||||
| 8 | Check for all bolts & nuts | 7.5K /
6M |
● | ● | ● | ● | ● | ● | ● | ● | ● | ● | ● | ● | ● | ● | ● | ● | ● | ● | ● | ● | ||
| ENGINE (Gasoline) NA | ||||||||||||||||||||||||
| 1 | Clean air filter element (more frequently for vehicle | 15K /
12M |
● | ● | ● | ● | ● | ● | ● | ● | ● | ● |
|
Sr. No. |
Operation |
Km |
Pdi | 1500k | 7500k | 15000 | 22500 | 30000 | 37500 | 45000 | 52500 | 60000 | 67500 | 75000 | 82500 | 90000 | 97500 | 105000 | 112500 | 120000 | 127500 | 135000 | 142500 | 150000 |
| Months | 0 | 2 | 6 | 12 | 18 | 24 | 30 | 36 | 42 | 48 | 54 | 60 | 66 | 72 | 78 | 84 | 90 | 96 | 102 | 108 | 114 | 120 | ||
| operating in severe condition) | ||||||||||||||||||||||||
| 2 | Change engine oil and Oil filter | 15K /
12M |
● | ● | ● | ● | ● | ● | ● | ● | ● | ● | ||||||||||||
| 3 | Gasoline – Replace Gasoline Fuel Filter | 75K/60 M | ● | ● | ||||||||||||||||||||
| 4 | Change Spark plugs – Natural Aspirated Engine | 45K/36 M | ● | ● | ● | |||||||||||||||||||
|
5 |
Check accessory belt condition visually, replace if found damage | 15K/12 M |
● |
● |
● |
● |
● |
● |
● |
● |
● |
● |
||||||||||||
|
6 |
Replace air filter element (more frequently for vehicle operating in severe condition) |
45K/36 M |
● |
● |
● |
|||||||||||||||||||
| 7 | Change coolant | # 60K/ 36M | ● | ● | ||||||||||||||||||||
| BRAKES | ||||||||||||||||||||||||
| 1 | Check front brake pads & | 15K/12M | ● | ● | ● | ● | ● | ● | ● | ● | ● | ● |
|
Sr. No. |
Operation |
Km |
Pdi | 1500k | 7500k | 15000 | 22500 | 30000 | 37500 | 45000 | 52500 | 60000 | 67500 | 75000 | 82500 | 90000 | 97500 | 105000 | 112500 | 120000 | 127500 | 135000 | 142500 | 150000 |
| Months | 0 | 2 | 6 | 12 | 18 | 24 | 30 | 36 | 42 | 48 | 54 | 60 | 66 | 72 | 78 | 84 | 90 | 96 | 102 | 108 | 114 | 120 | ||
| rear brake linings. Replace if necessary | ||||||||||||||||||||||||
|
2 |
Repalce brake fluid , Check brake system components for Leakages | # 45K / 24M |
● |
● |
● |
|||||||||||||||||||
|
3 |
Inspect and if necessary adjust handbrake setting (First check @7.5K/6M then after every 15K/12M) |
15K / 12M |
● |
● |
● |
● |
● |
● |
● |
● |
● |
● |
● |
|||||||||||
| WHEELS & TYRES | ||||||||||||||||||||||||
|
1 |
Check & adjust wheel alignment (For severe usage, above checks to be done at every 5,000 km or after every severe usage event) |
# 15K/18 M |
● |
● |
● |
● |
● |
● |
● |
● |
● |
● |
||||||||||||
| 2 | Check for Tyre pressure, condition & rotate | # 7.5
K/12M |
● | ● | ● | ● | ● | ● | ● | ● | ● | ● | ● | ● | ● | ● | ● | ● | ● | ● | ● | ● |
|
Sr. No. |
Operation |
Km |
Pdi | 1500k | 7500k | 15000 | 22500 | 30000 | 37500 | 45000 | 52500 | 60000 | 67500 | 75000 | 82500 | 90000 | 97500 | 105000 | 112500 | 120000 | 127500 | 135000 | 142500 | 150000 |
| Months | 0 | 2 | 6 | 12 | 18 | 24 | 30 | 36 | 42 | 48 | 54 | 60 | 66 | 72 | 78 | 84 | 90 | 96 | 102 | 108 | 114 | 120 | ||
| TRANSAXLE | ||||||||||||||||||||||||
| 1 | Replace transaxle oil | 75K/60 M | ● | ● | ||||||||||||||||||||
|
2 |
Check AMT Kit oil level, it should be in between min. & Max. level when the vehi- cle is in standstill and Ignition ON condition. Top up AMT kit oil if necessary. |
Every Service |
● |
● |
● |
● |
● |
● |
● |
● |
● |
● |
● |
● |
● |
● |
● |
● |
● |
● |
● |
● |
● |
● |
| ELECTRICAL | ||||||||||||||||||||||||
| 1 | Check specific gravity of battery electrolyte | 7.5K/6M | ● | ● | ● | ● | ● | ● | ● | ● | ● | ● | ● | ● | ● | ● | ● | ● | ● | ● | ● | ● | ||
| 2 | Check headlamp focusing | 15K/12 M | ● | ● | ● | ● | ● | ● | ● | ● | ● | ● | ||||||||||||
| A.C. SYSTEM | ||||||||||||||||||||||||
|
1 |
Clean filter and check of Air- conditioning / HVAC System for satisfactory performance | Every Service |
● |
● |
● |
● |
● |
● |
● |
● |
● |
● |
● |
● |
● |
● |
● |
● |
● |
● |
● |
● |
● |
● |
Reference Links
View Full User Guide: Tata Punch User 2021 Manual
Download Manuals: https://cars.tatamotors.com/service/owners/owners-manual
Tata 2023 Top Accessories
[amalinkspro_table id=”32452″ new-window=”on” nofollow=”on” addtocart=”off” /]