Auto User Guide

Tata Punch User Manual

Tata logo

Table of Contents

Tata Punch User Manual

Tata Motors makes a small SUV called the Tata Punch. The Punch is made to look fast and tough, and it is meant to be a fun and flexible car to drive. The Tata Punch stands out in the compact SUV market because of how stylish it looks, how many high-tech features it has, and how useful it is. The Tata Punch has a strong and muscular appearance on the outside. Its small size makes it good for driving in cities, while its high ground clearance and rugged design make it look like it’s ready for an adventure. It has a sporty and powerful look because of its front grille, its sleek LED headlights, and its unique body lines. The Tata Punch has a range of powerful and fuel-efficient engines under the hood, which gives it a good mix between speed and gas mileage. The SUV has a smooth acceleration, good handling, and a comfy ride, which makes it good for both driving in the city and going off-road occasionally.

Inside the Tata Punch, the cabin is big and full of features. The inside is made for comfort and ease of use, with comfortable seats, plenty of space, and clever storage solutions. The infotainment system lets you connect your phone and has a tablet display for entertainment and easy access to different functions. The Tata Punch is also built with safety in mind. It should have important safety features like dual front airbags, ABS with EBD (electronic brakeforce distribution), rear parking sensors, and more to make sure the safety of the people inside. Overall, the Tata Punch is a small SUV that is designed to be stylish, fast, and useful. With its eye-catching design, powerful engines, comfortable cabin, and focus on safety, the Tata Punch aims to be a good choice for people who want a versatile and reliable compact SUV.

Tata Punch Important Information User Manual

Tata Punch 2021 Important Information User Manual

IMPORTANT INFORMATION

In this Owner’s Manual, you will find the text under the headings “WARNING” and “NOTE” which highlights important information. Pay particular attention to these highlighted messages.

NOTE
Indicates additional information that will assist you in gaining the optimum benefit and care for your vehicle.

WARNING
Indicates procedures or information that must be followed precisely in order to avoid the possibility of severe personal injury and serious damage to the vehicle.

Safe Driving

Safety consciousness not only ensures your safety and the safety of other road users, but it also helps to reduce the wear and tear on your vehicle.

Safe driving depends on:

  1. How quickly you make decisions to avoid an accident.
  2. Your ability to concentrate.
  3. How well you can see and judge objects.
  4. How well familiar you are with your vehicle controls and its capabilities.
  5. Test

NOTE
Fatigue is a result of physical or mental exertion that impairs judgment. Driver fatigue may be due to inadequate sleep, extended work hours, strenuous work or non-work activities or combination of other factors. Take rest at regular intervals.

Safety Tips

  1. Always take into account the road conditions, weather conditions, vehicle speed in order to prevent accidents.
  2. Turn ‘ON’ the side indicators at least 30 meters before taking a turn or changing the lane.
  3. Decelerate to a safe speed before taking turn. Do not apply brakes during cornering.
  4. When overtaking other vehicles, watch out for the oncoming vehicle.
  5. Never drive under the influence of alcohol or drugs.
  6. If your vehicle is equipped with an infotainment/navigation system, set and make changes to your travel route only when the vehicle is parked.
  7. Program radio presets with the vehicle parked, and use your programmed presets to make radio use quicker and simpler.

Driving Through Water

Do not drive through flooded areas. Judge the depth of water before driving through it. Otherwise, water may enter the vehicle interior or the engine compartment. If at all the situation demands that you have to drive through water then;

  1. Keep engine in higher RPM and crawl the vehicle in low gear.
  2. Flowing or rushing water creates strong forces. Driving through flowing water could cause the vehicle to about trying to drive through flowing water.
  3. Lightly apply the brake pedal to dry the liners until the brakes work normally once you are out of water.

WARNING
Do not attempt to start the engine if vehicle gets flooded due to water. Tow the vehicle to a safe place. Contact a nearest TATA MOTORS Authorized Service Centre.

Driving on a Rainy Day

  1. Check wiper blades, lights and brakes for proper functioning and condition.
  2. Check the tyre treads depth, the condition of the tread and tyre.
  3. Avoid harsh braking and sharp turns. It may cause loss of control and lead to a skid.
  4. For slowing down, shift to lower gears and brake gently.
  5. Keep lights ‘ON’ if visibility is poor.

Driving on Wet Roads
On wet road or during light showers, “Aquaplaning” can occur. “Aquaplaning” is the loss of direct contact between the road surface and the vehicle’s tires due to a water film forming between them. Steering or braking the vehicle can be very difficult, and loss of control can occur. There is no hard and fast rule about aquaplaning. The best advice is to slow down when the road is wet.

NOTE
If you have driven for a long time in heavy rain without braking, there may be a delayed reaction from the brakes when braking for the first time. You have to press the brake pedal more firmly. Maintain a greater distance from the vehicle in front.

Read all Instructions for Important Information User Guide

Tata Punch Night Driving User Manual

Tata Punch User 2021 Night Driving Manual

Night Driving

  1. Ensure that all lights are working and windshield and window glasses are clean.
  2. Drive more slowly at night than in the daytime, as the visual range is restricted at night. Maintain a speed such that you can stop within illuminated distance of head lamps.
  3. Do not use the high beam unless inevitable. It may dazzle the driver of the oncoming vehicle, thus causing an accident.
  4. Use headlamp main/dip beam to alert other road users on turns/crossroads.
  5. Use side indicators for a lane change or turning.

Driving on Gradients
When climbing a gradient, the vehicle may begin to slow down and show a lack of power. If this happens, shift to a lower gear and apply power smoothly so that there is no loss of traction. When driving down a hill, the engine braking should be used by shifting into a lower gear. Do not drive in neutral gear or switch off the engine.

WARNING
On long and steep gradients you must reduce the load on the brakes by shifting early to a lower gear. This allows you to take advantage of the engine braking effect and helps avoid overheating of service brakes resulting in reduced braking efficiency.

On long and steep gradients you must reduce the load on the brakes by shifting early to a lower gear. This allows you to take advantage of the engine braking effect and helps avoid overheating of service brakes resulting in reduced braking efficiency.

SEAT BELTS

This section of the user manual describes your vehicleâ €™s seat belt, airbag, and Child restraints system. Please read and follow all these instructions carefully to minimize risk of severe injury or death. Seat belts are the primary restraints system in the vehicle. All occupants, including the driver, should always wear their seat belts to minimize the risk of injury. Sit back and adjust the front seat. Make sure that your seat is adjusted to a good driving position and that the back of the seat is upright.

Buckling the Shoulder Seat Belt

  • Grasp the tongue then slowly pull out the seat belt over the shoulder and across the chest. When the seat belt is long enough to fit, insert the tongue into the lock buckle until you hear a “CLICK” which indicates that the seat belt is securely locked. Position the lap portion of the seat belt across your pelvic bone, below your abdomen. To remove slack, pull up a bit on the shoulder seat belt. To loosen the lap portion seat belt if it is too tight, tilt the tongue and pull on the lap seat belt. A snug seat belt reduces the risk of sliding under the seat belt in a collision. Ensure that the seat belt running over the body (shoulder segment and lap segment) does not have any twist. The twisted seat belt may not offer effective protection when required.

Releasing the Seat Belt

To release the seat belt, push the red button on the lock buckle. The seat belt will automatically retract to its stowed position. If necessary, slide the tongue down the webbing to allow the seat belt to retract fully.Tata Punch User 2021 Night Driving Manual 01

NOTE
The above image is for reference purposes only.

Fixed Rear Centre Lap Seat Belt

When buckling, make sure you hear a click confirming that the tab is latched into the seat belt lock. To tighten it, pull the loose end through the buckle until the seat belt is comfortably adjusted around the hips.

WARNING
Each seating position and seat belt assembly must only be used by one occupant. It is not recommended to put a seat belt around a child, being carried on an occupant’s lap. Be careful not to damage or tamper the seat belt webbing or hardware. Inspect the seat belt system periodically, checking for cuts, frays, or loose parts. A frayed or torn seat belt could rip apart in a collision and leave you with no protection.

  • If the seat belt webbing or hardware is damaged, get it replaced immediately at TATA Motors Authorized service center.
  • Do not insert any items such as coins, clips, etc. into the seat belt buckles, and be careful not to spill liquids into these parts. If foreign materials get into a seat belt buckle, the seat belt will not work properly.
  • Do not wear seat belts over hard, sharp, or fragile items in clothing, such as pens, keys, spectacles, etc.
  • Do not use any accessories on seat belts or modify in any way the seat belt system. Devices claiming to improve occupant comfort or reposition the seat belt can reduce the protection provided by the seat belt and increase the chance of serious injury in a collision.

Read all Instructions for Night Driving User Guide

Tata Punch Seat Belts with Pretension User Manual

Tata Punch 2021 Seat Belts with Pre-tension User Manual

Seat Belts with Pre-tension

You can use the pre-tensioner seat belts in the same manner as ordinary seat belts. The seat belt pre-tensioner system works in conjunction with the SUPPLEMENTARY RESTRAINTS SYSTEM (SRS-Airbags). In the event of a collision, as may be necessary, the pre-tensioner tightens the seat belt so that it fits the occupant’s body more snugly. When the pre-tensioner activates, there could be some noise and release of smoke. This is normal and there are no health hazards or fire risks.

WARNING
In a collision, the pre-tensioner seat belt assembly mechanism becomes hot during activation. Do not touch the pre-tensioner seat belt assemblies for several minutes after they have been activated. If the vehicle has been involved in a collision, get it inspected immediately at the authorized TATA MOTORS SERVICE Center.

Seat Belts With Load Limiter (if equipped)

You can use the load limiter seat belts in the same manner as ordinary seat belts. The seat belt load limiter system works in conjunction with the SUPPLEMENTARY RESTRAINTS SYSTEM (SRS-Airbags). In the event of a collision, as may be necessary, the load limiter reduces the load on the rib cage region of the occupant. If the vehicle has been involved in a collision, get it inspected immediately at Authorized TATA MOTORS SERVICE Center.

Use of Seat Belts for Pregnant Women

WARNING
Pregnant women must wear a correctly positioned seat belt. It is safer for the mother as well as an unborn child.
A pregnant woman should wear the lap part of the seat belt across the Pelvic Bone and as snugly across the hips as possible. Keep the seat belt low so that it does not come across the abdomen. That way the strong bones of the hips will take the force if there is a collision.Tata Punch User 2021 Seat Belts with Pre-tensione Manual 01

The seat belt warning lamp reminds you to fasten the seat belt.

  • If the driver does not fasten seat belt, the seat belt reminder lamp will blink and a buzzer will sound for predefined du-ration until the driver seat belt is buck-led.
  • If the front passenger seat is occupied by adult who does not fasten seat belt, seat belt reminder lamp will blink and a buzzer will sound for predefined du-ration until the front passenger seat belt is buckled.
  • If this system is also provided for other than Front row seats, applicable above warning will appear until seat belts are buckled.
  • If front passenger seat is occupied by child, the system may detect occupancy and warn with front passenger seat belt warning. It is not taken to mean child can occupy front passenger seat and use seat belt. Please refer CRS section for recommended seating position.

NOTE
Using unauthorized after-market seat cover may affect function of occupant sensor. TATA MOTORS does not recommended any non-validated seat cover on seats.

CHILD RESTRAINT SYSTEM (CRS)

TATA MOTORS strongly recommends the use of Child Restraint Systems (CRS) for all children up to age of 12 years and to be placed at recommended positions only. Children travelling without recommended CRS and seated at other positions may face serious injuries in case of a collision.
CRS can be installed in the vehicle using seat belts and/or ISOFIX only (if equipped) or ISOFIX with Top Tether (if equipped) or ISOFIX with support leg.
If the child seat is equipped with support leg(s), always fit the support leg(s) directly to the floor. Never fit support leg(s) to a footrest or on any other object.
The harness system of CRS holds the child in place, and in a collision, acts to keep the child positioned in the seat and reduce the risk of injuries.
All children below age of two years must always ride in a rear-facing infant CRS.
Keep children in a forward-facing CRS with a harness until they reach the size or weight limit allowed by your CRS manufacturer.
Once your child outgrows the forward-facing CRS, your child is ready for a booster seat.

Selection and Installation of CRS

Always select the CRS that complies with latest safety standards (AIS072 / ECE R44). The CRS are classified according to the child’s size, height and weight. Select the appropriate CRS for your child. Ensure that the CRS is securely installed in the vehicle and subsequently child fits properly in it and wears harness of CRS. For installation, please refer CRS manufacturer’s instruction manual.Tata Punch User 2021 Seat Belts with Pre-tensione Manual 02

NOTE
The above images are for reference purpose only.

Read all Instructions for Seat Belts with Pretensione User Guide

Recommended CRS Position as per the Vehicle Matrix User Manual

Tata Punch 2021 Recommended CRS Position as per Vehicle Matrix User Manual

Recommended CRS Position as per the Vehicle

Recommended CRS Position as per the Vehicle Matrix The suitability of seat position for carriage of children and recommended category of CRS is shown in the table below as per the child group.
X – Seat Position not suitable for children in this age group.
U – Suitable for “universal” category restraints approved for use in this age group.
L – Suitable for particular child restraints. These restraints may be of the specific vehicle, restricted or semi-universal categories.
Universal is a category in the AIS072 / ECE R44 norm.

WARNING
If a child is seated in the front seat it may cause serious injury or even death during any collision.

Group Mass Group Age Group Front Passenger Rear Out- boardL H Rear Out- board R H Rear Center
0 Up to 10 kg Up to 9 months X U U X
0+ Up to 13 kg Up to 24 months X U,L U,L X
I 9 to 18 kg 9 monthsto 48 months X U,L U,L X
II 15 to 25 kg Approx. 3to 7 years X U U X
III 22 to 36 kg Approx. 6to 12 years X U U X

WARNING
If your vehicle is equipped with a front passenger Airbag (PAB) and does not have PAB deactivation switch, do not in-stall a rear-facing CRS in the front passenger seat. If the PAB inflates, a child in a rear facing CRS could be seriously injured or killed.

If you install a CRS in the rear seat, slide the front seat far enough forward so that the child’s feet do not touch the front seat-back. This will help avoid injury to the child in the event of a collision.

NOTE
Children could be endangered in a collision if their CRS is not properly se-cured in the vehicle. Be sure to secure the child in the restraint system according to the manufacturer’s instructions.

WARNING
Do not use an infant carrier or a child safety seat that “hooks“ over a seat-back, it will not provide adequate protection in a collision.

After a collision, we recommend to get seat belts, seats, ISOFIX and top-tether anchorages (as may be applicable) investigated at TATA MOTORS Authorized service center.

NOTE
CRS in a closed vehicle can become very hot. To prevent burns, check the seating surface and buckles before placing your child in CRS.

WARNING

  1. Do not leave unattended children in your vehicle.
  2. Do not modify CRS in any way.
  3. Do not install a booster seat or a booster cushion with only the lap strap of the seat belt.
  4. Do not install a booster seat or a booster cushion with a seat belt that is slack or twisted.
  5. Do not put the safety seat belt under your child’s arm or behind its back.
  6. Do not use pillows, books or towels to boost your child’s height.
  7. Make sure that your children sit in an upright position.
  8. Do not allow children to stand up or kneel on either the rear or the front seats. An unrestrained child could suffer serious or fatal injuries during a collision.
  9. Do not leave any toys or other objects loose in the CRS or on the seat while the vehicle is in motion.

Each CRS should be used for one child only. If the airbag SRS warning indicator in the instrument cluster illuminates continuously, it means that there is a malfunction in the system. Remove the CRS from front passenger seat and contact your TATA MOTORS authorized service center.Tata Punch User 2021 Recommended CRS Position as per the Vehicle Matrix Manual 01Tata Punch User 2021 Recommended CRS Position as per the Vehicle Matrix Manual 02Tata Punch User 2021 Recommended CRS Position as per the Vehicle Matrix Manual 03Tata Punch User 2021 Recommended CRS Position as per the Vehicle Matrix Manual 04

NOTE
The above images are for reference purposes only.

SUPPLEMENTARY RESTRAINT SYSTEM (SRS) (AIRBAGS) (if equipped)

The airbag ‘SRS’ system comprises of the following components depending upon the provided safety features in your vehicle.

  1. Seat belt Pre-tensioners.
  2. Seat belt with load limiters.
  3. Driver Airbag.
  4. Front Passenger Airbag.
  5. Airbag ‘SRS’ ECU (Electronic Control Unit).
  6. Collision Sensors.
  7. SRS wiring harness.
  8. SRS Warning lamp

The System is active when the ignition switch is in the “ON” position or the ignition mode is “ON”. Airbags are designed to inflate in collisions when required. In the event of a collision, the collision sensors will detect signals, and if the Airbag ECU judges that the signals represent a severe collision, will trigger the airbags. The inflated Airbags

provide a cushion to the occupants. The Airbag inflates and deflates so quickly that you may not even realize that it has activated. The Airbag will neither hinder your view nor make it harder to exit the vehicle. Airbag inflation is virtually instantaneous and occurs with considerable force, ac-companied by loud noise and smoke, which is normal. The inflated airbag, together with seat belts, limit the movement of an occupant, thereby reducing the risk of injury. When an airbag inflates, you may see some smoke-like particles. The particles are a normal by-product of the process that generates the non-toxic gas used for airbag inflation. These airborne particles may irritate the skin, eyes, nose, or throat. If you have skin or eye irritation, rinse the area with water. For nose or throat irritation, move to fresh air. Also sometimes the smoke can cause breathing problems. In such cases, it is recommended to get fresh air promptly.
After inflation, airbag provides a gradual cushioning effect for the occupant there after deflates. It is not advisable to drive your vehicle after the airbags have been deployed. If you are involved in another collision, the airbags will not be in place to protect you.Tata Punch User 2021 Recommended CRS Position as per the Vehicle Matrix Manual 05

NOTE
The above image is for reference purpose only.

NOTE
Open your windows and doors as soon as possible after collision to reduce prolonged exposure to the smoke and powder released by the inflating Airbag.

  • Do not touch the Airbag container’s internal components immediately after an Airbag has inflated. The parts that come into contact with an inflating Airbag may be very hot.
  • Always wash exposed skin areas thoroughly with lukewarm water and mild soap. The driver airbag is mounted in the center of the steering wheel. The front passenger airbag is located inside the dashboard in front of the passenger seat. The vehicle fitted with the airbags has suitable indications on the steering wheel and on the dashboard. The word ‘AIRBAG’ is embossed on the airbag covers.

WARNING
Even in vehicles with Airbags, you and your passengers must always wear the seat belts provided. In order to minimize the risk and severity of injury in the event of a collision.

  • ALWAYS use seat belts and CRS –during every trip and at all times. Even with airbags, you can be seriously injured or killed in a collision if you are not wearing seat belt properly or not wearing seat belt when airbag inflates. You and your passengers should never sit or lean unnecessarily close to the Airbags. Move your seat as far back as possible from front Airbags, while still maintaining control of the vehicle.
  • All occupants should sit upright with the seatback in an upright position, center on the seat cushion with their seat belt on, legs comfortably extended and their feet on the floor until the vehicle is parked and the engine is turned off. If an occupant is out of position during a collision, the rapidly deploying Airbag may forcefully contact the occupant causing serious or fatal injuries.
  • Do not allow the front passenger to place their feet or legs on the dashboard.

Read all Instructions for Recommended CRS Position as per the Vehicle Matrix User Guide


CHILD LOCK

Both the rear doors of the vehicle are provided with a child-proof lock. Push the lock lever located on the vertical face of the door downward before closing the door. The door which has been locked by activating the child lock cannot be opened from in-side, it can be opened only from the outside.
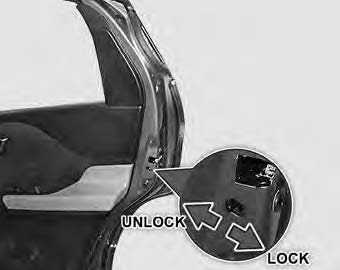
Tata Punch User 2021 CHILD LOCK Manual 01

NOTE
Lift the lock lever upward to deactivate the childproof lock when not required.
Child safety lever to be used for safety of child for preventing them to open rear door while seating in passenger seat to avoid accident while vehicle is running.

ANTI-THEFT DEVICE IMMOBILIZER / PEPS

The immobilizer system is designed to prevent vehicle theft by electronically disabling the engine ignition system. The engine can be started only with vehicle’s original Immobilizer ignition key which has an electronic identification programmed code

NOTE
Use only Flip key, the other should be kept in a safe location. Note down “key Tag no.” information (and keep it safe) which is required while getting new/spare keys. Remember that it is not possible to prepare new/spare keys without the “key Tag number.” Take precaution about Flip key, as without Flip key vehicle cannot be started.

Vehicle Condition Immobilizer Lamp Sta- tus Vehicle State Meaning / Function Of The State
Ignition OFF Blinking Locked Vehicle Immobilized and awaiting electronic key
Ignition ON OFF Unlocked Normal condition and ready to start the vehicle
Ignition ON ON Locked
  • Problem with key (Wrong key used to start vehicle)
  • Problem with Immobilizer system. Con- tact a TATA MOTORS Authorized Service Centre.
Ignition ON Blinking Unlocked Contact a TATA MOTORS Authorized Service Centre immediately.

ANTI-LOCK BRAKING SYSTEM (ABS)

ABS regulates brake pressureTata Punch User 2021 CHILD LOCK Manual 01
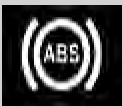
in such a way that the wheels do not lock when you brake. This allows you to continue steering the vehicle when braking. The ABS warning lamp in the instrument cluster lights up when the ignition is switched on. It goes out when the engine is running.

WARNING
If ABSTata Punch User 2021 CHILD LOCK Manual 01is faulty, the wheels could lock when braking. The steer ability and braking characteristics may be severely impaired. There is an increased danger of skidding and accidents. Drive on carefully. Have ABS checked immediately at a TATA MO-TORS Authorized Service Centre as soon as possible.

While Braking

  1. If ABS intervenes: continue to press the brake pedal vigorously until the braking situation is over.

  2. To make a full brake application: press the brake pedal with full force
    If ABS intervenes when braking, you will feel a pulsing in the brake pedal. The pulsating brake pedal can be an indication of hazardous road conditions, and functions as a reminder to take extra care while driving. 

WARNING
The stopping distance required for vehicles with ABS may be slightly more than for conventional brake systems but ABS will still offer the advantage of helping you maintain directional control. However, remember that ABS will not compensate for bad road or weather conditions or poor driver judgment. Drive within safety margins taking into consideration into consideration prevailing weather and traffic conditions.

ELECTRONIC BRAKEFORCE DISTRIBUTION (EBD)

EBD monitorsTata Punch User 2021 CHILD LOCK Manual 02and controls the brake pressure on the rear wheels to improve driving stability while braking. EBD provides optimal braking pressure distribution between front and rear wheels to optimize braking distance and to ensure vehicle stability by means of lowering braking pressure increase at rear wheels.

WARNING
If EBD is malfunctioning, the rear wheels can lock, e.g. under full braking. This increases the risk of skidding and an accident.
You should therefore adapt your driving style to the different handling characteristics. Have the brake system checked immediately at a TATA MOTORS Authorized Service Centre as soon as possible.

BRAKE SWAY CONTROL (BSC)

Detects tendency of instability during Braking in ABS-alone vehicles by monitoring individual wheel. Enhances vehicle stability by controlling braking pressure on individual wheels during partial braking.Tata Punch User 2021 CHILD LOCK Manual 03

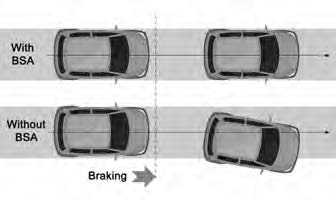
STUCK MODE RECOVERY (TRACTION PRO) (if applicable)

Traction Pro mode helps the driver to get the vehicle moving if one of the front wheels is continuously spinning because of low grip from the road surface. This situation may arise due to road undulation, snow, mud, or any low-friction surface. These situations are automatically identified by ABS-driven Traction Pro mode and pop-up windows on the infotainment system support the driver. The driver can activate the Traction pro mode and take the vehicle out of the stuck situation without any external assistance. Once activated, the driver will be guided of further steps via the infotainment unit itself. Traction pro mode can be used only in the forward direction and cannot be used if both front wheels are spinning.

CAUTION
Please use Traction Pro Mode cautiously in extreme conditions where vehicle digs deep into the ground. which can cause vehicle’s body to touch the ground.
During activation of Traction Pro Mode, service brake may not deliver normal braking performance at very low speeds. In case vehicle rolls back on slope please be ready to use hand brake.
Do not press brake and accelerator pedal together except where Traction Pro Mode is activated.

If the vehicle is stuck with one wheel continuously spinning, you will receive the notification pop up (in below image) to activate the Traction Pro Mode.Tata Punch User 2021 CHILD LOCK Manual 04

In case you select “yes”, Traction Pro Mode will be activated and you can follow the instructions to take the vehicle out of stuck situation.Tata Punch User 2021 CHILD LOCK Manual 05

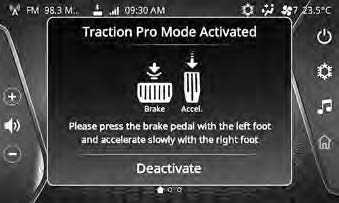
If the vehicle comes out of the stuck situation, a notification pops up as seen in below image.Tata Punch User 2021 CHILD LOCK Manual 06


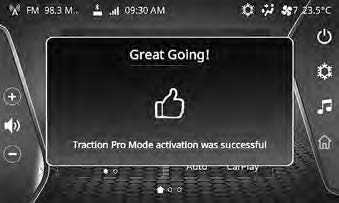
Also, you can deactivate Traction Pro Mode at any point of time of activation by pressing deactivate button which results in a notification pop-up as seen in the below image.Tata Punch User 2021 CHILD LOCK Manual 07

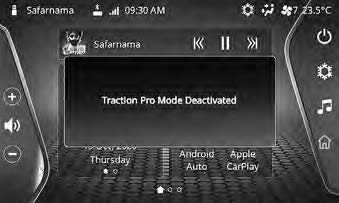
In case there is any system temperature high is identified during the operation of Traction Pro Mode, Traction Pro Mode will be disabled temporarily for around 2 minutes.Tata Punch User 2021 CHILD LOCK Manual 08


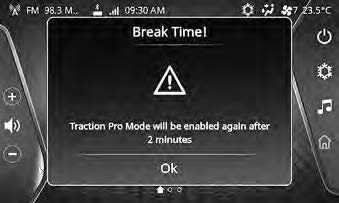
If the terrain is beyond the physical limit of the Traction Pro Mode, a notification pop-up as described in the below image will be displayed on the infotainment system. Please take external aid to tow the car in this situationTata Punch User 2021 CHILD LOCK Manual 09

Read all Instructions CHILD LOCK User Guide

Tata Punch 2021 KEYS User Manual

Tata Punch 2021 KEYS User Manual

KEYS

A key is an electronic access and authorization system available as a standard feature with your vehicle.

Unlocking Principle

The transponder in the ignition key carries a Unique Identification Code (UID). The vehicle unlocks when the code on the key matches with the code on the Engine Management System (EMS). In case of PEPS variant, the Immobilizer function is provided by PEPS ECU.

Engine Starting

When the key is inserted and the ignition is switched to ‘ON’, all codes are communicated within key, Immobilizer and EMS. The engine will start only if all the codes match.

Loss Of Keys

If one of the keys is lost, Contact the TATA MOTORS Authorized Dealer/Service Center immediately.

WARNING
Do not turn ‘ON’ ignition switch by using key with any type of metal wound around its grip or in contact with it. This may be detected as ab-normal condition by immobilizer and prevent engine from starting. Do not leave the key in high temperature areas. The transponder in it will behave abnormally when reused.
Do not try to start the vehicle when the Immobilizer indicator lamp on the instrument cluster is glowing. In this condition the vehicle will not start and the vehicle’s battery will also be drained due to frequent cranking.

Sn Name Remote Key Description
  

1


Mechanical key

 Tata Punch User 2021 KEYS Manual 01   

1.    Locking all doors

2.    Unlocking all doors


2


Smart Key (PEPS)

Tata Punch User 2021 KEYS Manual 02 1.    Locking all doors2.    Approach light

3.    Tail gate opening

4.    Unlocking all doors


3


Flip Key

Tata Punch User 2021 KEYS Manual 03 1.    Unlock2.    Approach Light follow me

3.    Lock

4.    Key blade in out button

SMART KEY (if available)Tata Punch User 2021 KEYS Manual 02

Keep the smart key with the user to perform the passive access. It is used for locking, unlocking and starting the vehicle.

  1. Locking all doors
  2. Approach Light
  3. Tailgate opening
  4. Unlocking all doors

Locking All Doors

Press the lock button once (1) to lock all the doors of the vehicle.
The successful lock will be indicated by two flashes of turn signal indicators.

Approach Light

This feature helps to find and reach the parked vehicle. When you press the approach light button (2) once, position lamps or low beam and position lamps will turn ‘ON’. To switch ‘OFF’ the approach lights, press and release the same button or it automatically turns ‘OFF’ after a certain time.

Tail Gate Opening

Press the tailgate opening button once (3) to unlock the tailgate.

Unlocking All Doors

Press the unlock button once (4) to unlock all the doors. Successful unlock will be indicated by one flashes of turn signal indicators.

NOTE
If smart key battery is low/drained or vehicles battery is low/drained, user can unlock and enter into vehicle by using mechanical key blade, which is present inside the smart key.

Key Blade In outTata Punch User 2021 KEYS Manual 01

Slide the knob (1) to release the key. Pull the key blade (2) out.

SMART KEY FEATURES

Force Panic ON Operation
When vehicle is in OFF condition, if we press lock button and unlock button simultaneously, Force panic operation gets activated. In this case, turn indicators of vehicle start flashing and horn will blow automatically.

Force Panic OFF Operation

By pressing any button of smart key, Force panic operation gets deactivated.

Vehicle Search

In vehicle locked condition, if the lock button on the smart key is pressed, the turn indicators of the vehicle flash 4 times.

Automatic Activation Of Immobilizer

If the smart key is not found within the passenger compartment, the engine will be immobilized and the vehicle cannot start.

Auto Locking Unlocking Of Doors  Auto Relock

In PEPS variants, the door will get unlocked when the ignition is OFF by pressing the Start Stop switch.

Anti-grab Anti-scan Coding

The remote control set of this security system is protected against the use of devices called ‘scanners’ and ‘grabbers’ which can record and reproduce some types of remote codes.

Important

  • Don’t operate Unlock button of the remote in the vicinity of your vehicle, as it could lead to an unintentional unlocking of your vehicle.
  • For the battery, the replacement procedure refers ‘MAINTENANCE’ section.
  • Do not remove the battery connection of the vehicle while the vehicle has been locked by remote.

Smart Key Precautions

  1. If the smart key is close to a radio transmitter such as a radio station or an airport it can interfere with the normal operation of the transmitter.
  2. If the smart key is near a mobile two-way radio system or a cellular phone, then it will not work properly.
  3. If another vehicle’s smart key is being operated close to your vehicle, the signal will fluctuate.

WARNING
Keep the smart key away from electromagnetic materials that block electromagnetic waves to the key surface.

FLIP KEYTata Punch User 2021 KEYS Manual 02

  1. Unlock
  2. Approach Light follow me trunk lid
  3. Lock
  4. Key blade in  out button

1. Unlocking All Doors

To unlock all doors, press unlock push-but-ton (1) once. Unlocking will be confirmed by single flash of turn indicators.

2. Approach Light  Follow Me

Press approach light button (2) once, low beam, park and roof lamp will turn ‘ON’ for 60 seconds (default setting). This feature helps to find and reach the parked vehicle or to reach home in dark/ cloudy condition after parking. Red LED will be flashed on the remote. To switch ‘OFF’ the approach lights, press and release the same button or it automatically turns ‘OFF’ after 60 seconds.

Tail Gate Opening (if equipped)
Electric Tail gate opening can be done through long press (4 sec) approach light button on remote key.

3. Locking All Doors

To lock all doors, press lock push-button (3) once. Locking will be con-firmed by two flashes of turn indicators. If lock button is pressed on the remote key with the driver door open, locking unlocking takes place with audible warning sound. If any other door is open, the vehicle gets locked but indicators do not flash.

4. Folding Key Blade In / Out

Press button (4) to flip out the key blade. For folding, press the button (4) and fold the key blade inside.Tata Punch User 2021 KEYS Manual 04

NOTE
Key Blade should not be folded without pressing the button. Also, it should not be forced in any direction apart from folding direction to avoid damage to Flip Mechanism.

Manual Operation Of Central Door Locking Unlocking

All doors can be locked unlocked operating driver door using either key blade from outside or knob from inside.

FLIP KEY FEATURES

Vehicle Search
In vehicle locked condition if lock button on the remote key is pressed the turn indicators of the vehicle flashes 4 times.

Force Panic ON Operation

Force Panic ON operation When a vehicle is in OFF condition, if we press the lock button and unlock button simultaneously, Force panic operation gets activated. In this case, the turn indicators of the vehicle start flashing and the horn will blow automatically. Force Panic OFF operation.

Force Panic OFF Operation

By pressing any button of the flip key, the Force panic operation gets deactivated

Automatic Activation Of Immobilizer

If the key is removed from the ignition, the engine will be immobilized automatically even if you forget to lock the vehicle.

Auto Locking Unlocking Of Doors  Auto Relock

Vehicle doors get automatically locked when all doors are closed and the vehicle speed crosses 10 kaphs. When the ignition key is taken out all the doors get automatically unlocked. Also, when unlocked with remote key and if no door is opened within 30 seconds, vehicle doors get automatically locked.

Anti-grab Anti-scan Coding

The remote control set of this security system is protected against the use of devices called ‘scanners’ and ‘grabbers’ which can record and reproduce some types of remote codes.

Important
Don’t operate Unlock push-button of re-mote while in the vicinity of your vehicle, as it could lead to an unintentional unlocking of your vehicle. Don’t use discharged batteries in the remote, as it could damage the remote. For the battery replacement procedure refer maintenance section. Don’t remove the battery connection of the vehicle while the vehicle has been locked by remote.

Read all Instructions KEYS User Guide

Tata Punch DOORS User Manual

Tata Punch 2021 DOORS User Manual

DOORS

Door Lock And Unlock With Key (if available)
The front doors can be locked or un-locked from outside using the key blade.Tata Punch User 2021 OPENING AND CLOSING Manual 13


Insert the key in the slot and turn it clock-wise to lock and anticlockwise to unlock the door.


Door Locking And Unlocking Using Door Handle Switch (DHS)

To lock/unlock all the doors without operating smart key button/ key blade. Press the door handle switch (DHS) provided on the driver door to lock/unlock all the four doors including Tail gate.Tata Punch User 2021 OPENING AND CLOSING Manual 14


NOTE
Authentication range for smart key ranges from 1 to 1.5 meters from outside the respective door or tail gate.
Passive entry works only when ignition is off.

Rear Door Opening

Door opening handle is provided on the side of the window.Tata Punch User 2021 DOORS Manual3

To open the door, press the lever provided inside the handle and pull.

OPENING AND CLOSING

Locking Without A Key From Inside
All the doors can also be locked from in-side by pressing lever on driver door and independently on other doors respectively.Tata Punch User 2021 DOORS Manual4

WINDOWS

Power Windows (if available)Tata Punch User 2021 DOORS Manual6

  1. Front Window Winding Switch (Left)
  2.  


  3. Front Window Winding Switch (Right)
  4. Rear Window Winding Switch (Left)
  5. Rear Window Winding Switch (Right)
  6. Inhibit Switch

Window glasses on all four doors can be operated by switches provided on the main control panel located on the driver’s arm rest. They work only when the key is in the ‘IGN ON’ position.

NOTE
Power windows can be operated for 30 seconds in ‘IGN OFF’ and ‘KEY OUT’ positions, provided the doors are closed.

Express-Down (if available)

Window glasses can be opened by a single long press of the switch. Express down feature is provided for the driver’s door only.

Individual Switches

Individual window winding switches have been provided on the front passenger and rear doors.Tata Punch User 2021 DOORS Manual7

Glasses are wound up or down by pulling or pressing the switch.


WARNING
While raising the glass, take care to avoid fingers/hands getting trapped between the glass and the door frame.

Inhibit SwitchTata Punch User 2021 DOORS Manual8

Inhibit Switch ON
When switch is pressed, Amber light turns ‘ON’. The individual switches provided on rear and front passenger door.Tata Punch User 2021 DOORS Manual9

OPENING AND CLOSING

cannot be operated. However, it can be operated from the switches on the driver’s armrest

Inhibit Switch OFF
When switch is pressed, Amber light turns ‘OFF’. The individual switches provided on rear and front passenger door can be operated. It can also be operated from the switches on driver’s arm rest. .Tata Punch User 2021 DOORS Manual9


WARNING
If children operate the windows they could be get trapped, particularly if they are left unsupervised. There is a risk of injury.
Activate the window inhibit feature when children are travelling. When leaving the vehicle, always take the key with you and lock the vehicle. Never leave children unsupervised in the vehicle.

Manual Window Winding (if available)

Use window winder handle for lowering or raising up window glasses manually where power windows are not provided.Tata Punch User 2021 DOORS Manual10

Opening The Bonnet

  1. Make sure that the engine is switched off and vehicle is in neutral gear with the parking brake applied.
  2. Pull the bonnet release lever. The bon-net will pop up slightly.Tata Punch User 2021 DOORS Manual11 For MTTata Punch User 2021 DOORS Manual12For MT
  3.  


  4. Lift the bonnet slightly and with your finger and slide the secondary lock lever located under the center of the bonnet
    NOTE
    Make sure that the wiper arms are not raised and not operate before you lift up the bonnet to avoid damaging the wiper arms and the bonnet.
  5. Lift the bonnet up. Pull the bonnet stay rod from its clip and put the free end into the slot provided on frame.

Tata Punch User 2021 DOORS Manual13


WARNING
The stay rod can be hot enough to burn your finger right after driving. Touch the rod after it becomes cool enough.
Put the stay rod into the hole correctly. If the rod drops off, your body may be caught below the bonnet.
Deactivate the Idle Stop Start (ISS) function for any operation to be performed in the Engine compartment.

Read all Instructions for DOORS User Guide

Tata Punch Closing User Manual

2021 Tata Punch Closing User Manual

Closing

  1. To close the bonnet, hold the bonnet by one hand, disengage the stay rod and clamp it back properly.
  2. Lower the bonnet close to the bumper, then let it drop down.

WARNING
Make sure that the bonnet is correctly locked or it can fly up unexpectedly when you dri


TAILGATE OPENING

NOTE
Some variants may have multiple options.

Option ITata Punch User 2021 Closing Manual 01

To release the tailgate, press the tail gate button on the remote.

NOTE
Press the tail gate button on smart key and press the tail gate door handle switch within 30 seconds to open it.

Option IITata Punch User 2021 Closing Manual 02

If the vehicle is locked, tailgate is closed and tailgate DHS switch is pressed with valid smart key in the authentication range the tail gate gets unlatched. On closing the tail gate door, it gets locked. While closing the tail gate, if doors are in a locked condition and a valid smart key is in-side the trunk, then tailgate gets unlocked.

NOTE
Once tailgate is opened, it will not get locked automatically with other doors.
If the doors are unlocked, the tailgate can be unlocked via tailgate handle switch without a smart key.
Do not keep the smart key in the boot when you close the tailgate.


WARNING
Tail gate can’t be locked using mechanical key flip key smart key. It has to be locked by slamming it.

Option III

Emergency Tailgate Opening

In emergency situation like key or vehicle battery is discharged or electrical malfunctioning, you can unlock the tailgate from in-side as per procedure given below:Tata Punch User 2021 Closing Manual 01

  1. Open driver door using mechanical key.
  2. Open the rear door.
  3. Fold the rear seat.
  4. And access the tailgate opening lever from inside.
  5. Turn the lever clockwise to unlatch and open the tailgate.

NOTE
This can be used in emergency situation when you are inside the vehicle.

FUEL LIDTata Punch User 2021 Closing Manual 04

To release the fuel flap, pull the lever located at the right hand side below the driver seat. For opening, open the fuel cap, turn it counter clockwise. For closing, turn the fuel cap clockwise and gently push the fuel flap till it gets locked.Tata Punch User 2021 Closing Manual 05

WARNING
Fuel vapor is extremely hazardous. Always switch ‘OFF’ the engine be-fore refueling and never refill near sparks or open flames. Do not use cell phone when you fill fuel.
Do not continue adding fuel after the automatic shut ‘OFF’ function is operated if it is equipped on the fuel station. Overfilling the fuel tank could damage the fuel system.


NOTE
To fill up the fuel, the Engine must be stopped by turning OFF the Ignition Key / Start-Stop button. If the Engine is in Idle Stop Start (ISS) mode, it may restart automatically while filling the fuel.
Remove the fuel filler cap slowly, and wait for any hissing to stop. The fuel may be under pressure and may spray out.
If fuel cap needs replacement, make sure that it is replaced by a genuine cap at the TATA MOTORS authorized service center.Tata Punch User 2021COCKPIT Manual 01

1 A.C. Air vent
2 Airbag (PAB)
3 Infotainment Display (if available)
4 Steering controls (if available)
5 Instrument Cluster
6 Combi-Switch
7 Horn pad
8 Fascia switch (if available)
9 Driver side Utility pocket
10 Start – Stop switch (if available)
11 Airbag (DAB)
12 Controls
13 Foot Rest
14 USB Port
15 Parking Brake Lever
16 Glove box
17 Gear shift lever
18 ETC / FATC (as available)
19 Hazard Warning switch
20 Center air vent

INSTRUMENT CLUSTER (TFT Screen)Tata Punch User 2021COCKPIT Manual 02

NOTE: All indicators shown may not be applicable to your vehicle. All indicators shown may not be applicable to your vehicle

SpeedometerTata Punch User 2021COCKPIT Manual 03

Speedometer indicates the vehicle speed in kmph.

NOTE
At every key IN and ignition ON, the Instrument Cluster needles and gauges move to max. and return to ‘0‘ position. This is a welcome strategy and a self-check feature.

TachometerTata Punch User 2021 Closing Manual 06

Tachometer indicates engine speed in revolutions per min (rpm).

WARNING
Do not drive the vehicle with a high engine rpm. This may cause damage to the engine and reduce its life.

Fuel Gauge

When the ignition switch is in “ON” position, fuel gauge gives an approximate indication of the amount of fuel in the fuel tank. In indication window, “F” stands for full and “E” stands for empty.Tata Punch User 2021 Closing Manual 07

When the fuel in the tank nears empty, low fuel warning tell-tale light glows. Fill the fuel as soon as possible.


NOTE
Do a check of the fuel level when the vehicle is stationary on a level road.
The fuel level displayed can vary when you drive on inclines, curve brakes and accelerate suddenly. This is due to the movement of fuel in the tank. The low fuel warning lamp may turn to ON or OFF earlier or later than usual.

WARNING
If there is any defect in the system, the Low fuel warning symbol will blink. Take your vehicle to the nearest TATA MOTORS Authorized Dealer/Service Center.

Temperature Gauge

When the ignition switch is in the “ON” position, this gauge indicates the engine coolant temperature.Tata Punch User 2021 Closing Manual 08

The indicator should be within the normal, acceptable temperature range i.e. between “H” and “C”. If the indicator approaches “H”, overheating is indicated by a RED progress bar. If the coolant temperature is very high, the engine coolant temperature tell-tale light flashes and you will hear an audio warning. In this case, stop the vehicle, switch the engine ‘OFF’ and allow it to cool down for some time. Contact the nearest TATA MOTORS Authorized service center immediately for rectification.


WARNING
The red progress bar indicates overheating due to high coolant temperature that may damage the engine. If you continue to drive the vehicle in this case, it can result in severe engine damage or even fire.

Read all Instructions for Closing User Guide

Tata Punch Driver Information System User Manual

Tata Punch 2021 Driver Information System User Manual

Driver Information System Image Description


Odometer

Tata Punch User 2021 Driver Information System Manual 01 This indicates distance travelled by the vehicle. The odometer reading does not return to “0” when maximum value is reached; the display will freeze the maximum value.


Trip meter A & B

 Tata Punch User 2021 Driver Information System Manual 02  The trip meter can be used to measure the distance travelled on short trips or between fuel stops. It can be reset to “0”. The trip meter reading becomes “0.0” after it crosses 9999.9 km.


Clock

Tata Punch User 2021 Driver Information System Manual 03 Indicates current time in AM/PM mode. Clock time can be changed using steering wheel switches on the steering wheel.Whenever the battery terminals or related fuses are connected, you must reset the clock time. This feature is available when ignition switch is in ‘ON’ position.

NOTE: Clock settings can also be changed through infotainment system. For more information, refer infotainment manual.

 Service reminder Tata Punch User 2021 Driver Information System Manual 04 This indicates how many days/kilometres are left till service is due. If service is overdue, it will display “0” km or “0” days and a spanner symbol will blink every time ignition is ON for a few seconds. Never reset the display between
Driver Information System Image Description
service intervals as it may give incorrect readings. The in- formation is retained in the service interval display even after the vehicle battery is disconnected.NOTE: This option is for indicative purpose only. Keep track of your odometer reading and follow the maintenance schedule.
 Door Ajar Tata Punch User 2021 Driver Information System Manual 05 Respective door open display pop up come for few sec and then telltale with respective door open shall be dis- played.
  

Current gear position (indicator)

Tata Punch User 2021 Driver Information System Manual 06 


 Current gear engaged by the transmission shall be dis played on DIS.

NOTE: If “F” is displayed it means a defect in the system is detected Contact the nearest TATA MOTORS Authorized service centre immediately to rectify the problem.


In case of a manual transmission, the gear number will be displayed when the clutch is fully released.

 Gear Recommendation Tata Punch User 2021 Driver Information System Manual 07 Up or down arrow will be displayed on DIS to shift a gear up or down.No arrow shall be displayed when the selected gear is as per the Vehicle dynamics.
Driver Information System Image Description
  

Night time Illumination control

Tata Punch User 2021 Driver Information System Manual 08  Dashboard Illumination in Night time can be controlled in 5 steps as per user’s convenience using SET and MODE button.

Refer settings flow.

 Drive Mode (AMT)  Tata Punch User 2021 Driver Information System Manual 09  Applicable to AMT variant of the vehicle. “M” indicates Manual Drive mode. “A” indicated Automatic Drive mode.

Instantaneous Fuel Economy (IFE)Tata Punch User 2021 Driver Information System Manual 10

To reach the Instant Fuel Economy in the Instrument cluster. Press theTata Punch User 2021 Driver Information System Manual 11 button on the RHS of the steering wheel.

  1. IFE display does not show Fuel Economy of last drive.
  2. The display does not show actual value unless vehicle is moving.
  3. The indication on the display screen may be delayed if fuel consumption is affected by driving pattern.

NOTE
IFE will vary frequently as per driving pattern.

Power And TorqueTata Punch User 2021 Driver Information System Manual 12

Indicates the value of Power and Torque delivered by engine in the particular driving condition.

Average Fuel Economy (AFE)Tata Punch User 2021 Driver Information System Manual 13

Trip ATata Punch User 2021 Driver Information System Manual 14

Trip B
AFE value is an estimate of fuel economy. It may vary significantly based on driving conditions, driving habits, and the condition of the vehicle.
To see the average fuel economy in the instrument cluster, press the switch Trip time, Average speed and Trip distance will reset to ‘0’ when the respective Trip meter is reset. on the RHS of the steering wheel.

NOTE
Average Fuel Economy, Trip time, and Average speed will get reset to ‘0’ when Battery is removed and refitted. Average Fuel Economy will be displayed as ‘—.—‘for the initial 0.5 km of the respective trip. Once 0.5 km distance is covered, Average Fuel Economy will be displayed. Even after 0.5 km distance covered for a particular trip, if Average Fuel Economy is displayed as ‘—.—‘, then take your vehicle to TATA MOTORS Authorized Dealer/Service Center.

Read all Instructions for Driver Information System User Guide

Tata Punch Distance To Empty (DTE) User Manual

Tata Punch User 2021 Distance To Empty (DTE) Manual

Distance To Empty (DTE)Tata Punch User 2021 Distance To Empty (DTE) Manual 01

The above DTE screen indicates an approximate distance in ‘km’ that your vehicle can travel with available fuel in tank. To reach the Distance to Empty in the Instrument cluster. Press theTata Punch User 2021 Distance To Empty (DTE) Manual 02buttons on RHS of the steering wheel. DTE values may vary significantly based on driving conditions, driving habits, and condition of the vehicle. It is an estimate value of the available driving distance. If low fuel warning light glows, fill the fuel tank immediately regardless of the DTE figure.

NOTE
If DTE is displayed as ‘—-‘, then take your vehicle to the TATA MO-TORS Authorized Dealer/Service Center. The DTE will update with a new value when fuel is added for more than 7 liters at a time.


Infotainment Information On Instrument Cluster Display UnitTata Punch User 2021 Distance To Empty (DTE) Manual 03

The instrument cluster will display information like media, navigation and FM.

Setting ScreenTata Punch User 2021 Distance To Empty (DTE) Manual 04

User can enter into setting by pressing select button while being in setting screen.Tata Punch User 2021 Distance To Empty (DTE) Manual 05

To change the option by pressingTata Punch User 2021 Distance To Empty (DTE) Manual 02button on RHS of the steering wheel.

NOTE
In the Setting menu if there is no user input for 10 sec the previous screen shall be displayed.

Illumination Screen

User can select illumination setting by scroll down & pressing set button on the RHS of the steering wheel.Tata Punch User 2021 Distance To Empty (DTE) Manual 06

To increase the illumination from 20% to 100% in five steps by pressing button on RHS of the steering wheel.
To decrease the illumination from 100% to 20% in five steps by pressing button on RHS of the steering wheel.

Illumination setting

If parking lamp is OFF, the option is greyed out and can not be selectable

Illuminated Key Ring

When the vehicle is unlocked, the illuminated key ring glows up. This helps to locate ignition switch in the dark.

Outside Ambient TemperatureTata Punch User 2021 Distance To Empty (DTE) Manual 07

This displays outside ambient temperature reading with an accuracy of ±1 °C. The temperature sensor is located at the front bumper. Therefore the temperature reading can be affected by heat reflection from the road surface, engine heat, and the exhaust from surrounding traffic. If the outside temperature falls below -1°C, a “snowflake” symbol appears beside the outside temperature reading.

NOTE
For an accurate temperature reading, make sure the vehicle speed is above 30 mph.

WARNING
If the display shows OAT temp as “- – “, take your car to the TATA-authorized service center.

Service Reminder Setting

The service reminder reset option will be enabled only in service-due/overdue conditions only.Tata Punch User 2021 Distance To Empty (DTE) Manual 08

User can reset the service reminder symbol by pressing up-down buttons & and selecting set buttons.

NOTE
In the Setting menu if there is no user input for 10 sec the previous screen shall be displayed.

Clock

The clock indicates the current time in 12 / 24

  • hours mode.
    Clock mode can be changed either through Instrument Cluster setting screen (If clock option not grey out by default) or through Infotainment system setting screen, refer infotainment system manual for this.
  • Clock Setting
    User can select clock setting by scroll down & pressing set button in setting screen.

Tata Punch User 2021 Distance To Empty (DTE) Manual 09

  • Up and down button to be used for scrolling through fields of 24 hour format/hour/minute/AM/PM.
    Select button to be used to enter into required field and exit from that.
  • Up and down button to be used for changing the values.

Display Messages On the Instrument Cluster

Below messages may be displayed in the screen for three seconds based on the priority and after display time is over some warnings will be shown with minimized tell tale symbol.

Interrupts MessagesTata Punch User 2021 Distance To Empty (DTE) Manual 10

NOTE: All messages may not be applicable to your vehicle

Sn Alert Interrupts Messages On Instrument Cluster
1 Rotate steering wheel (In ESCL jam condition) Press Start Button While Turning Wheel
2 Key Fob battery Low Smart Key Battery Low Replace Battery
3 Smart key out of range Smart Key Out of Range
4 Drive Alert – Tea Break Take a Break
5 Steering Failure, Please Stop Driving Steering Failure Stop the Vehicle Safely
6 Steering Failure, Please Visit Garage Steering Failure Contact Service Center
7 Pedal Press Alert Clutch Press Clutch Pedal to Start Engine
8 Happy Birthday Happy Birthday
9 Align Steering wheel Align Steering wheel

Warning MessagesTata Punch User 2021 Distance To Empty (DTE) Manual 11

Sn Alert Warning Messages On Instrument Cluster
1 Fuel Level Low State Fuel Level Low
2 Fasten seat belt co-driver Fasten Co-Driver Seat Belt
3 Fasten Seat Belt – Driver Fasten Driver Seat Belt
4 Speed Limit Warning Over Speeding Detected Slow Down

Information MessagesTata Punch User 2021 Distance To Empty (DTE) Manual 12

Sr.no Alert Information Messages On Instrument Cluster
1 Park Brake Engaged Park Brake Engaged
2 Traction Control Off TCS Turned Off
3 Auto Headlamp Auto Headlamp Activated
4 Resume to Target Speed Not Possible in Current Gear Change Gear to Resume Cruise Speed
5 Cruise Override Cruise Override
6 ISS-Start the Engine Auto Stop Start the Engine
Sr.no Alert Information Messages On Instrument Cluster
7 Auto Start Enabled Low Battery Charge Autonomous Start Enabled – Battery SOC Low
8 Auto Start Enabled Low Brake Assist Vacuum Autonomous Start Enabled – Brake Vacuum Low
9 Auto Start Enabled High Cabin Temperature Autonomous Start Enabled – Cabin Temp high
10 Auto Start Enabled Low Coolant Temperature Autonomous Start Enabled – Coolant Temp Low
11 Auto Start Enabled Start Vehicle Rolling Auto Start Enabled Vehicle Rolling
12 Auto Start-Stop Enabled Text Alert Auto Start- Stop Enabled
13 Auto Start-Stop Disabled Text Alert Auto Start- Stop Disabled

Read all Instructions for Distance To Empty (DTE) User Guide

Tata Punch INSTRUMENT CLUSTER User Manual

Tata Punch 2021 INSTRUMENT CLUSTER User Manual

Tata Punch User 2021 INSTRUMENT CLUSTER Manual 01


NOTE:
All indicators shown may not be applicable to your vehicle.


SpeedometerTata Punch User 2021 INSTRUMENT CLUSTER Manual 02

The speedometer indicates the vehicle’s speed in mph.

NOTE
Whenever you turn the ignition on, the Instrument Cluster needles and gauges move to a maximum value and return to ‘0’ position. This is a welcome strategy and a self-check feature.

TachometerTata Punch User 2021 INSTRUMENT CLUSTER Manual 03

Tachometer indicates engine speed in revolutions per min (rpm).

WARNING
Do not drive the vehicle with high engine rpm. This may cause damage to the engine and reduce its life.

Fuel Gauge

When the ignition switch is in “ON” position, fuel gauge gives an approximate indication of the amount of fuel in the fuel tank. “F” stands for full and “E” stands for empty.Tata Punch User 2021 INSTRUMENT CLUSTER Manual 04

When fuel in the tank nears empty, low fuel warning tell-tale light glows. Fill fuel as soon as possible.

NOTE
Do a check of the fuel level when the vehicle is stationary on a plain surface.
The fuel level displayed can vary when you drive on inclines, curves, brake and accelerate suddenly. This is due to the movement of fuel in the tank. The low fuel warning lamp may turn to ON or OFF earlier or later than usual.

WARNING
If there is any fault in the system, Low fuel warning symbol will start blinking. Take your vehicle to the nearest TATA MOTORS Authorized Dealer/Service Center.

Temperature Gauge

When the ignition switch is in the “ON” position, this gauge indicates the engine coolant temperature.Tata Punch User 2021 INSTRUMENT CLUSTER Manual 05

The indicator should stay within the normal, acceptable temperature range between “H” and “C”. If the indicator approaches “H”, overheating is indicated by a red bar.
If the coolant temperature reading is very high, the engine coolant temperature tell-tale light flashes with an audible buzzer. In this case, stop the vehicle, switch ‘OFF’ the engine and cool it down for some time. Contact the nearest TATA MOTORS Authorized Dealer/Service Center immediately for rectification.

WARNING
The red progress bar indicates overheating, due to high coolant temperature which may damage the engine. Continuing to drive the vehicle in this case can result in severe engine dam-age or even fire.

Driver Information System (DIS)

Driver Information System Image Description
 Odometer Tata Punch User 2021 INSTRUMENT CLUSTER Manual 06 Indicates distance travelled by a vehicle. The Odometer reading does not re- turn to “0” when maximum value is reached, the display will freeze to maximum value.
 Trip meter A & B  Tata Punch User 2021 INSTRUMENT CLUSTER Manual 07 The trip meter can be used to measure the distance travelled on short trips or between fuel stops. It can be reset to “0”. The Trip meter reading becomes “0.0” after it crosses 9999.9 km.
  

Clock

Tata Punch User 2021 INSTRUMENT CLUSTER Manual 08 Indicates current time in AM/PM mode. Clock time can be changed using ‘SET’ & ‘MODE’ knob.Whenever the battery terminals or related fuses are connected, you must reset the clock time. This feature is available when ignition switch is in ON position. NOTE: Clock settings can also be changed through infotainment system. For more information, refer infotainment manual.
 Door Ajar Tata Punch User 2021 INSTRUMENT CLUSTER Manual 09 This warning will be indicated when the driver’s door or front passenger door is open.
  

Service reminder

 Tata Punch User 2021 INSTRUMENT CLUSTER Manual 10


This indicates how many days/kilometres are left till service is due. If service is overdue, it will display “0” km or “0” days and a spanner symbol will blink every time ignition is ON for a few seconds. Never reset the display between service intervals as it may give incorrect readings. The information is retained in the service interval display even after the vehicle battery is disconnected. NOTE: This option is for indicative purpose only. Keep track of your odometer reading and follow the maintenance schedule.
Driver Information System Image Description
  

Current gear position indicator

 Tata Punch User 2021 INSTRUMENT CLUSTER Manual 11  Current gear engaged by the transmission shall be displayed on Driver Information System.

NOTE:

If “F” is displayed it means a ‘Fault’ condition. Contact the nearest TATA MO- TORS authorized service centre immediately

In case of manual transmission, the gear number shall be displayed even when the clutch is fully released.

 Gear Recommendation Tata Punch User 2021 INSTRUMENT CLUSTER Manual 12 Up or down arrow will be displayed indicating for a gear change.No arrow shall be displayed when the selected gear is as per the vehicle dynamics.

Read all Instructions for INSTRUMENT CLUSTER User Guide

Tata Punch Instantaneous Fuel Economy (IFE) User Manual

2021 Tata Punch Instantaneous Fuel Economy

Instantaneous Fuel Economy (IFE)Tata Punch User 2021 Instantaneous Fuel Economy (IFE) Manual 01

Monitor the IFE bar graph to achieve better fuel economy. IFE display does not show Fuel Economy of last drive. The above image indicates real time fuel economy when the ignition is turned ‘ON’. The display does not show actual value unless vehicle is moving. The indication on the display may be de-layed if fuel consumption is affected by driving pattern

NOTE
IFE will vary frequently as per driving pattern.
IFE display does not show Fuel Economy of last drive.


Average Fuel Economy (AFE)Tata Punch User 2021 Instantaneous Fuel Economy (IFE) Manual 02

Tata Punch User 2021 Instantaneous Fuel Economy (IFE) Manual 03Trip time, average speed and trip distance will reset to ‘0’ when respective trip meter is reset. Average Fuel Economy will be displayed as ‘—.—‘for initial 0.5 km of respective trip. Once 0.5 km distance is covered, Average Fuel Economy will be displayed. Even after 0.5 km distance covered for particular trip, if Average fuel economy is displayed as ‘—.—‘, then take your vehicle to the nearest TATA MOTORS authorized service center.

NOTE
AFE value is an estimate of fuel economy. It may vary significantly based upon driving conditions, driving habits and condition of vehicle.
Average Fuel Consumption will get reset to ‘0’ when Battery is removed and refitted.

Distance To Empty (DTE)Tata Punch User 2021 Instantaneous Fuel Economy (IFE) Manual 04

The above image indicates an approximate distance in ‘km’ that your vehicle can travel with available fuel in the tank. DTE values may vary significantly based on driving conditions, driving habits, and the condition of the vehicle. It is an estimated value of the available driving distance. The DTE figure will update with a new value when fuel is added for more than seven liters at a time. If the low fuel warning light glows, fill fuel immediately regardless of the DTE figure displayed.

NOTE
If DTE is displayed as ‘—-‘, then take your vehicle to the TATA MOTORS Authorized Dealer/Service Center.

Outside Ambient TemperatureTata Punch User 2021 Instantaneous Fuel Economy (IFE) Manual 05

This displays outside ambient temperature reading with an accuracy of ±1 °C. Since the temperature sensor is located at the front bumper of the vehicle, the temperature reading can be affected by heat reflection from the road surface, engine heat and the exhaust from surrounding traffic.Tata Punch User 2021 Instantaneous Fuel Economy (IFE) Manual 06

Driver Information System (DIS) Setting

Instrument cluster’s brightness intensity and backlight intensity will turn on after the Parking lamp is ON.

WARNING
The clock and illumination settings should be changed only when the vehicle is in stationary condition for safety purposes.

Illumination setting procedure

For illumination setting short Press
SET button with position lamp ON Change illumination levels by short pressing SET button.Tata Punch User 2021 Instantaneous Fuel Economy (IFE) Manual 07

NOTE

  1. If parking lamp is ON and by short pressing SET button you can entering to illumination setting.
  2. If user want go to clock screen then user has to short press SET button.
  3. If user is in Illumination setting then Short press MODE will go to clock setting.
  4. If user want clock in 24/12 hour for mat, in any screen on Long press MODE button, clock changes.

Tata Punch User 2021 Instantaneous Fuel Economy (IFE) Manual 08

Display Messages On the Instrument Cluster

Below messages can be displayed on the screen for four seconds based on the priority.Tata Punch User 2021 Instantaneous Fuel Economy (IFE) Manual 09

  1. Gear number Up/down Auto/Manual
  2. Text info and warning
  3. Mode display7.Color tell tale
  4. Driver Information display
  5. Fuel gauge
  6. Temperature gauge
  7. Instantaneous Fuel Economy
  8. Clock
  9. Odometer  Trip A and B

NOTE: All messages may not be applicable to your vehicle.

Sn Information String On Lcd Screen
1 Speed Limit Warning OVERSPEED
2 Service Reminder Days SERVICE DUE
3 Service Reminder Km SERVICE DUE
4 Fuel Level Low State LOW FUEL
5 Key Fob battery Low KEY BATT LOW
6 Smart key out of range KEY OUT OF RANGE
7 Rotate steering wheel (In ESCL jam condition) ROTATE STEERING
8 Resume to Target Speed Not Possible in Current Gear UNABLE TO RESUME
9 Cruise Override CRUISE OVERRIDE
10 Cruise is Resuming to set speed CRUISE RESUMED
11 Cruise Off CRUISE OFF
12 Press CLUTCH PRESS CLUTCH
13 Please Crank PLZ CRANK
14 Autonomous Start Enabled – Battery SOC Low AUTOSTART
15 Autonomous Start Enabled – Brake Vacuum Low AUTOSTART
16 Autonomous Start Enabled – Cabin Temp high AUTOSTART
17 Autonomous Start Enabled – Coolant Temp Low AUTOSTART
18 Drive Alert1 – Tea Break TAKE A BREAK
19 Cruise Cancelled CRUISE CANCELLED
20 Owner’s Birthday HAPPY BIRTHDAY

Read all Instructions for Instantaneous Fuel Economy (IFE) User Guide

Tata Punch TELL TALES User Manual

Tata Punch 2021 TELL TALES User Manual

TELL TALES

Warning Lamps Color Indicator Remarks


Malfunction Indication Lamp (MIL)


Amber

Tata Punch User 2021 TELL TALES Manual 01
  1. The lamp comes on when ignition is switched ‘ON’. Once engine is started, it turns ‘OFF’.
  2. It remains ‘ON’ for any engine related fault that may increase emission levels of the vehicle beyond the regulatory norms. Contact the TATA MO- TORS Authorized Dealer/Service Center for rectification.
 Check Engine Lamp  Amber Tata Punch User 2021 TELL TALES Manual 02
  1. The lamp comes on when ignition is switched ‘ON’. Once engine is started, it turns ‘OFF’.
  2. Illuminates continuously if a fault arises in Engine Management System. Contact the TATA MOTORS Authorized Dealer/Service Center.
  

Immobilizer (if avail- able)


Red

 Tata Punch User 2021 TELL TALES Manual 03
  1. The lamp comes on when the system disables the engine start if the original key is not used.
  2. Lamp blinks: Vehicle is in immobilized condition when key is not inserted.
  3. Lamp ON: Problem with key/system. Contact TATA MOTORS Authorized Dealer/Service Center
  4. Lamp OFF: Normal condition (Authenticated user) and engine will start.
  

Turn Signal


Green

 Tata Punch User 2021 TELL TALES Manual 04 Indicates direction indicated by the turn signal.While you operate the left/right turn indicator, the turn signal blinks along with the buzzer (when ignition is ‘ON’). The direction indicator arrow on the in- strument cluster flashes along with the selected external indicator lights. Both tell-tale lights will blink simultaneously when the hazard switch is pressed ir- respective of whether the ignition ON or OFF. A tick-tock sound will be heard in both cases.
Warning Lamps Color Indicator Remarks
High Beam Blue Tata Punch User 2021 TELL TALES Manual 05 The lamp comes on when the high beam headlamps are switched ‘ON’ or flashed.
 Low Oil Pressure indi- cator   

Red

Tata Punch User 2021 TELL TALES Manual 06
 
1.   The lamp comes on when ignition is switched ‘ON’ and goes ‘OFF’ once required engine oil pressure is developed after starting the engine.2.   If the low oil pressure indicator does not glow or remains ‘ON’ when the engine is running, it indicates a fault in the electrical circuit/lubrication system. Contact the nearest TATA MOTORS Authorized service center to rectify the issue.
  

Battery charging


Red

Tata Punch User 2021 TELL TALES Manual 07
  
The lamp comes on when ignition is switched ‘ON’. Once engine is started, it turns ‘OFF’.If it remains ‘ON’ while the engine is running, it indicates that the battery is not getting charged or having the lower charge. In such cases attempt to charge the battery 3000 engine rpm for 15 min and see if battery telltale goes off after one ignition ON-OFF. Even after 15 minutes, charging the battery telltale keeps ‘ON’ then switch off all unnecessary electrical equipment and contact the nearest TATA MOTORS Authorized service center.
 Airbag status  Red Tata Punch User 2021 TELL TALES Manual 08
The lamp comes on when ignition is switched ‘ON’ and goes ‘OFF’. If it continuously blinks then contact the TATA MOTORS Authorized Dealer/Service Center immediately.
Park Brake / Brake Fluid Low / EBD mal- function  Red Tata Punch User 2021 TELL TALES Manual 09 The lamp comes on momentarily when ignition is switched ‘ON’. Once park- ing brake is released, it turns ‘OFF’. If it remains ‘ON’, then it indicates:1.    Brake fluid level is low.

2.    EBD malfunctioning.

Warning Lamps Color Indicator Remarks
 Cruise Control lamp (if available)  Green Tata Punch User 2021 TELL TALES Manual 10 The lamp comes on when ignition is switched ‘ON’. Once engine is started, it turns ‘OFF’.The Cruise Control is used to indicate the status of cruise control system to the driver. If the lamp is on, it indicates that the cruise control feature is activated.


High Coolant Temperature


Red

 Tata Punch User 2021 TELL TALES Manual 11


The lamp comes on when ignition is switched ‘ON’. Once engine is started, it turns ‘OFF’.If the engine overheats due to higher coolant temperatures, this indicator blinks along with an audible buzzer. Contact your nearest TATA MOTORS authorized service Centre immediately. When the engine coolant temperature reaches the maximum limit, the tell-tale lights blink with a RED color and you will hear an audio warning.

Note: Do not remove the radiator pressure cap from the radiator when the engine is hot. Do not restart the engine until the problem has been duly at- tended.

 ABS  Amber Tata Punch User 2021 TELL TALES Manual 12 The ABS warning lamp in the instrument cluster lights up when the ignition is switched on. It goes off after 2-3 seconds if system is healthy.The lamp remains on if there is any malfunction in ABS. Normal braking system will be operational without assistance of ABS. Contact the TATA MO- TORS Authorized Dealer/Service Center immediately.
  

SPORT (if available)

 Tata Punch User 2021 TELL TALES Manual 13

Amber

 This symbol comes ON when SPORT driving mode is activated when more torque is required 

.

Warning Lamps Color Indicator Remarks
  

Low Fuel indicator


Amber


Tata Punch User 2021 TELL TALES Manual 14

The lamp comes on when ignition is switched ‘ON’. Once engine is started, it turns ‘OFF’.The symbol lights up continuously if fuel level in the tank is low. Fuel needs to be filled immediately.

Note: The tell-tale warning light will start flashing if there is any fault in the fuel system. Contact the nearest TATA MOTORS Authorized Dealer/Service Center immediately.


Driver Seat belt indicator


Red

Tata Punch User 2021 TELL TALES Manual 15  The driver seatbelt warning indicator remains ON, when ignition is turned ON.The warning lamp remains ON as long as the driver seatbelt is not fastened. If seatbelt remains unbuckled and vehicle goes above 15 kmph, then final audio warning will go on for 90 seconds.

Note: Once the seatbelt is fastened the buzzer and warning lamp turns OFF. Seatbelt reminder gets OFF when reverse gear is engaged.

Key Not Detected (if available)  Amber Tata Punch User 2021 TELL TALES Manual 16 This lamp comes on when the Valid Smart key is not detected inside the vehicle.
Press Clutch Pedal to Start Engine (if avail- able)  Amber Tata Punch User 2021 TELL TALES Manual 18 This lamp comes on with IGN ON till user presses the clutch pedal to start the engine.
Water in fuel indicator (Diesel)  Amber Tata Punch User 2021 TELL TALES Manual 19 The lamp remains on if excess water is accumulated in the fuel filter. When this lamp blinks along with chime contact the nearest TATA MOTORS Authorized Dealer/Service Center to drain the water immediately to avoid serin.


Warning Lamps Color Indicator Remarks
Tata Punch User 2021 TELL TALES Manual 20 opus damage to the fuel injection system.
Daytime running lamps DRL (if avail- able)  Green Tata Punch User 2021 TELL TALES Manual 21 The lamp comes on when ignition is switched ‘ON’. Once engine is started, it turns ‘OFF’.This lamp comes on when the Daytime Running lamp is ‘ON’.

Note: parking lamp should be on start the DRL lamp.


Door Ajar lamp (if available)


White / Red

Tata Punch User 2021 TELL TALES Manual 22    

All four door and Tail gate are indicated independently when the respective door or tail gate is open.


Front Passenger Seat belt indicator


Red

 Tata Punch User 2021 TELL TALES Manual 23 The co-driver seatbelt warning indicator turns ON when ignition is turned ON. If front passenger seat is occupied by adult, the warning lamp remains ON as long as the co-driver seatbelt is not fastened.If seatbelt remains unbuckled and vehicle goes above 15 kmph, then final audio warning will go on for 90 seconds.

Note: Once the seatbelt is fastened the buzzer and warning lamp turns OFF. Seatbelt reminder gets OFF when reverse gear is engaged.

 Speed limit warning indicator  Amber   When the vehicle speed crosses 80 kmph, then speed limit warning indicator turns ‘ON’ along with an audio chime for every two minutes (audible warn- ing).
Warning Lamps Color Indicator Remarks
If vehicle speed crosses 120 kmph, the speed limit warning indicator flashes along with an audio warning continuously, until the vehicle speed is above 120 kmph.If vehicle speed is between 80 kmph and 120 kmph, then the audio warning will become less frequent but the speed limit warning Indicator will remain ‘ON’ continuously. When the vehicle speed is reduced below 80 kmph, then the speed limit warning indicator and the audio warning will turn off.
 ECO (if available)  Green Tata Punch User 2021 TELL TALES Manual 24 The lamp comes on when ignition is switched ‘ON’. Once engine is started, it turns ‘OFF’.When ECO lamp is ON, it indicates the car is in ‘Economy’ drive mode, which helps to achieve a better fuel economy.
 CITY  White / Blue   The lamp comes on when ignition is switched ‘ON’. Once engine is started, it turns ‘OFF’.If CITY lamp is ON, it indicates ‘City’ drive mode, which helps to achieve optimum torque and fuel economy.


DPF (if available)


Amber


The DPF warning light or symbol switches ‘ON’ continuously to indicate that the DPF needs to eliminate the trapped pollutants (particulate matter) through the re-generation procedure. The warning light or symbol switch ‘ON’ only when driving conditions require the driver to be notified.DPF ‘ON’ does not indicate a malfunction.

To switch off the warning light or symbol, keep the car running on road until regeneration is complete (ideally at 3rd gear, 50-80 kmph, with engine speed over 2000 rpm).

The process normally takes about 20 minutes.

Warning Lamps Color Indicator Remarks
Tata Punch User 2021 TELL TALES Manual 09 The warning light or symbol remains off during the entire DPF regeneration procedureIf the procedure is not followed, MIL lamp will switch ON, along with DPF lamp on Instrument cluster.

Note: Please follow the above-recommended DPF regeneration procedure to avoid MIL lamp switch ‘ON’.

In case, MIL lamp switch ON, please contact nearest TATA authorized service center to restore DPF operation.

 EPAS  Amber   Illuminates momentarily when ignition is switched ‘ON’.Illuminates when there is a fault in the EPAS. Contact a TATA MOTORS Authorized Service Centre immediately.
 AMT Fault (If avail- able)  Amber Tata Punch User 2021 TELL TALES Manual 10 Illuminates momentarily when ignition is switched ‘ON’. Illuminates continuously when there is a fault in AutomaticManual Transmission system. Contact a TATA MOTORS authorized Service Centre immediately.

DASHBOARD AND FEATURES

2 Slow Wipe
Push the stalk towards position (2) for continuous slow wipe.

3 Fast Wipe
Push the stalk towards position (3) for a continuous fast wipe.

4 Flick Wipe (spring return)
Pull the stalk downwards and hold it for continuous wipe, the wiper continuously wipes across the wind-shield at low speed till the stalk is re-leased.

5 Front Windshield Washer
Pull the lever a little longer, to spray the washer fluid on the windshield.
The windshield wipers will operate for three cycles after the lever is released and for one more cycle after five seconds.

NOTE
When you crank the engine, the supply to the washer motor is momentarily cut off.

Auto Front Wipe
If your vehicle is fitted with rain and light sensor, the wipers will automatically wipe the windscreen, if it senses rainfall. Make sure that the wiper stalk is in Auto position. When you crank the engine, the supply to the washer motor is momentarily cut off.

6 Rear Wash And WipeTata Punch User 2021 Instantaneous Fuel Economy (IFE) Manual 10

Rear Windshield / Wiper And Washer (spring return)

Turn the rotary knob clockwise and release to operate rear windshield wash and wipe. The wind-shield wipers will operate for three cycles.

Rear Wipe

Turn the rotary knob counter clockwise such that it aligns its positions with arrow mark to operate rear windshield wiper continuously.

NOTE
Rear wiper will not work as long as tail-gate is open.

Read all Instructions for the TELL TALES User Guide

Tata Punch Electronic Steering Column Lock User Manual

Tata Punch 2021 Electronic Steering Column Lock User Manual

Electronic Steering Column Lock (ESCL) Chime

This feature informs the driver to rotate the steering wheel when ESCL gets engaged accidentally.

WIF (Water in fuel)/FFC(fuel Filter Clog ) Chime

If water is detected in fuel buzzer shall sound to alert you.

Amt Fault Reminder

If Fault occur in AMT, 3-second audio warning will alert you.

COMBI-SWITCH (RH Stalk) (if available)Electronic Steering Column Lock (ESCL) Chime 01

  1. Left Turn Signal
    Move the lever fully upward.
  2. Right Turn Signal
    Move the lever fully downward.
    NOTE
    When the turn is completed, the signal will cancel and the lever will return to its normal position.
  3. High Beam
    Move the lever forward to select the high beam function.
    Pull the lever back to normal for low beam.
  4. High Beam Flash (spring Return)
    To flash the high beam, pull the lever to-wards you from the normal position. It will return to its normal position when you re-lease it.
  5. Headlamp Rotary Switch
    OFF Position
    All lamps will remain ‘OFF’Electronic Steering Column Lock (ESCL) Chime 02Parking Lamp
    Rotate stalk to turn ‘ON’ the Parking lamps.Electronic Steering Column Lock (ESCL) Chime 03Low Beam
    Rotate stalk to turn ‘ON’ the Low Beam function.Electronic Steering Column Lock (ESCL) Chime 04Auto Light
    The headlights will be automatically switched ON depending on ambient light conditions (while entering a tunnel or when it is twilight).Electronic Steering Column Lock (ESCL) Chime 05
  6. Day Time Running Lamps (DRL
    Day time Running Lamps (DRL) are used to increase the visibility of the vehicle to other drivers during daytime.Electronic Steering Column Lock (ESCL) Chime 06

    1. To activate and deactivate DRL, keep the ignition switch is ‘ON’ position and switch the parking lamp ON-OFF twice.
    2. Activation and Deactivation of DRL can be done by DRL soft switch, which is available on the Infotainment Display.
  7. Lane Change Signal
    To signal a lane change, move the lever slightly up or down to the point where the turn signal light begins to flash for six times, but the lever does not latch. The turn signal will flash six times automatically.

HEADLAMP LEVELING ROTARY SWITCHElectronic Steering Column Lock (ESCL) Chime 07

Inner rotary switch on right hand stalk is provided for head lamp leveling. With the inner rotary switch, Head lamp leveling can be done with head lamp in Low Beam and in ‘ON’ position. Select correct position before start of trip, when the vehicle is stationary. Depending on the number of passengers and luggage in the vehicle headlamp focus may change. This can be adjusted by rotating the knob to one of the three level positions.

COMBI-SWITCH (LH Stalk) (if available)Electronic Steering Column Lock (ESCL) Chime 08

0 ‘off’ Position
The wiper is switched ‘OFF’.

  1. Intermittent Wipe
    Push the stalk upwards to operate intermittent wipe.Electronic Steering Column Lock (ESCL) Chime 09Inner rotary switch on left hand stalk is provided for intermittent front wiper delay. The switch has five delay timers. Push the stalk towards position (1) for single wipe.
  2. Slow Wipe
    Push the stalk towards position (2) for continuous slow wipe.
  3. Fast Wipe
    Push the stalk towards position (3) for con-tinuous fast wipe.
  4. Flick Wipe (spring return)
    Pull the stalk downwards and hold it for continuous wipe, the wiper continuously wipes across the wind-shield at low speed till the stalk is released.
    Electronic Steering Column Lock (ESCL) Chime 10
  5. Front Windshield Washer
    • Pull the lever little longer, to spray the washer fluid on the windshield.
      Electronic Steering Column Lock (ESCL) Chime 11
    • The windshield wipers will operate for three cycles after the lever is released and for one more cycle after five seconds.
      NOTE
      When you crank the engine, the supply to washer motor is momentarily cut off.
      Auto Front Wipe
      If your vehicle is fitted with rain and light sensor, the wipers will automatically wipe the windscreen, if it senses rainfall. Make sure that the wiper stalk is in Auto position.
      NOTE
      When you crank the engine, the supply to washer motor is momentarily cut off.
  6. Rear Wash And Wipe

Electronic Steering Column Lock (ESCL) Chime 12

Rear Windshield / Wiper And Washer (spring return)

Turn the rotary knob clockwiseElectronic Steering Column Lock (ESCL) Chime 13and release to operate rear windshield wash and wipe. The windshield wipers will operate for three cycles.

Rear Wipe

Turn the rotary knob counter clockwise Electronic Steering Column Lock (ESCL) Chime 14such that it aligns its positions with the arrow mark to operate the rear windshield wiper continuously.

NOTE
The rear wiper will not work as long as the tailgate is open.

Read all Instructions for Electronic Steering Column Lock User Guide

Tata Punch Rear Windshield User Manual

Tata Punch 2021 Rear Windshield User Manual

Rear Windshield

Turn the rotary knob counterElectronic Steering Column Lock (ESCL) Chime 13clockwise such that it aligns its positions with the arrow mark and hold it to operate rear windshield wash and wipe function. It will return to ‘Rear wipe’ position as soon as it is released and continues to wipe.

NOTE
When you reverse the car with front wipers in ‘ON’ condition, the rear wiper will also be ‘ON’ (if provided).

WARNING
If you operate wash and wipe function for more than 15 seconds the controller cuts off the supply to the washer motors to avoid overheating.

Rain light Sensor (if available)

The integrated rain and light sensor is mounted on front windshield glass to sense rain and light. As per the input from sensor, the wipe and light functions will work automatically.

DASHBOARD CONTROLS

Fascia switches are provided on driver side dashboard.Tata Punch User 2021 Rear Windshield Manual 01

  1. Front Fog lamp switch
  2. ECO mode
  3. Idle stop start switch (ISS)

Front Fog Lamps (if available)Tata Punch User 2021 Rear Windshield Manual 02

The front fog lamps are located on the front bumper. In poor visibility conditions due to fog, snow or rain, the fog lamps make visibility better and make it easier for other road users to see you. It turns to ‘ON’ when the fog lamp switch is turned on when the ignition is ‘ON’ and when the po-sition and parking/ head lamp is ‘ON’. An indicator on the instrument cluster will come on when the front fog light is ‘ON’.

Fog Lamp As Cornering Lamp

The front fog lamps also function as cornering lamps to light up the area to the side of the vehicle, making night-time parking and turning safer.

Eco Mode(if available)

Refer Starting and Driving section.

Idle Stop Start Switch (ISS) (if available)

Your car is equipped with push Button on right side of the dashboard to Enable OR Disable ISS function. For more details refer ‘starting & driving” section.

STEERING MOUNTED CONTROLS (LHS) (if available)Tata Punch User 2021 Rear Windshield Manual 03

  • Volume
    Press above switch to increase or decreaseTata Punch User 2021 Rear Windshield Manual 04volume of music system  radio.
  • Seek Forward backwardTata Punch User 2021 Rear Windshield Manual 05
    Press above switches to change radio channels.
  • Receive Calls/PTT (Push to Talk)Tata Punch User 2021 Rear Windshield Manual 06
    Press the above switches to accept incoming call when a cell phone is connected via Bluetooth.
  • Voice Recognition
    To start, press the voice activation button provided on the steering wheel. The system mutes/ pauses the currently played audio and you will hear a beep sound to indicate the activation of the voice recognition feature. The system displays the Voice Recognition screen on Infotainment to indicate activation of the feature.
  • NOTE
  • The system will start recognizing your voice command only after the beep. So, speak your command only after you hear the voice activation beep.
    For more information related to steering-mounted controls, refer the infotainment manual. ((Refer link –http://service.tatamotors.com/content/owners-manual )if applicable)
  • Mute phone RejectTata Punch User 2021 Rear Windshield Manual 07
    Press above switch to reject or hang up a phone call. It is also used to mute the volume of the music system/radio.
  • SourceTata Punch User 2021 Rear Windshield Manual 08
    Press above switches to select the required source in the infotainment system i.e. USB, AM, FM and Bluetooth.

STEERING MOUNTED CONTROLS (RHS) (if available)Tata Punch User 2021 Rear Windshield Manual 09

Instrumentation Controls(IC)

  1. Instrumentation Controls Scroll LH1. Instrumentation Controls Scroll LH
    Press above switch to scroll LH on Instrument Cluster display
  2. Instrumentation Controls Scroll RH
    Press above switch to scroll RH on Instrument Cluster display.
  3. OK / Select & Long Press for Settings Press the above switch to select the option and long press it (approx. three seconds) to go directly to the instrument cluster settings.
  4. Cruise Set (reset)Tata Punch User 2021 Rear Windshield Manual 07Using Speed Increase (decrease) Switch Press the cruise control master switch on steering wheel. Accelerate the vehicle to the desired speed.
    Make sure that the Clutch and Brake pedals are not pressed.

    • Press the ‘SET’Tata Punch User 2021 Rear Windshield Manual 08button on steering wheel switch to set the desired cruise speed. The cruise control indicator on instrument cluster will turn ‘ON’.
      Remove your foot from the accelerator pedal.
    • Once Cruise control is activated the vehicle automatically maintains the stored speed.

NOTE
Minimum gear and speed requirements for setting the cruise.

Changing the Set Cruise Speed

The set cruise speed can be adjusted using the buttons ‘+’ (to increase) or ‘-’ (to decrease) on the steering wheel. The speed increases and decreases on a single press.
The changed speed will be shown on the speedometer. Keeping the switch pressed increases or decreases the speed continuously till the switch is released or the maximum minimum speed limit for a particular gear is reached. The set speed can also be increased by pressing the accelerator pedal till the desired speed is achieved and then pressing the ‘SET’ button.
The set speed can also be decreased by pressing the brake pedal (The cruise indicator will turn OFF) and slowing down to desired speed and then pressing the ‘SET’ button (The cruise control indicator will turn ‘ON’ again).

Cruise Control Master Switch

Cruise speed can be resumed only if cruise control is deactivated by applying the brake. To resume the previously set cruise speed, accelerate the vehicle to a speed is as per gear selected as below:
3rd gear approx. 30Kmph to 80Kmph
4th gear approx. 40kmph to 120Kmph
5th gear approx. 50kmph to 140Kmph

Cruise Control Deactivating Switch
There are two ways to deactivate cruise control:

Applying brake clutch.
Press the deactivation switch on Steering Wheel.

NOTE
Minimum gear and speed requirements for setting the cruise.

NOTE
When the vehicle will come out of cruise automatically- when the threshold required.ment of required power and torque is not met, the vehicle might come out of cruise control and manual intervention might be required. It normally happens when the vehicle runs at a gradient and sharp turning with a slope.

NOTE
For more information related to steering-mounted controls, refer to the infotainment manual. ((Refer link –http://service.tatamotors.com/content/ownersmanual )if applicable)

Read all Instructions for Rear Windshield User Guide

Tata Punch INFOTAINMENT SYSTEM DISPLAY User Manual

2021 Tata Punch INFOTAINMENT SYSTEM DISPLAY

INFOTAINMENT SYSTEM DISPLAYTata Punch User 2021INFOTAINMENT SYSTEM DISPLAY Manual 01

Option IITata Punch User 2021INFOTAINMENT SYSTEM DISPLAY Manual 02

NOTE
For more information, refer infotainment manual.


Refer link 
https://cars.tatamotors.com/service/owners/owners-manual)
For a compatible list of phones,


Refer link:
https://cars.tatamotors.com/service/owners/phone-bluetooth-compatibility-with-car-infotainment-system

Master /force Reset Process

If your infotainment system touchscreen becomes unresponsive or shows some unusual behavior, then you can restart it to potentially resolve the issue. Follow some basic steps given below and you can restart the system.

To restart the infotainment system

  1. Park the vehicle.
  2. Hold the Steering wheel Mute button (long press) for more than 10 secs and then release the button as soon as the display goes blank.
  3. The step above will trigger the infotainment system restart procedure. Wait until the system restarts.
  4. When you Hold the Steering wheel Mute button for more than 15 sec, sys-tem aborts restart process and display turns ON.

NOTE
It is preferable to do one Ignition OFF to ON cycle after Master/Force reset to synchronize vehicle settings with the TATA Infotainment System.
If the reboot does not work or master/force resets are required on a weekly or daily basis, vehicle shall be taken to dealership. There, the dealer can update your firmware or inspect the system for hardware problem. Force/Master reset keeps the stored data, such as call history, text message information, and previously paired phones as it is.

SPEAKERS & TWEETER (if avail-able)Tata Punch User 2021INFOTAINMENT SYSTEM DISPLAY Manual 03

  1. Tweeter
  2. Speaker

Speakers and Tweeters are available in models with infotainment systems. Provisions are given for the music systems and speakers on versions without an infotainment systems.

USB PORT (if available)Tata Punch User 2021INFOTAINMENT SYSTEM DISPLAY Manual 04

Connect your pen drives to this socket for playing music tracks through the vehicle’s music system.

POWER SOCKET (if available)

The power socket will work when the ignition switch is in the “ACC” or “ON” position. This socket can be used to provide 12V (10A) power for electrical accessories.Tata Punch User 2021INFOTAINMENT SYSTEM DISPLAY Manual 05

For front passengerTata Punch User 2021INFOTAINMENT SYSTEM DISPLAY Manual 07

Antenna is located on the roof. Turn the antenna anticlockwise to remove it from the vehicle, if required.

NOTE
Please keep vehicle Antenna position in maximum upward direction to get good quality Tuner reception.

ROOF GRAB HANDLE Option ITata Punch User 2021INFOTAINMENT SYSTEM DISPLAY Manual 22

Option IITata Punch User 2021INFOTAINMENT SYSTEM DISPLAY Manual 09

Grab handles are installed on the roof for all seats except for the driver’s seat. These help the passengers to position them-selves comfortably during the journey.

ROOF LAMP

Interior roof lighting lamp is provided on the roof with inbuilt switch.Tata Punch User 2021INFOTAINMENT SYSTEM DISPLAY Manual 12

The switch has three positions:

ON – The lamp will turn ‘ON’ as long as the switch is in this position.

DOOR – In this position theTata Punch User 2021INFOTAINMENT SYSTEM DISPLAY Manual 13 lamp turns to ‘ON’ when either of the doors are opened. When the last door is closed, the lamp will turn ‘OFF’ with dimming. This helps settling in the seat and inserting the key in the ignition switch.
When the key is turned to the ‘IGN’ position, the lamp goes ‘OFF’ immediately.

OFF – In this position, the lampTata Punch User 2021INFOTAINMENT SYSTEM DISPLAY Manual 14will remain ‘OFF’.

BOOT LAMP (if available)Tata Punch User 2021INFOTAINMENT SYSTEM DISPLAY Manual 11

Boot lamp is provided in the rear luggage compartment to illuminate the luggage area.
It will switch on whenever any door or tail-gate is open.

FRONT LAMPTata Punch User 2021INFOTAINMENT SYSTEM DISPLAY Manual 14

  1. Position /Turn indicator lamp
  2. High beam lamp
  3. Front fog lamp (if available)
  4. Low beam lamp
  5. DRL (if available)

TAIL LAMPTata Punch User 2021INFOTAINMENT SYSTEM DISPLAY Manual 16

  1. Reverse lamp (on LH lamp only)
  2. Stop lamp
  3. Position lamp
  4. Turn indicator
  5. High mounted Stop Lamp (CHMSL)

STORAGE COMPARTMENTTata Punch User 2021INFOTAINMENT SYSTEM DISPLAY Manual 17

  1. Glove box
  2. Driver side coin box
  3. Utility pockets on front doors
  4. Utility pockets on rear doors
  5. Centre console
  6. Stowage for rear passenger
  7. Tailgate Compartment (Luggage)

Glove BoxTata Punch User 2021INFOTAINMENT SYSTEM DISPLAY Manual 21

Opening And Closing
To open – Pull the lever to open the glove box flap.
To close – Lift glove box flap until it engages.

Glove Box Illumination (if available)
The glove box lamp illuminates when the glove box flap is opened.

NOTE
Make sure that glove box flap is closed while driving.

Read all Instructions for INFOTAINMENT SYSTEM DISPLAY User Guide

Tata Punch Stowage Detail User Manual

Tata Punch 2021 Stowage Detail User Manual

Stowage Detail (if available)Tata Punch User 2021 Stowage Detail Manual1

The following items can be stowage in the glove box.

  1.  iPad
  2. Visiting card
  3. Pen holder
  4. Mobile Phone

Cooling Facility (if available)

On selected models glove box is provided with a cooling facility. It cools the glove box only when the front A/C is ON. Shut OFF the vent by rotating the knob, whenever cooling is not required.Tata Punch User 2021INFOTAINMENT SYSTEM DISPLAY Manual 20

Driver Side Coin Box

Stowage is provided on RH side of steering wheel for Coin, mobile and wallet.Tata Punch User 2021 Stowage Detail Manual 03

Utility Pockets On Front Doors

Utility pockets are provided on front doors and it can be used to keep following items.Tata Punch User 2021 Stowage Detail Manual 04

  1. Magazine/paper/books
  2. Suitable water bottle
  3. Umbrella

NOTE
Remove the water from the umbrella and fold it properly before storing it in the umbrella holder.

Utility Pockets On Rear Doors

Utility pockets are available on rear doors and it can be used to keep the following items.Tata Punch User 2021 Stowage Detail Manual 05

  1. Suitable water bottle
  2. Magazine/paper / books

Center Console

The following items can be stowage in the Center console.Tata Punch User 2021 Stowage Detail Manual 06

  • • Pen holder
    • Cup holder
    • Coin box

Cup Holder For Front Passenger

Space for cup holder are provided in centre console.Tata Punch User 2021 Stowage Detail Manual 07

Stowage For Rear Passenger (if available)

Stowage for the rear passenger is avail-able on rear side of floor console between the front passenger seats. It can be used to keep phone and small items.Tata Punch User 2021 Stowage Detail Manual 08

NOTE
Applicable for models where rear vents is not provided.

Tailgate Compartment (luggage)

Store the luggage in tailgate compartment. You can keep suitcase, bags, etc.Tata Punch User 2021 Stowage Detail Manual 09

Do not put any object on Luggage cover as it may obstruct driver’s rear visibility.Tata Punch User 2021 Stowage Detail Manual 10

WARNING

  1. Distribute the items of luggage as evenly as possible.
  2. Position heavy loads towards rear seat and low down in the trunk as possible.
  3. Do not allow occupants to travel in the luggage compartment.
  4. Do not place anything on luggage cover as it could obstruct driver’s rear view. Also in case of an accident or sudden braking, it could cause an injury to occupants.

NOTE
Luggage cover is designed only for hiding the luggage compartment.

HOOKS (if available)

Coat Hook
Coat hanger is provided for rear passenger on right side grab handle.Tata Punch User 2021 Stowage Detail Manual 11

NOTE

  • The coat hook is not designed to carry heavy objects or lug-gage items.
  • Do not hang hard, sharp-edged or fragile objects on the coat hook.

Collapsible HookTata Punch User 2021 Stowage Detail Manual 12

Collapsible hook is provided for hanging small carry bags etc.

NOTE
Do not use these hooks for securing luggage like using nets etc. in the boot.

Carrier HookTata Punch User 2021 Stowage Detail Manual 13

Carrier hook is provided for hanging small carry bags etc.

TAG HOLDER (if available)

Tag holder is provided near the front wind-shield for ease of displaying toll, parking tickets, ID’s, passes, labels etc.

FRONT SEAT BACK POCKETS (if available)Tata Punch User 2021 Stowage Detail Manual 14

Rear pockets are provided behind the front seats for keeping small magazines /Note-book etc.

AIR DISTRIBUTION

Air Distribution- The air is distributed through the vents in the passenger compartment as shown below:Tata Punch User 2021 AIR DISTRIBUTION Manual 01

AIR VENTS

Air vents are available on the dashboard. The direction of air flow can be adjusted using sliders on the respective vents.Tata Punch User 2021 AIR DISTRIBUTION Manual 02

Centre Air Vents (Front)Tata Punch User 2021 AIR DISTRIBUTION Manual 03

Side Air Vent (Front)

ELECTRONIC TEMPERATURE CONTROL (ETC) (if available)Tata Punch User 2021 AIR DISTRIBUTION Manual 04

  1. Air Distribution Mode -Center and side
  2. Air Distribution Mode- center, side and footwell
  3. Air Distribution Mode -footwell
  4. Blower Speed Control
  5. AC ON/OFF Switch
  6. Air Distribution Mode- defroster & footwell
  7. Max. Defrost button
  8. Fresh / Recirculation air mode
  9. OFF Switch

Air Distribution Mode -center And Sid
This is to select the air distribution pattern that directs air through the center and side air vents.

  1. Air Distribution Mode Center, Side, And Foot Well This is to select the air distribution pattern that directs air through the center and side and footwell air vents.
    Tata Punch User 2021 Stowage Detail Manual 15
  2. Air Distribution Mode -foot Well This is to select the air distribution pattern that directs air through the foot well air vent.
    Tata Punch User 2021 Stowage Detail Manual 16
  3. Blower Speed Control.
    Tata Punch User 2021 Stowage Detail Manual 17
  4. Press the Blower Speed control down button to decrease the blower speed and press the blower speed control up buttonTata Punch User 2021 Stowage Detail Manual 19for increasing the blower speed.

Read all Instructions for Stowage Detail User Guide

Tata Punch Ac On/off User Manual

Tata Punch 2021 Ac On/off User Manual

Ac On/off

Press the button to switch ON/OFF the AC. The indicator lamp in the button will light up when AC is ON.
tata Punch User 2021 Ac On/off Manual1

NOTE
The AC can be switched ‘ON’ only if the blower is ‘ON’ and engine is running.

When AC is switched ‘ON’, engine idling RPM increases marginally to adjust the AC compressor load.
When desired temperature is achieved Ac compressor will self-displace optimum refrigerant flow.

NOTE
Condensate may drip from the underside of the vehicle when it is in cooling mode. Traces of water on the ground are normal and are not a sign of leakage or malfunction. Ventilate the vehicle for a brief period during warm weather. This will speed up the cooling process and the desired vehicle interior temperature will be reached quickly.

  • Do not cover the air vents or air in-take grilles in the vehicle interior. If the AC is not used for a long period, such as during winter, it may not give the best performance when you start using it again. Operate the AC at least once a month to maintain optimum performance. While you start the vehicle after a long duration (more than 15 days), follow the procedure for better AC performance:
  • Start the vehicle and allow the engine to idle for 2-3 minutes. AC should be off in this period. Switch the AC on and run it for another 2~3 minutes while the engine idles. This circulates the refrigerant and oil to lubricate the internal parts of the air-conditioning system.

Air Distribution Mode- Defroster & Foot Well

This is to select the air distribution pattern directs air through the foot well air vent and also through defrost.ata Punch User 2021 Ac On off Manual02

Max. Defrost Button

This button directs the main airflow towards the windscreen for faster defrosting. (It also overrides any mode selection you may have made.)tata Punch User 2021 Ac On off Manual03

NOTE
For your safety make sure you have a clear view through all the windows before driving.
When “Air Distribution Mode – Defroster & Foot Well” or “Air distribution mode – Defroster” is pressed, system may switch on AC and move to fresh air for optimum demisting/defrosting

Fresh / Recirculation Air Mode

Press the switch to activate / deactivate air recirculation mode. Press to ‘ON’ or ‘OFF’tata Punch User 2021 Ac On off Manual05

Off Button

Press the OFF button to switch the system ‘OFF’.Tata Punch User 2021 Ac On off Manual04

FULLY AUTOMATIC TEMPERATURE CONTROL (FATC) (if avail-able)

FATC system controls the in-cabin temperature of the vehicle automatically and pro-vides maximum passenger convenience regardless of outside weather conditions.tata Punch User 2021 Ac On off Manual06

  1. Rear window demister button
  2. Maximum Defrost button
  3. Air Distribution mode – Defroster
  4.  Blower speed control down button
  5. Blower speed up control button
  6. Temperature control knob
  7. Auto ON selection button
  8. AC button
  9. Fresh Air / Recirculation button
  10. OFF button

Display Unit

FATC display is shown on main display screen.tata Punch User 2021 Ac On off Manual07

FATC functions can be controlled using both the FATC control panel and the touchscreen display.
Whenever the user presses any push button or turns the rotary knob, then the display unit will show the relevant Climate In-formation.
Also, when the display is not in climate mode then climate information will be displayed on the all-time display available on the top bar.

Fats Controls

Rear Window Demister Button

This button turns the rear windowTata Punch User 2021 Ac On off Manual08demister ON or OFF. The system will be deactivated after 15 min of continuous operation.

NOTE

Max Defrost Button

This button directs the main airflow towards windscreen tata Punch User 2021 Ac On off Manual03for faster defrosting. (It also overrides any mode selection you may have made.)
When you turn off the button, the system returns to its former settings.

NOTE
For your safety make sure you have a clear view through all the windows be-fore driving.

Read all Instructions for Ac On/off User Guide

Tata Punch Air Distribution Mode Button User Manual

2021 Tata Punch Air Distribution Mode Button Instruction

Air Distribution

In AUTO mode, the FATC system will regulate the mode automatically. However, user override is possible with the use of MODE button to select the desired airflow mode. Each time you press the MODE button, the display shows the mode selected.Tata Punch User 2021 Air Distribution Mode Button Manual 01

  1. Blower Speed Control Down ButtonTata Punch User 2021 AIR DISTRIBUTION Manual 06
    Press the Blower Speed control down button to decrease the blower speed.
  2. Blower Speed Control Up ButtonTata Punch User 2021 AIR DISTRIBUTION Manual 06
  3. Press the Blower Speed control up button to increase the blower speed.
  4. Temperature Control Knob

Tata Punch User 2021 AIR DISTRIBUTION Manual 05

Turning the temperature control knob clockwise increases the temperature of the air. The desired temperature will be in-creased by steps of 0.5ºC. User can select temperature range from 18ºC to 30ºC. Turning the knob in the anticlockwise direction reduces temperature. When you set the temperature to its lower limit (Lo) or its upper limit (Hi), the system runs at full cooling or heating only. It doesn’t regulate the interior temperature.

Auto On Selection ButtonTata Punch User 2021 AIR DISTRIBUTION Manual 07

To put the automatic climate control in fully automatic mode:

Press the ‘AUTO’ button.

  1. Set the desired temperature by turning temperature control knob. The display will show all the functions during ‘AUTO’ mode.
  2. The system automatically selects the proper mix of conditioned and  or heated air that will, as quickly as possible, raise or lower the interior temperature to your preference.
  3. When you set the temperature to its lower limit (Lo) or its upper limit (Hi), the system runs at full cooling or heating only. It does not regulate the interior temperature.
  4. of the climate control system when it is in fully automatic mode. All other features re-main automatically controlled. Making any manual selection causes the word ‘AUTO’ in the display to go OFF and the overridden setting is displayed. System will re-main in semiautomatic mode till ‘AUTO’ is pressed again.
    Ac ON/OFF Button

Press the AC ON/OFF button to turn the air conditioning ON or OFF. The AC icon activated on the display when the AC is ON.
Fresh Air  Recirculation Button

  1. When the recirculation button or LED is switched ‘ON’, air from the vehicle’s interior is sent throughout the system.
  2. When the recirculation button is switched to ‘OFF’, air from outside enters into the cabin (fresh mode). When-ever discomfort is felt, switch to fresh air mode.

NOTE
The outside air intakes for the climate control systems are at the base of wind-screen. Keep this area clear from leaves and other debris. Use recirculation mode for faster heating and cooling. However, keeping the system in recirculation mode – particularly when the AC is in OFF – can cause fogging of windows.

NOTE
When reverse gear is selected, air inlet may switch to recirculation mode if it is in fresh air mode, to prevent exhaust fumes from entering the cabin.

“OFF” Button OFF
Press the OFF button to switch the system ‘OFF’. OFF will be displayed on the infotainment screen.

Hvac Sensors
HVAC system is fitted with three sensors.

  1. A solar sensor on windshield glass at the top center.Tata Punch User 2021 AIR DISTRIBUTION Manual 08
  2. In-car sensor on HVAC control panel Outside Ambient Temperature (OAT)
    Tata Punch User 2021 AIR DISTRIBUTION Manual 09
  3. a sensor located under the front bumper grill.

NOTE

  1. Do not cover or spill any liquid on sensors.
  2. Do not cover sensor, this may cause the sensor to malfunction. This may lead to FATC not functioning to desired level.
Functions Settings Control Knob Posi- tion Button Position
(6) (7) (1) (2) (3) (4) (5) (8) (9)
Temperature Auto R e a r demister Maximum Defrost Air     distribu- tion B l o w e r Down Blower Up A/C Fresh air/ recir- culation
Normal heat- ing Desired Temp Auto OFF OFF Tata Punch User 2021 TELL TALES Manual 08 Desired Speed Desired Speed As      de- sired OFF
Quick heat- ing To the extreme right until temp ‘HI’  OFF  OFF  OFF Tata Punch User 2021 TELL TALES Manual 08  NA M      a      x speed  AC ON  OFF
Cooling Desired     Tem- perature Auto OFF OFF Tata Punch User 2021 TELL TALES Manual 08 Desired Speed Desired Speed AC ON ON
Quick Cool- ing To the extreme left until temp ‘LO’  OFF  OFF  OFF Tata Punch User 2021 TELL TALES Manual 08  NA M      a      x speed  AC ON  ON
Demisting To the right up, to the desired temperature  OFF  As Desired  ON Tata Punch User 2021 TELL TALES Manual 08 Desired speed Desired speed  AC ON  OFF
Defrosting To the right up, to the desired temperature  OFF  As Desired  ON Tata Punch User 2021 TELL TALES Manual 08  NA M      a      x speed  AC ON  OFF

Fully Automatic Temperature Control (FATC) Adjusted By Infotainment SystemTata Punch User 2021 Air Distribution Mode Button Manual 02

AC set in Auto modeTata Punch User 2021 Air Distribution Mode Button Manual 03

Blower SpeedTata Punch User 2021 Air Distribution Mode Button Manual 04

FATC settings on Head Unit

Read all Instructions for Air Distribution Mode Button User Guide

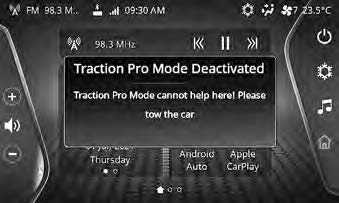
Tata Punch PRE DRIVING CHECKS User Manual

Tata Punch 2021 PRE DRIVING CHECKS User Manual

PRE DRIVING CHECKS

Make Sure That

  • Windshield, windows, mirrors, lights, and reflectors are clean and unobstructed.
  • Tool kit, jack & handle, warning triangle, owner’s manual, first aid kit and vehicle documents are available and stored at their locations.

WARNING
Do not put any mat on the floor carpet near control pedals area

  1. All doors, engine bonnet and tailgate are securely closed and latched.
  2. All occupants should always wear seat belts or suitable CRS as applicable while travelling.
  3. Objects, luggage or loads are secured correctly against slipping or tipping.
  4. The rear seat is securely latched.
  5. There is sufficient fuel for the trip.

Daily Check

  1. Tires for unusual wear, cracks or damage and embedded foreign material such as nails, stones, etc.
  2. Traces of fluid and oil below vehicle.
  3. Water dripping below the car is normal. This is due to the usage of air conditioning system.
  4. All lamps, wipers, wiper blades and horn for proper operation.
  5. All switches, gauges and telltales are working properly.
Adjust
  • Seats, head restraints and steering wheel position.
  • Adjust all the mirrors before you start the car.
Weekly Check
  1. Engine oil level
  2. Coolant level
  3. Brake fluid level
  4. Windshield washer fluid level
  5. Battery electrolyte level
  6. Fuel level

Tire pressure should always be measured in cold conditions. Do a check of the tire pressure and condition after every 15 days, including the pare tire.

DRIVING TIPS

Fuel consumption, engine, transmission, brake and tire wear are mainly affected by the below factors:

Operating conditions of your vehicle
Your personal driving style

Operating Conditions

Avoid frequent starts and stops as these actions increase the fuel consumption of the vehicle.
Always ensure correct tire pressure.
Do not carry any unnecessary weight.
Regularly service your vehicle and adhere to the recommended service maintenance schedule.

Personal Driving Style

  1. Do not press the accelerator pedal when starting the engine.
  2. Do not warm up the engine when the vehicle is stationary.
  3. Always adapt your driving style to suit the prevailing road, and weather conditions, and maintain a safe distance from the vehicle in front. Drive carefully.
  4. Avoid frequent, sudden acceleration and braking.
  5. Select appropriate gear according to varying speeds and load conditions.

NOTE
Do not rest your foot on the clutch pedal while driving.

  • Switch ‘OFF’ the engine in stationary traffic or at signals.
  • Keep an eye on the vehicle’s fuel consumption.
  • Safety systems are merely aids designed to assist driving. You are responsible for the distance between the vehicles in front, for vehicle speed and anticipating braking in good time.

WARNING
You could lose control of your vehicle if you try to adjust the driver’s seat, head restraint, mirror, steering wheel and fasten the seat belt while driving. There is a risk of an accident. Press the clutch fully while shifting the gears. The reverse gear should be engaged only when the vehicle is stationary. Trans-mission may get damage by trying to shift into re-verse gear while the vehicle is moving. Wait for 5 seconds after declutching to ensure smooth engagement of the reverse gear or shift into one of the forward gears for a moment while clutch is pressed fully. This will avoid grinding of re-verse gear while shifting.

Recommended Fuel Economy Speeds

Gear Petrol
Speed(kmph)
1 20
2 35
3 55
4 75
5 95

Good Driving Practices

  1. Slow down before you shift to a lower gear. This helps the engine to keep a lower rpm and result in less wear and tear of the engine components.
  2. Avoid frequent brake application which can cause overheating of brakes.
  3. Slow down the vehicle when you drive in cross winds to get better control over the vehicle.
  4. Avoid high speed when cornering or turning.
  5. Press the clutch fully while shifting gears.
  6. Make sure that vehicle is completely stationary before you attempt to shift in reverse gear.
  7. Drive slowly on wet roads.
  8. You can get extra braking from the engine by shifting to a lower gear. This can help you to maintain a safe speed and prevent your brakes from over-heating specially while going down a hill.

Tips For Obtaining Better Fuel Efficiency

  1. Always maintain the specified tire pressure during fuel top-ups and also before a long trip. Vehicle running with low tire pressure will consume more fuel than the one running with specified tire pressure.
  2. Keep the vehicle clean. Get rid of the unwanted stuff lying in the boot etc., to reduce weight.
  3. Regularly inspect your vehicle for any leakages, worn out wires, damaged by rat bites etc.
  4. Always follow periodic & regular serve.
  5.  In places with high dust content. Clean the air filter element at every 5000 km.
  6. Anticipate the road conditions and drive in a smooth manner.
  7. Do not accelerate excessively when you are in lower gears (1st or 2nd). Be gentle on the accelerator when you are in traffic. In lower gears, opening up the throttle will increase the engine rpm while keeping the vehicle at lower speeds. This reduces the fuel efficiency of the vehicle.
  8. Be in the maximum possible higher gear at a given speed. This reduces the engine operating speeds which means the engine is running at lower rpm (Revolutions per Minute) for the same vehicle speed. Lesser the number of engine revolutions lesser the fuel burned.
  9. Avoid harsh braking.
  10. Maintain healthy driving habits & while decelerating, do coasting in gear and not in neutral or with clutch pedal pressed.
  11. Use the car AC only when you require it. For cooling, keep the blower speeds low, as at higher blower speeds, the AC consumes more electric power which is ultimately drawn from the engine by burning fuel.
  12. Avoid unnecessary extra electrical loading on the car.
  13. Stop the engine wisely at traffic signals. Switch ‘OFF’ the engine at the traffic signal only if the stoppage time is high (typically more than 30 sec).
  14. When you drive on highways, close all the windows. This reduces the drag on the vehicle and improves fuel efficiency.
  15. Do not over speed. Follow the speed limits. With increasing speed, the engine rpm increases to overcome external air resistance and this reduces fuel efficiency.

Running-in Period
The purpose of running in a car is to give time for the mechanical parts to settle so that they work efficiently. This involves gentle acceleration and not revving the engine too much. This is done by changing gears early for the first 1,500 – 1,800 km. This will increase the life of the engine. The more you look after the engine when it is new, the more satisfied you will be with its performance in the future. Do not exceed the following road speeds during the running-in period.

Gear Petrol
Speed(kmph)
1 20
2 35
3 55
4 75
5 95

Avoid heavy loads, e.g. driving at full throttle, during this period. Change gears judiciously.

NOTE
Avoid excessive revving up of engine rpm. Do not keep the engine at idling for long duration.

SEAT ADJUSTMENTS

Front Seat Adjustments
Following seat adjustments can be carried out manually.Tata Punch User 2021 PRE DRIVING CHECKS Manual 01

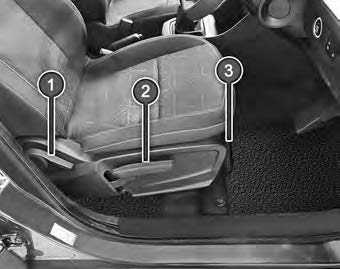
  1. Backrest recliner adjustment lever
  2. Seat height adjustment lever (if avail2. able)
  3. Seat forward rearward adjustment lever.

WARNING
Do not adjust the driver’s seat while driving. Adjusting the seat while driving could cause the driver to lose control of the vehicle.

Read all Instructions for PRE DRIVING CHECKSUser Guide

Tata Punch Seat Backrest Angle Adjustment User Manual

Tata Punch 2021 Seat Backrest Angle Adjustment User Manual

Seat Backrest Angle Adjustment

To change the seat backrest angle, lean forward slightly and pull up the lever (1). Adjust the seat backrest until it reaches a de-sired comfortable position. Make sure that the lever returns to its original position and seat is securely latched.

NOTE
Adjust the seat backrest until your arms are slightly angled when holding the steering wheel.

WARNING
Do not travel in a moving vehicle with the seat backrest in an excessively reclined position as this can be dangerous.

Seat Height Adjustment (if available)

To raise the seat, pull and continue pumping the lever (2) in the upward direction until the seat is at the desired height.
To lower the seat, pump the lever downward until the seat is at the desired height.

Seat Forward/rearward Adjustment

Lift lever (3) and slide the seat forward or to the rear. Release the lever and make sure that seat is securely latched.

NOTE
Adjust the driver seat position in such a way that the driver will be able to operate the control pedals comfortably.

Head Restraint (if available)

Adjust the head restraint so that it is as close to the head as possible and the center of the head restraint supports the back of the head at eye level. This will reduce the risk of injury to the head and neck in the event of an accident or similar situation.Tata Punch User 2021 Seat Backrest Angle Adjustment Manual 01

WARNING
Do not drive the vehicle without the seat head restraints. Head restraints are intended to help reduce injuries during an accident.Tata Punch User 2021 Seat Backrest Angle Adjustment Manual 02

Front Passenger Seat Sensor

An occupant detection sensor is installed in the front passenger seat to detect whether the seat is occupied or not and if occupied, it will activate the seat belt re-minder warnings. The sensor does not have any control on the deployment of airbags.

WARNING
Any modification in the seat material or addition of seat cover may damage or affect the performance of the sensor.

Rear SeatsTata Punch User 2021 Seat Backrest Angle Adjustment Manual 03

Rear seat folding

Rear Seat Folding (complete Seat 100%)Tata Punch User 2021 Seat Backrest Angle Adjustment Manual 04

To fold the seat:
Press the backrest release knobs provided on both sides at the same time.Tata Punch User 2021 Seat Backrest Angle Adjustment Manual 05

  • Fold the backrest seat forward. Move the driver and front passenger seat for-ward if necessary.

Tata Punch User 2021 Seat Backrest Angle Adjustment Manual 06

WARNING
If the rear bench seat and seat backrest are not latched properly, they could fold forwards during hard braking or in the event of a collision. The vehicle occupant would thereby be pushed into the seat belt by the rear bench seat or by the seat back-rest. The seat belt can no longer offer the intended level of protection and could even cause injuries. Objects or loads in the trunk cannot be restrained by the seat backrest. There is an increased risk of injury. Before every trip, make sure that the seat backrests and the rear bench seat/rear seat are engaged and securely latched.

REARVIEW MIRRORS

Inside Rear View Mirror (IRVM)
To adjust the mirror move the mirror up, down or sideways manually to obtain the best rear view.
When you drive at night, set the selector tab to select anti-glare mode (if available) to reduce glare from the headlights of vehicles behind you.Tata Punch User 2021 Seat Backrest Angle Adjustment Manual 07

NOTE
Use antiglare position only when necessary, as it reduces rear view clarity.

Outer Rear View Mirrors (ORVM)

You can adjust the outer rear view mirrors manually (By hand) or remotely by knob. Adjust the outside rear view mirrors to de-sired position.

NOTE
Objects visible in mirror are actually closer than they appear. Always make sure of the actual distance from the road users traveling behind by glancing over your shoulder.

Read all Instructions for Seat Backrest Angle Adjustment User Guide

Tata Punch Motorized ORVM Adjustment User Manual

Tata Punch 2021 Motorized ORVM Adjustment User Manual

Motorized ORVM AdjustmentTata Punch User 2021 Motorized ORVM Adjustment Manual 01

The switch to adjust the motorized mirrors is located on the driver’s door. You can ad-just the mirrors when the ignition switch is in the “ACC” or “ON” position.


To Adjust The Mirrors:

  1. Move the mirror selection switch to L (for left side) and R (for right side) to select the mirror you wish to ad-just.
  2. Use the four positions of the knob to adjust the rear view mirrors to required position.

Tata Punch User 2021 Motorized ORVM Adjustment Manual 02

ORVM FOLDING (as applicable)

Option 1: Manual Folding
ORVMs can be folded or unfolded manually. This is applicable only for vehicles which are not equipped with motorized folding provision.

Option 2: Auto Folding By Smart KeyTata Punch User 2021 Motorized ORVM Adjustment Manual 02

When you lock the vehicle, ORVMs will be folded automatically.
When you unlock the vehicle, ORVMs will be unfolded automatically.
In case to repeated usage, Mirror Folding/Un-folding will stop functioning and will be reactivated after delay of 2 mins. During that period avoid repeated pressing of Switch.

Option 3: Auto Folding By KnobTata Punch User 2021 Motorized ORVM Adjustment Manual 04

To fold / unfold the ORVMs, keep the Se-lector switch in center position (i.e. neither ‘L’ nor ‘R, position) and then toggle down. This will operate when the ignition switch is in the “ACC” or “ON” position.

 SUN VISORS (if available)Tata Punch User 2021 Motorized ORVM Adjustment Manual 05

The sun visors can be pulled down to block the glare coming through the wind-shield.
To block the glare from side windows, pull down the sun visor and release it from retainer. Swing the sun visor to the side.

Vanity Mirror (if available)

Vanity mirror is provided on the back of the front passenger side sun visor.

ELECTRIC POWER ASSISTED STEERING (EPAS)

Steering System is tuned in such a way that steering effort will slightly get heavy at high speed to have better control on vehicle whereas it will get lighter at low speed to reduce the driver effort in parking.
In EPAS system, the steering effort be-comes heavier as the vehicle speed in-creases and becomes lighter as the vehicle speed decreases for better control of the vehicle at different vehicle speeds.
If the engine is ‘OFF’ or if the EPAS system becomes inoperative, the vehicle still can be steered with more steering effort.
This EPAS system is available with the following assist features

  1. Speed sensitive assist control
  2. Active return control

NOTE
A click noise may be heard from the EPAS relay after the ignition switch is turned ON or OFF position.
The steering wheel may not un-lock normally in some cases when ignition key turned ‘ON’ or ‘ISS’ button pressed. If this happens, turn the steering wheel to the right or left slightly to unlock the steering wheel while turning the ignition key or pressing ISS button. Contact the nearest TATA authorized service center if in case of the above scenarios.

WARNING
Below are the symptoms of the system malfunction. Then, take your vehicle to the nearest TATA MOTORS service center and have the EPAS system checked as soon as possible.

  • The EPAS warning lamp illuminates.
  • EPAS motor noise may be heard when the vehicle is driven at low speeds.
  • If the EPAS system does not operate normally, the warning light will illuminate on the instrument cluster. The steering wheel rotation may be-come difficult to control or operate.

STEERING WHEEL ADJUSTMENTTata Punch User 2021 Motorized ORVM Adjustment Manual 05

You can adjust the steering wheel position to suit your convenience.
The Tilt lever is located offset to the steering column.

To Adjust The Steering Wheel

  1. Adjust the seat to a comfortable position.
  2. Push “Tilt lever” completely down to unlock the steering column.
  3. Adjust the steering wheel to the de-sired position.
  4. 4. Pull Tilt lever up completely to lock the steering column.
    5. Make sure that steering wheel is fixed at desired position by gently pushing the wheel in up & down direction.

NOTE
After adjustment, sometimes the lock Tilt lever may not lock the steering wheel.
It is not a malfunction; this occurs when there is mismatch in gear teeth engagement of tilt mechanism. In this case adjust the steering wheel again & then lock the Steering wheel.

NOTE
When adjusting the steering wheel, make sure that:

  • You can operate the control pedals without any obstacles.
  • You can see all the displays in the instrument cluster clearly.

WARNING
Before you start the car, make sure the steering wheel position is locked. Do not unlock or adjust the steering wheel while the vehicle is in motion.

NOTE
To prevent serious accidents, the steering effort may Increase suddenly in case if the operation of the EPAS system detects Malfunction during self diagnosis.
When steered for a prolonged period, the steering effort will increase to prevent overheating and damage to the steering system.

Read all Instructions for Motorized ORVM Adjustment User Guide

Tata Punch STEERING LOCK AND IGNITION SWITCH User Manual

Tata Punch 2021 STEERING LOCK AND IGNITION SWITCH

STEERING LOCK AND IGNITION SWITCH

Tata Punch User 2021 STEERING LOCK AND IGNITION SWITCH Manual 01The ignition switch has the following four positions:

LOCK 
This is the normal parking position. The key from the lock can be removed in this position only.

“LOCK”
position prevents normal use of the steering wheel after the key is removed.
To release the steering lock, put the key in the slot and turn it clockwise to one click (ACC).

ACC
Accessories such as the infotainment system can be operated, but the engine remains ‘OFF’. Steering gets unlocked.

ON
This is the normal operating position. All electrical systems are ‘ON’.

START
Turn the key further clockwise to the START position, (spring loaded) to start the engine. As soon as the engine starts, release the ignition key, which re-turns to ON position. While cranking, all accessories will be momentary ‘OFF’.

Illuminated Key Ring (if available)

When the vehicle is unlocked, the illuminated key ring glows. This helps to locate ignition switch in the dark.

STARTING AND STOPPING (with-out PEPS)

Starting The Engine
Make sure that parking brake is engaged and vehicle is in neutral gear.
Press the clutch pedal fully and crank the engine. Do not press the accelerator pedal when starting the engine.

NOTE
The Starter protection system fit-ted in this vehicle does not allow you to crank the engine until you fully press the clutch pedal.

Release the key as soon as the engine starts. Repeat if engine does not start.

NOTE
The Starter protection system switches off the starter when it is continuously cranked for more than 10 secs. In such a case, get the key back to ‘OFF’ position & wait for 30 secs.
For vehicle equipped with turbocharger, after you start the engine, run the engine at idle speed for 30 seconds. Do not press accelerator pedal while starting the engine to avoid damage to the turbocharger.

Starting Off

To start off, press the clutch pedal fully and shift into 1st gear.
After releasing the parking brake, gradually release the clutch and slowly press the accelerator.

NOTE
When shifting or starting off, do not race the engine. Racing the engine can shorten engine life and affect smooth shifting.

Stopping The Vehicle

For vehicle equipped with turbocharger, turn the key to ‘ACC’ position to switch off the engine. Before switching off the engine, run the engine at idle speed for 30 seconds and then switch off. This will allow the engine oil to lubricate the turbocharger, till its speed is fully reduced and also allow the unit to cool down.

WARNING
Do not switch off the ignition while driving.
For vehicle equipped with turbocharger, do not switch the engine off when it is running at high speed. This will lead to premature turbocharger bearing wear. If you switch off the ignition while driving, safety-relevant functions are only available with limitations, or not at all. This could affect the power steering and the brake boosting effect. You will require considerably more effort to steer and brake. There is a risk of an accident.

STARTING AND STOPPING (PEPS) (if available)

Engine Passive Start/stopTata Punch User 2021 STEERING LOCK AND IGNITION SWITCH Manual 02

Start/Stop switch is provided on the dash-board towards the right side of steering wheel.

Start/stop Button
The start/stop button or Push to Start But-ton is a main component of Passive (Engine) Start and Stop system. It is used to control ACC, IGN outputs as well as to start and stop the engine.

NOTE
If smart key is inside the vehicle and on pressing start stop switch, if start stop switch green LED blinks more than 10 sec. duration then contact authorized TATA MOTORS dealer. If ESCL (Electronic Column Steering Lock) is not unlocked properly, then vehicle doesn’t go into ACC mode.

Read all Instructions for STEERING LOCK AND IGNITION SWITCH User Guide

Tata Punch Backup Start User Manual

Tata Punch 2021 Backup Start User Manual

Backup Start

To start the engine when smart key battery voltage is low, the user needs to press start/stop button two times with an interval of 2.5 seconds after pressing the clutch with valid smart key near immobilizer antenna (on key symbol in Centre Console).Tata Punch User 2021 Backup Start Manual 01

Emergency Start

If the engine is switched from ON to OFF and start/stop button is pressed with clutch pressed within 5 seconds, engine gets cranked.

NOTE
If ESCL (Electronic Column Steering Lock) is not unlocked properly, then Engine will not get cranked.

ENGINE PASSIVE START – CONDITIONS

Single Press Start

  1. Bring the smart key with you and sit in the driver seat.
  2. Press the clutch pedal and then press the start/stop switch.
  3. Green colour LED on start/stop button will turn ON.
  4. Once engine is started successfully, the green colour LED on start/stop but-ton stays ON.

Two Step Start
Step 1

  1. Have the smart key with you and sit on the driver’s seat.
  2. Press the start/stop button without pressing clutch pedal.
  3. Amber colour LED on start/stop switch turns ON.
  4. Engine will remain OFF and all electrical equipment and infotainment system can be used. Steering is un-locked.

Step 2

  1. Press the clutch pedal and then press start/stop button to start the engine.
  2. Green colour LED on start/stop button will turn ON.
  3. Once engine start successfully, green colour LED on start/stop switch will re-main ON.

Three Step Start
Step 1

  1. Have the smart key with you and sit on the driver’s seat.
  2. Press the start/stop button without pressing clutch pedal.
  3. Amber colour LED on start/stop button will turn ON.
  4.  Limited information will be dis-played on instrument cluster and steering will be unlocked. Engine remains OFF.

Step 2

  1. Press the start/stop button without pressing clutch pedal again.
  2. Green colour LED on start/stop button will turn ON.
  3. Engine will remain OFF but all electrical equipment and infotainment system can be used.

Step 3

  1. Press the clutch pedal and then press start/stop button to start the engine.
  2. Green colour LED on start/stop button will turn ON.
  3. Once the engine is started success-fully, the green colour LED on start/stop button stays ON.

ENGINE PASSIVE STOP – CONDITIONS

Single Press Stop

  1. IGN is ON and engine is running.
  2. Press the start/stop button with or with-out clutch.
  3. ACC and IGN turns OFF.
  4. LED on start/stop switch turns OFF.

Single Long Press Stop

  1. IGN is ON and engine is running.
  2. Vehicle is in running condition i.e. wheel rpm >10 RPM or wheel sensor faulty.
  3. Press the start/stop button for more than three seconds.
  4. IGN returns OFF, ACC remains ON.
  5. Amber colour LED on start/stop switch turns ON.

WARNING
When vehicle is in OFF mode (ACC, IGN and Crank OFF) and user tries to lock the vehicle from outside by press ing any door handle switch and if PEPS detects that the smart key is left inside the vehicle, an audio warning/ chime is sounded.

NOTE
If clutch pedal is pressed for more than 3 minutes, then release the clutch/brake pedal and again press clutch/brake pedal with start stop button to crank the engine.

GEAR SHIFTINGTata Punch User 2021 Backup Start Manual 02

The gearshift pattern is as shown on the gear lever knob. Gear shifting should al-ways be done with the clutch pedal fully pressed.

NOTE
Gear recommendation is dis-played when the clutch pedal is fully re-leased.
If “F” is displayed in DIS of instrument cluster, it means ‘Fault’ condition. Contact TATA MOTORS Authorized Dealer/Service Center. Press the clutch fully when gear shifting. The reverse gear should be engaged only when the vehicle is stationary. Use the clutch only to shift gears and do not use it when vehicle is stationary on a slope, as the car will roll down due to gravity.
If all doors are closed when the vehicle is in ACC/IGN/RUN mode and if PEPS does not detect the smart key inside the car, then an audio warning is given. Do not rest your hand on the shift lever during driving; Pressure transmitted from your hand may result in premature wear of the transaxle internal gear shift mechanism.

Read all Instructions for Backup Start User Guide

Tata Punch REVERSE GEAR User Manual

Tata Punch 2021 REVERSE GEAR User Manual

REVERSE GEAR

To engage reverse gear, shift to reverse position as shown on the gear lever knob.Tata Punch User 2021 REVERSE GEAR Manual 01

DRIVING

Climbing Sharp Gradients On Loose Surfaces
Start off smoothly in a suitable gear. Accelerate smoothly so that there is no loss of traction by over-revving of the engine. Choose a smooth slope and select the appropriate gear so that gear changing in the middle of the climb is not required. Changing gears in the middle of the climb can cause loss of momentum and engine stalling. Shifting to lower gear has to be done cautiously to avoid loss of traction. Under no conditions should the vehicle be moved diagonally across a hill. The danger is in loss of traction and side-ways slip-page, possibly resulting in toppling over. If unavoidable, choose a mild angle and keep the vehicle moving. If the tires start to slip within few feet at the end of the climb, keep the vehicle stable by steering left and right. It gives in-creased grip to the tires. If the vehicle stalls or losses headway while climbing a steep hill, make a quick shift to reverse and allow the vehicle to move back with the help of engine braking.

Descending Sharp Gradients

Depending on the severity of the gradient, shift into appropriate gear. Use engine braking judiciously without over-revving the engine. Brake gently in such situations.

WARNING
When descending on sharp gradients, do not turn the ignition key to the ‘OFF’ position. The braking assist and steering assist may malfunction and the emission control system may be dam-aged.

AUTOMATED MANUAL TRANSMISSION (AMT) (If fitted)Tata Punch User 2021 REVERSE GEAR Manual 02

The transmission (AMT) Gearbox offers a choice of three driving modes:

  1. Automated mode with the gear lever in position ‘A’.
  2.  Manual mode with the gear lever in position ‘M’.

Starting

  1. Engage the parking brake firmly. Press Brake pedal.Tata Punch User 2021 REVERSE GEAR Manual 03
  2. Put the ignition ‘ON’
  3. While the brake pedal is pressed, bring the shifter lever to Neutral – ‘N’. Check ‘N on instrument cluster.

Crank to start the engine with the brake pedal still pressed.

NOTE
If push button is pressed with brake pedal is pressed and gear is in A mode, the vehicle will not start. It will start within 10 seconds if gear shifter is moved from A to N with the brake pedal continuously pressed.”

Stopping

The vehicle can be stopped by depressing the brake pedal regardless of the gear position. This is because the clutch is automatically disengaged to prevent the engine from stalling. If the gearshift lever is in the ‘A’ position, the gear will be down shifted to ‘1st’ when the vehicle stops. Also, if the gearshift lever is in the ‘M’ position, the gear will be down shifted to ‘1st’ when the vehicle stops.

NOTE
‘Auto’ mode will give optimum engine Torque and Power output. Drive the vehicle in ‘Auto’ mode to get max fuel economy. Exhaust fan in the engine compartment will remain ‘ON’ for a short while after IGN is switched ‘OFF’.

Gear Shifter Driving Modes NeutralTata Punch User 2021 REVERSE GEAR Manual 04

Vehicle is in neutral gear position. This will be indicated on instrument cluster.

WARNING
Always make sure to keep the gear shift lever in the “N” position, when the engine is running and vehicle is stationary.
Do not shift the lever in “N” position, even momentarily, when the vehicle is in motion.

ReverseTata Punch User 2021 REVERSE GEAR Manual 05

Reverse gear will be engaged only when vehicle is stationary and brake pedal pressed. An audio signal indicates when reverse gear is engaged. will be indicated on instrument cluster.

Auto ModeTata Punch User 2021 REVERSE GEAR Manual 06

Auto mode will be engaged only when vehicle is stationary and brake pedal pressed. An audio signal indicates when Automatic gear is engaged. will be indicated in instrument cluster. Gear Upshift and Downshift will be done automatically while driving.

Manual ModeTata Punch User 2021 REVERSE GEAR Manual 07

Shift gear lever to left for engaging manual mode. An audio signal indicates when manual mode is engaged. will be indicated in the instrument cluster.
In manual mode, driver should select the desired gear by shifting lever to,
+ Upshift the gears.
– Downshift the gears.

Push the gearshift lever to the ‘+’ direction and release it. Every time the lever is operated, upshifting takes place 1 step in the order of 1st > 2nd > 3rd > 4th > 5th gear. Pull the gearshift lever to the ‘–’ direction and release it. Every time the lever is operated, downshifting takes place in the order 5th > 4th > 3rd > 2nd > 1st gear.

NOTE
Down shifting of gear occurs automatically while braking engine rpm reduction. In manual mode, gears are not shifted automatically unless the engine RPM thresh-old is reached.

Creeping Feature

Creeping function allows the car movement without accelerator Pedal pressed when the brake pedal is released. This functionality is generally used in parking maneuvers, with 1st or ‘R’ gear engaged, in this situations the driver enters and exits from creeping just by pressing the Acc. pedal.  Creeping function will not operate when vehicle is in standstill condition on inclined surface.

  1. Creep feature is enabled for Manual as well as Auto Mode for first and reverse gear.
  2. After vehicle cranking and brake pedal released vehicle starts moving without pressing accelerator Pedal.
  3. Whenever accelerator pedal is pressed creep function will be dis-abled.
  4. Whenever driver door is opened and /or parking brake is engaged, creep function will be disabled.

Kick Down Feature

In Automatic mode, while driving at a constant speed if the accelerator pedal is quickly pressed the AMT downshifts the gear (if required). It ensures optimum ac-celebration to complete overtaking in mini-mal time.

Driving

  1. With the engine running and the brake pedal pressed, depending on your requirement shift the lever on R, D or M. Check the position engaged on the Instrument Cluster display.
  2. Release the parking brake.
  3. Release the brake pedal and press the accelerator pedal gently.

NOTE
Use right foot only to operate the brake or accelerator pedal. Do not operate the accelerator and brake pedal simultaneously. Do not use your left leg to operate the pedals while driving AMT vehicle.

NOTE
If displayed on the Instrument Cluster display, it means ‘Fault condition. Contact a TATA MOTORS Authorized Service Centre immediately.

Read all Instructions for REVERSE GEAR User Guide

Tata Punch Amt Instruction Sticker User Manual

Tata Punch 2021 Amt Instruction Sticker User Manual

Amt Instruction StickerTata Punch User 2021 Amt Instruction Sticker Manual 01

Parking

AMT does not have a parking position. The vehicle can be parked with the gearshift lever in any position.

  1. Apply the parking brake firmly.
  2. Press the brake pedal and shift the gearshift lever to the ‘R’ position on a downhill slope, or to the Auto ‘A’ mode or the ‘M’ position in the manual ‘M’ mode on an uphill slope or flat road and confirm the gear position by checking the gear position indicator on instrument cluster. Gear engagement (R or A) can be done with ignition ON/engine running condition only.
  3. Turn the key to ‘ACC’ position to switch off the engine. Before switching off the engine, run the engine in idle condition for at least 30 seconds and then switch off. This will allow the engine oil to lubricate the turbocharger, till its speed is fully reduced and also allow the unit to cool down.

WARNING
A quick burst on the accelerator before turning off the engine serves absolutely no practical purpose, it wastes fuel and is damaging especially to turbocharged engine.

WARNING
Do not switch the engine off when it is running at high speed. This will lead to premature turbocharger bearing wear.

NOTE
The AMT vehicle will shift itself into Neutral as a precautionary measure, if the vehicle is stationary and one or both of the front wheels spin on a low friction surface (e.g. Snow, mud, soft sand etc). AMT symbol will glow in the instrument cluster indicating an intervention from the Transmission Control Unit. Following steps need to be carried out sequentially in order to maneuver the vehicle in such a situation.

  1. Shift the gear shift lever to Neutral position and switch the ignition off.
  2. Press the brake pedal and crank the engine again.
  3. With the engine running, shift the gear position in Auto mode.
  4. March the vehicle with low input from the accelerator pedal as this will ensure that the wheels do not spin.

Driving (AMT)

Climbing Sharp Gradients
Apply the parking brake firmly so that the vehicle does not roll backwards.
Shift the gearshift lever to the “A” position while depressing the brake pedal. Make sure that the gear position indicator in the instrument cluster displays ‘1st’ gear.
Release the brake pedal and depress the accelerator pedal gradually, and when the vehicle starts to move, release the parking brake and depress the accelerator pedal to start off.
On climbing sharp gradients, never hold the vehicle at a stop using only the accelerator pedal or the creeping function. If you perform this operation for a certain period of time, this can also cause excessive damage to the clutch.

WARNING
Try not to hold the brake pedal down too long or too often while going down a steep or long hill.
This could cause the brakes to over-heat, resulting in reduced braking efficiency. Failure to take this precaution could result in loss of vehicle control.

Descending Sharp Gradients

Depress the brake pedal and shift the gear shift lever to the ‘A’ position. Make sure that the gear position indicator in the instrumental cluster displays ‘1st’ gear.
Release the brake pedal and depress the accelerator pedal slowly. Even if the accelerator pedal is not depressed, the clutch will be engaged when the vehicle speed increases.

WARNING
When descending on sharp gradients, NEVER turn the ignition key to the ‘OFF’ position. Emission control system damage may result.

STARTING THE ENGINE

  1. Make sure that parking brake is engaged and vehicle is in neutral gear.
  2. Press the clutch pedal fully and crank the engine. Do not press the accelerator pedal when starting the engine.
  3. Release the key as soon as the engine starts. Repeat if engine does not start.

WARNING
The engine emits poisonous exhaust gases such as carbon monoxide. Inhaling these exhaust gases leads to poisoning. There is a risk of serious health problems. Therefore, never leave the engine running in enclosed spaces without sufficient ventilation.

NOTE
After starting, run the engine in idle speed for at least 30 seconds. Do not press the accelerator pedal while starting the engine to avoid damage to the turbocharger.

Read all Instructions for Amt Instruction Sticker User Guide

Tata Punch BRAKING User Manual

Tata Punch 2021 BRAKING User Manual

BRAKING

Your vehicle has vacuum assisted brakes.
The distance needed to bring the vehicle to a halt increases with the speed of the vehicle. Start applying brake anticipating the distance and slow down gradually.

WARNING

  1. Do not use the brake pedal as a footrest.
  2. If you rest your foot on the brake pedal while driving, the braking system can overheat and cause fading of brake pads. This in-creases the stopping distance and can even cause the braking system to fail. There is a risk of an accident.
  3. Do not press the brake pedal and the accelerator pedal at the same time.
  4. Do not use the brake pedal as a footrest.
  5. If you rest your foot on the brake pedal while driving, the braking system can overheat and cause fading of brake pads. This in-creases the stopping distance and can even cause the braking system to fail. There is a risk of an accident.
  6. Do not press the brake pedal and the accelerator pedal at the same time.

If you have driven for a long time in heavy rain without braking, there may be a delayed reaction from the brakes when you brake for the first time. This may also occur after the vehicle has been washed.

Brake performance may become poor and unpredictable if brakes are wet.
After you drive through water or if you wash the underside of the vehicle, test the brakes at slow speeds to see if the brakes work fine. If the brakes are less effective than normal, dry them by repeatedly applying the brakes at slow speeds until the brakes have regained their normal effectiveness.
Check traffic conditions before doing the above activity.

Braking On Downhill Gradients

When you drive on downhill slopes, re-duce the load on the brakes by shifting to a lower gear. This is called as engine braking and aids to reduce overheating and wear of brakes.

WARNING
Do not shift to lower gears on a slippery road surface to in-crease the engine’s braking effect. By doing so, the tyres could lose their grip.
There is an increased danger of skidding and accidents.

DRIVE MODETata Punch User 2021 Amt Instruction Sticker Manual 02

Drive mode selection
These modes can be used to adjust engine characteristics and vehicle performance in line with desired requirement.
Drive mode selection switch is provided on center console for activation.
According Engine type the car is equipped with ‘City’ (Default) and ‘Eco’.
City is being default mode in each ignition cycle.

Drive Mode Performance
CITYTata Punch User 2021 Amt Instruction Sticker Manual 05 Increased engine Torque and Power output for BAL- ANCED performance
ECOTata Punch User 2021 Amt Instruction Sticker Manual 06 Optimum engine Torque and Power output for FUEL EFFICIENT performance

CURRENT GEAR INDICATION

The Driver Information display (DIS) in the Instrument Cluster indicates the current gear position engaged. or .

STARTING AND DRIVING GEAR RECOMMENDATION
Up or down arrow will be displayed in DIS, recommending whenever gear should be  shifted to up or downTata Punch User 2021 Amt Instruction Sticker Manual 07  or 3

IDLE STOP START (ISS) (if available)Tata Punch User 2021 Amt Instruction Sticker Manual 03

Idle Stop Start system is a Green Environment initiative.
Your vehicle is equipped with fuel saving ISS feature to shut off the engine to con-serve fuel and emit less carbon dioxide.Tata Punch User 2021 Amt Instruction Sticker Manual 04

Your vehicle is equipped with fuel saving ISS feature to shut off the engine to con-serve fuel and emit less carbon dioxide.

ISS function

Working
Starting the vehicle initially will be by conventional method (key start or push button start). When the vehicle is stationary and engine is idle (in a traffic light, traffic jam, toll gate, etc.) it will turn-off automatically. When the clutch pedal is pressed, the engine will restart automatically. Engine may also restart automatically without Clutch pedal press due to other preconditions which are captured below.

Read all Instructions for the BRAKING User Guide

Tata Punch Sequence Of Functions User Manual

Tata Punch 2021 Sequence Of Functions User Manual

Sequence Of Functions

  1. Vehicle started through Ignition key or Push button switch.
  2. Vehicle is in standstill and Engine is running.
  3. Vehicle moves forward and exceeds speed threshold values.
  4. When vehicle is to be stopped (scenario: Red signal), press the brake and then, press the clutch. The vehicle comes to a halt. Shift the gear to neutral and release the clutch. Engine will be automatically stopped.
  5. When you want to move (Scenario:
    Green signal), Press Clutch pedal to start.
  6. Engine will automatically start when Clutch is pressed fully.
    This system enables the ISS functions automatically when Ignition is turned ON. If you do not want to use this feature, you can switch it off by pressing the ISS OFF switch provided in the vehicle.

Tata Punch User 2021 Sequence Of Functions Manual 01

Following Conditions Will Prevent Iss Function Standby / Not Enabled 

  1. Engine hood (bonnet) is open
  2. Reverse Gear is engaged.
  3. Outside temperature is too low or too high
  4. Battery system is unhealthy
  5. Engine coolant temperature is too low
  6. Driver presence is not detected (Seat belt is not fastened)
  7. Driver door is open
  8. Any system fault

Warning light will be displayed on the instrument cluster to indicate the heathy status of this function.

Special Feature Of Automatic Restart

This system is equipped with a special feature of Automatic Restart. Under certain conditions, the Engine will automatically restart on its own in order to meet your Safety and Comfort requirements.
This can occur especially when the vehicle is standstill and following conditions occurred,

  1. Battery is being discharged too low.
  2. Vehicle started rolling forwards/ back-wards
  3. Brake has been pressed repeatedly for several times/brake Pressure too low
  4. When the Cabin temperature is too hot/too cold
  5. Defrost button is pressed

NOTE
Your vehicle is equipped with ISS function which may automatically Stop and Restart the engine. Do not panic and follow the messages on the display to understand the event.

  • Use an alternator that has been approved by Tata Motors. Otherwise, your ISS function may not work. Contact the nearest Tata Motors authorized dealer for alternator replacement.
  • ISS will be available only when the driver’s seat belt is fastened at all times. Use a battery that has been approved by Tata Motors. Otherwise, your ISS function may not work as intended. Contact nearest Tata Mo-tors authorized dealer for battery re-placement or any issues in the battery. ISS function may not be active when the Safety (For example: Seat Belt) and Comfort (Example: AC in high demand) conditions are not met. Do not panic and follow the messages on the display to understand the event. Do not remove the Battery Sensor from Battery. Removal of Battery sensor will result in loss of function. Function will be automatically restored when the vehicle is parked for a period of three hours.In the event of traffic, ISS function may work with delay in auto-stop which is intended logic.
  • Use a battery sensor that has been approved by Tata Motors. Otherwise, your ISS function may not work as intended. Contact nearest Tata Mo-tors authorized dealer for battery sensor replacement.
  • The engine will be automatically started again when the following safety conditions are met: driver presence, gear in neutral, bonnet and doors should be closed. In case if any of these criteria are not met, a message will pop-up on the screen to indicate the user to start the car manually. To fill up fuel, the engine must be stopped by turning OFF the ignition key / ISS button. Switch the engine off before you perform any operation in the engine compartment.

Frequently Asked Questions

  1. What are the advantages of this feature?
    This feature helps to reduce the fuel consumption, CO2 emission by automatically shutting down the Engine when the Vehicle is in standstill conditions like traffic signal, Traffic jam, etc.
  2. When the Vehicle is in Engine Idle stop start Phase, how can I start the Vehicle to move?
    Simply press the Clutch fully down to Start the Vehicle. No need to use Key / Push Start Switch.
  3. Can I start the Engine only by pressing the Clutch Pedal for the first time when I enter in Vehicle?
    No. Always the first start has to be through Ignition Key or Push button.
  4. How can I activate / deactivate this feature?
    This feature will be active as default when Ignition is ON. If you wish to switch it OFF, press the ISS switch.
  5. Whether AC will work when the Engine is in Idle stop start mode?
    No. AC function will not be available when the Engine is in Idle stop start mode. Only Blower will be functional.
  6. How to start the Engine if feeling too hot / too cold when Engine is in Idle stop start mode?
    In the event of higher temperature difference, Engine will automatically restart without any user input. As an alternate user can start the Vehicle by pressing the Clutch pedal fully.
  7. What will happen If press the Clutch continuously in traffic signals?
    System will not shut down the Engine automatically when the Clutch is pressed continuously.
  8. Whether I am allowed to crank the Vehicle normally when the system is in Idle stop start mode?
    Yes. You can perform the normal cranking by switching off and Switch ON the Ignition Key / Push button.
  9. Whether the vehicle will stop and restart when the Vehicle in Gear condition?
    No. Idle Stop and Start function will not work when the Gear level is not in Neutral.

Smart Alternator Management

Smart Alternator management (applicable if equipped with Intelligent Alternator Control feature) – a Green Environment initiative.
Your vehicle is equipped with fuel saving smart alternator management system to recuperate the brake energy to charge the Battery to help conserve fuel, CO2.

Working
When the Vehicle is running, if the acceleration demand is higher than threshold, smart alternator management system will allow the Battery discharge to reduce the load on the Engine.
When the Vehicle is in deceleration and the accelerator demand is lower than threshold, smart alternator management system recuperates the brake energy and charges the Battery.
Battery discharge and charge behavior is dynamic behavior during the Vehicle running.

Following Conditions Will Prevent Smart Alternator Function Standby / Not Enabled

  1. Head Lamp ON (Low / High)
  2. Battery System is unhealthy
  3. Any System fault.

Tata Punch User 2021 Sequence Of Functions Manual 02Read all Instructions for the Sequence Of Functions User Guide

Tata Punch Frequently Asked Questions User Manual

Tata Punch 2021 Frequently Asked Questions User Manual

Alternate Function

Frequently Asked Questions

  1. What are the advantages of this feature?
    This feature helps to reduce the fuel consumption, CO2 emission by automatically shutting down the Engine when the Vehicle is in standstill conditions like traffic signal, Traffic jam, etc.
  2. When the Vehicle is in Engine Idle stop start Phase, how can I start the Vehicle to move?
    Simply press the Clutch fully down to Start the Vehicle. No need to use Key / Push Start Switch.
  3. Can I start the Engine only by pressing the Clutch Pedal for the first time when I enter in Vehicle?
    No. Always the first start has to be through Ignition Key or Push button.
  4. How can I activate deactivate this feature?
    This feature will be active as default when Ignition is ON. If you wish to switch it OFF, press the ISS switch.
  5. Whether AC will work when the Engine is in Idle stop start mode?
    No. AC function will not be available when the Engine is in Idle stop start mode. Only Blower will be functional.
  6. How to start the Engine if feeling too hot  too cold when Engine is in Idle stop start mode?
    In the event of higher temperature difference, Engine will automatically restart without any user input. As an alternate user can start the Vehicle by pressing the Clutch pedal fully.
  7. What will happen If press the Clutch continuously in traffic signals?
    System will not shut down the Engine automatically when the Clutch is pressed continuously.
  8. Whether I am allowed to crank the Vehicle normally when the system is in Idle stop start mode?
    Yes. You can perform the normal cranking by switching off and Switch ON the Ignition Key  Push button.
  9. Whether the vehicle will stop and restart when the Vehicle in Gear condition?
    No. Idle Stop and Start function will not work when the Gear level is not in Neutral.
    Smart Alternator Management
    Smart Alternator management (applicable if equipped with Intelligent Alternator Con-trol feature) – a Green Environment initia-tive.
    Your vehicle is equipped with fuel saving smart alternator management system to recuperate the brake energy to charge the Battery to help conserve fuel, CO2.

Working

When the Vehicle is running, if the acceleration demand is higher than threshold, smart alternator management system will allow the Battery discharge to reduce the load on the Engine. When the Vehicle is in deceleration and the accelerator demand is lower than threshold, smart alternator management system recuperates the brake energy and charges the Battery. Battery discharge and charge behavior is dynamic behavior during the Vehicle running. Following Conditions Will Prevent Smart Alternator Function Standby Not Enabled.

  1. Head Lamp ON (Low / High)
  2. Battery System is unhealthy
  3. Any System fault.

Tata Punch User 2021 REVERSE GEAR Manual 08

Alternator function

Frequently Asked Questions

  1. What are the advantages of this feature?
    This feature helps to reduce the fuel consumption, CO2 emission by balancing the Battery discharge and charge during the Vehicle running.
  2. Do I need to adjust my driving pat-tern to enable this function?
    No. This smart function will automatically perform this smart alternator function and adjust to your driving pattern.
  3. Is there any issue to my Battery charging due to this function when I follow aggressive driving cycle?
    No. This smart function is capable enough to manage the Battery charging according to your drive cycle.
  4. Do I see any variation in my head lamp performance when the Battery charge discharge behavior which is dynamic?
    No. This smart function will accommodate the charge discharge behavior according to the head lamp status.
  5. Do I see any perceivable variation in my system function when this function executed?
    No. This smart function won’t create any functional issue to the vehicle system. You may see some difference in air flow of blower when it is in higher speed when this function is active. But this won’t affect the quality of the vehicle function.

WARNING
Deactivate the Idle Stop Start (ISS) function for any operation to be per-formed in the Engine compartment.

PARKING BRAKE

Mechanical parking brake acting on the rear wheels is provided on the vehicle.Tata Punch User 2021 REVERSE GEAR Manual 09

Parking brake applied

To apply the parking brake, pull the lever up fully. The parking brake tell-tale light comes on in the instrument cluster.Tata Punch User 2021 REVERSE GEAR Manual 10

Parking brake released

To release it, pull the lever up slightly, press the release button and push the lever down. The parking brake tell-tale in the instrument cluster will turn ‘OFF’ when the lever is fully released.

NOTE
Apply the parking brake properly before leaving the vehicle and release it before moving.

Read all Instructions for Frequently Asked Questions User Guide

Tata Punch VEHICLE PARKING User Manual

Tata Punch 2021 VEHICLE PARKING User Manual

VEHICLE PARKING

  1. Park the vehicle in a safe place. Switch on the indicator signal before turning to park.
  2. Apply the parking brake.
  3. Make sure that all window glasses are closed and all lamps are turned ‘OFF’.
  4. At night, put on the parking lights if required.
  5. Remove the key from the ignition switch and lock the vehicle.
  6. Use wheel chocks if the vehicle is parked on a slope.

NOTE
When parking on a downhill gradient, place the gear lever in the ‘Reverse’ position. While parking on up-hill gradient, place the gear lever in the ‘1st’ position.

WARNING
Never leave children unsupervised in parked vehicles. They could also operate the vehicle’s equipment. There is a risk of an accident and injury.

NOTE
Do not use the parking brake for braking unless unavoidable circumstances like when the service brake is not working properly. The braking distance is considerably longer and the wheels could lock. There is an increased danger of skidding and accidents.

REVERSE PARK ASSIST WITH SENSOR (if available)

The Reverse Park Assist system is an electronic parking aid that will assist you to park your vehicle safely when in reverse gear mode. It provides audio and visual information through the vehicle’s infotainment system. Always look out for kids, pets and elderly people behind the vehicle before reversing.Tata Punch User 2021 VEHICLE PARKING Manual 01

There are ultrasonic sensors placed on the rear bumper. Number of sensors may vary depending on the variant.
Once the system is activated, the sensors will detect how near the obstacle is from the bumper, and this information would be displayed on the vehicle’s infotainment system. In base variants, only audio warn-ing shall be given through a buzzer.

WARNING
Due to ultrasonic sensor technology limitations, detection of obstacles from 0-25 cm is not guaranteed.

Variant, where infotainment display is not present and audio warning, is given through a buzzer, on activating the Re-verse Park Assist system, a tone will be played within first two seconds to indicate the proper functioning of the system. After these two seconds, normal functioning of the system will continue. If no tone is heard for first two seconds, it shall mean that RPAS system is faulty. The owner should, in that case, go to the nearest dealer for rectification.

Park Assist Indications

In case reverse park assist system mal-functions, the following message may appear on the infotainment screen.

Reason for this fault may be :

  1. Park Assist Controller / Body Control Module Failure”
  2. Sensor Malfunction
  3. Partner component such as Reverse park assist system is failure.

Tata Punch User 2021 VEHICLE PARKING Manual 02

Operation
The reverse park assist system can also be activated manually through infotainment screen. Display will be seen on infotainment screen.

Reverse Park Assist Limitations
Reverse Park Assist system is not a collision avoiding system. It is solely the driver’s responsibility to park the vehicle safely.
Reverse Park Assist feature works on ultra sound echo technology, due to which performance is not guaranteed in following scenarios:

  1. If the object has a sharp edge surface, where surface may divert echoes from sensor reception.
  2. If object is mesh fence made up of thin wires, where echoes can’t be given by the surface.
  3. Fast moving objects passes in the sensor’s field of detection, where echoes are not processed by the system.
  4. If object is made/covered by foam or sponge or snow where ultrasonic sound signals are absorbed.
  5. Objects close to the rear bumper can go undetected by the Reverse Park Assist’s field of detection. Driver should use extreme caution while parking the vehicle.
  6. If height of the bumper is changed due to alteration to the suspension or other causes
  7. If the sensor areas are extremely hot from direct sunlight or cold due to freezing weather.
  8. If Sensors are covered by a hand, sticker, accessory, etc.
  9. If ultrasonic noise is present around Vehicle due to other vehicle sensors, horn, engine, air braking system (large vehicles), Exhaust Fans, Wireless transmitters or mobile phones
  10. If the vehicle speed exceeds 10kmph, the system will not warn you even though objects are detected, error message ‘Vehicle Speed is high, drive slowly!’ will appear.
  11. Driving on uneven road surfaces e.g. Gravel, unpaved roads, Artificial Speed Breakers, or gradient.
  12. Poles of square/rectangular cross section might not be detected

WARNING
Due to any reason, if the sensor gets misaligned or loses its intended fitment position, contact your dealer for referment.

NOTE
Turning the ignition ‘OFF’ ‘while the park assist feature is active would disable it.

Reverse Park Assist System Preventive Maintenance

  • Regularly clean the sensors and keep them free from dust, ice, mud, water, chewing gum etc. for proper working of the system.

Use a smooth cloth for cleaning.

  • Do not use water at high pressure for cleaning the sensor or camera.
  • Do not cover the sensors surface with any additional fitment. This will interrupt park assist performance.
  • Do not remove mud, snow on the sensors using stick or hard material. Use normal water and soft cloth.

General Warning 

  1. In low light conditions, the screen may darken or image may appear faint.
  2.  If the tire sizes are changed, the position of the fixed guidelines dis-played on the screen may change.
  3. In case of damage of the rear portion of the vehicle, Reverse Park Assist sensors position may change which causes wrong visual information on display. In case of damage make sure that Reverse Park Assist sensors are fitted properly at the intended location.
  4.  In case of uneven road conditions or uphill or downhill conditions, do not de-pend on Reverse Park Assist aid.
  5.  Do not apply any kind of force on the reverse park assist sensors.
  6. Always use rear view mirrors along with Reverse Park Assist for confirming the safety of the rear and the sur-rounding conditions.

Read all Instructions for the VEHICLE PARKING User Guide

Tata Punch REAR VIEW CAMERA User Manual

Tata Punch 2021 REAR VIEW CAMERA User Manual

REARVIEW CAMERATata Punch User 2021REAR VIEW CAMERA Manual 01

Rear View Camera is a visual reverse guiding system. When reversing or parking, make sure that there are no persons, animals or objects in the area where you are reversing.Tata Punch User 2021REAR VIEW CAMERA Manual 02

Display screen

Activation

Reverse gear
This system will start, if reverse gear is engaged, or park assist button (if available) is pressed or manual activation is done through Infotainment screen.

Deactivation

System will stop, if reverse gear is disengaged, or park assist button (if available) is pressed. If started through infotainment, the system can be stopped using a cross button on infotainment screen.

Understanding Guidelines IndicationTata Punch User 2021REAR VIEW CAMERA Manual 03

Green Line
You can safely reverse the vehicle, but be cautious if objects fall in this zone.

Yellow Line
You have to take utmost care if objects fall in this zone. However, the objects may not hit vehicle.

Red Line
Red line indicates that you have to stop re-versing the vehicle. If you still go back-wards, the car will hit the obstacle.

Do’s And Don’t
Mation may not be the actual rear view of the vehicle & system will warn with message ‘Tail Gate Open, Please close.

  • When the camera is operated under fluorescent lights, sodium light or mercury light etc., illuminated areas on the lens may appear to flicker in the dis-play.
  • Do not attach any advertisement or styling or any kind of stickers on top of camera. If this happens, camera can-not provide you the visual image and it may damage the camera.
  • Do not add any accessory, which will cause blockage to the camera’s field of view.

Cleaning Camera

  1. Due to environmental reasons like snow, dust, mud or fog may accumulate on the camera lens. So regularly clean the camera lens.
  2. Use water to clean the camera lens. Do not use extreme cold or hot water. Rapid changes in temperature may brittle the camera lens. Do not apply High Pressure water for cleaning.

  3. Wipe the camera lens with soft cloth.
  4. Do not use hard cloth or material to wipe the camera lens. This will cause scratches on the camera, and leads to deteriorated visual image on the dis-play.
  5. Do not apply organic solvent, car wax, window cleaner or glass coat to clean the camera. If this is applied, wipe it off as soon as possible.
  6. Do not apply heavy force on lens, while cleaning.
  7. Do not remove mud, snow on the cam-era lens using stick or hard material. Use normal water and soft cloth.

WARNING

  • The camera uses fish eye lens. So the size of the objects or in the dis-play may differ from the actual size and distances
  • In low light conditions, the screen may darken or image may appear faint.
  • If the tire sizes are changed, the position of the fixed guidelines dis-played on the screen may change.
  • During rainy conditions, image may get obscured. In such conditions, do not depend on camera view. The camera used in the vehicle, may not reproduce the same color of the real object.
  • In case of damage of the rear portion of the vehicle, camera position may change. Which causes wrong visual information on display. In case of damage, make sure that, camera is fitted properly at the in-tended location.
  • In case of uneven road conditions or up-hill or downhill conditions, do not depend on rear view camera park aid.
  • Do not apply any kind of force on the camera.
  • Always use rear View mirrors along with Rear View Camera for confirming the safety of the rear and the surrounding conditions.
  • High humidity and variation in ambient temperature may result into condensation inside the camera lens, which may further result into degradation of camera video feed on the screen. It is recommended that not to rely on camera video feed for parking assistance in such scenario. This phenomenon is temporary and will be automatically recovered with reduction in humidity and less variation in ambient temperature.
  • The area displayed by the rear view camera is limited. The camera does not display objects that are close to or below the bumper, underneath the vehicle, or objects out of the camera’s field of view. The area dis-played on the screen may vary ac-cording to vehicle orientation or road conditions.

Rear View Camera System Precautions

Area Displayed On Screen
The rearview camera system displays an image of the view from the bumper of the rear area of the vehicle.Tata Punch User 2021REAR VIEW CAMERA Manual 04Tata Punch User 2021REAR VIEW CAMERA Manual 05

  • The area displayed on the screen may vary according to vehicle orientation conditions.
  • Objects, which are close to either corner of the bumper or under the bumper, cannot be seen on the screen.
  • The camera may not display items that are located higher than the camera’s field of view.

Read all Instructions for REAR VIEW CAMERA User Guide

Tata Punch-Up Gradient Behind Vehicle User Manual

Tata Punch 2021 VEHICLE PARKING User Manual

VEHICLE PARKING

  1. Park the vehicle in a safe place. Switch on the indicator signal before turning to park.
  2. Apply the parking brake.
  3. Make sure that all window glasses are closed and all lamps are turned ‘OFF’.
  4. At night, put on the parking lights if required.
  5. Remove the key from the ignition switch and lock the vehicle.
  6. Use wheel chocks if the vehicle is parked on a slope.

NOTE
When parking on a downhill gradient, place the gear lever in the ‘Reverse’ position. While parking on up-hill gradient, place the gear lever in the ‘1st’ position.

WARNING
Never leave children unsupervised in parked vehicles. They could also operate the vehicle’s equipment. There is a risk of an accident and injury.

NOTE
Do not use the parking brake for braking unless unavoidable circumstances like when the service brake is not working properly. The braking distance is considerably longer and the wheels could lock. There is an increased danger of skidding and accidents.

REVERSE PARK ASSIST WITH SENSOR (if available)

The Reverse Park Assist system is an electronic parking aid that will assist you to park your vehicle safely when in reverse gear mode. It provides audio and visual information through the vehicle’s infotainment system. Always look out for kids, pets and elderly people behind the vehicle before reversing.Tata Punch User 2021 VEHICLE PARKING Manual 01

There are ultrasonic sensors placed on the rear bumper. Number of sensors may vary depending on the variant.
Once the system is activated, the sensors will detect how near the obstacle is from the bumper, and this information would be displayed on the vehicle’s infotainment system. In base variants, only audio warn-ing shall be given through a buzzer.

WARNING
Due to ultrasonic sensor technology limitations, detection of obstacles from 0-25 cm is not guaranteed.

Variant, where infotainment display is not present and audio warning, is given through a buzzer, on activating the Re-verse Park Assist system, a tone will be played within first two seconds to indicate the proper functioning of the system. After these two seconds, normal functioning of the system will continue. If no tone is heard for first two seconds, it shall mean that RPAS system is faulty. The owner should, in that case, go to the nearest dealer for rectification.

Park Assist Indications

In case reverse park assist system mal-functions, the following message may appear on the infotainment screen.

Reason for this fault may be :

  1. Park Assist Controller / Body Control Module Failure”
  2. Sensor Malfunction
  3. Partner component such as Reverse park assist system is failure.

Tata Punch User 2021 VEHICLE PARKING Manual 02

Operation
The reverse park assist system can also be activated manually through infotainment screen. Display will be seen on infotainment screen.

Reverse Park Assist Limitations
Reverse Park Assist system is not a collision avoiding system. It is solely the driver’s responsibility to park the vehicle safely.
Reverse Park Assist feature works on ultra sound echo technology, due to which performance is not guaranteed in following scenarios:

  1. If the object has a sharp edge surface, where surface may divert echoes from sensor reception.
  2. If object is mesh fence made up of thin wires, where echoes can’t be given by the surface.
  3. Fast moving objects passes in the sensor’s field of detection, where echoes are not processed by the system.
  4. If object is made/covered by foam or sponge or snow where ultrasonic sound signals are absorbed.
  5. Objects close to the rear bumper can go undetected by the Reverse Park Assist’s field of detection. Driver should use extreme caution while parking the vehicle.
  6. If height of the bumper is changed due to alteration to the suspension or other causes
  7. If the sensor areas are extremely hot from direct sunlight or cold due to freezing weather.
  8. If Sensors are covered by a hand, sticker, accessory, etc.
  9. If ultrasonic noise is present around Vehicle due to other vehicle sensors, horn, engine, air braking system (large vehicles), Exhaust Fans, Wireless transmitters or mobile phones
  10. If the vehicle speed exceeds 10kmph, the system will not warn you even though objects are detected, error message ‘Vehicle Speed is high, drive slowly!’ will appear.
  11. Driving on uneven road surfaces e.g. Gravel, unpaved roads, Artificial Speed Breakers, or gradient.
  12. Poles of square/rectangular cross section might not be detected

WARNING
Due to any reason, if the sensor gets misaligned or loses its intended fitment position, contact your dealer for referment.

NOTE
Turning the ignition ‘OFF’ ‘while the park assist feature is active would disable it.

Reverse Park Assist System Preventive Maintenance

  • Regularly clean the sensors and keep them free from dust, ice, mud, water, chewing gum etc. for proper working of the system.

Use a smooth cloth for cleaning.

  • Do not use water at high pressure for cleaning the sensor or camera.
  • Do not cover the sensors surface with any additional fitment. This will interrupt park assist performance.
  • Do not remove mud, snow on the sensors using stick or hard material. Use normal water and soft cloth.

General Warning 

  1. In low light conditions, the screen may darken or image may appear faint.
  2.  If the tire sizes are changed, the position of the fixed guidelines dis-played on the screen may change.
  3. In case of damage of the rear portion of the vehicle, Reverse Park Assist sensors position may change which causes wrong visual information on display. In case of damage make sure that Reverse Park Assist sensors are fitted properly at the intended location.
  4.  In case of uneven road conditions or uphill or downhill conditions, do not de-pend on Reverse Park Assist aid.
  5.  Do not apply any kind of force on the reverse park assist sensors.
  6. Always use rear view mirrors along with Reverse Park Assist for confirming the safety of the rear and the sur-rounding conditions.

Reference link:

Download link: https://cars.tatamotors.com/service/owners/owners-manual

Leave a Reply

Your email address will not be published. Required fields are marked *