
Subaru Impreza 2023 Fuses Base Sedan
Fuse protection is how the 2023 Subaru Impreza guards against harm from electrical surges and malfunctions to its electrical components. Fuses are tiny, swappable parts positioned thoughtfully throughout the electrical system of the car. Every fuse is made to “blow” or break if it senses an electrical overload, protecting linked components from harm. Every fuse in the Impreza’s fuse box, which is usually found in the engine compartment and another within the car, is associated with a particular electrical circuit or part. The seamless functioning of the car’s electrical systems depends on proper maintenance and sporadic fuse inspections, underscoring Subaru’s dedication to dependability and safety.
2024 Subaru Impreza Specs, Price, Features, Mileage (Brochure)
Fuses
CAUTION
Never replace a fuse with one having a higher rating or with material other than a fuse because serious damage or a fire could result.
NOTE
Fuse rating and using circuit are described on each behind the fuse box cover. The fuses are designed to melt during an overload to prevent damage to the wiring harness and electrical equipment. The fuses are located in two fuse boxes.
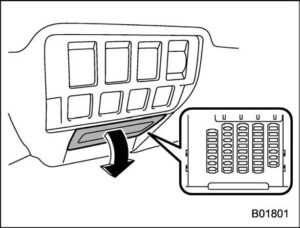
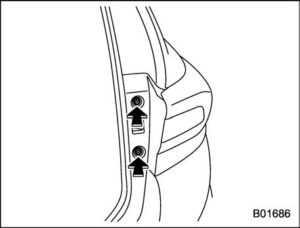
One is located under the instrument panel behind the fuse box cover on the driver’s seat side. To remove the cover, pull it out. One is located under the instrument panel behind the fuse box cover on the driver’s seat side. To remove the cover, pull it out.
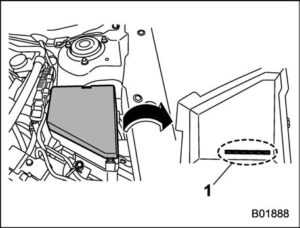
Spare fuses
The other one (main fuse box) is housed in the engine compartment. Also, the spare fuses are stored in the fuse box cover.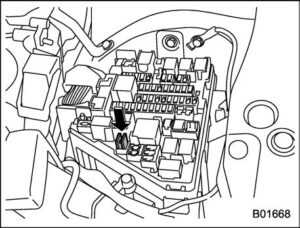
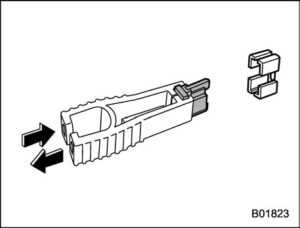
The fuse puller is stored in the main fuse box in the engine compartment. Pinch the upper part of the fuse puller when removing it from the main fuse box.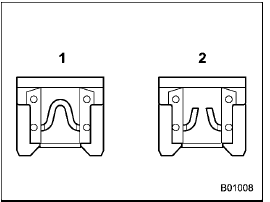
- Good
- Blown
If any lights, accessories, or other electrical controls do not operate, inspect the corresponding fuse. If a fuse has blown, replace it.
- Turn the ignition switch to the “LOCK”/ “OFF” position and turn off all electrical accessories.
- Remove the cover.
- Determine which fuse may be blown.
 Look at the back side of each fuse box cover.
 - Pull out the fuse with the fuse puller.
- Inspect the fuse. If it has blown, replace it with a spare fuse of the same rating.
- If the same fuse blows again, this indicates that its system has a problem. Contact your SUBARU dealer for repairs.
Installation of accessories
Always consult your SUBARU dealer before installing fog lights or any other electrical equipment in your vehicle. Such accessories may cause the electronic system to malfunction if they are incorrectly installed or if they are not suited for the vehicle.
Replacing bulbs
WARNING
Bulbs may become very hot while illuminated. Before replacing the bulbs, turn off the lights and wait until the bulbs cool down. Otherwise, there is a risk of sustaining a burn injury.
CAUTION
Replace any bulb only with a new bulb of the specified wattage. Using a bulb of different wattage could result in a fire.
NOTE
For models with type B combination meter, if SRH is malfunctioning, the SRH OFF indicator light appears on the combination meter when the ignition switch is in the “ON” position. It indicates that SRH has been deactivated. Contact a SUBARU dealer for an inspection.
Headlights (models with LED headlights)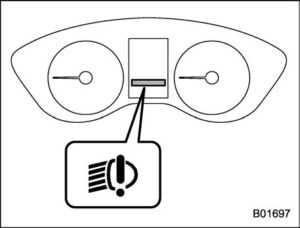
LED headlight warning light (type B)
The LED headlight warning light illuminates if the LED headlights malfunction. Have your vehicle inspected at a SUBARU dealer as soon as possible.
Headlights (models with halogen headlights)
Halogen headlight bulbs become very hot while in use. If you touch the bulb surface with bare hands or greasy gloves, fingerprints or grease on the bulb surface will develop into hot spots, causing the bulb to break. If there are fingerprints or grease on the bulb surface, wipe them away with a soft cloth moistened with alcohol.
NOTE
- If headlight aiming is required, consult your SUBARU dealer for proper adjustment of the headlight aim.
- It may be difficult to replace the bulbs. Have the bulbs been replaced by your SUBARU dealer if necessary?
Perform the following steps to replace the bulbs.
- Use a screwdriver to undo the clips on the air intake duct, then remove the air intake duct.
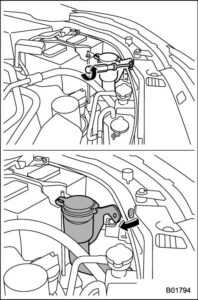 Left-hand side
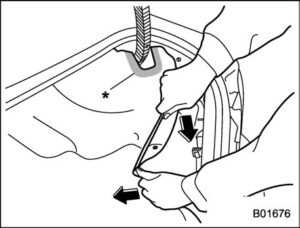
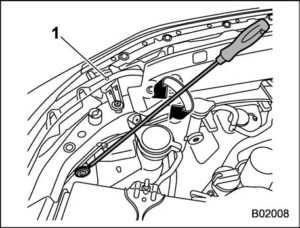
 - Use a screwdriver to remove the secured clip of the washer tank. To make it easy to access the bulb, turn the neck of the washer fluid filler pipe as illustrated.
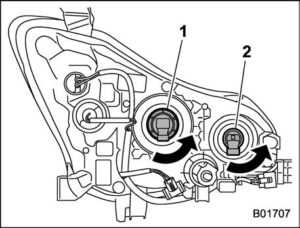
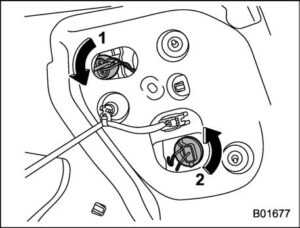
- Low beam bulb
- High beam bulb
- Disconnect the electrical connector from the bulb and remove the bulb from the headlight assembly by turning it counterclockwise.
- Replace the bulb with a new one. At this time, use care not to touch the bulb surface.
- To install the bulb to the headlight assembly, turn it clockwise until it clicks.
- Reconnect the electrical connector.
- Install the air intake duct with clips (right-hand side).
- Set the washer fluid filler pipe to the original place and secure it by clip (left-hand side).
Front turn signal light
It may be difficult to replace the bulbs. Have the bulbs replaced by your SUBARU dealer if necessary.
Parking light
It may be difficult to replace the bulbs. Have the bulbs replaced by your SUBARU dealer if necessary.
Front fog light (if equipped)
It may be difficult to replace the bulbs. Have the bulbs replaced by your SUBARU dealer if necessary.
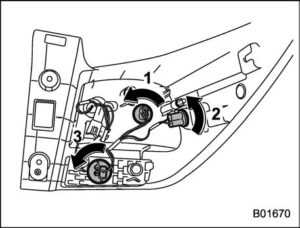
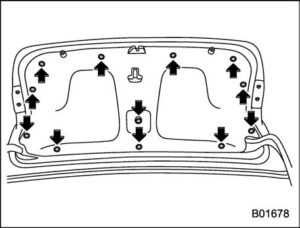
Rear combination lights Sedan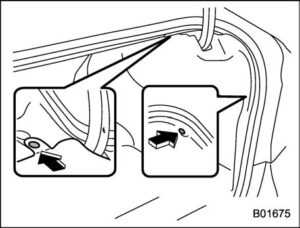
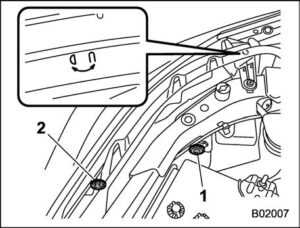
- Remove the clips from the trunk trim with a flat-head screwdriver.
- Open the rear portion of the trunk trim panel as illustrated.
NOTE
Make sure that the part of the trunk trim in the illustration does not contact the trunk lid stay. If the “*” part is bent, the trunk trim may be torn.
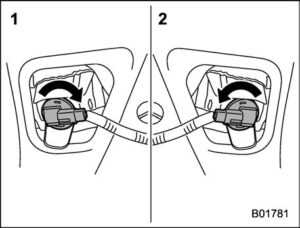
- Tail and rear side marker light
- Rear turn signal light
- Remove the bulb socket from the rear combination light assembly by turning it counterclockwise.
- Pull the bulb out of the bulb socket and replace it with a new one.
- Set the bulb socket into the rear combination light assembly and turn it clockwise until it locks.
- Secure the rear trunk trim panel with the clips.
door models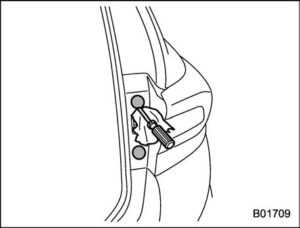
- Remove the covers.
- Using a Phillips screwdriver, remove the upper and lower screws that secure the rear combination light assembly.
- Slide the rear combination light assembly rearward and remove it from the vehicle.
- Tail light
- Rear side marker light
- Rear turn signal light
- Remove the bulb socket from the rear combination light assembly by turning it counterclockwise.
- Pull the bulb out of the bulb socket and replace it with a new one.
- Set the bulb socket into the rear combination light assembly and turn it clockwise until it locks.
- Guide pins
- Catches
- Clips
- Put the rear combination light assembly into place while aligning the 2 guide pins and catches with the guide holes and clips on the vehicle.
- Tighten the upper and lower screws.
- Reinstall the covers.
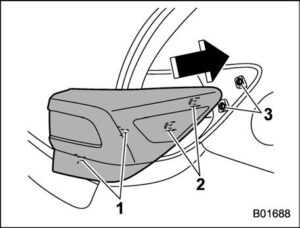
Backup light! Sedan
It may be difficult to replace the bulbs. We recommend that you have the bulbs replaced by your SUBARU dealer if necessary.
- Open the trunk.
- Remove the trunk trim lining by removing the clips indicated in the illustration.
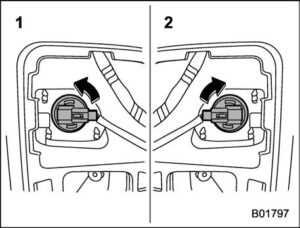
- Left side light
- Right side light
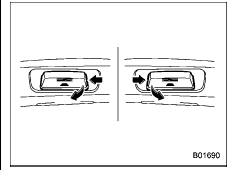
- For left side light, turn the bulb socket clockwise and remove it.
For right side light, turn the bulb socket counterclockwise and remove it. - Pull the bulb out of the bulb socket and replace it with a new one.
- For left side light, turn the bulb socket counterclockwise and install it.
For right side light, turn the bulb socket clockwise and install it. - Reinstall the trunk trim lining.
Door models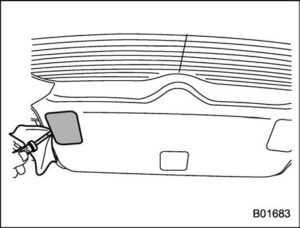
- Apply a flat-head screwdriver to the light cover as shown in the illustration, and pry the light cover off from the rear gate trim.
- Right side light
- Left side light
- For left side light, turn the bulb socket clockwise and remove it.
For right side light, turn the bulb socket counterclockwise and remove it.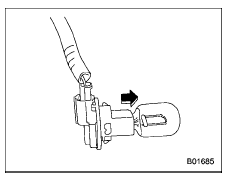
- Pull the bulb out of the bulb socket and replace it with a new one.
- For left side light, turn the bulb socket counterclockwise and install it.
For right side light, turn the bulb socket clockwise and install it. - Install the light cover on the rear gate.
License plate light
Sedan
- Open the trunk and remove the clips from the trunk lid trim with a flat-head screwdriver.
- Turn the bulb socket counterclockwise and pull out the socket.
- Pull the bulb out of the socket.
- Install a new bulb.
- Reinstall the bulb socket and the trunk lid trim.
Map light
Replacing the bulb could cause burns since the bulb may be very hot. Has the bulb been replaced by your SUBARU dealer?
Vanity mirror light (if equipped)
Replacing the bulb could cause burns since the bulb may be very hot. Have the bulb been replaced by your SUBARU dealer?
Dome light (all models) and cargo area light (5-door models)
Cargo area light
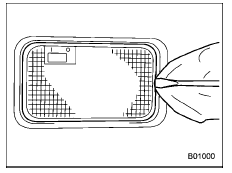
- Remove the lens by prying the edge of the lens with a flat-head screwdriver.
- Pull the bulb out of the socket.
- Install a new bulb.
- Reinstall the lens.
Trunk light (sedan)
Replacing the bulb could cause burns since the bulb may be very hot. Has the bulb been replaced by your SUBARU dealer?
Other bulbs
It may be difficult to replace the bulbs. Have the bulbs been replaced by your SUBARU dealer if necessary?
Adjusting headlight aim (models with LED headlights)
- Adjustment screw A
- Adjustment screw B
Before checking the headlight aiming
- Make sure the vehicle has a full tank of gasoline and the area around the headlight is not deformed.
- Park the vehicle on level ground.
- Sit in the driver’s seat.
- Bounce the vehicle several times.
Headlight aim adjustment
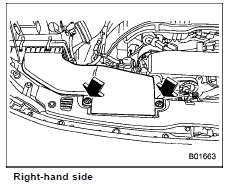
Right-hand side
- Use a screwdriver to undo the clips on the air intake duct, and then remove the air intake duct (right-hand side).
- Adjustment direction mark
- Turn screw A clockwise or counter-clockwise to adjust it.
Remember the direction of the rotation and the number of rotations.

- Turn screw B the same number of turns and in the same direction as step 2.
NOTE
If the headlight aim cannot be adjusted, contact your SUBARU dealer. To inspect the headlight aim position, consult a SUBARU dealer.
FAQ
What is the purpose of fuses in the 2023 Subaru Impreza?
Fuses in the Impreza protect its electrical components from damage by breaking or “blowing” if there’s an electrical overload.
Where are the fuses typically located in the Impreza?
The Impreza usually has two fuse boxes: one in the engine compartment and another in the interior, often near the driver’s side.
How do I identify which fuse corresponds to a specific electrical component?
The fuse box cover typically includes a diagram that identifies each fuse and its corresponding circuit. The owner’s manual also provides this information.
Can I visually determine if a fuse is blown in the Impreza?
Yes, you can often visually inspect a fuse to check if it’s blown. If the metal wire inside the fuse is broken or melted, it needs to be replaced.
What should I do if I suspect a blown fuse in the Impreza?
If you suspect a blown fuse, consult the owner’s manual or fuse box diagram to identify the affected circuit and replace the fuse with one of the same amperage rating.
Can I use a higher-amp fuse to replace a blown one in the Impreza?
It’s not recommended to use a higher-amp fuse, as it can potentially damage the electrical components and wiring. Always replace a fuse with one of the same amperage rating.
Are spare fuses typically provided in the Impreza’s fuse box?
Some Impreza models may include spare fuses in the fuse box, but it’s a good practice to keep spare fuses of various amperage ratings on hand.
How can I prevent blown fuses in the Impreza?
To prevent blown fuses, avoid overloading electrical circuits, use the correct amperage-rated fuses, and address any electrical issues promptly.
What are the most common reasons for blown fuses in the Impreza?
Common reasons include overloading a circuit, short circuits, faulty electrical components, or issues with aftermarket accessories.
Does Subaru provide any specific guidelines for fuse replacement and maintenance?
Subaru typically includes instructions for fuse replacement and maintenance in the owner’s manual.
How often should I check the fuses in the Impreza?
Regularly inspect the fuses during routine maintenance or if you encounter electrical problems. An annual check is a good practice.
Are there any special precautions when working with fuses in the Impreza?
Always disconnect the vehicle’s battery before working with fuses to prevent electrical shock or damage.
Can I add additional fuses or fuse taps in the Impreza for aftermarket accessories?
You can add additional fuses and fuse taps for aftermarket accessories, but it’s crucial to do so properly to avoid overloading circuits or causing electrical issues.
Is the Impreza’s fuse system covered under the vehicle’s warranty?
The fuse system itself is not typically covered under the vehicle’s warranty, but fuses are inexpensive and easily replaceable.
Are there any specific safety features related to fuses in the Impreza?
Fuses play a crucial role in safety by protecting against electrical faults that could lead to malfunctions or even fires.
Useful Link
View Full User Guide: Subaru Impreza 2023 Base Sedan User Guide
Download Manuals: https://www.subaru.com/owners/vehicle-resources/manuals.html
2024 Subaru Impreza Specs, Price, Features, Mileage (Brochure)