
Suzuki New CARRY 2019 Raising Vehicle with Garage Jack User Manual
Raising Vehicle with Garage Jack
- Apply the garage jack to one of the points as shown in the illustration.
- Always support the raised vehicle with jack stands (commercially available) at the points as shown in the illustration.
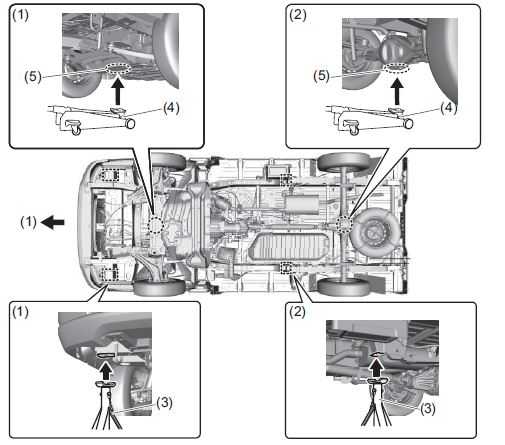
- Front
- Rear
- Jack stand
- Garage jack
- Jacking point for garage jack
NOTICE
Never apply a garage jack to the exhaust pipe or engine undercover and rear torsion beam.
NOTE:
For more details, please contact a SUZUKI dealer or a qualified workshop.
Changing Wheels
To change a wheel, use the following procedure:
- Remove the jack, tools, and spare
- Loosen, but do not remove the wheel nuts.
- Jack up the vehicle (follow the jacking instructions in this section).
WARNING
Shift into “R” (Reverse) when you jack up the vehicle.
Never jack up the vehicle with the transmission in “N” (Neutral). Otherwise, an unstable jack may cause an accident.
Remove the wheel nuts and wheel.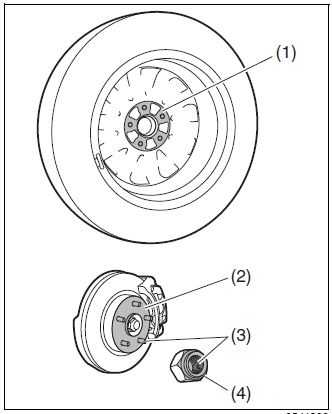
- Clean any mud or dirt off from the surface of the wheel (1), hub (2), thread part (3) and surface of the wheel nuts with a clean cloth. Clean the hub carefully; it may be hot from driving.
- Install the new wheel and replace the wheel nuts with their cone-shaped end facing the wheel. Tighten each nut snugly by hand until the wheel is securely seated on the hub.
Tightening torque for wheel nuts 90 Nm (9.2 kg-m, 66.5 lb ft)
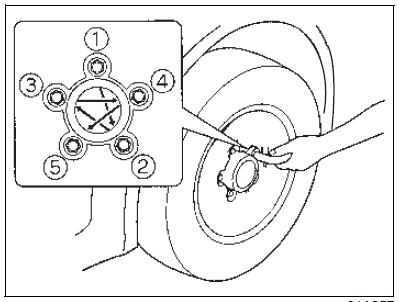
Lower the jack and fully tighten the nuts with a wheel wrench in numerical order as shown in the illustration.
WARNING
Use genuine wheel nuts and tighten them to the specified torque as soon as possible after changing wheels. Incorrect wheel nuts or improperly tightened wheel nuts may come loose or fall off, which can result in an accident. If you do not have a torque wrench, have the wheel nut torque checked by a SUZUKI dealer or a qualified workshop.
Jump-starting Instructions
WARNING
- Never attempt to jump-start your vehicle if the battery appears to be frozen. Batteries in this condition may explode.
- When making jump lead connections, be certain that your hands and the jump leads remain clear from pulleys, belts or fans.
- Batteries produce flammable hydrogen gas. Keep flames and sparks away from the battery or an explosion may occur.
- Never smoke when working near the battery if the booster the battery you use for jump-starting is installed in another vehicle, make sure the two vehicles are not touching each other.
- If your battery discharges repeatedly, for no apparent reason, have your vehicle inspected by a SUZUKI dealer or a qualified work-shop.
- To avoid harm to yourself or damage to your vehicle or battery, follow the jump-starting instructions in this section.
- If you are in doubt, call for a qualified road service.
NOTICE
Your vehicle should not be started by pushing or towing. This starting method could result in permanent damage to the catalytic converter. Use jump leads to start a vehicle with a weak or flat battery.
Jump-starting
- Use only a 12-volt battery to jump-start your vehicle. Position the good 12-volt battery close to your vehicle so that the jump leads will reach both batteries. When using a battery installed on another vehicle, check that the two vehicles do not touch each other. Set the parking brakes fully on both vehicles.
- Turn off all vehicle accessories, except those necessary for safety reasons (for example, headlights or hazard lights).
- Connect jump leads as follows:
- Connect one end of the first jump lead to the positive (+) terminal of the discharged battery (1).
- Connect the other end to the positive (+) terminal of the booster battery (2).
- Connect one end of the second jump lead to the negative (–) terminal of the booster battery (2).
- Make the final connection to an unpainted, heavy metal part (i.e. door latch striker (3)) of the engine of the vehicle with the discharged battery (1).
WARNING
Never connect the jump lead directly to the negative (–) terminal of the discharged battery, or an explosion may occur.
CAUTION
Connect the jump lead to the engine mount bolt securely. If the jump lead disconnects from the engine mount bolt because of vibration at the start of the engine, the jump lead could be caught in the drive belts.
- If the booster battery you are using is fitted to another vehicle, start the engine of the vehicle with the booster battery. Run the engine at moderate speed.
- Start the engine of the vehicle with the discharged battery.
- Remove the jump leads in the exact reverse order in which you connected them.
Reference Links
View Full User Guide: Suzuki New CARRY 2019 User Manual
Download Manuals: https://suzuki-aftersales.net/manuals