Suzuki New ERTIGA 2018 EMERGENCY SERVICE User Manual
EMERGENCY SERVICE
Tyre Changing Tool
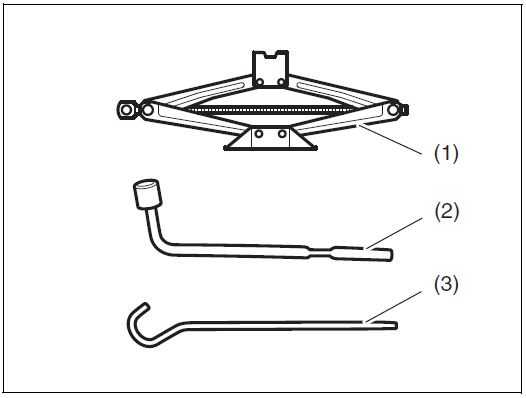
- Jack
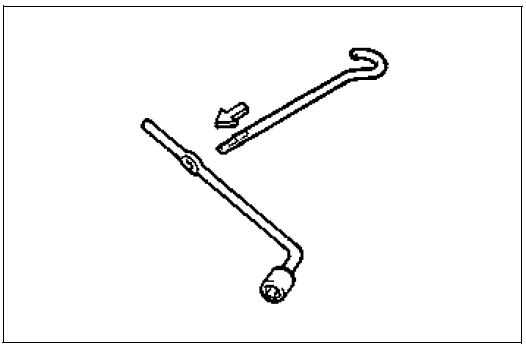
- Wheel wrench
- Jack handle
The tyre changing tools are stowed in the side of the luggage compartment. Remove the cover to access the tools.

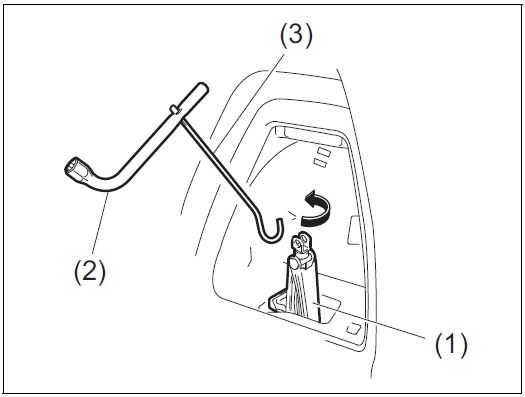
To remove the jack (1), turn its shaft counterclockwise by using jack handle (3) and pull the jack out of the storage bracket.
NOTE:
If you are difficult to use the jack handle (3), use jack handle and wheel wrench (2) as shown in the illustration.
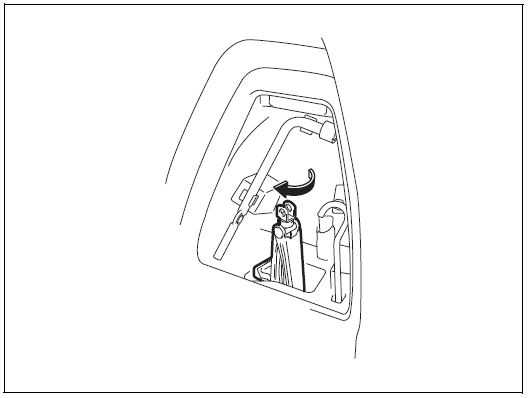 To stow the jack, place it in the storage bracket and turn the shaft clockwise with hand.
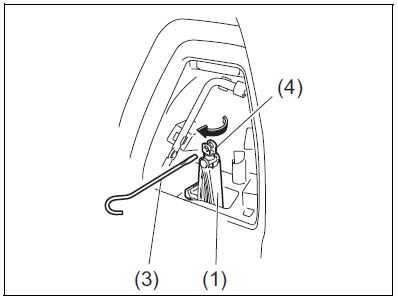
After temporarily holding the jack (1) until it contacts the storage bracket, turn the shaft (4) approximately 90° to 180° by using jack handle (3) to securely hold the jack in place.
WARNING
After using the tyre changing tools, stow them securely or they can cause injury if an accident occurs.
CAUTION
The jack should be used only to change wheels. It is important to read the jacking instructions in this section before attempting to use the jack.
The spare tyre is stowed under the rear floor.
To remove the spare tyre:
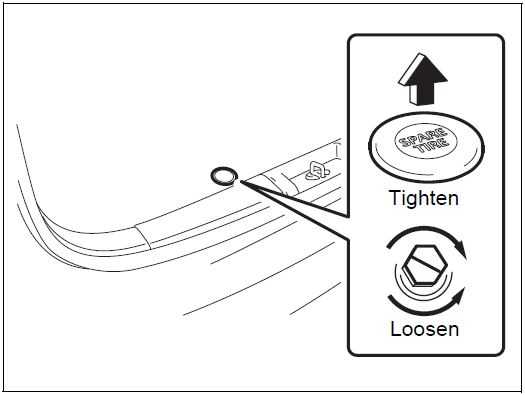
- Remove the cap and use a wheel wrench to loosen the hook bolt of the spare tyre holder. Then, rotate using the end of the jack handle.
NOTICE
Loose the spare tyre holder hook bolt until you can remove the hook by yourself. If the bolt is loosen too much, the hook might off and the spare tyre might drop off to the ground.

- Unhook the spare tyre holder and lower it slowly.
- Remove the tyre.
To install the spare tyre:
- Install the spare tyre facing up the outside of the wheel in the reverse order of removal.
- Tighten the spare tyre holder hook bolt securely.
WARNING
Do not drive your vehicle with the loose spare tyre holder hook bolt, otherwise it may come loose or the spare tyre may drop off, which can result in an accident.
NOTICE
Tighten the spare tyre holder hook bolt securely. However, do not over-tighten the bolt, it may be warped or broken.
Tightening torque for the spare tyre holder hook bolt
30 Nm (3.0 kg-m, 22.1 lb-ft)
Jacking Instructions
- Place the vehicle on level, hard ground. Set the parking brake firmly and shift into “P” (Park) if your vehicle has an automatic transmission, or shift into “R”
- (Reverse) if your vehicle has a manual transmission.
WARNING
- Shift into “P” (Park) for an automatic transmission, or into “R” (Reverse) for a manual transmission vehicle when you jack up the vehicle.
- Never jack up the vehicle with the transmission in “N” (Neutral). Otherwise, unstable jack may cause an accident.
- Turn on the hazard warning switch if your vehicle is near traffic.
- Block the front and rear of the wheel diagonally opposite of the wheel being lifted.
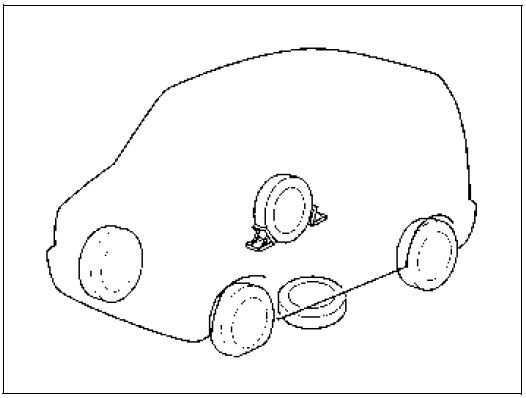
- Place the spare tyre near the wheel being lifted as shown in the illustration in case the jack slips.
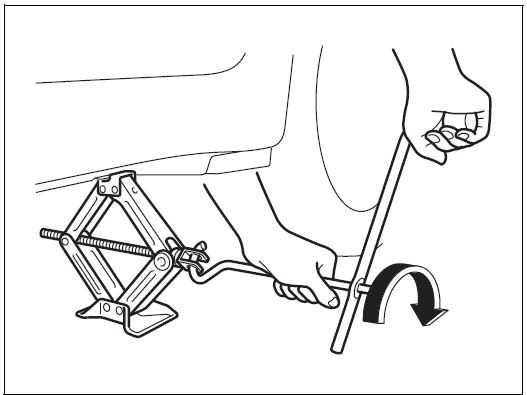
- Position the jack at an angle as shown in the illustration and raise the jack by turning the jack handle clockwise until the jack-head groove fits around the jacking bar beneath the vehicle body.
- Continue to raise the jack slowly and smoothly until the tyre clears the ground. Do not raise the vehicle more than necessary.
WARNING
- Use the jack only to change wheels on level, hard ground.
- Never jack up the vehicle on an inclined surface.
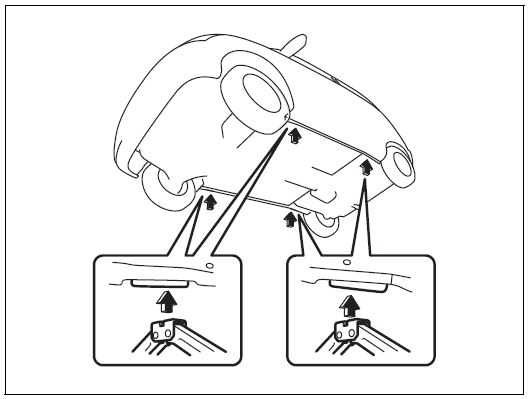
- Never raise the vehicle with the jack in a location other than the specified jacking point (shown in the illustration) near the wheel to be changed.
Especially, do not raise the vehicle with a jack at a part of the torsion beam which is located under the vehicle body, between rear wheels. - Make sure that the jack is raised at least 51 mm (2 inches) before it contacts the flange. Use of the jack when it is within 51 mm (2 inches) of being fully collapsed may result in failure of the jack.
- Never get under the vehicle when it is supported by the jack.
- Never run the engine when the vehicle is supported by the jack and never allow passengers to remain in the vehicle.
Raising Vehicle with Garage Jack
- Apply the garage jack to one of the points indicated below.
- Always support the raised vehicle with jack stands (commercially available) at the points indicated below.
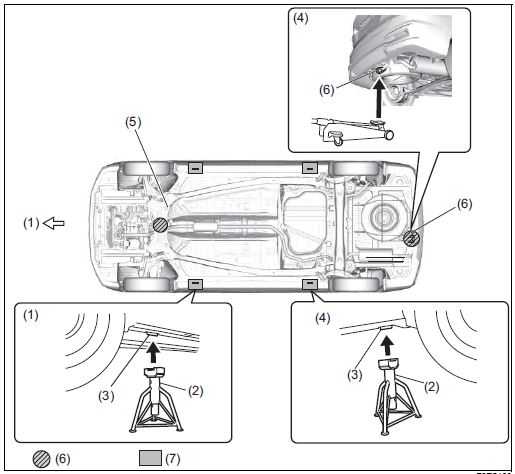
- Front
- Jack stand
- Jacking point for onboard jack
- Rear
- Front suspension frame
- Jacking point for garage jack
- Application point for two-column lift and jack stand.
NOTICE
Never apply a garage jack to the exhaust pipe or engine undercover and rear torsion beam.
When you apply a garage jack to the rear jacking point, it may interfere with the rear bumper depending on the shape of the garage jack.
NOTE:
For more details, please contact a SUZUKI dealer or a qualified workshop.
Changing Wheels
To change a wheel, use the following procedure:
- Remove the jack, tools and spare wheel from the vehicle.
- Loosen, but do not remove the wheel nuts.
- Jack up the vehicle (follow the jacking instructions in this section).
WARNING
Shift into “P” (Park) for an automatic transmission, or into “R” (Reverse) for a manual transmission vehicle when you jack up the vehicle.
Never jack up the vehicle with the transmission in “N” (Neutral). Otherwise, unstable jack may cause an accident.
CAUTION
Immediately after the vehicle has been driven, the wheels, the wheel nuts and the area around the brakes might be extremely hot. Touching these areas may cause burn injury. Do not touch these areas, immediately after the vehicle has been driven.
- Remove the wheel nuts and wheel.
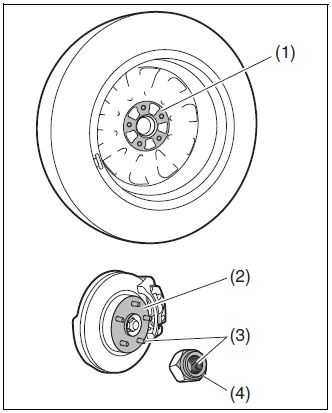
- Clean any mud or dirt off from the surface of the wheel (1), hub (2), thread part (3) and the surface of the wheel nuts
- with a clean cloth. Clean the hub carefully; it may be hot from driving.
- Install the new wheel and replace the wheel nuts with their cone-shaped end facing the wheel. Tighten each nut snugly by hand until the wheel is securely seated on the hub.
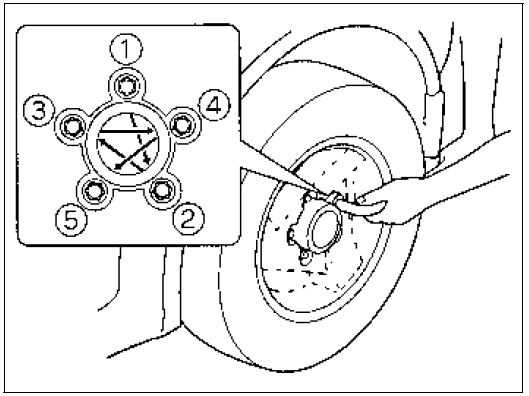
Tightening torque for wheel nuts 100 Nm (10.2 kg-m, 74.0 lb-ft)- Lower the jack and fully tighten the nuts with a wheel wrench in numerical order as shown in the illustration.
- WARNING
- Use genuine wheel nuts and tighten them to the specified torque as soon as possible after changing wheels. Incorrect wheel nuts or improperly tightened wheel nuts may come loose or fall off, which can result in an accident. If you do not have a torque wrench, have the wheel nut torque checked by a SUZUKI dealer or a qualified workshop.
After Changing Wheels
Stow the tyre-changing tools (jack, jack handle and lug wrench) in place. Also, stow the flat tyre in the spare tyre stowed position. Refer to “Tyre Changing Tool” in this section.
NOTICE
Repair or replace the flat tyre immediately. If the flat tyre is placed in the spare tyre stowed position for long time, it can cause vehicle shakiness, noise, or scratches.
Jump-Starting Instructions
WARNING
- Never attempt to jump-start your vehicle if the battery appears to be frozen. Batteries in this condition may explode.
- When making jump lead connections, be certain that your hands and the jump leads remain clear from pulleys, belts or fans.
- Batteries produce flammable hydrogen gas. Keep flames and sparks away from the battery or an explosion may occur. Never smoke when working near the battery.
- If the booster battery you use for jump-starting is installed in another vehicle, make sure the two vehicles are not touching each other.
- If your battery discharges repeatedly, for no apparent reason, have your vehicle inspected by a SUZUKI dealer or a qualified work-shop.
- To avoid harm to yourself or dam-age to your vehicle or battery, follow the jump-starting instructions below.
- If you are in doubt, call for qualified road service.
NOTICE
Your vehicle should not be started by pushing or towing. This starting method could result in permanent damage to the catalytic converter. Use jump leads to start a vehicle with a weak or flat battery.
Jump-Starting
- Use only a 12-volt battery to jump-start your vehicle. Position the good 12-volt battery close to your vehicle so that the jump leads will reach both batteries. When using a battery installed on another vehicle, check that two vehicles do not touch each other. Set the parking brakes fully on both vehicles.
- Turn off all vehicle accessories, except those necessary for safety reasons (for example, headlights or hazard lights).
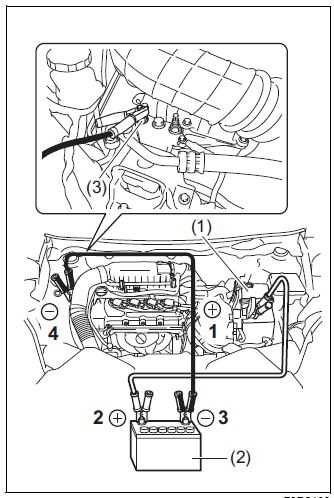
- Connect jump leads as follows:
- Connect one end of the first jump lead to the positive (+) terminal of the discharged battery (1).
- Connect the other end to the positive (+) terminal of the booster battery (2).
- Connect one end of the second jump lead to the negative (–) terminal of the booster battery (2).
- Make the final connection to an unpainted, heavy metal part (i.e.
- engine mount bolt (3)) of the engine of the vehicle with the dis-charged battery (1).
WARNING
Never connect the jump lead directly to the negative (–) terminal of the dis-charged battery, or an explosion may occur.
CAUTION
Connect the jump lead to the engine mount bolt securely. If the jump lead disconnects from the engine mount bolt because of vibration at the start of the engine, the jump lead could be caught in the drive belts.
- If the booster battery you are using is fitted to another vehicle, start the engine of the vehicle with the booster battery. Run the engine at moderate speed.
- Start the engine of the vehicle with the discharged battery. Remove the jump leads in the exact reverse order in which you connected them.
Towing Your Vehicle
If you need to have your vehicle towed, contact a professional service. SUZUKI dealer or a qualified workshop can provide you with detailed towing instructions.
NOTICE
- Observe the following instructions when towing your vehicle.
- To help avoid damage to your vehicle during towing, proper equipment and towing procedures must be used.
- Using the frame hook, tow your vehicle on paved roads for short distances at low speed.
Wheel Drive (2WD) Automatic Transmission
Automatic transmission vehicles may be towed using either of the following methods.
- From the front, with the front wheels lifted and the rear wheels on the ground. Before towing, make sure that the parking brake is released.
- From the rear, with the rear wheels lifted and a dolly under the front wheels.
NOTICE
Towing your vehicle with the front wheels on the ground can result in damage to the automatic transmission.
Wheel Drive (2WD) Manual Transmission
Manual transmission vehicles may be towed using either of the following methods.
- From the front, with the front wheels lifted and the rear wheels on the ground. Before towing, make sure that the parking brake is released.
- From the rear, with the rear wheels lifted and the front wheels on the ground, provided the steering and drivetrain are in operational condition. Before towing, make sure that the transmission is in neutral, the steering wheel is unlocked (vehicle without a keyless push start system – the ignition key should be in “ACC” position) (vehicle with a keyless push start system – the ignition mode is “ACC”), and the steering wheel is secured with a clamping device designed for towing service.
NOTICE
The steering column is not strong enough to withstand shocks transmitted from the front wheels during towing. Always unlock the steering wheel before towing.
Engine Trouble: Starter Does not Operate
- Try turning the ignition switch to “START” position or try pressing the engine switch to change the ignition mode to “START” with the headlights turned on to determine the battery condition. If the headlights go excessively dim or go off, it usually means that either the battery is discharged or the battery terminal contact is poor. Recharge the battery or correct battery terminal contact as necessary.
- If the headlights remain bright, check the fuses. If the reason for failure of the starter is not obvious, there may be a major electrical problem. Have the vehicle inspected by a SUZUKI dealer or a qualified workshop.
Engine Trouble: Does not Start
Make sure that your vehicle has enough fuel and battery. If the engine does not start under very cold conditions, press the accelerator pedal all the way to the floor and hold it while cranking the engine. Refer to “Starting engine (vehicle without keyless push start system) (if equipped)” or “Starting engine (vehicle with keyless push start system) (if equipped)” in the operating your vehicle section. If the engine still does not start have your vehicle inspected at a SUZUKI dealer or a qualified workshop. Do not operate the starter motor for more than 12 seconds.
(Vehicle with Keyless Push Start System)
NOTE:
If the engine refuses to start, the starter motor automatically stops after a certain period of time. After the starter motor has automatically stopped or if there is anything abnormal in the engine starting system, the starter motor runs only while the engine switch is held pressed.
Engine Trouble: Overheating
The engine could overheat temporarily under severe driving conditions. If the high engine coolant temperature warning light comes on as overheating during driving:
- Turn off the air conditioner, if equipped.
- Take the vehicle to a safe place and park.
- Run the engine at a normal idle speed for a few minutes until the high engine coolant temperature warning light goes off.
WARNING
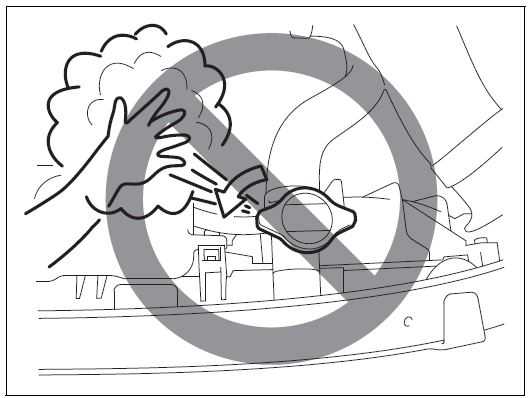
If you see or hear escaping steam, stop the vehicle in a safe place and immediately turn off the engine to cool it. Do not open the hood when steam is present. When the steam can no longer be seen or heard, open the hood to see if the coolant is still boiling. If it is, you must wait until it stops boiling before you proceed.
If the high engine coolant temperature warning light does not go off:
- Turn off the engine and check that the water pump belt and pulleys are not damaged or slipping. If any abnormality is found, correct it.
- Check the coolant level in the reservoir. If it is found to be lower than the “LOW” line, check the radiator, water pump and radiator hoses for leakage. If leakage that may cause overheating is found, do not run the engine until these problems have been corrected.
- If leakage is not found, carefully add coolant to the reservoir and then the radiator, if necessary. (Refer to “Engine Coolant” in the “INSPECTION AND MAINTENANCE” section.).
WARNING
It is hazardous to remove the radiator cap when the water temperature is high, because scalding fluid and steam may be blown out under pressure. The cap should only be taken off when the coolant temperature has lowered. To help prevent personal injury, keep hands, tools and clothing away from the engine cooling fan and air-conditioner fan (if equipped). These electric fans can automatically turn on without warning.
Reference Links
View Full User Guide: Suzuki New ERTIGA 2020 User Manual
Download Manuals: https://suzuki-aftersales.net/manuals