Suzuki New ERTIGA 2020 Controls and Equipment User Manual
Controls and Equipment
Heating and Air Conditioning System
There are three types of heating and air conditioning systems as follows:
- Manual Heating and Air Conditioning System
- Digital air conditioning system
- Automatic heating and air conditioning system (climate control)
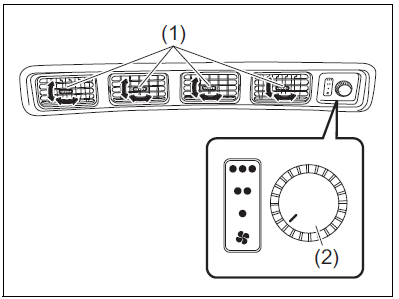
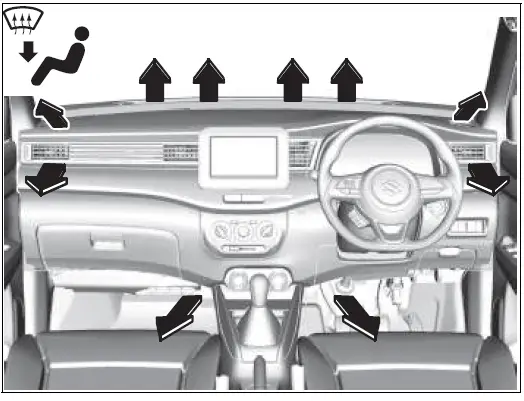
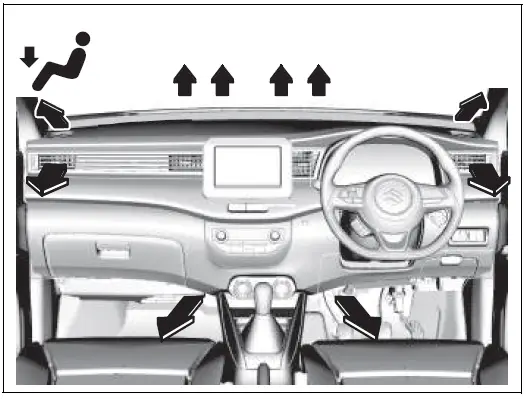
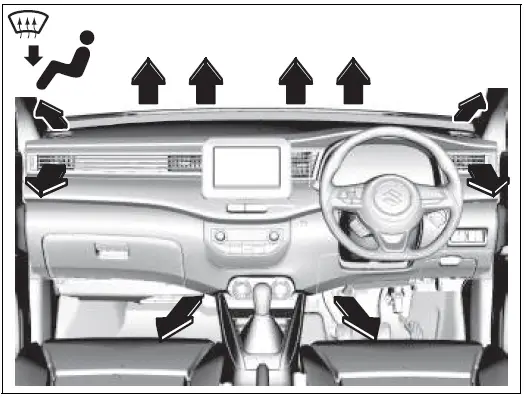
Air Outlet
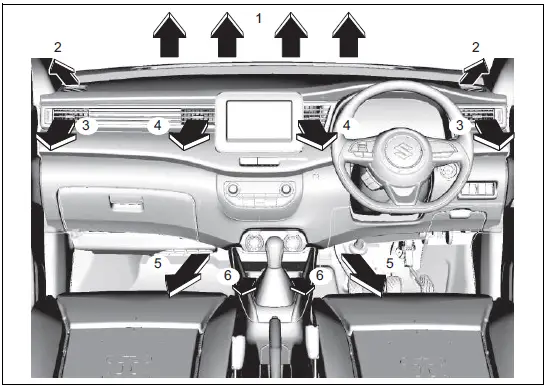
- Windshield defroster outlet
- Side defroster outlet
- Side outlet
- Center outlet
- Floor outlet
- Cup holder outlet (if equipped)
Center outlet
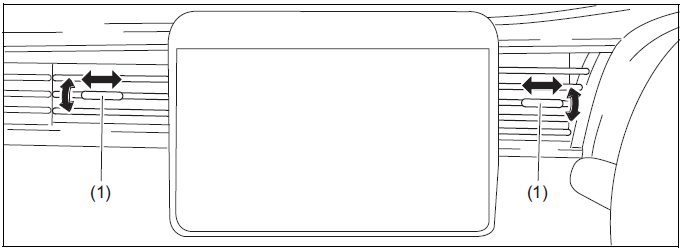
Move the knob (1) vertically or horizontally to adjust the direction of air flow as desired.
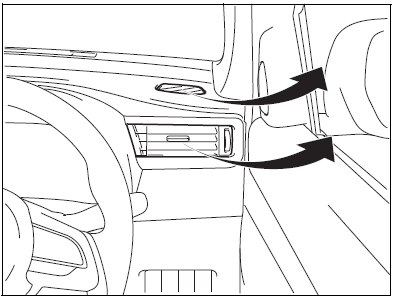
Side outlet
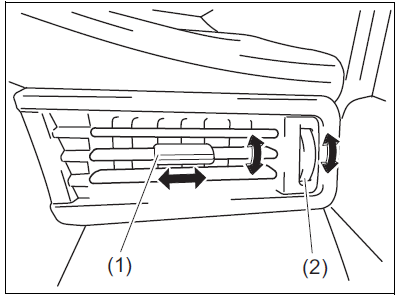
When open, air comes out regardless of the air flow selector position.
Move the knob (1) vertically or horizontally, to adjust the direction of air flow as desired.
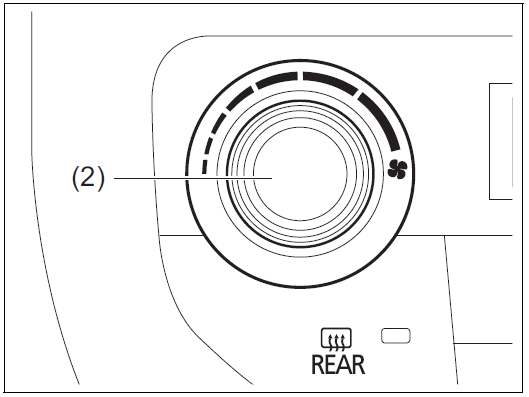
The side outlet opens when you turn the dial (2) upward and closes when you turn it downward.
CAUTION
Prolonged exposure to hot air from the heater or air conditioner could result in low temperature burns. All vehicle occupants, particularly children, the elderly, those with special needs, individuals with delicate skin, and sleeping individuals, should maintain sufficient distance from the air outlets to prevent prolonged exposure to hot airflow.
Overhead Rear Air Conditioning System (if equipped)
Manual Heating and Air Conditioning System
To turn on the overhead rear air conditioning system, set the blower speed selector of the manual heating and air conditioning system to a position other than off and push in “A/C” switch. Refer to “Air conditioning switch” in this section. And set the rear blower speed selector (2) to a position other than off.
(Digital Air Conditioning System)
To turn on the overhead rear air conditioning system, set the blower speed selector of the digital air conditioning system to a position other than off and push in “A/C” switch. Refer to “Air conditioning switch” in this section. And set the rear blower speed selector (2) to a position other than off.
Automatic Heating and Air Conditioning System
To turn on the overhead rear air conditioning system, set the blower speed selector of the automatic heating and air conditioning system to a position other than off and push in “A/C” switch. Refer to “Air conditioning switch” in this section. And set the rear blower speed selector (2) to a position other than off.
Move the knob (1) vertically or horizontally to adjust the direction of air flow as desired.
During operation of the air conditioner, you may notice slight changes in engine speed. These changes are normal, the system is designed so that the compressor turns on or off to maintain the desired temperature. Less operation of the compressor results in better fuel economy.
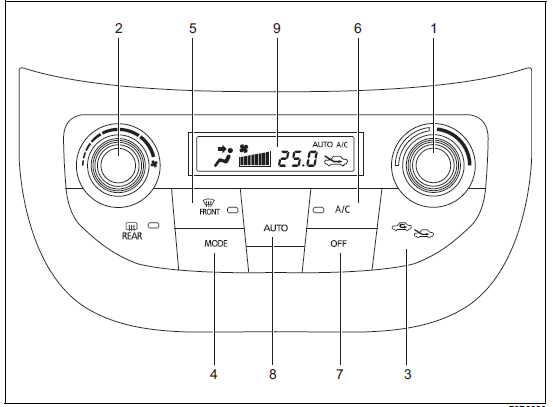
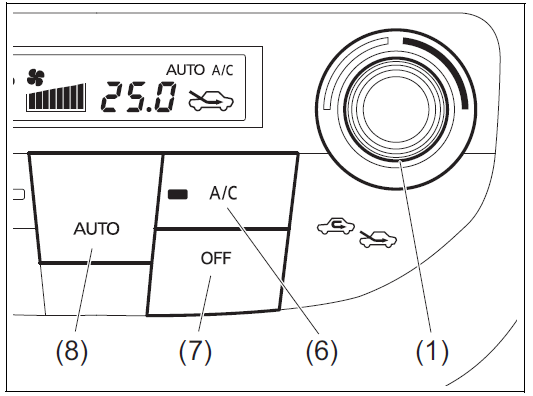
Description of Controls
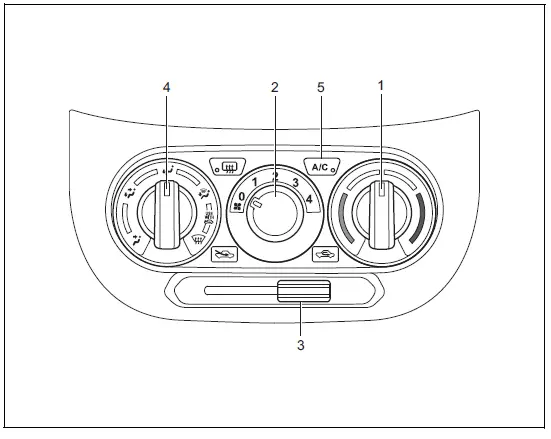
- Temperature selector
- Blower speed selector
- Air intake selector
- Air flow selector
- Air conditioning switch
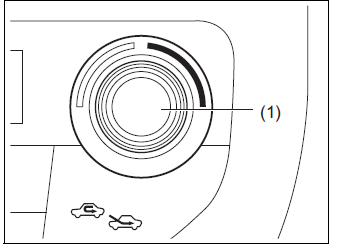
Temperature selector (1)
This is used to adjust the temperature.
Blower speed selector (2)
This is used to turn on the blower and to select blower speed.
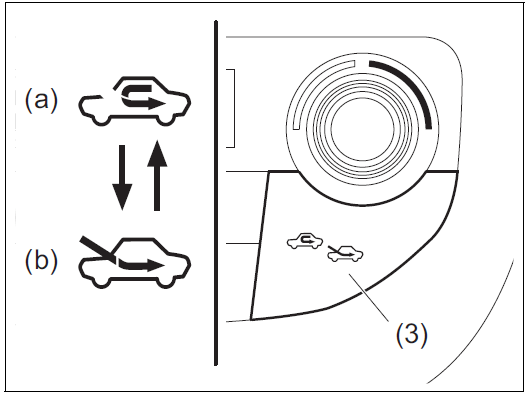
Air intake selector (3) (Left hand drive vehicle)
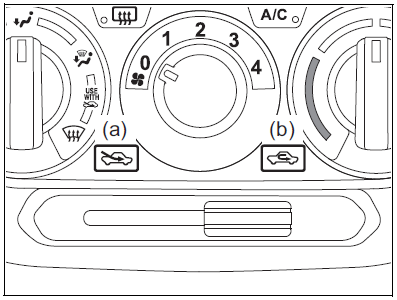
This selector is used to select the following modes.
FRESH AIR (a)
When this mode is selected by moving the lever to left, outside air comes in.
RECIRCULATED AIR (b)
When this mode is selected by moving the lever to right, outside air is shut out and inside air is recirculated. This mode is suit-able when driving through dusty or polluted air such as in a tunnel, or when attempting to quickly cool down or warm up the interior.
Air intake selector (3) (Right hand drive vehicle)

This selector is used to select the following modes.
RECIRCULATED AIR (a)
When this mode is selected by moving the lever to left, outside air is shut out and inside air is recirculated. This mode is suit-able when driving through dusty or polluted air such as in a tunnel, or when attempting to quickly cool down or warm up the interior.
FRESH AIR (b)
When this mode is selected by moving the lever to right, outside air comes in.
NOTE:
If you select RECIRCULATED AIR for an extended period of time, the air in the vehicle can become contaminated and the windows tend to get misted. Therefore, you should select FRESH AIR whenever possible.
NOTE:
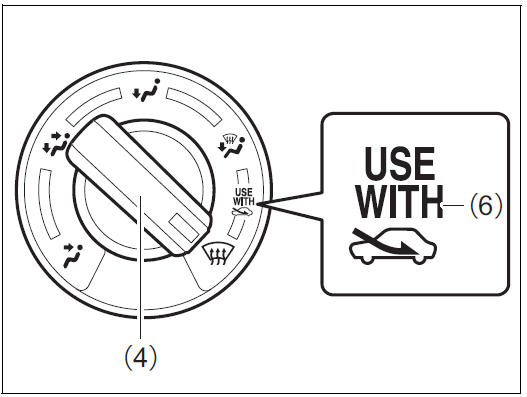
The mark of “USE WITH” (6)
To clear fog on the windshield and/or the side windows quickly, set the air flow selector (4) to “HEAT & DEFROST” or “DEFROST” and air intake selector (3) to “FRESH AIR”. These positioning will clear the fogged windshield and/or the side windows faster than the “RECIRCULATED AIR”.
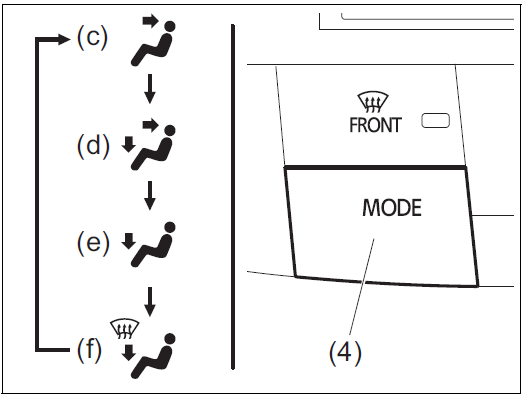
Air flow selector (4)
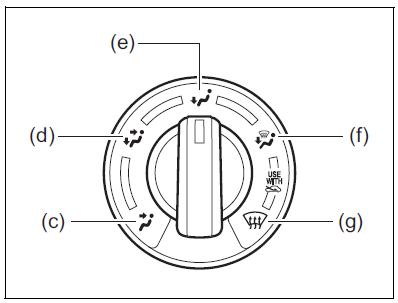
This is used to select one of the following functions.
VENTILATION (c)
Temperature-controlled air comes out of the center, side and cup holder outlets (if equipped).
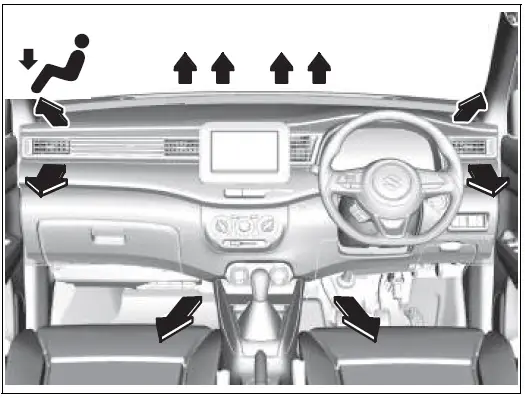
BI-LEVEL (d)
Temperature-controlled air comes out of the floor outlets and cooler air comes out of the center, side and cup holder outlets (if equipped). When the temperature selector (1) is in the fully cold position or fully hot position, however, the air from the floor outlets and the air from the center, side and cup holder outlets (if equipped) will be the same temperature.
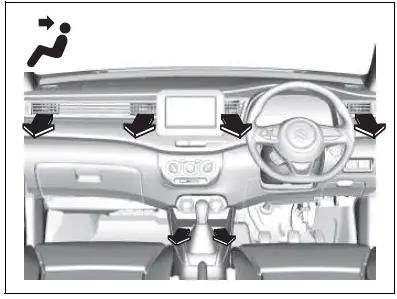
HEAT (e)
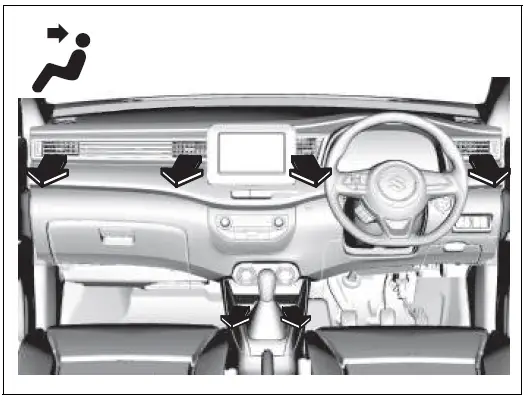
Temperature-controlled air comes out of the floor outlets and the side outlets, also comes out of the windshield defroster out-lets and also comes slightly out of the side defroster outlets.
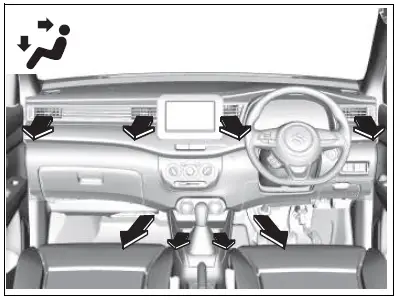
HEAT & DEFROST (f)
Temperature-controlled air comes out of the floor outlets, the windshield defroster outlets, the side defroster outlets and the side outlets.
DEFROST (g)

Temperature-controlled air comes out of the windshield defroster outlets, the side defroster outlets and the side outlets.
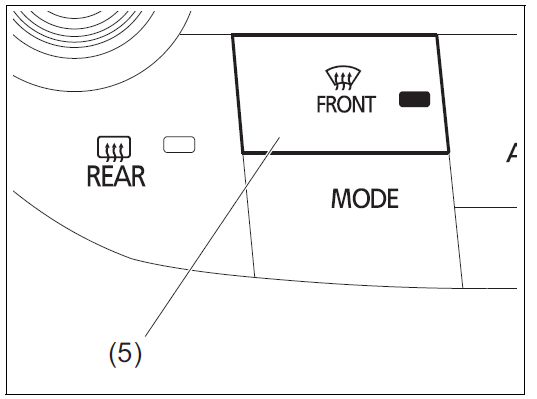
Air conditioning switch (5)
To turn on the air conditioning system, set the blower speed selector to a position other than off and push in “A/C” switch. With this “A/C” switch operation, a indicator light will come on when the air conditioning system is working. To turn off the air conditioning system, push “A/C” switch again.
During operation of the air conditioner, you may notice slight changes in engine speed. These changes are normal, the system is designed so that the compressor turns on or off to maintain the desired temperature.
Less operation of the compressor results in better fuel economy.
System Operating Instructions
Natural ventilation
Select VENTILATION and FRESH AIR, the temperature selector to the desired temperature position, and the blower speed selector to off. Fresh air will flow through the vehicle during driving.
Forced ventilation
The base settings are the same as for natural ventilation except you set the blower speed selector to a position other than off.
Normal heating (using outside air) Select HEAT and FRESH AIR, the temperature selector to the desired temperature position and the blower speed selector to the desired blower speed position. Set-ting the blower speed selector to a higher blower speed position increases heating efficiency.
Quick heating (using recirculated air) The base settings are the same as for nor-mal heating except you select RECIRCU-LATED AIR. If you use this heating method for an extended period of time, the air in the vehicle can become contaminated and the windows can become misty. Therefore, use this method only for quick heating and change to the normal heating method as soon as possible.
Head cooled/Feet warmed heating Select BI-LEVEL and FRESH AIR, the temperature selector to the desired temperature position, and the blower speed selector to the desired blower speed position. Unless the temperature selector is in the fully cold position or fully hot position, the air that comes out of the center and side outlets will be cooler than the air that comes out of the floor outlets.
Normal cooling
Set the air flow selector to VENTILATION, the temperature selector to the desired temperature position and the blower speed selector to the desired blower speed position, and turn on “A/C” switch. Setting the blower speed selector to a higher blower speed position increases cooling efficiency.
You can switch the air intake selector to either FRESH AIR or RECIRCULATED AIR as you desire. Choosing RECIRCU-LATED AIR increases cooling efficiency.
Quick cooling (using recirculated air) The base settings are the same as for nor-mal cooling except you select RECIRCU-LATED AIR and the highest blower speed.
NOTE:
- If you select RECIRCULATED AIR for an extended period of time, the air in the vehicle can become contaminated and the windows tend to get misted. There-fore, you should select FRESH AIR whenever possible.
- If your vehicle has been left in the sun with the windows closed, it will cool faster if you open the windows briefly while you operate the air conditioner with the air intake selector at FRESH AIR and the blower at high speed.
Dehumidifying
Set the air flow selector to a desired air flow selector position, the temperature selector to the desired temperature position and the blower speed selector to the desired blower speed position. Also select FRESH AIR and turn on “A/C” switch.
NOTE:
Because the air conditioner dehumidifies the air, turning it on will help keep the windows clear, even when blowing heated air using DEFROST or HEAT & DEFROST functions.
NOTE:
If you need maximum defrosting:
- Select DEFROST and FRESH AIR,
Set the blower speed selector to high,
Adjust the temperature selector to the hot end,
Turn on “A/C” switch, and - Adjust the side outlets so the air blows on the side windows.
Maintenance
If you do not use the air conditioner for a long period, such as during winter, it may not give the best performance when you start using it again. To help maintain optimum performance and durability of your air conditioner, it needs to be run periodically. Operate the air conditioner at least once a month for one minute with the engine idling. This circulates the refrigerant and oil and helps protect the internal components.
If your air conditioner is equipped with air filters, clean or replace them as specified in “Maintenance schedule” in “INSPEC-TION AND MAINTENANCE” section. Have this job done by a SUZUKI dealer or a qualified workshop as the lower glove box must be lowered for this job.
NOTE:
Your vehicle uses the air conditioning refrigerant HFC-134a, commonly called “R-134a”. R-134a replaced R-12 around 1993 for automotive applications. Other refrigerants are available, including recycled R-12, but only R-134a should be used in your vehicle.
NOTICE
Using the wrong refrigerant may damage your air conditioning system. Use R-134a only. Do not mix or replace the R-134a with other refrigerants.
Digital Air Conditioning System
Description of Controls
- Temperature selector
- Blower speed selector
- Air intake selector
- Air flow selector
- Defrost switch
- Air conditioning switch
- “OFF” switch
- Maximum cooling switch
- Display
Temperature selector (1)
Turn the temperature selector (1) to adjust the temperature.
NOTE:
- The temperature setting can be adjusted to 8 levels. The current setting value (1 to 8) is displayed in the display.
- If you turn the temperature selector (1) clockwise until the setting value is changed to “8” and “MAX” appears on the display, the air conditioning system will operate at maximum cooling.
- If you turn the temperature selector (1) counterclockwise until the setting value is changed to “1” and “MIN” appears on the display, the air conditioning system will operate at minimum cooling.
Blower speed selector (2)
The blower speed selector (2) is used to turn on the blower and to select blower speed.
Air intake selector (3)
Push the air intake selector (3) to change between the recirculated air and fresh air modes.
RECIRCULATED AIR (a)
When this mode is selected, outside air is shut off and inside air is recirculated. This mode is suitable when driving through dusty or polluted air such as a tunnel, or when attempting to quickly cool down the interior.
FRESH AIR (b)
When this mode is selected, outside air is introduced.
FRESH AIR and RECIRCULATED AIR are selected alternately each time the air intake selector is pushed.
NOTE:
If you select RECIRCULATED AIR for an extended period of time, the air in the vehicle can become contaminated and the windows tend to get misted. Therefore, you should select FRESH AIR whenever possible.
Air flow selector (4)
Push the air flow selector (4) to change among the following functions. The indication of the selected mode appears in the display.
VENTILATION (c)
Temperature-controlled air comes out of the center and side outlets.
BI-LEVEL (d)

FOOT & DEFROST (f)
Temperature-controlled air comes out of the floor outlets, the windshield defroster outlets, the side defroster outlets and the side outlets.
Defrost switch (5)
Push the defrost switch (5) to turn on the defroster.
DEFROST

Temperature-controlled air comes out of the windshield defroster outlets, the side defroster outlets and the side outlets.
NOTE:
When the defrost switch (5) is pushed to turn on the defroster, the air conditioning system will operate and FRESH AIR mode will be selected automatically. In very cold weather, however, the air conditioning system will not operate.
Air conditioning switch (6)

The air conditioning switch (6) is used to turn on and off the air conditioning system only when the blower is on. To turn on the air conditioning system, push in the switch and “A/C” will appear in the display. To turn off the air conditioning system, push in the switch again and “A/C” will go off.
Maximum cooling switch (8)
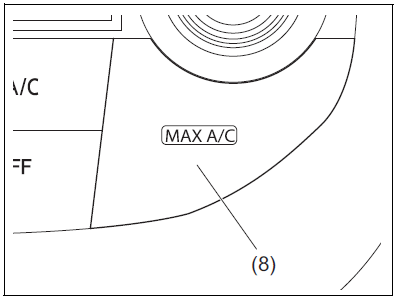
Push the maximum cooling switch (8) to cool down the interior at peak efficiency.
NOTE:
- When the maximum cooling switch is pushed, “MAX A/C” will appear in the display and the air conditioning system will operate in the following settings automatically.
- The air conditioner: On
- The blower speed: Full speed
- The temperature setting level: Level 8 (MAX)
- The air flow mode: VENTILATION (c)
- The air intake mode: RECIRCULATED AIR (a)
- To return to the current setting, push the maximum cooling switch again.
System Operating Instructions
To set the air conditioning system, follow the procedure below.
- Start the engine.
- Set the desired blower speed by turning the blower speed selector (2).
- Set the desired temperature by turning the temperature selector (1).
You can use the air conditioning switch (6) to manually turn the air conditioner on or off according to your preference. When you turn the air conditioning switch off, the air conditioning system cannot lower the inside temperature below the outside temperature.
To turn the air conditioning system off, push the “OFF” switch (7).
Normal cooling
Set the air flow selector (4) to VENTILA-TION (c), the temperature selector (1) to the desired temperature position and the blower speed selector (2) to the desired blower speed position. Setting the blower speed selector (2) to a higher blower speed position increases cooling efficiency.
You can switch the air intake selector (3) to either FRESH AIR (b) or RECIRCULATED AIR (a) as you desire. Choosing RECIR-CULATED AIR (a) increases cooling efficiency.
Maintenance
If you do not use the air conditioner for a long period, such as during winter, it may not give the best performance when you start using it again. To help maintain optimum performance and durability of your air conditioner, it needs to be run periodically. Operate the air conditioner at least once a month for one minute with the engine idling. This circulates the refrigerant and oil and helps protect the internal components.
If your air conditioner is equipped with air filters, clean or replace them as specified in “Maintenance schedule” in “INSPEC-TION AND MAINTENANCE” section. Have this job done by a SUZUKI dealer or a qualified workshop as the lower glove box must be lowered for this job.
NOTE:
Your vehicle uses the air conditioning refrigerant HFC-134a, commonly called R-134a. R-134a replaced R-12 around 1993 for automotive applications. Other refrigerants are available, including recycled R-12, but only R-134a should be used in your vehicle.
NOTICE
Using the wrong refrigerant may damage your air conditioning system. Use R-134a only. Do not mix or replace the R-134a with other refrigerants.
Automatic Heating and Air Conditioning System (Climate Control)
Description of Controls
- Temperature selector
- Blower speed selector
- Air intake selector
- Air flow selector
- Defrost switch
- Air conditioning switch
- “OFF” switch
- “AUTO” switch
- Display
Temperature selector (1)
Turn the temperature selector (1) to adjust the temperature.
NOTE:
If you turn the temperature selector (1) until “HI” or “LO” appears on the display, the climate control system will operate at maximum heating or cooling. The temperature of the air from the outlets may change suddenly while “LO” or “HI” is displayed, but this is normal.
NOTE:
When you change the unit of temperature in the information display, the unit of temperature in the air conditioning system will be changed. Refer to “Information display” in the “BEFORE DRIVING” section for details.
Blower speed selector (2)
The blower speed selector (2) is used to turn on the blower and to select blower speed.
If “AUTO” switch (8) is pushed, the blower speed will vary automatically as the climate control system maintains the selected temperature.
Air intake selector (3)
Push the air intake selector (3) to change between the recirculated air and fresh air modes.
If “AUTO” switch (8) is pushed, the air intake will vary automatically as the climate control system maintains the selected temperature.
NOTE:
When the recirculated air mode is selected, the automatic operation system is deactivated even if you push “AUTO” switch (8).
RECIRCULATED AIR (a)
When this mode is selected, outside air is shut off and inside air is recirculated. This mode is suitable when driving through dusty or polluted air such as a tunnel, or when attempting to quickly cool down or warm up the interior.
FRESH AIR (b)
When this mode is selected, outside air is introduced.
FRESH AIR and RECIRCULATED AIR are selected alternately each time the air intake selector is pushed.
NOTE:
If you select RECIRCULATED AIR for an extended period of time, the air in the vehicle can become contaminated and the windows tend to get misted. Therefore, you should select FRESH AIR whenever possible.
Air flow selector (4)
Push the air flow selector (4) to change among the following functions. The indication of the selected mode appears in the display.
If “AUTO” switch (8) is pushed, the air flow will vary automatically as the climate control system maintains the selected temperature.
VENTILATION (c)
Temperature-controlled air comes out of the center, side and cup holder outlets.
BI-LEVEL (d)
Temperature-controlled air comes out of the floor outlets and cooler air comes out of the center, side and cup holder outlets. When the temperature selector (1) is in the fully cold position or fully hot position, how-ever, the air from the floor outlets and the air from the center, side and cup holder outlets will be the same temperature.
HEAT (e)
Temperature-controlled air comes out of the floor outlets and the side outlets, a small amount of air comes out of the wind-shield defroster outlets and also comes slightly out of the side defroster outlets.
HEAT & DEFROST (f)
Temperature-controlled air comes out of the floor outlets, the windshield defroster outlets, the side defroster outlets and the side outlets.
Defrost switch (5)
Push the defrost switch (5) to turn on the defroster.
DEFROST
Temperature-controlled air comes out of the windshield defroster outlets, the side defroster outlets and the side outlets.
NOTE:
When the defrost switch (5) is pushed to turn on the defroster, the air conditioning system will operate and FRESH AIR mode will be selected automatically. In very cold weather, however, the air conditioning system will not operate.
Air conditioning switch (6)
The air conditioning switch (6) is used to turn on and off the air conditioning system only when the blower is on. To turn on the air conditioning system, push in the switch and “A/C” will appear in the display. To turn off the air conditioning system, push in the switch again and “A/C” will go off.
System Operating Instructions
Automatic operation
You can let the climate control system work automatically. To set the system for fully-automatic operation, follow the procedure below.
- Start the engine.
- Push “AUTO” switch (8).
- Set the desired temperature by turning the temperature selector (1).
The blower speed, air intake and air flow are controlled automatically to maintain the set temperature. However, the air flow is not changed to DEFROST position automatically..
NOTE:
When the recirculated air mode is selected, the automatic operation system is deactivated even if you push “AUTO” switch (8).
You can use the air conditioning switch (6) to manually turn the air conditioner on or off according to your preference. When you turn the air conditioning switch off, the climate control system cannot lower the inside temperature below outside temperature.
To turn the climate control system off, push the “OFF” switch (7).
NOTE:
If “AUTO” in the display blinks, there is a problem in the heating system and/or air conditioning system. You should have the system inspected by a Suzuki dealer or a qualified workshop.
NOTE:
- To find the temperature at which you are most comfortable, start with the 22°C (72°F) or 25°C (75°F) setting. (the temperature vary depending on vehicle specifications.).
If you turn the temperature selector (1) until “HI” or “LO” appears on the display, the climate control system will operate at maximum heating or cooling and the blower will run at full speed.
To avoid blowing cold air in cold weather or hot air in hot weather, the system will delay turning on the blower until warmed or cooled air is available. - If your vehicle has been left in the sun with the windows closed, it will cool faster if you open the windows briefly.
- Even under the automatic operation, you can set individual selectors to the manual mode. The manually selected functions are maintained, and the other functions remain under automatic operation.
- If the windshield and/or the front door windows are fogged, push the defrost switch (5) to turn on the defroster, or push the air flow selector (4) to change the air flow to HEAT & DEFROST position to defog the windows.
- To return the blower speed selector (2), air intake selector (3), and air flow selector (4) to automatic operation, push “AUTO” switch (8).
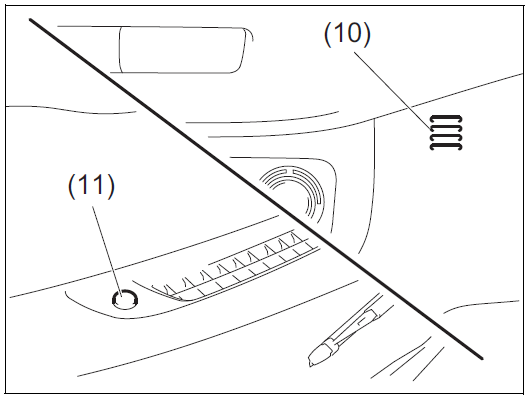
Be careful not to cover the interior temperature sensor (10) located between the steering wheel and the climate control panel, or the solar sensor (11) located at the top of the driver’s side dashboard. These sensors are used by the automatic system to regulate temperature.
Manual operation
You can manually control the climate control system. Set the selectors to the desired positions.
NOTE:
If you need maximum defrosting:
- Push the defrost switch (5) to turn on the defroster (the air conditioning system will operate and FRESH AIR mode will be selected automatically),
Set the blower speed selector to high,
Adjust the temperature selector to “HI” indication on the display, and
Adjust the side outlets so the air blows on the side windows.
Maintenance
If you do not use the air conditioner for a long period, such as during winter, it may not give the best performance when you start using it again. To help maintain optimum performance and durability of your air conditioner, it needs to be run periodically. Operate the air conditioner at least once a month for one minute with the engine idling. This circulates the refrigerant and oil and helps protect the internal components.
If your air conditioner is equipped with air filters, clean or replace them as specified in “Maintenance schedule” in “INSPEC-TION AND MAINTENANCE” section. Have this job done by a SUZUKI dealer or a qualified workshop as the lower glove box must be lowered for this job.
NOTE:
Your vehicle uses the air conditioning refrigerant HFC-134a, commonly called R-134a. R-134a replaced R-12 around 1993 for automotive applications. Other refrigerants are available, including recycled R-12, but only R-134a should be used in your vehicle.
NOTICE
Using the wrong refrigerant may damage your air conditioning system. Use R-134a only. Do not mix or replace the R-134a with other refrigerants.
Radio Antenna

The radio antenna on the roof is removable. To remove the antenna, turn it counterclockwise. To reinstall the antenna, turn it clockwise firmly by hand.
NOTE:
Adjust the antenna angle to maximum for optimum radio reception.
NOTICE
To avoid damage to the radio antenna:
- Remove the antenna when using an automatic car wash.
Remove the antenna when the antenna hits anything such as a low ceiling in a parking garage or putting a car cover over your vehicle.
Audio System (if equipped)
Safety Information
If you pay too much attention to operating the audio system or watching the audio system display while driving, an accident can occur. If you set the sound volume too loud, it could prevent you from being aware of road and traffic conditions.
- Keep your eyes on the road and your mind on the drive. Avoid paying too much attention to operating the audio system or watching the audio system display.
Familiarize yourself with the audio system controls and operation of the audio system before driving.
Preset your favorite radio stations before driving so that you can quickly tune to them using the presets.
Set the sound volume to a level that will allow you to continue to be aware of surrounding road and traffic conditions while driving.
The Bluetooth® word mark and logo are registered trademarks and are owned by the Bluetooth SIG, Ink.
Stop using this unit and a Bluetooth® ready device whenever requested. This unit shares the communication frequency with other private or public wireless communication equipment such as a wireless LAN and other wireless communication radios.
You should stop using this unit immediately whenever you are notified that your unit disturbs other wireless communication.

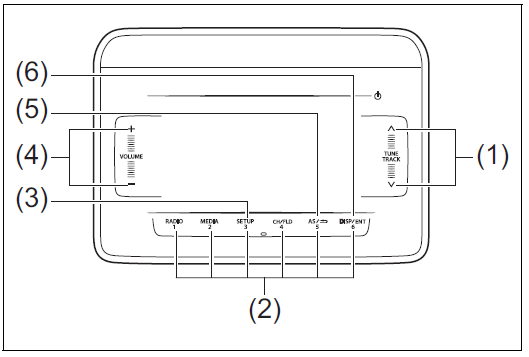
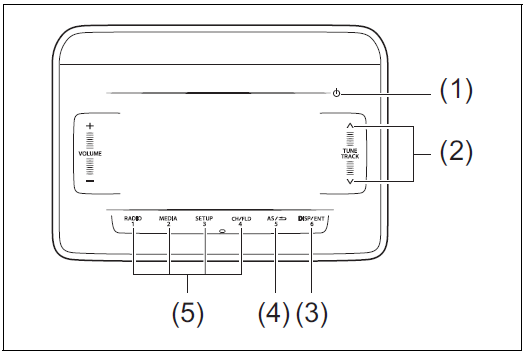
Basic Operations
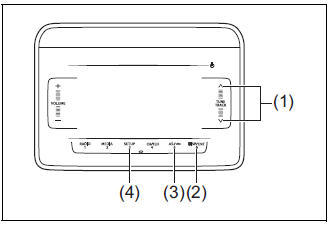
- POWER button
- “TUNE/TRACK” Up/Down button
- “ENTER” button
- BACK button
- SETUP button
- “VOLUME” button
Turning power on/off
Touch the POWER button (1).
The audio system starts in the function mode it was in when the power was turned off last.
- Touching the POWER button (1) for 1 second or longer can turn off the audio system.
Slide touch operation
Operate several functions with the slide touch operation. Touch the panel and slide up or down with your finger for increase/decrease or up/down operation.
NOTE:
Pay caution to the following content regarding slide touch operation:
- The touch button may not operate properly when the touch panel or your fingers are wet. Remove any liquid before operating.
- Depending on the operation method it may react without touching.
- It may not react properly when operated with gloves on.
- When metal objects are placed near the touch panel it may cause a malfunction.
- Do not attach protective film. Otherwise, the touch panel may not operate properly.
Functions available with the slide touch operation
| Mode | Function | ||
| Common | Volume up/down | O | – |
| Item selection | – | O | |
| Radio | TUNE up/down | – | O |
| USB | File up/down | – | O |
| Folder up/down (folder operation mode) | – | O | |
| iPod | TRACK up/down | – | O |
| Category selection (iPod menu) | – | O | |
| Bluetooth® audio | TRACK up/down | – | O |
| Group up/down (Group operation mode) | – | O | |
| Hands-free | Reception/ringtone/incoming call volume up/down | O | – |
| Switching pages of the speed dial selection screen | – | O |
Adjusting the volume
Touch or slide the “VOLUME” button (6).
- To increase the volume, touch or slide upwards.
- To decrease the volume, touch or slide downwards.
NOTE:
While driving, adjust the volume to an extent that sound and/or noise coming from outside can be heard.
Sound settings
- Touch the SETUP button (5).
- Touch for 1 second or longer when using radio mode.
- Touch or slide the “TUNE/TRACK” Up/Down button (2), select “Sound”, and touch the “ENTER” button (3).
- The sound setting screen will be displayed.
- Touch or slide the “TUNE/TRACK” Up/ Down button (2), select the desired item, and touch the “ENTER” button (3).
- The sound settings will change as follows:
EQ ↔ Bass ↔ Treble ↔ Balance ↔ Fader ↔ AVC
- The sound settings will change as follows:
Preset EQ
The preset EQ can set various types of sounds depending on the type of music.
- Touch or slide the “TUNE/TRACK” Up/Down button (2) from the “Sound” screen, select “EQ”, and touch the “ENTER” button (3).
- Touch or slide the “TUNE/TRACK” Up/Down button (2), select the desired item, and touch the “ENTER” button (3).
- The preset EQ settings will change as follows:
Off (Flat) ↔ Jazz ↔ Rock ↔ Pop ↔ Classic ↔ Hip-hop
- The preset EQ settings will change as follows:
Adjusting bass/treble/balance /fader The preset EQ can set various types of sounds depending on the type of music.
- Touch or slide the “TUNE/TRACK” Up/Down button (2) from the “Sound” screen, select “Bass”, “Treble”, “Balance”, or “Fader” and touch the “ENTER” button (3).
- Touch or slide the “TUNE/TRACK” Up/Down button (2), adjust to the desired settings and touch the “ENTER” button (3).
- “Bass”/“Treble”:
- Can be adjusted in stages from -6 to 0 to +6.
- Touch to emphasize the low or high sounds, and touch to quiet.
- Balance”:
- Can be adjusted in 9 stages left to right.
Touch to emphasize the right speaker, and touch to emphasize the left speaker. - “Fader”:
- Can be adjusted in 9 stages back to front.
Touch to emphasize the front speaker, and touch to emphasize the rear speaker.
Adjusting the AVC (Auto volume control)
The Auto Volume Control (AVC) function automatically adjusts (increases/decreases) the sound volume in accordance with vehicle speed. The AVC control is provided with three selectable levels (LEVEL OFF, 1, 2, 3). The range of volume adjustment increases together with the LEVEL number.
- Touch or slide the “TUNE/TRACK” Up/ Down button (2) from the “Sound” screen, select “AVC”, and touch the “ENTER” button (3).
Down button (2) from the “Sound” screen, select “AVC”, and touch the “ENTER” button (3). - Touch or slide the “TUNE/TRACK” Up/Down button (2), select the desired level, and touch the “ENTER” button (3).
- The AVC will change as follows:
Off ↔ Level 1 ↔ Level 2 ↔ Level 3
- The AVC will change as follows:
System Settings
Change the “Beep”, “Slide”, and “SW Sensitivity” settings.
- Touch the SETUP button (5).
Touch for 1 second or longer when using radio mode. - Touch or slide the “TUNE/TRACK” Up/Down button (2), select “System”, and touch the “ENTER” button (3).
- The system setting screen will be dis-played.
- Touch or slide the “TUNE/TRACK” Up/ Down button (2), select the desired item, and touch the “ENTER” button (3).
- The system settings will change as follows:
Beep ↔ Slide ↔ SW Sensitivity
BEEP on/off
- Touch or slide the “TUNE/TRACK” Up/Down button (2) from the “System” screen, select “Beep”, and touch the “ENTER” button (3).
- Touch or slide the “TUNE/TRACK” Up/Down button (2), select on or off, and touch the “ENTER” button (3).
Slide touch operation settings
Turn the slide operation on/off.
- Touch or slide the “TUNE/TRACK” Up/Down button (2) from the “System” screen, select “Slide”, and touch the “ENTER” button (3).
- Touch or slide the “TUNE/TRACK” Up/Down button (2), select on or off, and touch the “ENTER” button (3).
Touch panel sensitivity settings
Change the touch panel sensitivity.
- Touch or slide the “TUNE/TRACK” Up/Down button (2) from the “System” screen, select “SW Sensitivity”, and touch the “ENTER” button (3).
- Touch or slide the “TUNE/TRACK” Up/Down button (2), select Low or High, and touch the “ENTER” button (3).
NOTE:
If the touch button sensitivity is too high, set to “Low”.
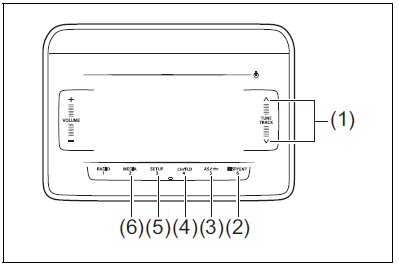
Radio
- “TUNE/TRACK” Up/Down button
- Preset button
- “RADIO” button*1
- “CH” (channel) button
- “AS” (auto store) button
Use this button to switch between manual preset and auto preset.
Display
Manual preset
Auto preset
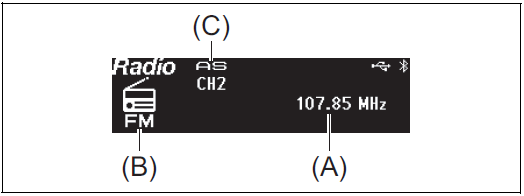
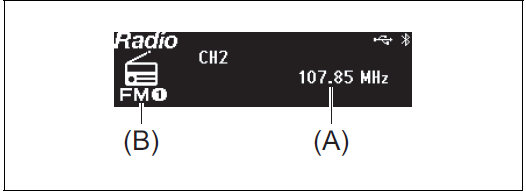
- Frequency
- Band
- Auto Store mode display
- NOTE:
Radio Reception
Radio reception can be affected by environment, atmospheric conditions, or radio signal’s power and distance from the station. Nearby mountains and buildings may interfere or deflect radio reception, causing poor reception. Poor reception or radio static can also be caused by electric cur-rent from overhead wires or high voltage power lines.
Selecting the band
- Touch the “RADIO” button (3) for 1 second or longer.
- Each time the button is touched, the mode will change as follows:
- AM → FM1 → FM2 → AM(AS) → FM(AS).
Seek tuning
- Touch the “TUNE/TRACK” Up/Down button (1) for 1 second or longer.
The audio system stops searching for a station at a frequency where a broadcast station is available.
Manual tuning
- Touch the “TUNE/TRACK” Up/Down button (1) to select the desired station.
Storing the station Manual store
- Select the station and frequency.
- Touch and hold the “CH” button (4) for at least 1 second.
- Hold down a desired button ([1] to [6]) of the Preset buttons (2) to which you want to store the station for 2 seconds or longer.
NOTE:
6 stations can be stored for AM, and 6 stations for each of FM1 and FM2, thus 18 stations can be stored in total.
Auto store
- Touch the “AS” button (5) for 1 second or longer.
- Start searching from a station whose frequency is the lowest. When a broadcast station that can be received with a sufficient strength is discovered, it will be assigned to the AM (AS)/FM (AS) band’s preset button (2). Once this process is completed the tuner will return to the first stored broadcast station.
NOTE:
- Auto store can be released by touching the “AS” button (5) while auto store is under way.
When the auto store is performed, the station previously stored in the memory at the position is overwritten. - 6 stations can be preset for FM, and 6 stations for AM in auto store mode.
Select from the preset channels Manual preset channel
- Select the radio station and frequency.
- Touch the “CH” button (4) for 1 second or longer.
- Touch a desired button ([1] to [6]) of the
Preset buttons (2).
NOTE:
Touch and hold the “CH” button (4) for at least one second to select from the preset channel list.
Auto preset channel
- Touch the “RADIO” button (3) for 1 second mor longer and select AM (AS) or FM (AS).
- Touch the “CH” button (4) for 1 second or longer.
- The preset channel list is displayed.
- Touch a desired button ([1] to [6]) of the Preset buttons (2).
USB
- “TUNE/TRACK” Up/Down button
- “DISP/ENTER” button
- BACK button
- “FLD” (folder operation) button
- SETUP (random/repeat) button
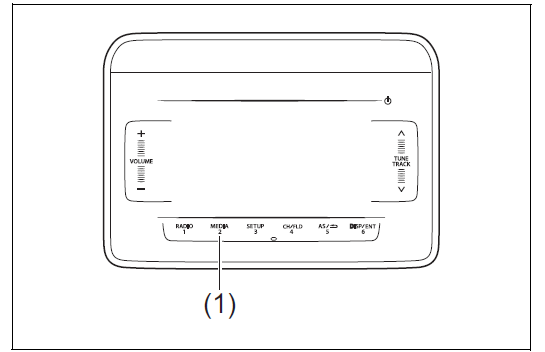
- “MEDIA” button
Display
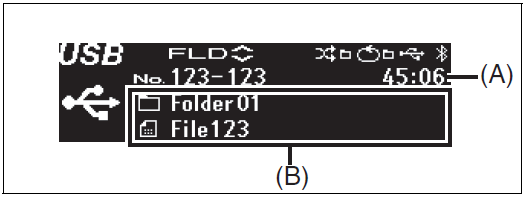
Play time
Text information display
WARNING
Do not connect any USB device other than a USB memory or a USB audio player. Do not connect multiple USB devices to the USB connector using a USB hub, etc. Supplying power to multiple USB devices from the connector could cause overheating and smoking.
Selecting a USB device mode
- Touch the “MEDIA” button (6).
- Each time the button is touched, the mode will change as follows:
USB (iPod) (if equipped) → Bluetooth® audio (if equipped) → AUX (if equipped).
Fast forwarding/Rewinding a track
- Hold down the “TUNE/TRACK” Up/ Down button (1).
- Hold down the Up button for 1 second or longer to fast forward the track.
- Hold down the Down button for 1 second or longer to fast rewind the track.
- Releasing the button can stop the fast forwarding/rewinding.
Selecting a track
- Touch the “TUNE/TRACK” Up/Down button (1).
- Touch the Up button to listen to the next track.
- When the Down button is touched once, the track currently being played will start from the beginning again. Touch the Down button twice to listen to the previous track.
Selecting a folder
- Touch the “FLD” (folder operation) but-ton (4).
- Touch the “TUNE/TRACK” Up/Down button (1).
- Touch the Up button to move to the next folder.
- Touch the Down button to move to the previous folder.
Repeat playback
- Touch the SETUP (random/repeat) but-ton (5).
- Touch or slide the “TUNE/TRACK” Up/Down button (1), select “Repeat”, and touch the “DISP/ENTER” button (2).
- Each time the “DISP/ENTER” button (2) is touched, the mode will change as follows:
Off → Folder random → All random .
- Each time the “DISP/ENTER” button (2) is touched, the mode will change as follows:
Random playback
- Touch the SETUP (random/repeat) but-ton (5).
- Touch or slide the “TUNE/TRACK” Up/Down button (1), select “Random”, and touch the “DISP/ENTER” button (2). Each time the “DISP/ENTER” button (2) is touched, the mode will change as fol-lows:
Off → Folder random → All random .
Display change
- Touch the “DISP/ENTER” button (2).
- Each time the button is touched, display will change as follows:
MP3/AAC:
Artist name/Track title → Album name/Track title → Folder name/File name… WMA:
Artist name/Track title → Folder name/File name.
NOTE:
- “NO TITLE” will be displayed when there is no text information in the USB device currently being played.
“…” is displayed if all text data cannot be displayed. Touch and hold the “DISP/ENTER” button (2) for at least 1 second to automatically display the rest of the text data.
Notes on USB device Compatible USB devices
- USB Mass Storage Class
For details as to whether your USB memory/USB Audio is compatible with USB Mass Storage Class, please con-tact the USB memory/USB Audio manufacturer.
Audio file
MP3 (.mp3)/WMA (.wma)/AAC (.m4a)/AAC (.aac)
File System
FAT 12/16/32,VFAT (supporting long file name)
USB Standard Compatibility
1.1/2.0 Full Speed
If a USB hub or extension cable is connected to the audio system, it may not be recognized. In this case, directly con-nect the USB device to the audio system.
Devices such as MP3 players/mobile phones/digital cameras may not be recognized as audio systems for playing music.
USB device connection
- When connecting a USB device, make sure that the connector is pushed all the way into the port.
- Depending on the USB flash drive that you are using, (non-brand product, USB flash drive that has been externally dam-aged) it may disable connection or cause unstable operation.
- Do not leave the USB device for long periods of time in places inside the vehicle where the temperature can rise too high.
- Back up any important data beforehand. We cannot accept responsibility for any lost data.
- It is recommended not to connect a USB device that contains data files other than MP3/WMA format.
Recording MP3/WMA/AAC files on a USB device
- Playback or display may not be possible depending on the type of USB device in use or the condition of the recording.
- Depending on the connected USB memory, the files may be played in different order from the order that the files were stored.
- The DRM (Digital Rights Management) file cannot be played.
Compression formats MP3
- Bit rate
MPEG1 Audio Layer III: 32 up to 320 kbps MPEG2 Audio Layer III: 8 up to 160 kbps MPEG2.5 Audio Layer III: 8 up to 160 kbps
VBR: up to 384 kbps (MAX.) - Sampling frequency
MPEG1 Audio Layer III: 32/44.1/48 kHz MPEG2 Audio Layer III: 16/22.05/24 kHz MPEG2.5 Audio Layer III: 8/11.025/12 kHz - Channel
Stereo/Joint stereo/Dual channel/Mon-aural
ID3 tag
ID3v1.x/ID3v2.x
WMA
- Windows Media Audio Ver.7/Ver.8/Ver.9 Standard compliant
- Bit rate: 32 up to 320 kbps
- VBR: up to 384 kbps (MAX.)
- Sampling frequency: 32/44.1/48 kHz
- WMA tag: Ver.8.0
- Channel: 2 Channels
AAC
- Bit rate: 16 up to 320 kbps
- VBR: up to 320 kbps (MAX.)
- Sampling frequency: 32/44.1/48 kHz
- AAC tag: iTunes m4a metadata
Maximum number of files/folders
- Maximum number of files: 2500
- Maximum number of files in a folder: 255
- Maximum number of folders: 255
- Root folder and empty folder are included.
- Maximum depth of tree structure: 8
NOTICE
Never use “.mp3”, “.wma” or “.m4a” as a file name extension if it is not in the MP3/WMA/AAC format file. Fail-ure to observe this may result in damage to the speaker due to noise production.
iPod
- “TUNE/TRACK” Up/Down button
- “DISP/ENTER” button
- BACK button
- “FLD” (iPod menu) button
- SETUP (shuffle/repeat) button
- “MEDIA” button
Display
- Play time
Text information display
Selecting an iPod mode
- Touch the “MEDIA” button (6).`
- Each time the button is touched, the mode will change as follows:
USB (iPod) (if equipped) → Bluetooth® audio (if equipped) → AUX (if equipped)
Fast forwarding/Rewinding a track
- Hold down the “TUNE/TRACK” Up/Down button (1).
- Hold down the Up button for 1 second or longer to fast forward the track. : Hold down the Down button for 1 second or longer to fast rewind the track.
- Releasing the button can stop the fast forwarding/rewinding.
Selecting a track
- Touch the “TUNE/TRACK” Up/Down button (1).
- Touch the Up button to listen to the next track.
When the Down button is touched once, the track currently being played will start from the beginning again. Touch the Down button twice to listen to the previous track.
Select a category
- Touch the “FLD” (iPod menu) button 4
- Touch or slide the “TUNE/TRACK” Up/ Down button (1), select the desired category, and touch the “DISP/ENTER” button (2).
- The Song selection mode for each cate-gory will be displayed as follows.
- Playlists: Playlists → Songs
- Artists: Artists → Albums → Songs
- Songs: Songs
- Genres: Genres → Artists → Albums
- Songs
- Radio: Station
- Audiobooks: Audiobooks
- Podcasts: Podcasts → Episodes
- i Tunes U: i Tunes U → Episodes
NOTE:
Categories is not displayed if the no files in the category.
Repeat playback
- Touch the SETUP (shuffle/repeat) but-ton (5).
- Touch or slide the “TUNE/TRACK” Up/Down button (1), select “Repeat”, and touch the “DISP/ENTER” button (2).
- Touch the “DISP/ENTER” button (2). Each time the button is touched, display will change as follows:
The repeat mode will vary depending on your device.
Off → 1 song repeat → All repeat .
Random playback
- Touch the SETUP (shuffle/repeat) button (5).
- Touch or slide the “TUNE/TRACK” Up/
Down button (1), select “Shuffle”, and touch the “DISP/ENTER” button (2). - Touch the “DISP/ENTER” button (2).
Each time the button is touched, display will change as follows:
Off → Shuffle → Album shuffle …
Display change
- Touch the “DISP/ENTER” button (2).
- Each time the button is touched, display will change as follows:
Artist name/Track title → Album name/
Track title → Playlist name/Track title…
NOTE:
- “NO TITLE” is displayed if the file currently being played has no text data.
- “…” is displayed if all text data cannot be displayed. Touch and hold the “DISP/ENTER” button (2) for at least one sec-ond to automatically display the rest of the text data.
“Playlist name/song name” is only dis-played by the “FLD” (Menu) button (4) when music is selected from Playlists.
Notes on iPod
Made for iPod
- iPod nano :
- iPod nano (7th generation)
- iPod touch :
- iPod touch (6th generation)
- i Pod touch (5th generation)
- iPhone :
- i Phone 5
- i Phone 5s
- i Phone 5c
- i Phone 6
- i Phone 6 Plus
- i Phone 6s
- i Phone 6s Plus
- i Phone SE
- i Phone 7
- i Phone 7 Plus
NOTE:
Some functions may not be available depending on the model of iPod.
iPod

- Use of the Made for Apple badge means that an accessory has been designed to connect specifically to the Apple product(s) identified in the badge, and has been certified by the developer to meet Apple performance standards. Apple is not responsible for the operation of this device or its compliance with safety and regulatory standards.
- Please note that the use of this accessory with an Apple product may affect wireless performance.
- Apple, iPod nano, iPod touch, iPhone, and Lightning are trademarks of Apple Inc., registered in the U.S. and other countries.
AUX
“MEDIA” button
Display

NOTICE
- Before connection, mute the unit, and also keep the volume of the auxiliary audio source within a range that will not cause distortion.
When the audio source is turned off, noise may be emitted. Be sure to turn off the unit or switch to another mode before turning off the audio source.
AUX selection
- Touch the “MEDIA” button (1).
- Each time the button is touched, the mode will change as follows:
USB (iPod) (if equipped) → Bluetooth® audio (if equipped) → AUX (if equipped)
NOTE:
- Please consult your place of purchase for details about whether a given auxiliary audio source can be connected and the proper auxiliary cord to use.
Setting of Bluetooth® Devices
Setting of Bluetooth® Devices
- “TUNE/TRACK” Up/Down button
- “ENTER” button
- BACK button
- SETUP button
- Bluetooth® button
- Off-hook button
CAUTION
Do not register or set the Bluetooth® device while driving. Stop your vehicle in a safe area before registering the device.
Registration of Bluetooth® devices
To use Bluetooth® devices (Bluetooth® audio or mobile phone) on the audio system, it is required to register the Blue-tooth® devices to the audio system. Up to 5 Bluetooth® devices can be registered.
NOTE:
- Certain functions cannot be used depending on the Bluetooth® device.
- Refer to the user manual included with your device regarding the operation method of Bluetooth® devices.
If the pairing cannot be established, the connection operation is canceled.
For the Bluetooth® device pairing method, refer to the user manual included with your device or try pairing again.
- The Bluetooth® setting screen will be displayed.
- From the panel button:
- Touch the SETUP button (4).
- Touch or slide the “TUNE/TRACK” Up/Down button (1), select “Bluetooth”, and touch the “ENTER” button (2). From the panel button:
- Touch the SETUP button (4).
- Touch or slide the “TUNE/TRACK” Up/Down button (1), select “Bluetooth”, and touch the “ENTER” button (2).
- The passkey will be displayed.
- Operate and register the Bluetooth® device.
Secure Simple Pairing (SSP) incompatible Bluetooth® device:
Enter the passkey into the Bluetooth® device.
Secure Simple Pairing (SSP) compatible Bluetooth® device:
Select “Yes” to register the Bluetooth® device.
- It is possible to automatically register devices depending on the type of Blue-tooth® device.
- NOTE:
If the Bluetooth® device contains music player and mobile phone function, both functions will be registered simultaneously. When deleting a Bluetooth® device, both functions will be deleted simultaneously.
If a mobile phone is not registered and the off-hook button (6) is pressed and the telephone mode is selected, it will automatically switch to “Pairing”.
When pairing with a mobile phone is established, it is possible to automatically transfer the phonebook and call history. If you wish to conduct an automatic transfer press “YES” and if not, press “NO”.
- Set from the list of mobile phones The list of paired mobile phones is dis-played and the various settings can be changed.
- The Bluetooth® setting screen will be displayed.
- From the panel button:
- Touch the SETUP button (4).
- Touch or slide the “TUNE/TRACK” Up/Down button (1), select “Bluetooth”, and touch the “ENTER” button (2).
- From the steering switch:
Press the Bluetooth® button (5).
- Touch or slide the “TUNE/TRACK” Up/Down button (1), select “Setup Blue-tooth”, and touch the “ENTER” button (2).
- Touch or slide the “TUNE/TRACK” Up/Down button (1), select “List Phone”, and touch the “ENTER” button (2).
Connect a registered mobile phone
- Touch or slide the “TUNE/TRACK” Up/Down button (1) from the “List Phone” screen, select the name of the desired mobile phone, and touch the “ENTER” button (2).
- Touch or slide the “TUNE/TRACK” Up/Down button (1), select “Select”, and touch the “ENTER” button (2).
Disconnect a connected mobile phone
- Touch or slide the “TUNE/TRACK” Up/Down button (1) from the “List Phone” screen, select the name of the desired mobile phone, and touch the “ENTER” button (2).
- Touch or slide the “TUNE/TRACK” Up/Down button (1), select “Disconnect”, and touch the “ENTER” button (2).
- Touch or slide the “TUNE/TRACK” Up/Down button (1), select “YES”, and touch the “ENTER” button (2).
Delete a registered mobile phone
- Touch or slide the “TUNE/TRACK” Up/Down button (1) from the “List Phone” screen, select the name of the desired mobile phone, and touch the “ENTER” button (2).
- Touch or slide the “TUNE/TRACK” Up/Down button (1), select “Delete”, and touch the “ENTER” button (2).
- Touch or slide the “TUNE/TRACK” Up/Down button (1), select “YES”, and touch the “ENTER” button (2).
Set from the Bluetooth® audio list The list of paired Bluetooth® audio is dis-played and the various settings can be changed.
- The Bluetooth® setting screen will be displayed.
- From the panel button:
Touch the SETUP button (4).
Touch or slide the “TUNE/TRACK” Up/Down button (1), select “Bluetooth”, and touch the “ENTER” button (2).
From the steering switch:
Press the Bluetooth® button (5).
- From the panel button:
- Touch or slide the “TUNE/TRACK” Up/Down button (1), select “Setup Blue-tooth”, and touch the “ENTER” button (2).
- Touch or slide the “TUNE/TRACK” Up/Down button (1), select “List Audio”, and touch the “ENTER” button (2).
Connect a registered Bluetooth® audio
- Touch or slide the “TUNE/TRACK” Up/Down button (1) from the “List Audio” screen, select the name of the desired Bluetooth® audio, and touch the “ENTER” button (2).
- Touch or slide the “TUNE/TRACK” Up/Down button (1), select “Select”, and touch the “ENTER” button (2).
Disconnect a registered Bluetooth® audio
- Touch or slide the “TUNE/TRACK” Up/Down button (1) from the “List Audio” screen, select the name of the desired Bluetooth® audio, and touch the “ENTER” button (2).
- Touch or slide the “TUNE/TRACK” Up/Down button (1), select “Disconnect”, and touch the “ENTER” button (2).
- Touch or slide the “TUNE/TRACK” Up/Down button (1), select “YES”, and touch the “ENTER” button (2).
Delete a registered Bluetooth® audio
- Touch or slide the “TUNE/TRACK” Up/Down button (1) from the “List Audio” screen, select the name of the desired Bluetooth® audio, and touch the “ENTER” button (2).
- Touch or slide the “TUNE/TRACK” Up/Down button (1), select “Delete”, and touch the “ENTER” button (2).
- Touch or slide the “TUNE/TRACK” Up/Down button (1), select “YES”, and touch the “ENTER” button (2).
Select a connection method
It is possible to switch connection methods when the Bluetooth® audio is registered to the audio system and the audio system and Bluetooth® audio are not connected.
- Touch or slide the “TUNE/TRACK” Up/Down button (1) from the “List Audio” screen, select the name of the desired Bluetooth® audio, and touch the “ENTER” button (2).
- Touch or slide the “TUNE/TRACK” Up/Down button (1), select “Connect Method”, and touch the “ENTER” button (2).
- Touch or slide the “TUNE/TRACK” Up/Down button (1), select the connection method, and touch the “ENTER” button (2).
- From Vehicle:
Operate from the audio system to connect to the Bluetooth® device. - From Audio:
Operate from the Bluetooth® device to connect to the audio system.
- From Vehicle:
Change of Passkey
- The Bluetooth® setting screen will be displayed.
- From the panel button:
Touch the SETUP button (4).
Touch or slide the “TUNE/TRACK” Up/Down button (1), select “Bluetooth”, and touch the “ENTER” button (2). - From the steering switch
Press the Bluetooth® button (5).
- From the panel button:
- Touch or slide the “TUNE/TRACK” Up/Down button (1), select “Setup Blue-tooth”, and touch the “ENTER” button (2).
- Touch or slide the “TUNE/TRACK” Up/Down button (1), select “Passkey”, and touch the “ENTER” button (2).
- Touch or slide the “TUNE/TRACK” Up/Down button (1), select “YES”, and touch the “ENTER” button (2).
- Touch or slide the “TUNE/TRACK” Up/Down button (1), select a number between 0 and 9, and touch the “ENTER” button (2).
Repeat this operation several times.- Enter the passkey one digit by one digit.
- The passkey must be between 4 to 8 digits.
- In order to cancel the number that you entered and return to the previous digit, touch the BACK button (3).
- If you do not enter a number that is 4 or more digits and re-touch the “ENTER” button (2), the passkey will be registered.
Automatic connection with the Blue-tooth® device
If the “Bluetooth Power” is set to ON, turning the ignition switch to ACC will automatically connect the registered Bluetooth® device.
- With the automatic connection, the Blue-tooth® device that was connected last will be prioritized.
- The Bluetooth® setting screen will be displayed.
- From the panel button:
Touch the SETUP button (4).
Touch or slide the “TUNE/TRACK” Up/Down button (1), select “Bluetooth”, and touch the “ENTER” button (2). - From the steering switch:
Press the Bluetooth button (5).
- From the panel button:
- Touch or slide the “TUNE/TRACK” Up/Down button (1), select “Setup Blue-tooth”, and touch the “ENTER” button (2).
- Touch or slide the “TUNE/TRACK” Up/Down button (1), select “Bluetooth Power”, and touch the “ENTER” button (2).
- Touch or slide the “TUNE/TRACK” Up/Down button (1), select “On” or “Off”, and touch the “ENTER” button (2).
NOTE:
- When “Bluetooth Power” is set to “OFF”, the audio system disconnects from the registered Bluetooth® device.
If “Bluetooth Power” is set to “Off”, the audio system will not automatically reconnect the next time the ignition is switched on.
The device status will be displayed
- The Bluetooth® setting screen will be displayed.
- From the panel button:
- Touch the SETUP button (4).
Touch or slide the “TUNE/TRACK” Up/Down button (1), select “Bluetooth”, and touch the “ENTER” button (2). - From the steering switch:
Press the Bluetooth button (5).
- Touch or slide the “TUNE/TRACK” Up/Down button (1), select “Setup Blue-tooth”, and touch the “ENTER” button (2).
- Touch or slide the “TUNE/TRACK” Up/Down button (1), select “Bluetooth Info”, and touch the “ENTER” button (2).
- Touch or slide the “TUNE/TRACK” Up/Down button (1), select the desired status, and touch the “ENTER” button (2).
- To display the device name, select “Device Name”.
- To display the device address, select “Device Address”.
Initialize
It is possible to initialize the audio system’s Bluetooth® settings or device information.
CAUTION
- Do not initialize the settings while driving. Stop your vehicle in a safe area before initializing the device.
Initialize with caution. Initialized settings and history cannot be restored.
- The Bluetooth® setting screen will be displayed.
- From the panel button:
Touch the SETUP button (4).
Touch or slide the “TUNE/TRACK” Up/Down button (1), select “Bluetooth”, and touch the “ENTER” button (2). - From the steering switch:
Press the Bluetooth button (5).
- From the panel button:
- Touch or slide the “TUNE/TRACK” Up/Down button (1), select “Setup Blue-tooth”, and touch the “ENTER” button (2).
- Touch or slide the “TUNE/TRACK” Up/Down button (1), select “Initialize”, and touch the “ENTER” button (2).
- Touch or slide the “TUNE/TRACK” Up/Down button (1), select the item that you want to initialize item, and touch the “ENTER” button (2).
- HF Sound Setting:
- Reception/ringtone volume
- Incoming call volume
- Vehicle Device Info:
Passkey - All Initialize:
- Reception/ringtone volume
- Incoming call volume
- Bluetooth audio volume
- Pairing registration
- Phonebook/history
- Speed dial
- Connect Method
- Bluetooth Power
- Auto Transfer
- HF Sound Setting:
- Touch or slide the “TUNE/TRACK” Up/Down button (1), select “YES”, and touch the “ENTER” button (2).
Notes on Bluetooth®
- The Bluetooth® word mark and logos are registered trademarks owned by Blue-tooth SIG, Inc. and any use of such marks by Denso Ten Limited is under license. Other trademarks and trade names are those of their respective owners.
This telecommunication equipment con-forms to the requirements of the National Telecommunications Commission.
Stop using this unit and a Bluetooth® ready device whenever requested. This unit shares the communication frequency with other private or public wire-less communication equipment such as a wireless LAN and other wireless communication radios.
You should stop using this unit immediately whenever you are notified that your unit disturbs other wireless communication.
Profile
- SSP (Secure Simple Pairing)
- PBAP (Phone Book Access Profile)
- OPP (Object Push Profile)
- HFP (Hand-Free Profile)
- A2DP (Advanced Audio Distribution Profile)
- AVRCP (Audio/Video Remote Control Profile)
Bluetooth® Hands-free (if equipped)
To use Bluetooth® devices (Bluetooth® audio or mobile phone) on the audio system, it is required to register the Blue-tooth® devices to the audio system by “Bluetooth Settings”.
Display
Steering switch

- “TUNE/TRACK” Up/Down button
- Speed dial button (1-6)
- SETUP button
- “VOLUME” button
- BACK button
- “ENTER” button
- Bluetooth® setting button
- Off-hook button
- On-hook button
- Mute button
- “VOL” (volume) button
NOTICE
- Do not leave your mobile phone inside your vehicle. If the temperature inside the vehicle increases, it may damage your mobile phone.
- When disposing your vehicle, make sure to delete all personal information saved to the audio system.
- The following hands-free data must be deleted from the audio system.
- Speed dial
- Reception history/Incoming call history
- Bluetooth® phonebook data
NOTE:
- Please keep your phone volume low. The person’s voice who you are talking to may be heard outside of the vehicle and increase the voice echo. When talking on the phone, speak clearly towards the microphone.
- In the following cases, your voice may not be heard clearly by the person on the other line:
- When driving on unpaved roads. (If there is loud traffic noise.)
- When driving at high speeds.
- When driving with the window open.
- If the air conditioner is blowing directly towards the microphone.
- When the sound of the air conditioner fan is loud.
When there is an adverse effect to the sound quality of the phone or network that you are using.
- The audio system may not function under the following conditions.
- When the phone power is not turned on.
- When the mobile phone is out of service.
- When the mobile phone is not connected.
- When the mobile phone battery is low
- The Bluetooth’s hands-free operation is dependent upon the mobile phone’s compatibility.
- The Bluetooth’s hands-free performance is affected by the driving conditions of mobile phone networks, handsets and vehicles.
- The audio system’s performance may be restricted due to the model of your mobile phone.
It is possible to register a mobile phone and register the phone number to the audio system as follows:
-
- Up to 1,000 phone numbers can be saved for every registered mobile phone.
Up to 30 phone numbers can be saved to the call history menu (missed calls/incoming/outgoing calls.) - When the call history exceeds 30 calls, they are deleted from the oldest one first, and the latest call history information is displayed in descending order.
- Up to 6 phone numbers can be saved to the speed dial list.
- Up to 1,000 phone numbers can be saved for every registered mobile phone.
Answer the phone
- Press the off-hook button (8).
- When you press the on-hook button (9) during an incoming call, you can block the call. (Only for compatible phone units)
NOTE:
- If you receive a call from a registered phone, the caller’s name will appear on the screen.
If you receive a call from an unregistered phone, only the caller’s phone number will appear on the screen.
Hang up the phone
- When the call is finished, press the on-hook button (9).
Make a call on call waiting
When the screen is displayed during a call, it is possible to hold the call and answer the other incoming call.
- When an incoming call is received during a call, press the off-hook button (8).
- When the call is on hold, it will connect to the other incoming call.
To end the call waiting, press the off-hook button (8).
When the call waiting is completed, the call on hold will connect.
When switching the caller, press the off-hook button (8) again while using the call waiting.
NOTE:
This function can only be used with phone units that are compatible with call waiting.
Mute the ringtone volume
- Press the mute button (10).
- To deactivate the mute volume, press the mute button (10).
Adjust the volume
Adjust the reception volume
- Touch or slide the “VOLUME” button (4) or press the “VOL” button (11) during a call.
- To increase the volume, touch or slide upwards.
- To decrease the volume, touch or slide downwards.
- Touch or slide the “TUNE/TRACK” Up/Down button (1), select “Setup Tele-phone”, and touch the “ENTER” button (6).
- Touch or slide the “TUNE/TRACK” Up/Down button (1), select “HF Sound Set-ting”, and touch the “ENTER” button (6).
- Touch or slide the “TUNE/TRACK” Up/Down button (1), select the item that you want to adjust, and touch the “ENTER” button (6).
- Call Volume: Reception/ringtone volume
- Ringtone Volume: Incoming call volume
- Touch or slide the “VOLUME” button (4).
- To increase the volume, touch or slide upwards.
- To decrease the volume, touch or slide downwards.
Make a call
Press the off-hook button (8) to enter the telephone mode.
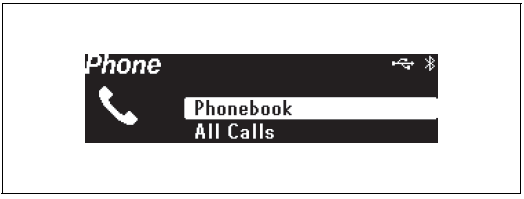
Use the phonebook
- Touch or slide the “TUNE/TRACK” Up/Down button (1), select “Phonebook”, and touch the “ENTER” button (6).
- Touch or slide the “TUNE/TRACK” Up/Down button (1), select the desired initials, and touch the “ENTER” button (6).
- Touch or slide the “TUNE/TRACK” Up/Down button (1), select the contact number, and touch the “ENTER” button (6).
- If there are multiple phone numbers for a single contact, touch or slide the “TUNE/TRACK” Up/Down button (1), select the phone number, and touch the “ENTER” button (6).
- Touch or slide the “TUNE/TRACK” Up/ Down button (1), select “Yes”, and touch the “ENTER” button (6) or press the off-hook button (8).
Use the call history
- Touch or slide the “TUNE/TRACK” Up/Down button (1), select “All Calls,” “Missed Calls”, “Incoming Calls” or “Outgoing Calls” and touch the “ENTER” button (6).
- Touch or slide the “TUNE/TRACK” Up/Down button (1), select the contact number, and touch the “ENTER” button (6).
- Touch or slide the “TUNE/TRACK” Up/Down button (1), select “Yes”, and touch the “ENTER” button (6) or press the off-hook button (8).
Use the speed dial
- Press the Off-hook button (8) for 1 second or longer.
- Touch the desired speed dial button (2)(1-6).
- Touch or slide the “TUNE/TRACK” Up/
- Down button (1), select “YES”, and then touch the “ENTER” button (6) or press the Off-hook button (8).
NOTE:
Speed dial numbers must be registered before this function can be used.
Transfer/delete the phonebook
- Display the Bluetooth® setup menu.
- From the panel button:
Touch the SETUP button (3).
Touch or slide the “TUNE/TRACK” Up/Down button (1), select “Bluetooth”, and touch the “ENTER” button (6). - From the steering switch:
Press the Bluetooth® button (7).
- From the panel button:
- Touch or slide the “TUNE/TRACK” Up/Down button (1), select “Setup Tele-phone”, and touch the “ENTER” button (6).
- Touch or slide the “TUNE/TRACK” Up/Down button (1), select “Setup Phone-book”, and touch the “ENTER” button (6).
Transfer all contacts from your mobile phone
- Touch or slide the “TUNE/TRACK” Up/Down button (1) from the “Setup Phonebook” screen, select “Add Contacts”, and touch the “ENTER” button (6).
- Touch or slide the “TUNE/TRACK” Up/Down button (1), select “Overwrite All”, and touch the “ENTER” button (6).
- Touch or slide the “TUNE/TRACK” Up/Down button (1), select “YES”, and touch the “ENTER” button (6).
Transfer 1 contact from your mobile phone
- Touch or slide the “TUNE/TRACK” Up/Down button (1) from the “Setup Phonebook” screen, select “Add Con-tacts”, and touch the “ENTER” button (6).
- Touch or slide the “TUNE/TRACK” Up/Down button (1), select “Add One Con-tact”, and touch the “ENTER” button (6).
- Touch or slide the “TUNE/TRACK” Up/Down button (1), select “YES”, and touch the “ENTER” button (6).
Delete the registered phonebook
- Touch or slide the “TUNE/TRACK” Up/Down button (1) from the “Setup Phonebook” screen, select “Delete Contacts”, and touch the “ENTER” but-ton (6).
- Touch or slide the “TUNE/TRACK” Up/Down button (1), select the desired initials from the list or “All”, and touch the “ENTER” button (6).
- When you select “All”, it will transition to step 4.
- Touch or slide the “TUNE/TRACK” Up/Down button (1), select the desired name from the list, and touch the “ENTER” button (6).
- Touch or slide the “TUNE/TRACK” Up/Down button (1), select “YES”, and touch the “ENTER” button (6).
Transfer/delete the call history
- Display the Bluetooth® setup menu.
- From the panel button:
Touch the SETUP button (3).
Touch or slide the “TUNE/TRACK” Up/Down button (1), select “Bluetooth”, and touch the “ENTER” button (6). - From the steering switch:
Press the Bluetooth® button (7).
- From the panel button:
- Touch or slide the “TUNE/TRACK” Up/Down button (1), select “Setup Tele-phone”, and touch the “ENTER” button (6).
- Touch or slide the “TUNE/TRACK” Up/Down button (1), select “Setup Call His-tory”, and touch the “ENTER” button (6).
Transfer the call history
- Touch or slide the “TUNE/TRACK” Up/Down button (1) from the “Setup Call History” screen, select “Overwrite His-tory”, and touch the “ENTER” button (6).
- Touch or slide the “TUNE/TRACK” Up/Down button (1), select “YES”, and touch the “ENTER” button (6).
Delete the call history
- Touch or slide the “TUNE/TRACK” Up/Down button (1) from the “Setup Call History” screen, select “Delete His-tory”, and touch the “ENTER” button (6).
Touch or slide the “TUNE/TRACK” Up/Down button (1), select “All Calls”, “Missed Calls”, “Incoming Calls” or “Outgoing Calls” and touch the “ENTER” button (6).
Touch or slide the TUNE/TRACK Up/Down button (1), select the desired data from the history or select “All“, and then touch the “ENTER” button (6).
Touch or slide the “TUNE/TRACK” Up/Down button (1), select “YES”, and touch the “ENTER” button (6).
Registration / deletion of speed dial
- Display the Bluetooth® setup menu.
- From the panel button:
Touch the SETUP button (3).
Touch or slide the “TUNE/TRACK” Up/Down button (1), select “Bluetooth”, and touch the “ENTER” button (6). - From the steering switch:
Press the Bluetooth® button (7).
- From the panel button:
- Touch or slide the “TUNE/TRACK” Up/Down button (1), select “Setup Tele-phone”, and touch the “ENTER” button (6).
- Touch or slide the “TUNE/TRACK” Up/Down button (1), select “Setup Speed Dials”, and touch the “ENTER” button (6).
Registration in speed dial
- Touch or slide the “TUNE/TRACK” Up/Down button (1) from the “Setup Speed Dials” screen, select “Add Speed Dial”, and touch the “ENTER” button (6).
- Touch or slide the “TUNE/TRACK” Up/Down button (1), select the phonebook or call history, and touch the “ENTER” button (6).
- When you select the call history, it will transition to step 4.
- Touch or slide the “TUNE/TRACK” Up/Down button (1), select the desired initials from the list and touch the “ENTER” button (6).
- Touch or slide the “TUNE/TRACK” Up/Down button (1), select the contact number, and touch the “ENTER” button (6).
- If there are multiple phone numbers for a single contact, touch or slide the “TUNE/TRACK” Up/Down button (1), select the phone number, and touch the “ENTER” button (6).
- Touch or slide the “TUNE/TRACK” Up/ Down button (1), select the speed dial number that you want to register, and touch the “ENTER” button (6).
Deletion of speed dial
- Touch or slide the “TUNE/TRACK” Up/Down button (1) from the “Setup Speed Dials” screen, select “Delete Speed Dials”, and touch the “ENTER” button (6).
- Touch or slide the “TUNE/TRACK” Up/Down button (1), select the speed dial number that you want to delete, and touch the “ENTER” button (6).
- Touch or slide the “TUNE/TRACK” Up/Down button (1), select “YES”, and touch the “ENTER” button (6).
Automatic transfer of the phonebook/call history
When registering the mobile phone, you can select to automatically transfer the phonebook and call history from your device. Select according to the following steps.
- Display the Bluetooth® setup menu.
- From the panel button:
Touch the SETUP button (3).
Touch or slide the “TUNE/TRACK” Up/Down button (1), select “Bluetooth”, and touch the “ENTER” button (6). - From the steering switch:
Press the Bluetooth® button (7).
- From the panel button:
- Touch or slide the “TUNE/TRACK” Up/Down button (1), select “Setup Tele-phone”, and touch the “ENTER” button (6).
- Touch or slide the “TUNE/TRACK” Up/Down button (1), select “Auto Transfer”, and touch the “ENTER” button (6).
- Touch or slide the “TUNE/TRACK” Up/Down button (1), select “On” or “Off”, and touch the “ENTER” button (6).
Bluetooth® Audio
To use Bluetooth® devices (Bluetooth® audio or mobile phone) on the audio system, it is required to register the Blue-tooth® devices to the audio system by “Bluetooth® Settings”.
- “TUNE/TRACK” Up/Down button
- “DISP/ENTER” button
- BACK button
- “FLD” (group operation) button
- SETUP (random/repeat) button
- “MEDIA” button
Display
Playback time
Text information display
NOTE:
Some functions may not be usable on some Bluetooth® devices.
Selecting the Bluetooth® audio
- Touch the “MEDIA” button (6).
- Touch the “MEDIA” button (6). Each time the button is touched, the mode will change as follows:
USB (iPod) (if equipped) → Bluetooth® audio (if equipped) → AUX (if equipped)
- Hold down the “TUNE/TRACK” Up/ Down button (1).
- Hold down the Up button for 1 second or longer to fast forward the track.
- Hold down the Down button for 1 second or longer to fast rewind the track.
- Releasing the button can stop the fast forwarding/rewinding.
Selecting a track
- Touch the “TUNE/TRACK” Up/Down button (1).
- Touch the Up button to listen to the next track.
- When the Down button is touched once, the track currently being played will start from the beginning again. Touch the Down button twice to listen to the previous track.
Selecting a group (only for supported models)
- Touch the “FLD” (group operation) button (4).
- Touch the “TUNE/TRACK” Up/Down button (1).
- Touch the Up button to go to the next group.
- Touch the Down button to go to the previous group.
Repeat playback
- Touch the SETUP (random/repeat) button (5).
- Touch or slide the “TUNE/TRACK” Up/ Down button (1), select “Repeat”, and touch the “DISP/ENTER” button (2).
- Each time the “DISP/ENTER” button (2) is touched, display will change as follows:
Off → One song repeat → Group repeat …
- Each time the “DISP/ENTER” button (2) is touched, display will change as follows:
Random playback
- Touch the SETUP (random/repeat) button (5).
- Touch or slide the “TUNE/TRACK” Up/ Down button (1), select “Random”, and touch the “DISP/ENTER” button (2)
- Each time the “DISP/ENTER” button (2) is touched, display will change as follows:
Off → One song repeat →
Group repeat
- Each time the “DISP/ENTER” button (2) is touched, display will change as follows:
Display change
- Touch the “DISP/ENTER” button (2).
- Each time the button is touched, display will change as follows:
Artist name/Track title → Album name/ Track title…
NOTE: - “NO TITLE” will be displayed when there is no text information in the USB device currently being played.
- “…” is displayed if all text data cannot be displayed. Touch and hold the “DISP/
ENTER” button (2) for at least one second to automatically display the rest of the text data.
- Each time the button is touched, display will change as follows:
Anti-Theft Feature
The anti-theft function is intended to dis-courage thefts, such as that the audio sys-tem becomes inoperable when it is installed on other vehicles.
This function works by entering a Personal Identification Number (PIN).
When the unit is disconnected from its power source, such as when the audio system is removed or the battery is disconnected, the unit will become inoperable until the PIN is reentered.
- POWER button
- List selection button
- “ENTER” button
- BACK button
- PIN entry button (1-4)
Display

Setting the Anti-Theft Function
- Touch the POWER button (1) for 1 second or longer to power off the audio system.
- Hold down the button numbered [1] of the PIN entry button (5) and the
“ENTER” button (3) and touch the POWER button (1).- “SECURITY” will be displayed.
- Hold down the Up button of the List selection button (2) and the button numbered [1] of the PIN entry button (5).
- “—-” will be displayed.
- Enter a 4-digit number to be registered as PIN using the buttons numbered [1] – [4] of the PIN entry button (5).
- Touch the “ENTER” button (3) for 1 second or longer.
- “COMPLETE” will be displayed, and the power will turns off after 3 seconds.
NOTE:
Take a note of the registered PIN and keep it for the future use.
Canceling the anti-theft feature
To cancel the anti-theft function, delete the registered PIN.
- Touch the POWER button (1) for 1 second or longer to power off the audio system.
- Hold down the buttons numbered [1] of the PIN entry button (5) and the
“ENTER” button (3) and touch the POWER button (1).- “PIN ENTRY” will be displayed.
- Hold down the Up button of the List selection button (2) and the button numbered [1] of the PIN entry button (5).
- “—-” will be displayed.
- Enter a 4-digit number to be registered as PIN using the buttons numbered [1] – [4] of the PIN entry button (5).
- Touch the “ENTER” button (3) for 1 second or longer.
- If an incorrect PIN is entered, “ERROR* (ERR Number)” will be displayed for 3 seconds, then the audio system will go back to step 2.
- “—-” is displayed on the screen, and the power will turns off after 3 seconds.
NOTE: - To change your PIN, first delete your current PIN, then set a new one.
- If an incorrect PIN is entered 10 times or more, “HELP” will be displayed and the audio system will become inoperable. In
this case, contact a SUZUKI dealer.
Confirming the Personal Identification Number (PIN)
When the main power source is disconnected such as when the battery is replaced, etc, it is required to enter the PIN to make the unit operable again.
- Set the ignition switch to the ACC position.
- “SECURITY” will be displayed.
- Hold down the Up button of the List selection button (2) and the button numbered [1] of the PIN entry button (5).
- “—-” will be displayed.
- Enter the registered 4-digit PIN number using the buttons numbered [1] – [4] of the PIN entry button (5).
- Touch the “ENTER” button (3) for 1 second or longer.
- If an incorrect PIN is entered, “ERROR* (ERR Number)” will be displayed for 3 seconds, then the audio system will go back to step 2.
- After 3 seconds, the power of the audio system will be turned off automatically and it will become operable again.
Steering Switch (if equipped)

Use the steering wheel button to operate the basic functions of the audio system
- MODE button
- Selection button
- Selecting the radio station
- Selecting the track (USB (iPod), Bluetooth
® audio mode) - Mute button
- “VOL” (volume) button
MODE button (1) - Each time the button is pressed, the mode will change as follows:
AM → FM1 → FM2 → USB (iPod) (if
equipped) → Bluetooth® audio (if
equipped) → AUX (if equipped)
Selection button (2)
- FM1, FM2, AM mode:
- Press > to transfer to the next preset channel.
- Press < to transfer to the previous preset channel.
- Press > for 1 second or longer, it will
search for receivable stations at a high frequency.
- Press < for 1 second or longer, it will search for receivable stations at a low frequency.
- USB (iPod), Bluetooth® audio mode:
- Press > to transfer to the next song.
With the folder operation mode, it will transfer to the next folder. - Press < to return to the beginning of the currently playing song. Pressing it twice consecutively will return to the previous song.
With the folder operation mode, it will return to the previous folder. - Press > for 1 second or longer to fast forward the song.
When the button is released, it will stop fast-forwarding. - Press < for 1 second or longer to rewind the song.
Releasing the button can stop rewinding.
- Press > to transfer to the next song.
- Mute button (3)
- Hands-free mode Each time you press the button the mute will switch from ON/OFF.
- USB (iPod), Bluetooth® audio mode:
Press the button during playback to temporarily
stop the playback.
“VOL” button (4)
- Hands-free mode:
- Press during an outgoing or ingoing call, the reception/ringtone sound will increase.
- Press during an outgoing or ingoing call, the reception/ringtone sound will decrease.
- Press during an outgoing call, the ringtone sound will increase.
- Press during an outgoing call, the ringtone sound will decrease.
Radio, USB (iPod), Bluetooth® audio,
AUX mode:
Press , the volume will increase.
Press , the volume will decrease.
Troubleshooting
When encountered a problem, check and follow the instructions as described below.
If the described suggestions do not solve the problem, it is recommended to take the unit to a SUZUKI dealer or a qualified workshop.
| Problem | Possible cause | Possible solution |
COMMON
|
Unable to operate |
The security function is on. |
When “SECURITY” is displayed, enter the ID. When “HELP” is displayed, contact a SUZUKI dealer or a qualified workshop. |
| Unable to turn on the power (no sound).
(No sound is produced) |
Fuse is blown. |
Contact a SUZUKI dealer or a qualified work- shop. |
Radio
| Much noise | It may not be exactly tuned in to the station. | Tune it in exactly to the station. |
| Unable to receive by auto tuning | There may be no station emitting signals powerful enough. | Pick up a station by manual tuning. |
USB
| Playback does not start when the USB device is connected. | There is no supported format file to play on this unit. | Check the file format. |
| The current consumption of the USB device exceeds
1.0 A. |
Use an USB device with a current consumption lower than 1.0 A. | |
| Sound skips or noise produced | Sound skipping may occur when playing VBR (Vari- able Bit Rate) files. | It is not recommended to play VBR files. |
| Problem | Possible cause | Possible solution |
Bluetooth
| Pairing failed | The distance between this unit and the Bluetooth® ready device is too far, or a metallic object may be located between the Bluetooth® ready device and this
unit. |
Change the location of the Bluetooth® ready device. |
| The Bluetooth® function of the Bluetooth® ready device is off. | Refer to the manual of the Bluetooth® ready device. (Some devices have the power saving function that automatically activates after a cer- tain time.) | |
| Unable to receive a call | Your current location may be out of service area. | Drive your vehicle to the service area of the phone. |
| The voice quality of hands-free is low (Distortion, noise etc.) | Another wireless device may be located near the unit. | Switch off the wireless device or keep it away from the unit. |
Error Display Messages
The following messages (flashing) will be displayed onto the screen depending on the condition of the audio system
| Message | Description |
| Reading | When the USB device or iPod’s file format is being read,, this message will be displayed. |
| ERROR 1 | When the USB device or iPod’s reading error occurs, this message will be displayed. Reconnect the USB device or iPod’s connection cable.
When the Bluetooth® audio playback malfunction occurs, this message will be displayed. Check the Bluetooth® audio body. |
Talk button (if equipped)
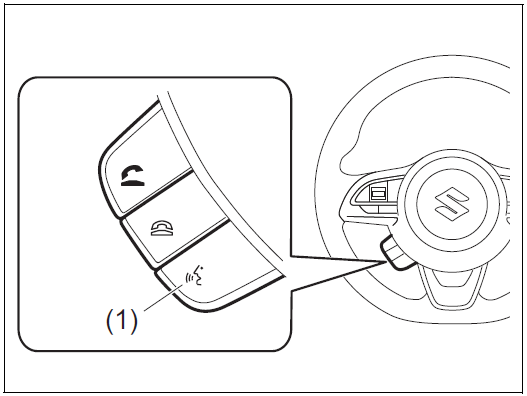
(1) Talk button
It can be used with a device having a voice recognition function. To use the function, it is necessary to perform a corresponding setting on your device. For operation of the audio system or the navigation system, refer to the supplementary manual provided along with it.
Importer: CFAO MOTORS TANZANIA LIMITED
Address: Pugu/Nyerere Road PO Box 40798 Dares Salaam Tanzania
Fuel Filler Cap
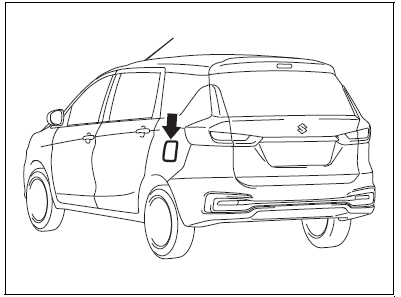
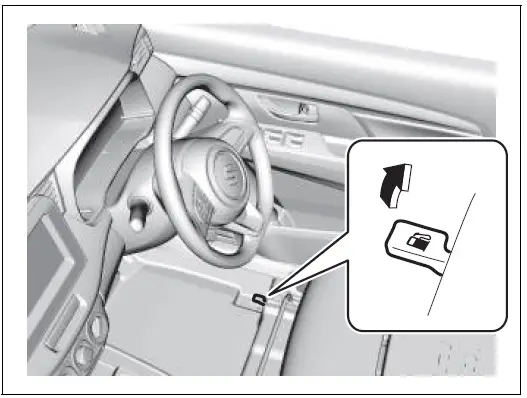
The fuel filler cap is located on the left rear side of the vehicle. The fuel filler door can be unlocked by pulling up the opener lever located on the outboard lower side of the driver’s seat and locked by simply closing the door.
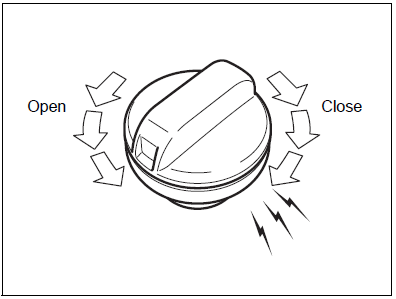
To remove the fuel filler cap:
- Stop the engine and close all the doors and windows while refueling.
- Open the fuel filler door.
- Remove the cap by turning it counterclockwise.
CAUTION
Remove the fuel filler cap slowly. The fuel may be under pressure and may spray out, causing injury.
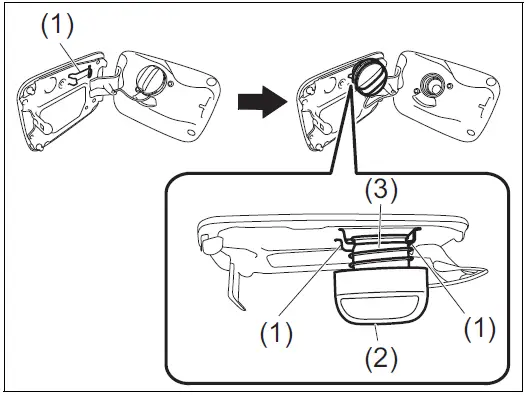
NOTE:
The cap holder (1) holds the fuel filler cap (2) by hooking the groove (3) when refueling.
To reinstall the fuel filler cap:
- Turn the cap clockwise until you hear several clicks.
- Close the fuel filler door.
WARNING
Fuel is extremely flammable. Do not smoke when refueling, and make sure there are no open flames or sparks in the area.
WARNING
If you need to replace the fuel cap, use a genuine SUZUKI cap. Use of an improper cap can result in a malfunction of the fuel system or emission control system. It may also result in fuel leakage while driving and in the event of an accident.
Engine Hood
WARNING
- Never allow children to open or close the hood. Children may injure themselves because the hood is heavy. Contact with the engine compartment and related parts may cause burns when this area/these parts are hot.
- Do not allow children to be near the vehicle when opening the hood.
- Do not leave tools, cloths, and other objects, which were used to clean or perform maintenance and inspections, in the engine compartment. Doing so may cause operational failures or even the vehicle to catch fire when the engine compartment becomes hot.
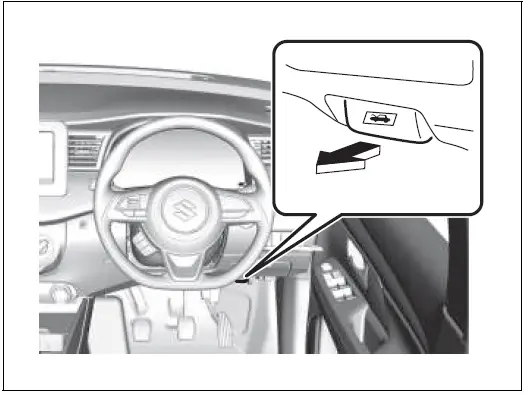
To open the engine hood:
- Pull the hood release handle located under the driver’s side instrument panel in the outboard position. This will disengage the engine hood lock halfway.
- Push the under-hood release lever upward with your finger, as shown in the illustration. While pushing the lever, lift up the engine hood.
CAUTION
The release lever and its peripheral, or engine hood can be hot enough to burn your finger right after driving. Touch after those becomes cool enough.
NOTICE
Check that the wiper arms are not raised before you lift up the engine hood to avoid damaging the wiper arms and the engine hood. - While holding the hood, pull the prop rod out from the holding clip, and then insert the end of the rod into the designated hole.
CAUTION- The prop rod can be hot enough to burn your finger right after driving. Touch the rod after it becomes cool enough.
- Insert the end of the rod into the hole securely. If the rod slips out, you may get caught in the closing hood.
- The rod may slip out when the hood is blown by wind. Be careful on windy days.
NOTICE
Hold the part make in * when removing the bracket from the holder.
To close the engine hood:
- Lift the hood up slightly and remove the prop rod from the hole. Put the prop rod back to the holding clip.
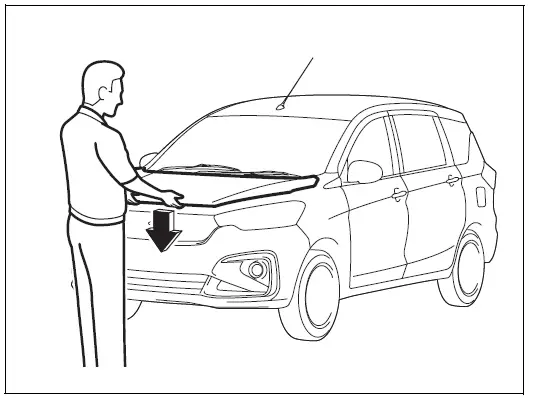
- Lower the hood to about 20 cm above the hood latch, and then let it drop down. Make sure the hood is securely latched after closing.
WARNING
Make sure the hood is fully closed and latched before driving. If it is not, it can fly up unexpectedly during driving, obstructing your view and resulting in an accident.
CAUTION
To avoid injury, check that no part of the occupant’s body such as hands or head is in the path of the hood when closing it.
NOTICE
Pushing on the hood from the top may damage it.
Sun Visor
The sun visor can be pulled down to block glare coming through the windshield, or they can be unhooked and turned to the side to block glare coming through the side window.
NOTICE
When unhooking and hooking a sun visor, handle it by the hard plastic parts or the sun visor can be dam-aged.
Vanity mirror (if equipped)
(1) Vanity mirror
WARNING
- Do not use the vanity mirror while driving. Doing so may result in an accident due to failure to pay attention to the road in front of you.
Do not place any weight on or come to close to the locations where an airbag is stored when using a vanity mirror. Doing so may cause the airbag to deploy and cause serious injury due to the impact of the airbag.
Interior Light
This light switch has two positions which function as described below:
Front (Type A)
Front (Type B)
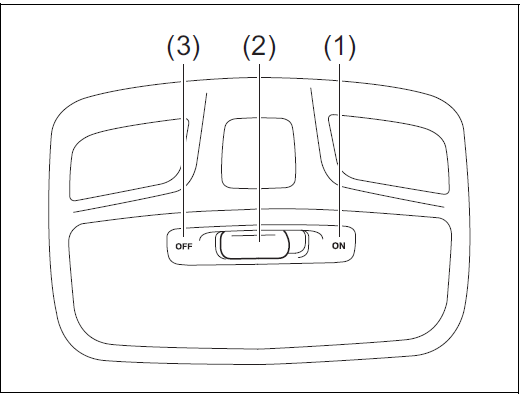
Rear
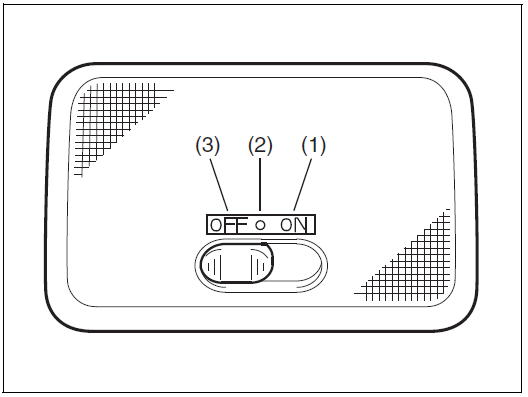
Interior light switch has three positions which function as described below:
ON (1)
The light comes on and stays on regard-less of whether the door is open or closed.
NOTE:
The light will automatically be turned off to prevent the lead-acid battery from dis-charging when the following conditions are simultaneously met:
- The ignition switch is in “LOCK” position, or the ignition mode is “LOCK” (OFF).
- The hazard warning lights, the position lights and the headlights are off.
- After 15 minutes from the light on.
DOOR (2)
- The light comes on when the door is opened. After closing all doors, the light will remain on for about 15 seconds and then fade out. If you insert the key, or press the engine switch to change the ignition mode to “ACC” or “ON” during this time, the light will start to fade out immediately. After removing the key from the ignition switch or press the engine switch to change the ignition mode to “LOCK” (OFF), the light will turn on for about 15 seconds and then fade out.
When the ignition switch is in LOCK position, or the ignition mode is “LOCK” (OFF), to prevent the battery from dis-charging, the light will automatically be turned off when a period of 15 minutes has elapsed after any of the doors (including the tailgate) is opened and other operations are not done.
OFF (3)
The light remains off even when the door is opened.
NOTE:
The number of doors involved in the lighting operation of the interior light depends on the vehicle specification. If there is a switch (rubber projection) at the door opening as shown, the door is involved in the lighting operation. The tailgate is also involved in this operation even without the rubber projection depending on the vehicle specification.
Accessory Socket (if equipped)
Center Console

Floor Console (if equipped)
The accessory socket will work when the ignition switch is in “ACC” or “ON” position. This socket can be used to provide 12 volt/ 120 watt/10 ampere power for electrical accessories.
NOTICE
Use of inappropriate electrical accessories can cause damage to your vehicle’s electrical system. Check that any electrical accessories you use are designed to plug into this type of socket.
Check that the cap remains on the socket when the socket is not in use.
When the ignition switch is in “LOCK” position during using the accessory socket, the unexpected situation may occur; the audio or navigation system does not turn off. If this occurs, disconnect the item from the accessory socket and check whether the electrical equipment work properly.
If the problem persists, ask an authorized SUZUKI dealer to have the system inspected.
-
Assist Grips
Front Passenger’s Seat / 2rd Ro
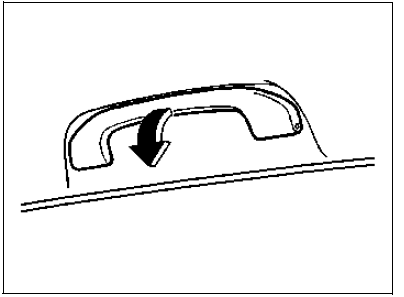
3rd Row Seat
Assist grips are provided for convenience.
NOTICE
To avoid damaging the assist grip and the molded headlining, do not hang down the assist grip.
Glove Box
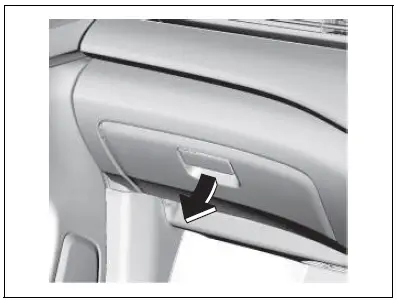
To open the glove box, pull the latch lever. To close it, push the lid until it latches securely.
WARNING
Never drive with the glove box lid open. It could cause injury if an accident occurs.
WARNING
Do not leave cigarette lighters or spray cans in the glove box. If a cigarette lighter or spray can is in a place such as the glove box, it may light accidentally when luggage is loaded, causing a fire.
WARNING
Do not drive the vehicle with the lid of glove box open.
AUX/USB Socket (if equipped)
Connect your portable digital music player, etc. to this socket to enjoy music through the vehicle’s audio system. Refer to “Audio system (if equipped)” in this section.
NOTICE
Always close the cap when not in use, since entry of foreign material, dust, water, conductive liquids may damage the audio system or USB device.
WARNING
If you pay too much attention to operating the AUX/USB socket while driving, an accident may occur.
WARNING
Do not put items in the vehicle that may fall or roll around in the vehicle while driving. Objects getting caught in the brake pedal or accelerator pedal may prevent proper operation of the pedals, which may result in an accident.
Cup Holder and Storage Area
Front
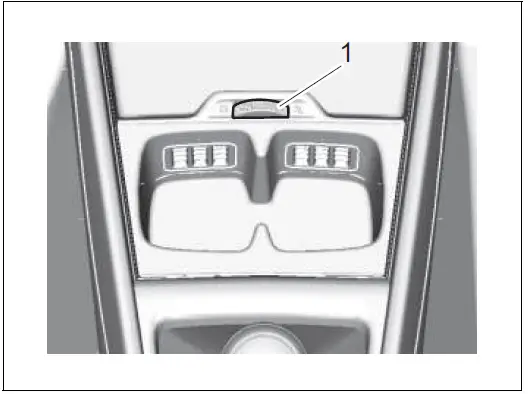
Ventilated cup holder (if equipped)
If you turn on the air conditioning system, air flow comes out of the cup holder outlet. Air flow prevent the temperature of the drink from increasing.
Turn the dial wheel (1) clockwise, the cup holder outlet will open.
Turn the dial wheel(1) counterclockwise, the cup holder outlet will close.
NOTE:
- The temperature of air flow in cup holder is about the same with the center outlet.
There is no effect to cool the drink in the cup holder.
3rd Row Seats
WARNING
Failure to take the precautions listed below could cause personal injury or vehicle damage.
- Be careful when you are using the cup holders to hold a cup containing liquid. Spilling out hot liquid can cause burn injury.
- Do not use the cup holders to hold sharpedged, hard, or breakable objects. Objects in the cup holders may be thrown about during a sudden stop or impact, and could cause personal injury.
Be careful not to spill liquid or insert any foreign materials into the moving part of the gearshift lever, or any electrical components. Liquid or foreign materials may dam-age these parts. - If you spill, or drop liquid accidentally, have your vehicle inspected by a SUZUKI dealer or a qualified workshop.
- Bottle Holder
- Front seats

- 2nd row seats
You should hold a bottle with a cap in the holder. 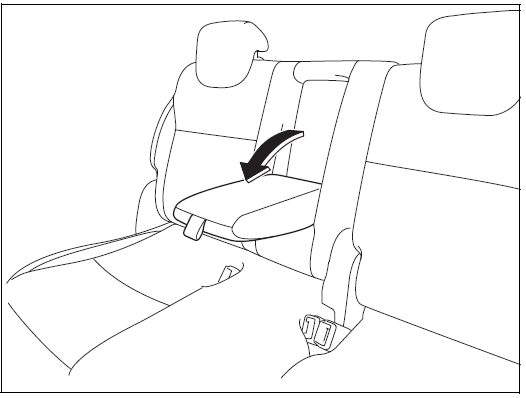
The rear armrest is stowed in the center of the seatback. Tilt it down forward to use.
WARNING
If the seat belt is obstructed by any part of the armrest when fastened, it cannot provide the intended protection. After fastening the seat belt, always check that the armrest is not interfering with the belt.
Bill/Coin Holder
WARNING
Never drive with the bill/coin holder lid open. It could cause injury if an accident occurs.
Footrest (if equipped)

Use the footrest (1) as a support for your left foot and body.
Front Seat Back Pocket (if equipped)
This pocket is provided for holding light and soft things such as gloves, newspapers or magazines.
CAUTION
Do not put hard or breakable objects in the pocket. If an accident occurs, objects such as bottles, cans, etc. can injure the occupants in the rear seat.
Luggage Box (if equipped)
Insert your hands into the notches and lift up the luggage box cover to use the box.
NOTICE
Do not allow items in the box to extend above the top of the box. Otherwise, the box or cover may be dam-aged.
NOTICE
Observe the following instructions, not to break the luggage box cover.
- Do not hold open the cover while driving.
- Do not apply any load to the cover while holding it open.
Roof Rails (if equipped)
Roof Rails
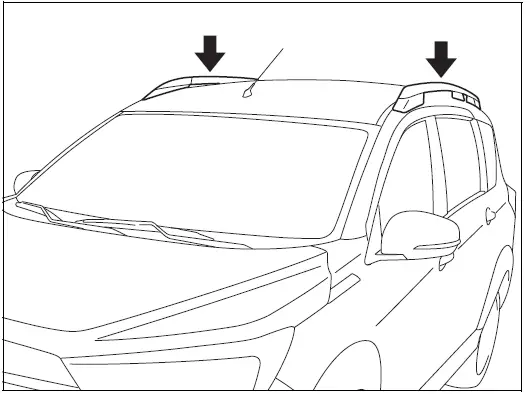
You can use the roof rails to attach the optional roof rack which is available at your SUZUKI dealer. If you use a roof rack, observe the instructions and precautions in this section and provided with the roof rack.
- Check that the roof rack is securely installed.
To mount various types of cargo (such as skis, bicycles, etc.) properly, use suit-able attachments which are available at your SUZUKI dealer. Install the attachments properly and securely according to the instructions provided. Do not mount cargo directly on the roof panel. The cargo can damage the roof panel. - The gross weight of the roof rack plus cargo must not exceed the loading capacity.
- Roof Rails: 50 kg (110 lbs)
Also, do not let the gross vehicle weight (fully loaded vehicle including driver, passengers, cargo, roof load and trailer tongue weight) exceed the Gross Vehicle Weight Rating (GVWR) listed in “SPECIFICATIONS” section.
- Roof Rails: 50 kg (110 lbs)
- Mount and secure the cargo onto the roof rack properly according to the instructions provided. Stow the heaviest items at the bottom and distribute the cargo as evenly as possible.
Do not carry large items that hang over the bumpers or the sides of the vehicle. Otherwise, these items could block your view. - Secure the front and rear ends of long items such as wood panels and surf-boards, to both the front and rear of the vehicle. You should protect the painted surfaces of the vehicle from scuffing caused by tie-down ropes.
Check periodically that the roof rack is securely installed and free from damage. Secure the front and rear ends of long items such as wood panels and surf-boards, to both the front and rear of the vehicle. You should protect the painted surfaces of the vehicle from scuffing caused by tie-down ropes.
Check periodically that the roof rack is securely installed and free from damage.
WARNING
Abrupt maneuvers or failure to properly secure cargo can allow the cargo to fly off the vehicle and hit others, causing personal injury or property damage.
Mount cargo securely and avoid abrupt maneuvers such as jackrabbit starts, sharp turns, fast cornering and sudden braking. Check periodically that cargo is securely fastened.
Large, bulky, long or flat items can affect vehicle aerodynamics or be caught by the wind, and can reduce vehicle control resulting in an accident and personal injury. Drive cautiously at a safely reduced speed when carrying this type of cargo.
Frame Hooks
It is not recommended that you use the frame hooks for towing another vehicle. They were originally designed to tow your vehicle in emergency situation.
If your vehicle needs to be towed in an emergency, refer to “Towing your vehicle” in “EMERGENCY SERVICE” section.
WARNING
Observe the following instructions when using frame hooks. The towing eye or vehicle body may break and cause serious injury or damage:
- Do not use the frame hooks for towing another vehicle.
Avoid pulling the vehicle to get out of severe snowy, muddy or sandy conditions, sudden starts or erratic driving maneuvers which could cause excessive stress on the towing eye.
In such case, we recommend that you contact a professional service.
Front
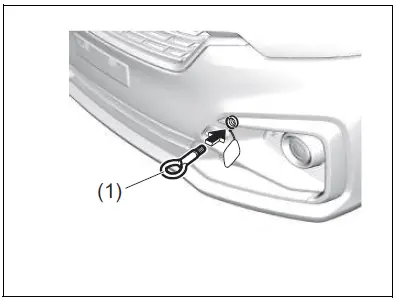
The towing eye (1) is provided on the front of the vehicle for use in emergency situations and sea shipping purpose only.
NOTICE
To prevent damage to the vehicle, never use the towing eye (1) for trailer / train shipping.
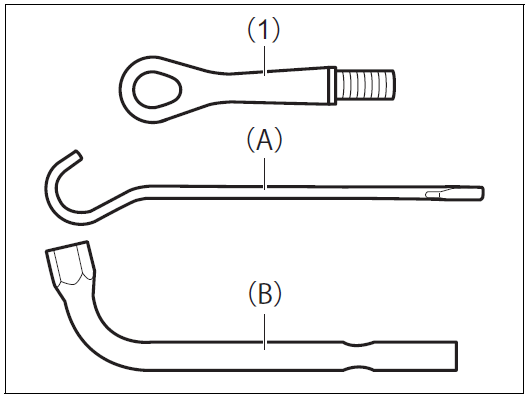
Tools are stowed in the side of the luggage compartment. Remove the cover to access the tools.
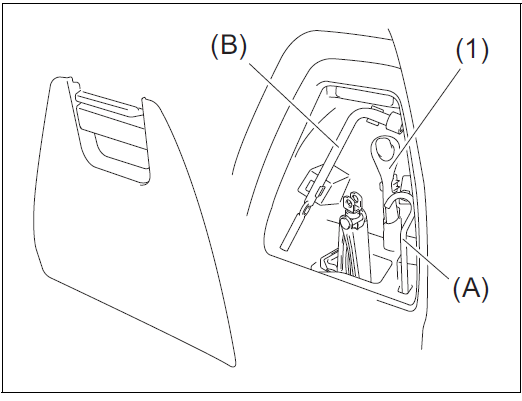
- Pick up the towing eye (1), jack handle (A) and wheel wrench (B) in the luggage compartment.
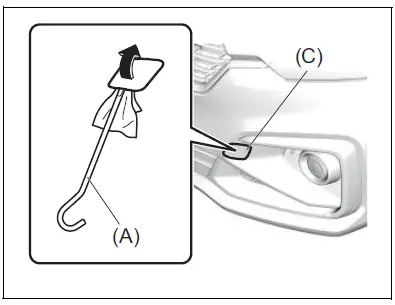
- Remove the cover (C) by using a jack handle (A) covered with a soft cloth as shown in the illustration.
NOTE:
Do not use excessive force as it may dam-age the cover strap. - Install the towing eye (1) by hand.
NOTE:
It is recommended to secure the cover with tape to prevent damage during towing. - To tighten the towing eye (1), turn it clockwise by using a wheel wrench (B) until the towing eye (1) is securely installed.To remove the towing eye (1), reverse the installation procedure.
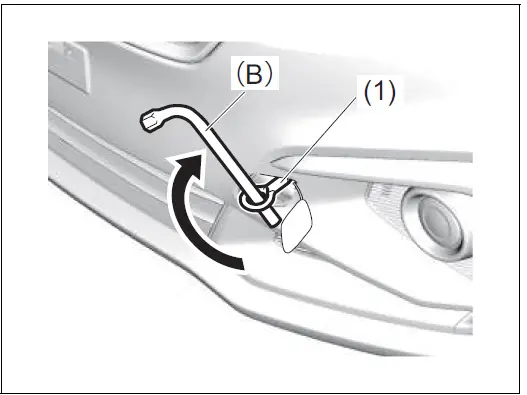
It is recommended to separate coins (2) and bills (3) with partition.
The holder can also be used after sliding out and removing the partition plate (1). Push the upper of the holder to close the cover.
Rear
The frame hook (2) is provided on the rear of the vehicle for use in emergency situations and sea shipping purposes only.
NOTICE
To prevent damage to the vehicle, never use the frame hook (2) for trailer / train shipping.
Other Holes
The frame holes (3) are provided only for transporting by a car carrier trailer.
NOTICE
Do not use the frame holes (3) for towing purpose. These holes may break and cause serious injury or damage.
Reference Links
View Full User Guide: Suzuki New ERTIGA 2020 User Manual
Download Manuals: https://suzuki-aftersales.net/manuals