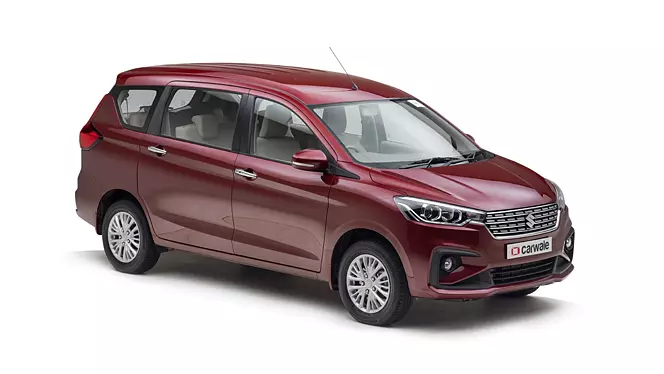
Suzuki New ERTIGA 2020 INSPECTION AND MAINTENANCE
The 2020 Suzuki New Ertiga is a great example of how great engineering and careful repair can work together to make a car that lasts and works well for a long time. As the proud owner of this flexible and dynamic vehicle, you need to know the ins and outs of inspection and maintenance to keep it running smoothly and at its best. The 2020 Suzuki New Ertiga has a lot of features that make it easier to own, but it’s just as important to take care of it regularly if you want it to last. From regular inspections to maintenance tasks that need to be done on a set schedule, this car needs a complete plan to make sure it works at its best. By learning about how to check and take care of your 2020 Suzuki New Ertiga, you take the first step toward being a responsible owner who will enjoy many miles of trouble-free driving.
INSPECTION AND MAINTENANCE
WARNING
Take extreme care when working on your vehicle to prevent accidental injury. Carefully observe the following precautions:
- To prevent damage or unintended activation of the airbag system or seat belt pre-tensioner system, be sure that the battery is disconnected and the ignition switch has been in LOCK position or the ignition mode has been “LOCK” (OFF) for at least 90 seconds before performing any electrical service work on your SUZUKI vehicle. Do not touch airbag system components, seat belt pre-tensioner system components or wires.
The wires are wrapped with yellow tape or yellow tubing, and the couplers are yellow for easy identification. - Do not leave the engine running in garages or other confined areas.
- When the engine is running, keep hands, clothing, tools, and other objects away from the fan and drive belt. Even though the fan may not be moving, it can automatically turn on without warning.
- When it is necessary to perform service work with the engine running, make sure that the parking brake is set fully and the transmission is in Neutral (for manual transmission vehicles) or Park (for automatic transmission vehicles).
- Do not touch ignition wires or other ignition system parts when starting the engine or when the engine is running, or you could receive an electric shock.
- Be careful not to touch a hot engine, exhaust manifold and pipes, muffler, radiator and water hoses.
- Do not allow smoking, sparks, or flames around fuel or the battery. Flammable fumes are present.
- Do not get under your vehicle if it is supported only with the portable jack provided in your vehicle.
- Be careful not to cause accidental short circuits between the positive and negative battery terminals.
- Keep used oil, coolant, and other fluids away from children and pets. Dispose of used fluids properly; never pour them on the ground, into sewers, etc.
Maintenance Schedule
The following table shows the times when you should perform regular maintenance on your vehicle. This table shows in miles, kilometers and months when you should perform inspections, adjustments, lubrication and other services. These intervals should be shortened if driving is usually done under severe conditions (refer to “Maintenance Recommended under Severe Driving Conditions”).
WARNING
SUZUKI recommends that maintenance on items marked with an asterisk (*) be performed by a SUZUKI dealer or a qualified workshop. If you are qualified, you may perform maintenance on the unmarked items by referring to the instructions in this section. If you are not sure whether you can successfully complete any of the unmarked maintenance jobs, ask a SUZUKI dealer or a qualified workshop to do the maintenance for you.
NOTICE
Whenever it becomes necessary to replace parts on your vehicle, it is recommended that you use genuine SUZUKI replacement parts or their equivalent.
Periodic Maintenance Schedule
“R”: Replace or Change
“I”: Inspect, clean, adjust, lubricate or replace as necessary
NOTE:
This table shows the service schedule up to 180000 km (108000 miles). Beyond 180000 km (108000 miles), perform the same services at the same intervals shown in the chart.
| Interval: This interval should be judged by odometer reading or months, whichever comes first. | km (x1000) | 15 | 30 | 45 | 60 | 75 | 90 |
| miles (x1000) | 9 | 18 | 27 | 36 | 45 | 54 | |
| months | 12 | 24 | 36 | 48 | 60 | 72 | |
| ENGINE | |||||||
| *1-1. Engine accessory drive belt Tension check, *Adjustment, *Replacement | I | I | I | I | I | I | |
| – | – | – | – | R | – | ||
| *1-2. Valve clearance | – | I | – | I | – | I | |
| 1-3. Engine oil and engine oil filter | R | R | R | R | R | R | |
| 1-4. Engine coolant | – | – | R | – | – | R | |
| *1-5. Exhaust system (except catalyst) | – | I | – | I | – | I | |
| IGNITION | |||||||
| 2-1. Spark plugs | |||||||
| When unleaded fuel is used Nickel plug | – | – | R | – | – | R | |
| When leaded fuel is used, refer to “Severe Driving Condition” schedule. | |||||||
| FUEL | |||||||
| 3-1. Air cleaner filter element Paved-road | I | I | R | I | I | R | |
| Dusty condition | Refer to “Severe Driving condition” schedule. | ||||||
| *3-2. Fuel lines | – | I | – | I | – | I | |
| *3-3. Fuel filter | Replace every 105000 km (63000 miles). | ||||||
| *3-4. Fuel tank | – | – | I | – | – | I | |
| EMISSION CONTROL SYSTEM | |||||||
| *4-1. PCV valve | – | – | – | – | – | I | |
| *4-2. Fuel evaporative emission control system | – | – | – | – | – | I | |
| Interval: This interval should be judged by odometer reading or months, whichever comes first. | km (x1000) | 105 | 120 | 135 | 150 | 165 | 180 |
| miles (x1000) | 63 | 72 | 81 | 90 | 99 | 108 | |
| months | 84 | 96 | 108 | 120 | 132 | 144 | |
| ENGINE | |||||||
| *1-1. Engine accessory drive belt Tension check, *Adjustment, *Replacement | I | I | I | I | I | I | |
| – | – | – | R | – | – | ||
| *1-2. Valve clearance | – | I | – | I | – | I | |
| 1-3. Engine oil and engine oil filter | R | R | R | R | R | R | |
| 1-4. Engine coolant | – | – | R | – | – | R | |
| *1-5. Exhaust system (except catalyst) | – | I | – | I | – | I | |
| IGNITION | |||||||
| 2-1. Spark plugs | |||||||
| When unleaded fuel is used Nickel plug | – | – | R | – | – | R | |
| When leaded fuel is used, refer to “Severe Driving Condition” schedule. | |||||||
| FUEL | |||||||
| 3-1. Air cleaner filter element Paved-road | I | I | R | I | I | R | |
| Dusty condition | Refer to “Severe Driving condition” schedule. | ||||||
| *3-2. Fuel lines | – | I | – | I | – | I | |
| *3-3. Fuel filter | Replace every 105000 km (63000 miles). | ||||||
| *3-4. Fuel tank | – | – | I | – | – | I | |
| EMISSION CONTROL SYSTEM | |||||||
| *4-1. PCV valve | – | – | – | – | – | I | |
| *4-2. Fuel evaporative emission control system | – | – | – | – | – | I | |
| Interval: This interval should be judged by odometer reading or months, whichever comes first. | km (x1000) | 15 | 30 | 45 | 60 | 75 | 90 |
| miles (x1000) | 9 | 18 | 27 | 36 | 45 | 54 | |
| months | 12 | 24 | 36 | 48 | 60 | 72 | |
| BRAKE | |||||||
| *5-1. Brake discs and pads (front) | I | I | I | I | I | I | |
| Brake drums and shoes (rear) | – | I | – | I | – | I | |
| *5-2. Brake hoses and pipes | – | I | – | I | – | I | |
| 5-3. Brake pedal | I | I | I | I | I | I | |
| *5-4. Brake fluid (#1) | I | R | I | R | I | R | |
| 5-5. Parking brake lever and cable Check, *Adjustment (1st 15000 km only) | I | – | – | – | – | – | |
| CHASSIS AND BODY | |||||||
| *6-1. Clutch pedal | I | I | I | I | I | I | |
| *6-2. Clutch fluid (#1) | I | R | I | R | I | R | |
| 6-3. Tyres/Wheels (#2) | I | I | I | I | I | I | |
| *6-4. Drive axle boots (#3) | – | – | I | – | – | I | |
| *6-5. Suspension system (#4) | – | I | – | I | – | I | |
| *6-6. Steering system (#5) | – | I | – | I | – | I | |
| *6-7. Manual transmission oil Genuine “SUZUKI GEAR OIL 75W-80” | Inspect every 30000 km (18000miles) or 24 months. | ||||||
| Replace every 150000 km (90000miles) or 120 months. | |||||||
| Other than “SUZUKI GEAR OIL 75W-80” | I | – | R | – | – | R | |
| (I: 1st 15000 km only) | |||||||
| 6-8. Automatic transmission Fluid level | – | I | – | I | – | I | |
| * Fluid change | Replace every 165000 km (99000 miles) | ||||||
| * Fluid hose | – | – | – | I | – | – | |
| 6-9. All latches, hinges and locks | – | I | – | I | – | I | |
| *6-10. Air conditioner filter element (if equipped) | – | I | R | – | I | R | |
- Clutch fluid is supplied from brake fluid reservoir.
- Tyres/Wheels (including tyre rotation) for Mexico models : Inspect every 15000 km (9000 miles) or 12 months.
- Drive axle boots for Mexico models
- Suspension system for Mexico models
- Steering system for Mexico models
WARNING
The shock absorbers are filled with high pressure gas. Never attempt to disassemble them or throw them into a fire. Avoid storing them near a heater or heating device. When scrapping the absorber, the gas must be released from the absorber safely. Ask a SUZUKI dealer or a qualified workshop for assistance.
| Interval: This interval should be judged by odometer reading or months, whichever comes first. | km (x1000) | 105 | 120 | 135 | 150 | 165 | 180 |
| miles (x1000) | 63 | 72 | 81 | 90 | 99 | 108 | |
| months | 84 | 96 | 108 | 120 | 132 | 144 | |
| BRAKE | |||||||
| *5-1. Brake discs and pads (front) | I | I | I | I | I | I | |
| Brake drums and shoes (rear) | – | I | – | I | – | I | |
| *5-2. Brake hoses and pipes | – | I | – | I | – | I | |
| 5-3. Brake pedal | I | I | I | I | I | I | |
| *5-4. Brake fluid (#1) | I | R | I | R | I | R | |
| 5-5. Parking brake lever and cable Check, *Adjustment (1st 15000 km only) | – | – | – | – | – | – | |
| CHASSIS AND BODY | |||||||
| *6-1. Clutch pedal | I | I | I | I | I | I | |
| *6-2. Clutch fluid (#1) | I | R | I | R | I | R | |
| 6-3. Tyres/Wheels (#2) | I | I | I | I | I | I | |
| *6-4. Drive axle boots (#3) | – | – | I | – | – | I | |
| *6-5. Suspension system (#4) | – | I | – | I | – | I | |
| *6-6. Steering system (#5) | – | I | – | I | – | I | |
| *6-7. Manual transmission oil Genuine “SUZUKI GEAR OIL 75W-80” | Inspect every 30000 km (18000miles) or 24 months. | ||||||
| Replace every 150000 km (90000miles) or 120 months. | |||||||
| Other than “SUZUKI GEAR OIL 75W-80” | – | – | R | – | – | R | |
| (I: 1st 15000 km only) | |||||||
| 6-8. Automatic transmission Fluid level | – | I | – | I | – | I | |
| * Fluid change | Replace every 165000 km (99000 miles) | ||||||
| * Fluid hose | – | I | – | – | – | I | |
| 6-9. All latches, hinges and locks | – | I | – | I | – | I | |
| *6-10. Air conditioner filter element (if equipped) | – | I | R | – | I | R | |
- Clutch fluid is supplied from brake fluid reservoir.
- Tyres/Wheels (including tyre rotation) for Mexico models : Inspect every 15000 km (9000 miles) or 12 months.
- Drive axle boots for Mexico models
- Suspension system for Mexico models
- Steering system for Mexico models
INSPECTION AND MAINTENANCE
Maintenance Recommended under Severe Driving Conditions
Follow this schedule if your vehicle is mainly operated under one or more of the following conditions:
- When most trips are less than 6 km (4 miles).
- When most trips are less than 16 km (10 miles) and outside temperature remains below freezing.
- Idling and/or low-speed operation in stop-and-go traffic.
- Operating in extremely cold weather and/or on salted roads.
- Operating in rough and/or muddy areas.
- Operating in dusty areas.
- Repeated high speed drive or high engine revolutions.
- Towing a trailer, if admitted.
- Schedule should also be followed if the vehicle is used for delivery service, police, taxi or other commercial applications.
| Interval: This interval should be judged by odometer reading or months, whichever comes first. | km (x1000) | 7.5 | 15 | 22.5 | 30 | 37.5 | 45 |
| miles (x1000) | 4.5 | 9 | 13.5 | 18 | 22.5 | 27 | |
| months | 6 | 12 | 18 | 24 | 30 | 36 | |
| ENGINE | |||||||
| *1-1. Engine accessory drive belt Tension check, *Adjustment, *Replacement | I | I | I | I | I | I | |
| – | – | – | – | R | – | ||
| *1-2. Valve Clearance | – | – | – | I | – | – | |
| 1-3. Engine oil and engine oil filter | R | R | R | R | R | R | |
| 1-4. Engine coolant | – | – | – | – | – | R | |
| *1-5. Exhaust system (except catalyst) | – | – | – | I | – | – | |
| IGNITION | |||||||
| 2-1. Spark plugs Nickel plug | Replace every 10000 km (6000 miles) or 8 months. | ||||||
| FUEL | |||||||
| 3-1. Air cleaner filter element*1 | Inspect every 2500 km (1500 miles). | ||||||
| Replace every 30000 km (18000 miles) or 24 months. | |||||||
| *3-2. Fuel lines | – | – | – | I | – | – | |
| *3-3. Fuel filter | Replace every 105000 km (63000 miles). | ||||||
| *3-4. Fuel tank | – | – | – | – | – | I | |
| EMISSION CONTROL SYSTEM | |||||||
| *4-1. PCV valve | – | – | – | – | – | – | |
| *4-2. Fuel evaporative emission control system | – | – | – | – | – | – | |
| Interval: This interval should be judged by odometer reading or months, whichever comes first. | km (x1000) | 52.5 | 60 | 67.5 | 75 | 82.5 | 90 |
| miles (x1000) | 31.5 | 36 | 40.5 | 45 | 49.5 | 54 | |
| months | 42 | 48 | 54 | 60 | 66 | 72 | |
| ENGINE | |||||||
| *1-1. Engine accessory drive belt Tension check, *Adjustment, *Replacement | I | I | I | I | I | I | |
| – | – | – | R | – | – | ||
| *1-2. Valve Clearance | – | I | – | – | – | I | |
| 1-3. Engine oil and engine oil filter | R | R | R | R | R | R | |
| 1-4. Engine coolant | – | – | – | – | – | R | |
| *1-5. Exhaust system (except catalyst) | – | I | – | – | – | I | |
| IGNITION | |||||||
| 2-1. Spark plugs Nickel plug | Replace every 10000 km (6000 miles) or 8 months.. | ||||||
| FUEL | |||||||
| 3-1. Air cleaner filter element*1 | Inspect every 2500 km (1500 miles). | ||||||
| Replace every 30000 km (18000 miles) or 24 months. | |||||||
| *3-2. Fuel lines | – | I | – | – | – | I | |
| *3-3. Fuel filter | Replace every 105000 km (63000 miles). | ||||||
| *3-4. Fuel tank | – | – | – | – | – | I | |
| EMISSION CONTROL SYSTEM | |||||||
| *4-1. PCV valve | – | – | – | – | – | I | |
| *4-2. Fuel evaporative emission control system | – | – | – | – | – | I | |
| Interval: This interval should be judged by odometer reading or months, whichever comes first. | km (x1000) | 7.5 | 15 | 22.5 | 30 | 37.5 | 45 |
| miles (x1000) | 4.5 | 9 | 13.5 | 18 | 22.5 | 27 | |
| months | 6 | 12 | 18 | 24 | 30 | 36 | |
| BRAKE | |||||||
| *5-1. Brake discs and pads (front) | – | I | – | I | – | I | |
| Brake drums and shoes (rear) | – | – | – | I | – | – | |
| *5-2. Brake hoses and pipes | – | – | – | I | – | – | |
| 5-3. Brake pedal | – | I | – | I | – | I | |
| *5-4. Brake fluid (#1) | – | I | – | R | – | I | |
| 5-5. Parking brake lever and cable Check, *Adjustment (1st 15000 km only) | – | I | – | – | – | – | |
| CHASSIS AND BODY | |||||||
| *6-1. Clutch pedal | – | I | – | I | – | I | |
| *6-2. Clutch fluid (#1) | – | I | – | R | – | I | |
| 6-3. Tyres/Wheels (#2) | – | I | – | I | – | I | |
| *6-4. Wheel bearings (#3) | – | I | – | I | – | I | |
| *6-5. Drive axle boots (#4) | – | I | – | I | – | I | |
| *6-6. Suspension system (#5) | – | – | – | I | – | – | |
| *6-7. Steering system (#6) | – | – | – | I | – | – | |
| *6-8. Manual transmission oil Genuine “SUZUKI GEAR OIL 75W-80” | Inspect every 30000 km (18000miles) or 24 months. | ||||||
| Replace every 60000 km (36000miles) or 48 months. | |||||||
| Other than “SUZUKI GEAR OIL 75W-80” | – | – | – | R | – | – | |
| 6-9. Automatic transmission Fluid level | – | – | – | I | – | – | |
| *Fluid change | – | – | – | R | – | – | |
| *Fluid hose | Inspect every 60000 km (36000miles) or 48 months. | ||||||
| 6-10. All latches, hinges and locks | – | – | – | I | – | – | |
| *6-11. Air conditioner filter element (if equipped)*2 | – | I | – | I | – | R | |
WARNING
The shock absorbers are filled with high-pressure gas. Never attempt to disassemble them or throw them into a fire. Avoid storing them near a heater or heating device. When scrapping the absorber, the gas must be released from the absorber safely. Ask a SUZUKI dealer or a qualified workshop for assistance.
| Interval: This interval should be judged by odometer reading or months, whichever comes first. | km (x1000) | 52.5 | 60 | 67.5 | 75 | 82.5 | 90 |
| miles (x1000) | 31.5 | 36 | 40.5 | 45 | 49.5 | 54 | |
| months | 42 | 48 | 54 | 60 | 66 | 72 | |
| BRAKE | |||||||
| *5-1. Brake discs and pads (front) | – | I | – | I | – | I | |
| Brake drums and shoes (rear) | – | I | – | – | – | I | |
| *5-2. Brake hoses and pipes | – | I | – | – | – | I | |
| 5-3. Brake pedal | – | I | – | I | – | I | |
| *5-4. Brake fluid (#1) | – | R | – | I | – | R | |
| 5-5. Parking brake lever and cable Check, *Adjustment (1st 15000 km only) | – | – | – | – | – | – | |
| CHASSIS AND BODY | |||||||
| *6-1. Clutch pedal | – | I | – | I | – | I | |
| *6-2. Clutch fluid (#1) | – | R | – | I | – | R | |
| 6-3. Tyres/Wheels (#2) | – | I | – | I | – | I | |
| *6-4. Wheel bearings (#3) | – | I | – | I | – | I | |
| *6-5. Drive axle boots (#4) | – | I | – | I | – | I | |
| *6-6. Suspension system (#5) | – | I | – | – | – | I | |
| *6-7. Steering system (#6) | – | I | – | – | – | I | |
| *6-8. Manual transmission oil Genuine “SUZUKI GEAR OIL 75W-80” | Inspect every 30000 km (18000miles) or 24 months | ||||||
| Replace every 60000 km (36000miles) or 48 months | |||||||
| Other than “SUZUKI GEAR OIL 75W-80” | – | R | – | – | – | R | |
| 6-9. Automatic transmission Fluid level | – | I | – | – | – | I | |
| *Fluid change | – | R | – | – | – | R | |
| *Fluid hose | Inspect every 60000 km (36000miles) or 48 months. | ||||||
| 6-10. All latches, hinges, and locks | – | I | – | – | – | I | |
| *6-11. Air conditioner filter element (if equipped)*2 | – | I | – | I | – | R | |
- Clutch fluid is supplied from the brake fluid reservoir.
- Tires/Wheels (including tire rotation) for Mexico models: Inspect every 7500 km (4500 miles) or 6 months.
- Wheel bearings for Mexico models
- Drive axle boots for Mexico models
- Suspension system for Mexico models
- The steering system for Mexico models.
NOTE:
This table shows the service schedule up to 90000 km (54000 miles). Beyond 90000 km (54000 miles), perform the same services at the same intervals shown in the chart.* 1 Inspect more frequently if the vehicle is used under dusty conditions. Clean more frequently if the air flow from the air conditioner decreases.
Drive Belt
WARNING
When the engine is running, keep hands, hair, clothing, tools, etc. away from the moving fan and drive belts.
Check that the drive belt tension is correct while the engine is stopped. If the belt is too loose, insufficient battery charging, engine overheating, poor air conditioning, or excessive belt wear can result. When you push the belt with your thumb midpoint between the pulleys, there should be a deflection according to the following chart. The belts should also be examined to ensure that they are not damaged. If you need to replace or adjust the belt have it done by a SUZUKI dealer or a qualified workshop.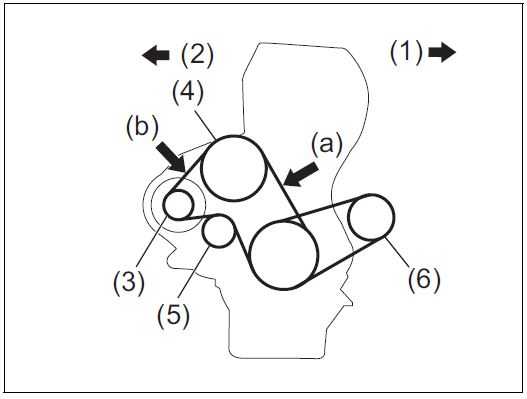
- Vehicle front
- Vehicle rear
- Generator
- Water pump
- Tensioner pulley
- Air conditioner compressor
Drive belt deflection
(100 N (10 kg, 22 lbs) press)
(a) New:
4.8 – 5.9 mm (0.19 – 0.23 in.) Readjustment:
7.2 – 8.2 mm (0.28 – 0.32 in.)
(b) New:
3.2 – 3.9 mm (0.12 – 0.15 in.) Readjustment:
4.8 – 5.6 mm (0.19 – 0.22 in.)
Engine Oil and Filter
Specified Oil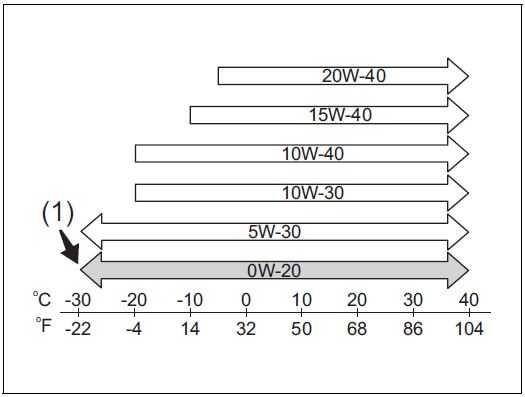
Preferred
Check that the engine oil you use comes under the quality classification of SG, SH, SJ, SL, SM or SN. Select the appropriate oil viscosity according to the above chart.
SAE 0W-20 (1) is the best choice for good fuel economy and good startability in cold weather.
NOTE:
We recommend that you use SUZUKI genuine oil. To purchase it, visit a SUZUKI dealer or a qualified workshop.
Oil Level Check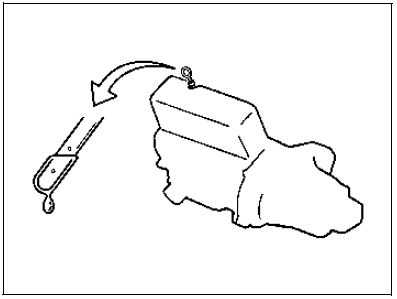
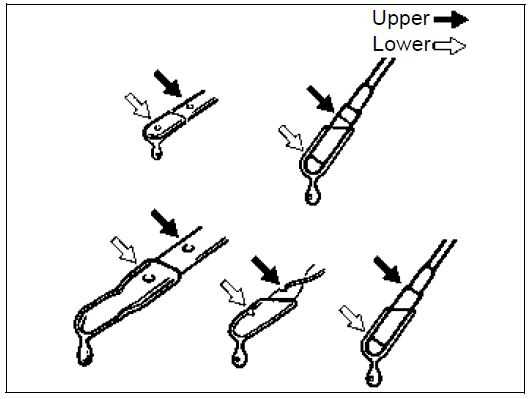
It is important to keep the engine oil at the correct level for proper lubrication of your vehicle’s engine. Check the oil level with the vehicle on a level surface. The oil level indication may be inaccurate if the vehicle is on a slope. The oil level should be checked either before starting the engine or at least 5 minutes after stopping the engine. The handle of the engine oil dipstick is colored with yellow for easy identification. Pull out the oil dipstick, wipe the oil off with a clean cloth, insert the dipstick all the way into the engine, and then remove it again. The oil on the stick should be between the upper and lower limits shown on the stick. If the oil level indication is near the lower limit, add enough oil to raise the level to the upper limit.
NOTICE
Failure to check the oil level regularly could lead to serious engine trouble due to insufficient oil.
Refilling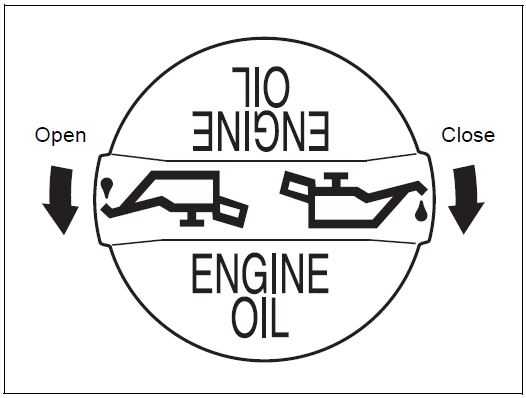
Remove the oil filler cap and pour oil slowly through the filler hole to bring the oil level to the upper limit on the dipstick. Be careful not to overfill the oil. Too much oil is almost as bad as too little oil. After refilling, start the engine and allow it to idle for about a minute. Stop the engine, wait about 5 minutes and check the oil level again.
Changing Engine Oil and Filter
Drain the engine oil while the engine is still warm.
- Remove the oil filler cap.
- Place a drain pan under the drain plug.
- Using a wrench, remove the drain plug and drain the engine oil.
CAUTION
The engine oil temperature may be high enough to burn your fingers when the drain plug is loosened. Wait until the drain plug is cool enough to touch with your bare hands.
Tightening torque for drain plug 35 Nm (3.6 kg-m, 25.8 lb ft)
WARNING
Engine oil can be hazardous. Children and pets may be harmed by swallowing new or used oil. Keep new and used oil and used oil filters away from children and pets. Repeated, prolonged contact with used engine oil may cause skin cancer. Brief contact with used oil may irritate skin. To minimize your exposure to used oil, wear a long-sleeve shirt and moisture-proof gloves (such as dish-washing gloves) when changing oil. If oil contacts your skin, wash thoroughly with soap and water. Launder any clothing or rags if it is with oil.
Recycle or properly dispose of used oil and filters. Reinstall the drain plug with new gasket. Tighten the plug with a wrench to the specified torque.
Oil Filter Replacement
- Using an oil filter wrench, turn the oil filter counterclockwise and remove it.
- Using a clean rag, wipe off the mounting surface on the engine where the new filter will be seated.
- Smear a small amount of engine oil around the rubber gasket of the new oil filter.
- Screw the new filter by hand until the filter gasket contacts the mounting sur-face.
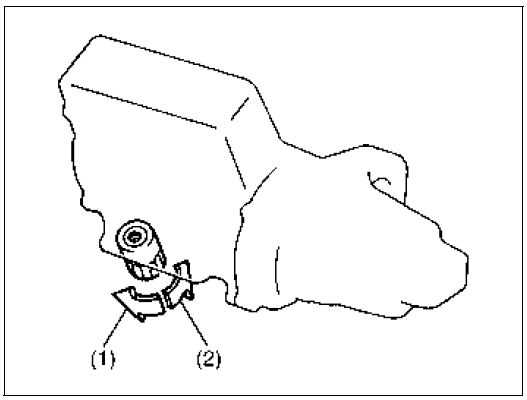
- Loosen
- Tighten
Tightening (viewed from filter top)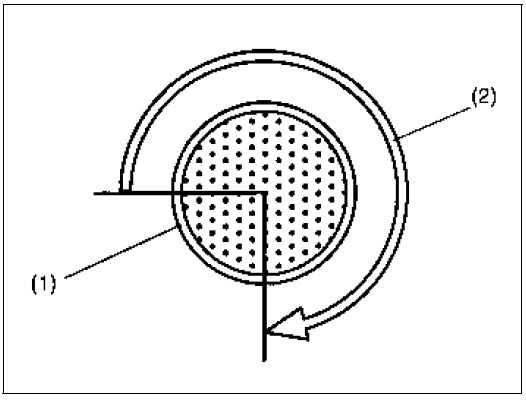
- Oil filter
- 3/4 turn
NOTICE
To tighten the oil filter properly, it is important to accurately identify the position at which the filter gasket first contacts the mounting surface. Tighten the filter as specified below from the point of contact with the mounting surface (or to the specified torque) using an oil filter wrench.
Tightening torque for oil filter 3/4 turn or 14 Nm (1.4 kg-m, 10.3 lb-ft)
NOTICE
To prevent oil leakage, make sure that the oil filter is tight, but do not over-tighten it.
Refill with Oil and Oil Leakage Check
- Pour oil through the filler hole and install the filler cap. For the approximate capacity of the oil, refer to “Capacities” in “SPECIFICA-TIONS” section.
- Start the engine and carefully check the oil filter and the drain plug for leakage. Run the engine at various speeds for at least 5 minutes.
- Stop the engine and wait about 5 minutes. Check the oil level again and add oil if necessary. Check for leakage again.
NOTICE
- When replacing the oil filter, it is recommended that you use a genuine SUZUKI replacement filter. If you use an aftermarket filter, make sure it is of equivalent quality and follow the manufacturer’s instructions.
- Oil leakage from the periphery of the oil filter or drain plug indicate incorrect installation or gasket damage. If you find any leakage or are not sure that the filter has been properly tightened, have the vehicle inspected by a SUZUKI dealer or a qualified workshop.
Engine Coolant
Selection of Coolant
To maintain optimum performance and durability of your engine, use SUZUKI genuine coolant or equivalent. This type of coolant is the best for cooling system for the following reasons:
- The coolant helps maintain proper engine temperature.
- It gives proper protection against freezing and boiling.
- It gives proper protection against corrosion and rust.
Failure to use the proper coolant can dam-age your cooling system. SUZUKI dealer or a qualified workshop can help you select the proper coolant.
NOTICE
To avoid damaging your cooling system:
- Always use a high quality ethylene glycol base non-silicate type cool-ant diluted with distilled water at the correct mixture concentration.
- Check that the proper mix is 50/50 coolant to distilled water and in no case higher than 70/30. Concentrations greater than 70/30 coolant to distilled water will cause overheat-ing conditions.
- Do not use straight coolant nor plain water.
- Do not add extra inhibitors or additives. They may not be compatible with your cooling system.
- Do not mix different types of base coolants. Doing so may result in accelerated seal wear and/or the possibility of severe overheating and extensive engine or automatic transmission damage.
Coolant Level Check
Check the coolant level at the reservoir tank, not at the radiator. With the engine cool, the coolant level should be between “FULL” and “LOW” marks.
Adding Coolant
WARNING
- Swallowing engine coolant can cause severe injury or death. Inhaling cool-ant mist or vapors or getting coolant in your eyes could result in severe injury.
- Do not drink antifreeze or coolant solution. If swallowed, do not induce vomiting. Immediately con-tact a poison control center or a physician.
- Avoid inhaling coolant mist or hot vapors. If inhaled, remove to a fresh air area.
- If coolant gets in the eyes, flush with water and seek medical attention.
- Wash thoroughly after handling coolant.
- Keep engine coolant out of the reach of children and pets.
NOTICE
- The mixture you use should contain 50% concentration of anti-freeze.
- If the lowest ambient temperature in your area is expected to be –35°C (–31°F) or below, use higher concentrations up to 60% following the instructions on the antifreeze container.
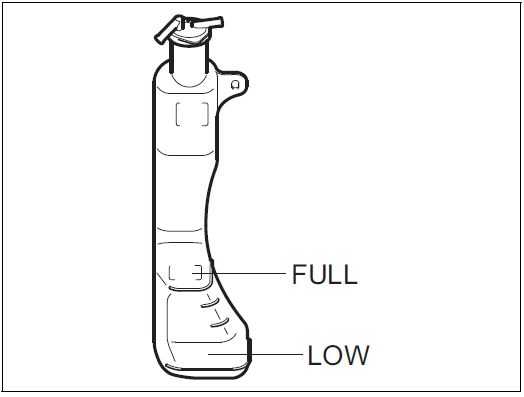
- If the coolant level is below “LOW” mark, coolant should be added. While the engine is cool, remove the reservoir tank cap and add coolant until the reservoir tank level reaches “FULL” mark. Never fill the reservoir tank above “FULL” mark.
- NOTICE
- When putting the cap on the reservoir tank, line up the mark on the cap and the mark on the tank. Failure to follow this can result in coolant leak-age.
-
Coolant Replacement
- Since special procedures are required, ask a SUZUKI dealer or a qualified workshop for this job.
-
Air Cleaner
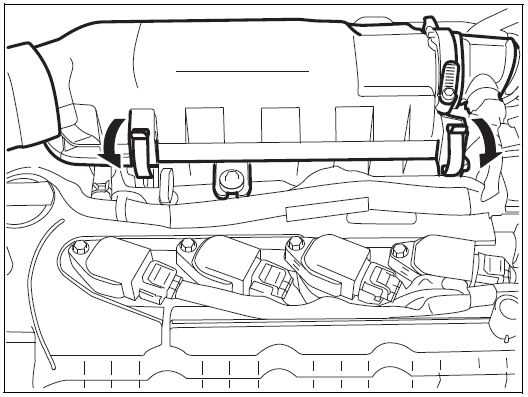
- If the air cleaner is clogged with dust, there will be greater intake resistance, resulting in decreased power output and increased fuel consumption. Unclamp the side clamps and remove the element from the air cleaner case. If it appears to be dirty, replace it with a new one. Clamp the side clamps securely.
Spark Plugs
For nickel spark plugs (traditional type): You should inspect spark plugs periodically for carbon deposits. When carbon accumulates on a spark plug, a strong spark may not be produced. Remove car-bon deposits with a wire or pin and adjust the spark plug gap.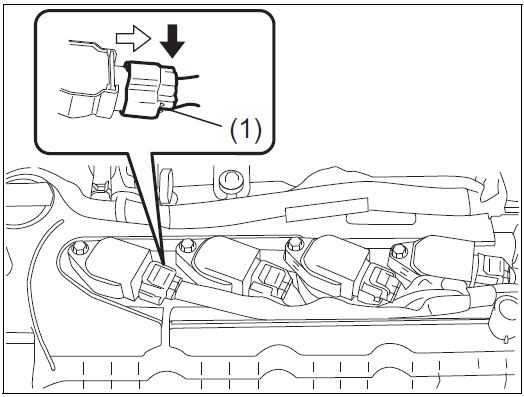
To access the spark plug:
- If necessary, disconnect the coupler (1) while pushing the release lever.
- Remove the ignitor bolts.
- Pull the spark plug boots out.
NOTE:
During installation, make sure that the wires, couplers, sealing rubber of air cleaners’ and washers, are correctly returned in place.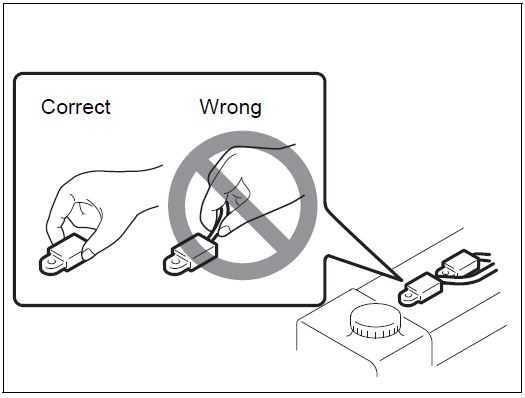
NOTICE
- When pulling out the ignition coils, do not pull on the cable. Pulling on the cable can damage it.
- When servicing the iridium/platinum spark plugs (slender center electrode type plugs), do not touch the center electrode, as it is easy to damage.
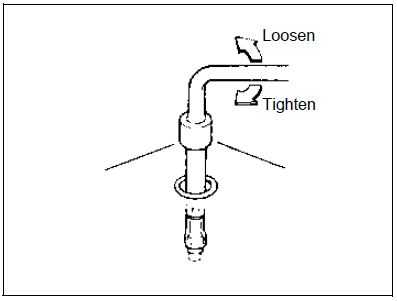
NOTICE
- When installing the spark plugs, screw them in with your fingers to avoid stripping the threads. Tighten the spark plugs with a torque wrench to 17.5 Nm (1.8 kg-m, 13.0 lb-ft). Do not allow contaminants to enter the engine through the spark plug holes when the plugs are removed.
- Never use spark plugs with the wrong thread size.
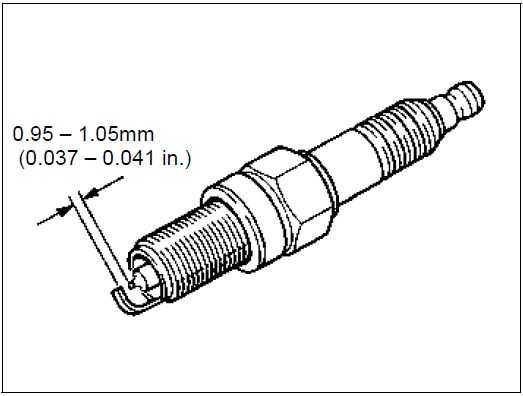
NOTICE
When replacing spark plugs, you should use the brand and type specified for your vehicle. For the specified plugs, refer to “SPECIFICATIONS” section in the end of this book. If you wish to use a brand of spark plug other than the specified plugs, consult a SUZUKI dealer or a qualified workshop.
Gear Oil
Specified Gear Oil
When adding gear oil, use gear oil with the appropriate viscosity and grade as shown in the chart below.
We highly recommend you use:
“SUZUKI GEAR OIL 75W-80” for manual transmission gear oil.
Manual Transmission oil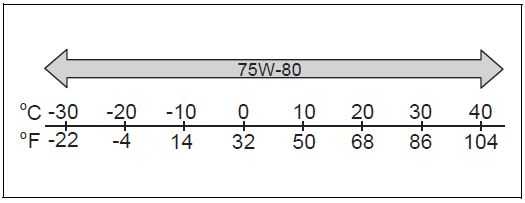
Gear Oil Level Check
Manual Transmission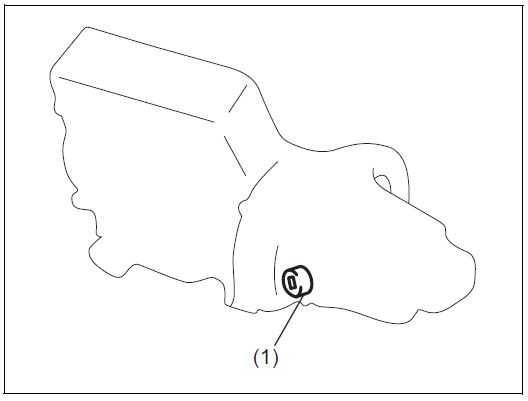
- Oil filler and level plug
To check the gear oil level, use the following procedure:1) Park the vehicle on a level surface with the parking brake applied. Then, stop the engine. - Remove the oil filler and level plug (1).
- If gear oil flows from the plug hole, the oil level is correct. Reinstall the plug. If gear oil does not flow from the plug hole, add oil through the filler plug hole until oil flows a little from the plug hole.
- If the oil level is low, add gear oil through the oil filler and level plug hole (1) until the oil level reaches the bottom of the filler hole, then reinstall the plug.
Tightening torque for oil filler and level plug (1)
Manual Transmission:
21 Nm (2.1 kg-m, 15.5 lb-ft)
CAUTION
After driving the vehicle, the gear oil temperature may be high enough to burn you. Wait until the oil filler and level plug is cool enough to touch with your bare hands before inspecting gear oil level.
NOTICE
When tightening the plug, apply the following sealing compound or equivalent to the plug threads to pre-vent oil leakage.
SUZUKI Bond No. “1216E” or “1217G”
Gear Oil Change
Since special procedures, materials and tools are required, ask a SUZUKI dealer or a qualified workshop for this job.
Clutch
Clutch Pedal
Clutch pedal play “d”: MAX. 10 mm (0.39 in.)
Measure the clutch pedal play by moving the clutch pedal with your hand and measuring the distance it moves until you feel slight resistance. The play in the clutch pedal should be between the specified values. If the play is more or less than the above, or clutch dragging is felt with the pedal fully depressed, have the clutch inspected by an authorized SUZUKI dealer.
Clutch Fluid
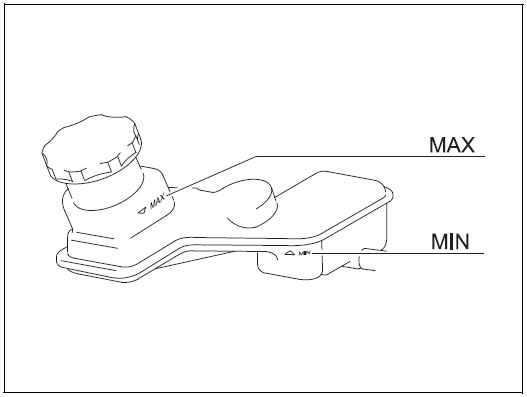
Check the clutch pedal for smooth operation and clutch fluid level from time to time. If clutch dragging is felt with the pedal fully depressed, have the clutch inspected by a SUZUKI dealer or a qualified workshop. If the clutch fluid level is near “MIN” line, fill it up to “MAX” line with DOT3 brake fluid.
NOTICE
Clutch fluid is supplied from brake fluid reservoir. If your clutch fluid level is increased or near the “MIN” line, there is a possibility of clutch or brake fluid leakage or abnormal wear of clutch. Have your vehicle inspected immediately by a SUZUKI dealer or a qualified workshop.
Automatic Transmission (AT) Fluid
Specified Fluid
Use an automatic transmission fluid SUZUKI AT OIL AW-1.
Fluid Level Check
NOTICE
Driving with too much or too little fluid can damage the transmission.
You must check the fluid level with the automatic transmission fluid at normal operating temperature.
To check the fluid level:
- To warm up the transmission fluid, drive the vehicle or idle the engine until the engine coolant temperature light (blue color) goes off.
- Then drive for ten more minutes.
NOTICE
Be sure to use the specified automatic transmission fluid. Using automatic transmission fluid other than SUZUKI AT OIL AW-1 may damage the automatic transmission of your vehicle.
NOTE:
Do not check the fluid level if you have just driven the vehicle for a long time at high speed, if you have driven in city traffic in hot weather. Wait until the fluid cools down (about 30 minutes), or the fluid level indication will not be correct.
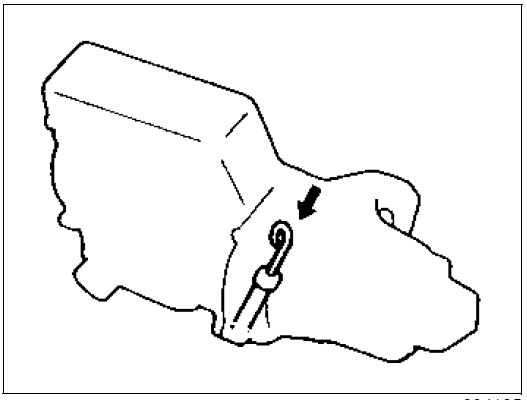
- Park your vehicle on level ground.
Apply the parking brake and then start the engine in “P” (Park). Let it idle for two minutes and keep it running during the fluid level check. - With your foot on the brake pedal, move the gearshift lever through each gear position, pausing for about three seconds in each position. Then move it back to “P” (Park) position.
WARNING
Be sure to depress the brake pedal when moving the gearshift lever, or the vehicle can move suddenly.
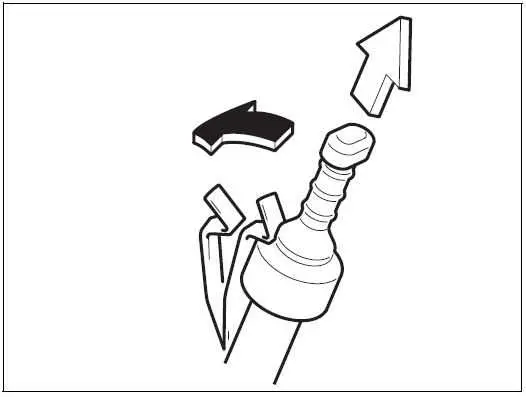
- The handle of the A/T fluid dipstick is colored red for easy identification. Remove the dipstick, wipe the oil off with a clean cloth and push it back in until the cap seats. Then pull out the dipstick.
- Check both sides of the dipstick, and read the lowest level. The fluid level should be between the two marks in hot range on the dipstick.
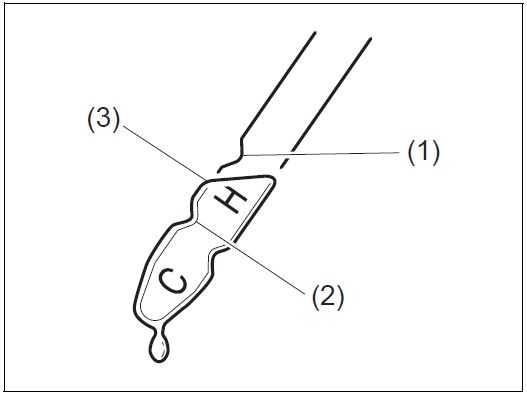
- FULL HOT
- LOW HOT
- The lowest point = Fluid level
- Add just enough specified fluid through the dipstick hole to fill the transmission oil to the proper level.
NOTICE
After checking or adding oil, be sure to insert the dipstick securely.
Changing Oil
Since special procedures, materials, and tools are required to change the automatic transmission oil, ask a SUZUKI dealer or a qualified workshop for this job.
Brakes
Brake Fluid
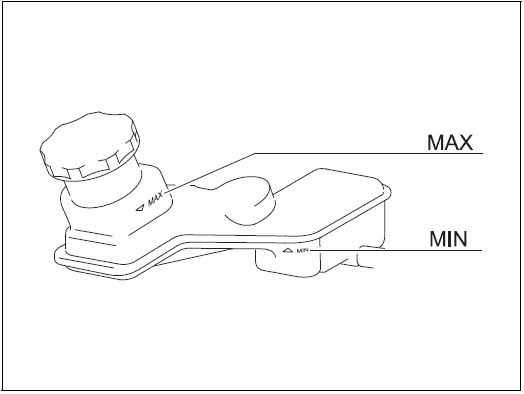
Check the brake fluid level by looking at the reservoir in the engine compartment. Check that the fluid level is between “MAX” and “MIN” lines.
- WARNING
- Failure to follow the guidelines below can result in personal injury or serious trouble in the brake system.
- If the brake fluid in the reservoir drops below a certain level, the brake warning light on the instrument panel will come on (the engine must be running with the parking brake fully disengaged). Should the light come on, immediately ask a SUZUKI dealer or a qualified workshop to inspect the brake system.
- A rapid fluid loss indicates a leakage in the brake system. In this case, immediately ask a SUZUKI dealer or a qualified workshop to inspect the brake system.
- Do not use any fluid other than SAE J1703 or DOT3 brake fluid. Do not use reclaimed fluid or fluid that has been stored in old or open containers. It is essential that foreign particles and other liquids are kept out of the brake fluid reservoir.
- Brake fluid is harmful or fatal if swallowed, and harmful if it comes in contact with skin or eyes. If swallowed, do not induce vomiting. Immediately contact a poison control center or a physician. If brake fluid gets in eyes, flush eyes with water and seek medical attention. Wash thoroughly after handling. Solution can be poisonous to animals. Keep out of reach of children and animals.
NOTICE
- If your brake fluid level is near “MIN” line, there is a possibility of brake pad and/or shoe wear and brake fluid leakage. In this case, ask a SUZUKI dealer or a qualified workshop to inspect the brake system.
- Brake fluid can damage painted surfaces. Use caution when refilling the reservoir.
- NOTE:
- The fluid level can be expected to gradually fall as the brake pad and/or shoe wear.
- Brake fluid absorbs water over time and brake fluid with high water content may cause vapor lock or brake system malfunction.
- Replace the brake fluid according to the maintenance schedule in this owner’s manual.
Brake Pedal
Check if the brake pedal stops at the regular height without “spongy” feeling when you depress it. If not, have the brake system inspected by a SUZUKI dealer or a qualified workshop. If you doubt the brake pedal for the regular height, check it as follows:
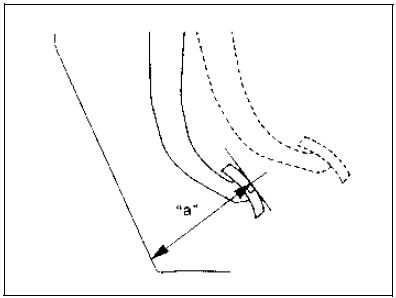
Pedal to floor carpet minimum distance “a”:
|
LHD |
MT | 61 mm (2.4 in.) |
| AT | 57 mm (2.2 in.) | |
| RHD | 47 mm (1.8 in.) | |
With the engine running, measure the distance between the brake pedal and floor carpet when the pedal is depressed with approximately 30 kg (66 lbs) of force. The minimum distance required is as specified. Since your vehicle’s brake system is self-adjusting, there is no need for pedal adjustment.
If the pedal to floor carpet distance as measured above is less than the minimum distance required, have your vehicle inspected by a SUZUKI dealer or a qualified workshop.
NOTE:
When measuring the distance between the brake pedal and floor wall, be sure not to include the floor mat or rubber on the floor wall in your measurement.
WARNING
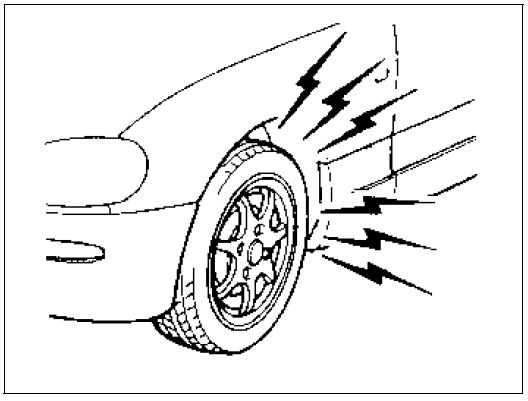
If the brake pad lining becomes worn and it has reached its minimum thick-ness, squealing noise sounds during braking. If you hear this noise, have the vehicle inspected immediately by an authorized SUZUKI dealer. Continued driving with this condition can cause an accident.
CAUTION
If you experience any of the following problems with your vehicle’s brake system, have the vehicle inspected immediately by an authorized SUZUKI dealer.
- Poor braking performance
- Uneven braking (brakes not working uniformly on all wheels)
- Excessive pedal travel
- Brake dragging
Parking Brake
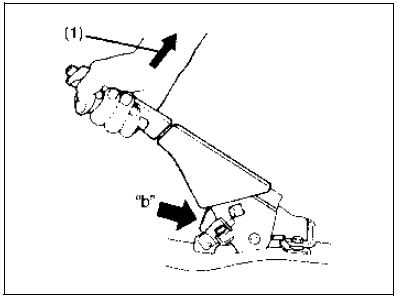
Ratchet tooth specification “b”: 4th – 9th
Lever pull force (1):
200 N (20 kg, 45 lbs)
Check the parking brake for proper adjustment by counting the number of clicks made by the ratchet teeth as you slowly pull up on the parking brake lever to the point of full engagement. The parking brake lever should stop between the specified ratchet teeth and the rear wheels should be securely locked. If the parking brake is not properly adjusted or the brakes drag is suspected even after the lever has been fully released, have the parking brake inspected and/or adjusted by a SUZUKI dealer or a qualified workshop.
Brake Discs and Brake Drums
Brake disc
| Brake location | Minimum thickness |
| Front wheels | 20.0 mm (0.8 in.) |
Brake drum
| Brake location | Maximum inner diameter |
| Rear wheels | 222 mm
(8.7 in.) |
If the measured thickness or inner diameter of the most worn part falls below or exceeds the value indicated above, the parts should be replaced with a new one. The measurement involves disassembling each brake and requires the use of a micrometer or caliper, which must be done according to the instructions described in the relevant service manual or available from the relevant repair information site.
Steering Wheel
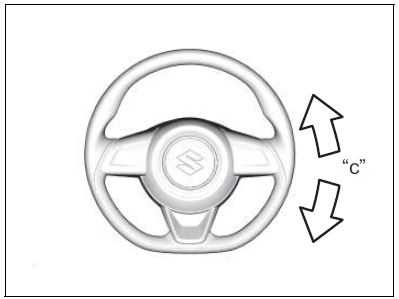
Steering wheel play “c”: 0 – 30 mm (0.0 – 1.2 in.)
Check the play of the steering wheel by gently turning it from left to right and measuring the distance that it moves before you feel slight resistance. The play should be between the specified values. Check that the steering wheel turns easily and smoothly without rattling by turning it all the way to the right and to the left while driving very slowly in an open area. If the amount of free play is outside the specification or you find anything else to be wrong, an inspection must be performed by a SUZUKI dealer or a qualified work-shop.
Tires
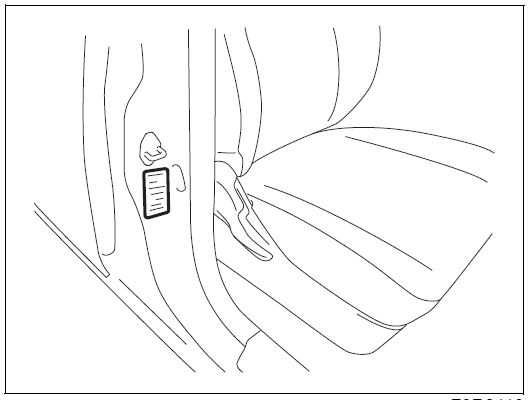
The front and rear tyre pressure specifications for your vehicle are listed in the tyre information label. Both front and rear tyres should have the specified tyre pressure.
Tyre Inspection
Inspect your vehicle’s tyres at least once a month or before long trip by performing the following checks:
- Measure the air pressure with a tyre gauge. Adjust the pressure if necessary. Remember to check the spare tyre, too.
WARNING
- Air pressures should be checked when the tyres are cold or you may get inaccurate readings.
Check the inflation pressure from time to time while inflating the tyre gradually, until the specified pressure is obtained. - Never underinflate or over-inflate the tyres.
- Underinflation can cause unusual handling characteristics or can cause the rim to slip on the tyre bead, resulting in an accident or damage to the tyre or rim.
- Overinflation can cause the tyre to burst, resulting in personal injury. Overinflation can also cause unusual handling characteristics which may result in an accident.
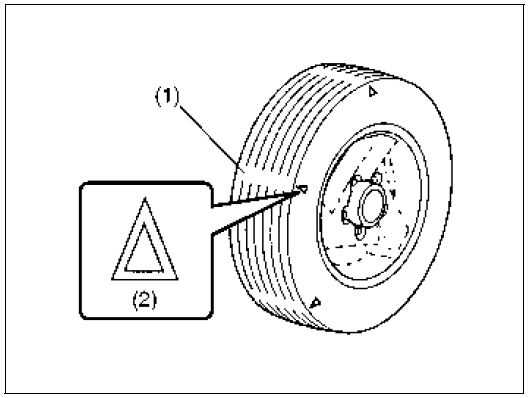
- Tread wear indicator
- Indicator location mark
- Check that the depth of the tread groove is more than 1.6 mm (0.06 in.). To help you check this, the tyres have molded-in tread wear indicators in the grooves. When the indicators appear on the tread surface, the remaining depth of the tread is 1.6 mm (0.06 in.) or less and the tyre should be replaced.
- Check for abnormal wear, cracks and damage. Any tyres with cracks or other damage should be replaced. If any tyres show abnormal wear, have them inspected by a SUZUKI dealer or a qualified workshop.
CAUTION
Hitting curbs and running over rocks can damage tyres and affect wheel alignment. Have tyres and wheel alignment checked periodically by a SUZUKI dealer or a qualified work-shop. - Check for loose wheel nuts.
- Check that there are no nails, stones or other objects sticking into the tyres.
WARNING
- Your SUZUKI vehicle is equipped with tyres which are all the same type and size. This is important to ensure proper steering and handling of the vehicle. Never mix tyres of different size or type on the four wheels of your vehicle.
- The size and type of tyres used should be only those approved by SUZUKI as standard or optional equipment for your vehicle.
- Replacing the wheels and tyres equipped on your vehicle with certain combinations of aftermarket wheels and tyres can significantly change the steering and handling characteristics of your vehicle. Therefore, use only those wheel and tyre combinations approved by SUZUKI as standard or optional equipment for your vehicle.
NOTICE
Replacing the original tyres with tyres of a different size may result in false speedometer or odometer readings. Check with a SUZUKI dealer or a qualified workshop before purchasing replacement tyres that differ in size from the original tyres.
Tyre Rotation
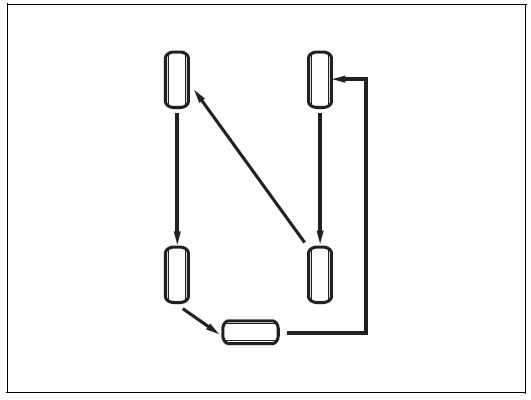
4-tyre rotation
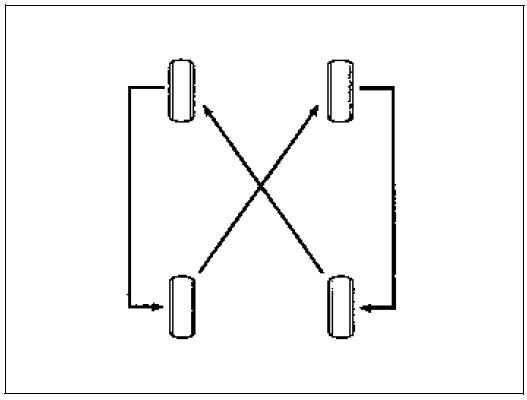
To avoid uneven wear of your tyres and to prolong their life, rotate the tyres as illus-trated. Tyres should be rotated every 10000 km (6000 miles). After rotation, adjust front and rear tyre pressures to the specification listed in your vehicle’s Tyre Information Label.
NOTE:
For Mexico:
For additional instruction, refer to the “SUPPLEMENT” section at the end of this book.
Battery
WARNING
- Batteries produce flammable hydrogen gas. Keep flames and sparks away from the battery or an explosion may occur. Never smoke when working in the vicinity of the battery.
- When checking or servicing the battery, disconnect the negative cable. Be careful not to cause a short circuit by allowing metal objects to contact the battery posts and the vehicle at the same time.
- To avoid harm to yourself or damage to your vehicle or battery, follow the jump-starting instructions in the “EMERGENCY SERVICE” section of this manual if it is necessary to jump-start your vehicle.
- Diluted sulfuric acid spilled from battery can cause blindness or severe burns. Use proper eye protection and gloves. Flush eyes or body with ample water and get medical care immediately if suffered. Keep batteries out of reach of children.
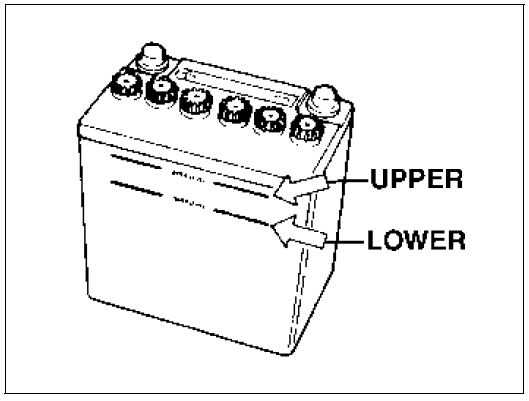
For a maintenance-free battery (cap-less type), you need not add water. For traditional type battery, which has water filler caps, the level of the battery fluid must be kept between the “UPPER” and the “LOWER” level lines at all times. If the level is found to be below the “LOWER” level line, add distilled water to the “UPPER” level line. You should periodically check the battery, battery terminals, and battery hold-down bracket for corrosion. Remove corrosion using a stiff brush and ammonia mixed with water, or baking soda mixed with water. After removing corrosion, rinse with clean water. If your vehicle is not going to be driven for a month or longer, disconnect the cable from the negative terminal of the battery to help prevent discharge.
Fuses
Your vehicle has three types of fuses, as described below:
Main fuse
The main fuse takes current directly from the battery.
Primary fuses
These fuses are between the main fuse and individual fuses, and are for electrical load groups.
Individual fuses
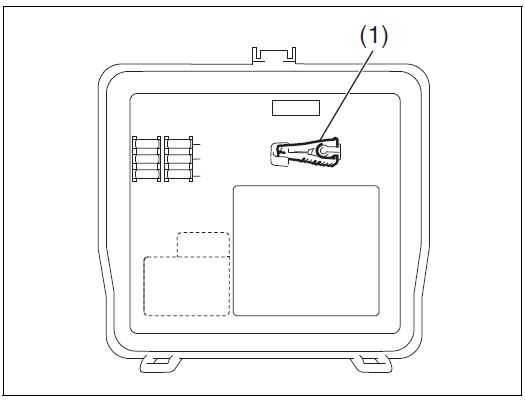
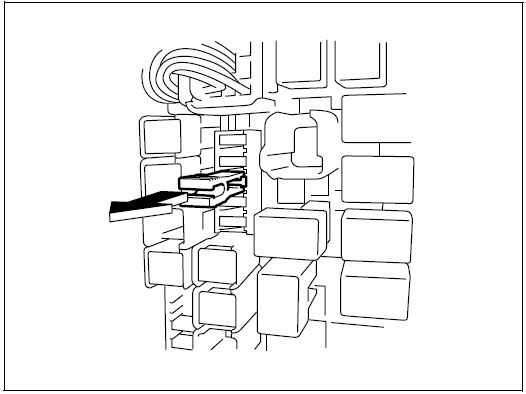
These fuses are for individual electrical circuits. To remove a fuse, use the fuse puller (1) provided in the relay box cover.
Relay box cover
Fuses in Engine Compartment
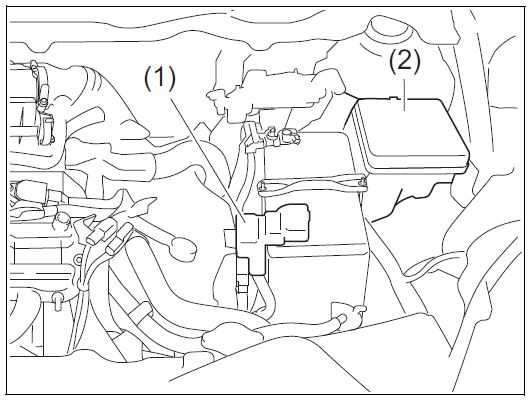
- Main fuse box
- Relay box
Main fuse box
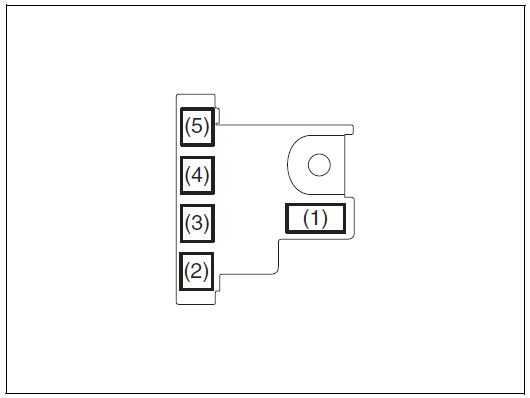
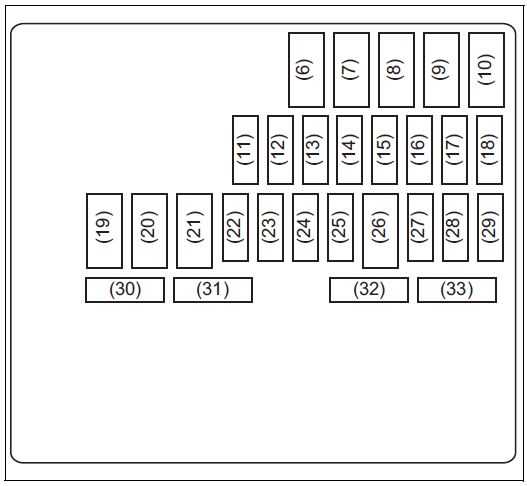
MAIN FUSE / PRIMARY FUSE
| MAIN FUSE / PRIMARY FUSE | ||
| (1) | 120 A | FL1 |
| (2) | 100 A | FL2 |
| (3) | 80 A | FL3 |
| (4) | 100 A | FL4 |
| (5) | 50 A | FL5 |
| (6) | 30 A | Starting motor |
| (7) | 30 A | Blower fan |
| (8) | – | Blank |
| (9) | 40 A | ABS motor |
| (10) | 40 A | Ignition switch |
| (11) | 30 A | Back up |
| (12) | – | Blank |
| (13) | 20 A | Front fog light |
| (14) | – | Blank |
| (15) | 25 A | ABS SOL |
| (16) | – | Blank |
| (17) | 10 A | Compressor |
| (18) | 30 A | Blank |
| (19) | 30 A | Radiator fan |
| (20) | – | Blank |
| (21) | – | Blank |
| (22) | 25 A | Headlight HI |
| (23) | 15 A | Headlight (Left) |
| (24) | 15 A | Headlight (Right) |
| (25) | 20 A | Blank |
| (26) | 50 A | Ignition switch -2 |
| (27) | 15 A | Transmission |
| (28) | 15 A | FI |
| (29) | – | Blank |
| (30) | 15 A | Headlight HI (Left) |
| (31) | 15 A | Headlight HI (Right) |
| (32) | 5 A | Starting Signal |
| (33) | – | Blank |
The main fuse, primary fuses and some of the individual fuses are located in the engine compartment. If the main fuse blows, no electrical component will function. If a primary fuse blows, no electrical component in the corresponding load group will function. When replacing the main fuse, a primary fuse or an individual fuse, use genuine SUZUKI replacement parts or equivalent for individual fuses. To remove a fuse, use the fuse puller provided in the fuse box. The amperage of each fuse is shown in the back of the fuse box cover.
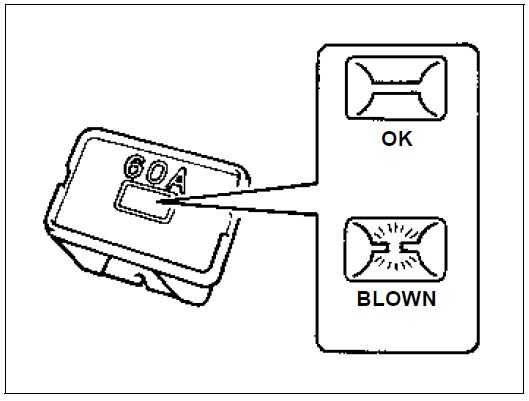
WARNING
If the main fuse or a primary fuse blows, have your vehicle inspected by a SUZUKI dealer or a qualified workshop. Always use a genuine SUZUKI replacement. Never use a substitute such as a wire even for a temporary repair, or extensive electrical damage and a fire can result.
NOTE:
Make sure that the fuse box always carries spare fuses.
Fuses under Dashboard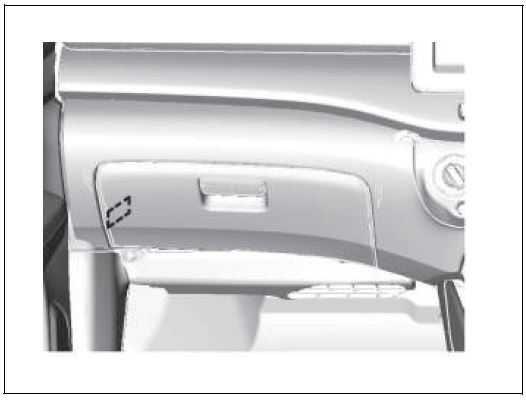
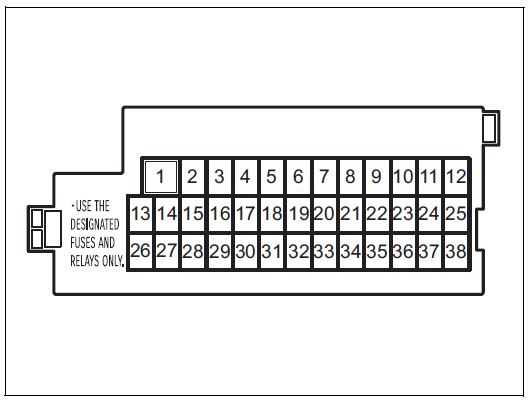
| PRIMARY FUSE | ||
| (1) | 30 A | Power window |
| (2) | 10 A | Meter |
| (3) | 15 A | Ignition coil |
| (4) | 5 A | Ignition-1 signal 2 |
| (5) | 20 A | Shift lever |
| (6) | 20 A | S/R |
| (7) | – | Blank |
| (8) | 20 A | DOOR LOCK |
| (9) | 15 A | Steering lock |
| (10) | 10 A | Hazard |
| (11) | 5 A | A-STOP |
| (12) | 10 A | RR FOG |
| (13) | 5 A | ABS control module |
| (14) | 15 A | REAR A/C |
| (15) | 5 A | Ignition-1 signal 3 |
| (16) | 10 A | Dome light-2 |
| (17) | 5 A | Dome light |
| (18) | 15 A | Radio |
| (19) | 5 A | CONT |
| (20) | 5 A | KEY2 |
| (21) | 20 A | Power window timer |
| (22) | 5 A | KEY |
| (23) | 15 A | Horn |
| (24) | 5 A | Tail light (Left) |
| (25) | 10 A | Tail light |
| (26) | 10 A | Airbag |
| (27) | 10 A | Ignition-1 signal |
| (28) | 10 A | Back up light |
| (29) | 5 A | ACC3 |
| (30) | 20 A | Rear defogger |
| (31) | 10 A | MRR HTR |
| (32) | 15 A | ACC2 |
| (33) | 5 A | ACC |
| (34) | 10 A | Wiper |
| (35) | 5 A | Ignition-2 signal |
| (36) | 15 A | Washer |
| (37) | 25 A | Front wiper |
| (38) | 10 A | Stoplight |
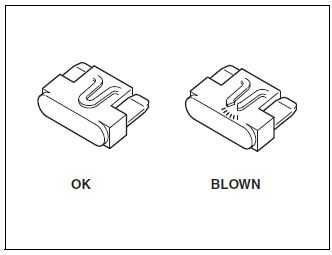
WARNING
Always replace a blown fuse with a fuse of the correct amperage. Never use a substitute such as aluminum foil or wire to replace a blown fuse. If you replace a fuse and the new one blows in a short period of time, you may have a major electrical problem. Have your vehicle inspected immediately by a SUZUKI dealer or a qualified workshop.
NOTE:
According to the vehicle specifications, fuse setting may be different from the specifications which are shown in the above tables.
Headlight Aiming
Since special procedures are required, ask a SUZUKI dealer or a qualified workshop for this job.
Bulb Replacement
CAUTION
- Light bulbs can be hot enough to burn your finger right after turning off lights. This is true especially for halogen headlight bulbs. Replace the bulbs after they become cool enough.
- The headlight bulbs are filled with pressurized halogen gas. They can burst and injure you if they are hit or dropped. Handle them carefully.
- To avoid injury by sharp-edged parts of the body, wear gloves and a long-sleeved shirt when replacing light bulbs.
NOTICE
The oils from your skin may cause a halogen bulb to overheat and burst when the lights are on. Grasp a new bulb with a clean cloth.
NOTICE
Frequent bulb replacement indicates the need for an inspection of the electrical system. This should be carried out by a SUZUKI dealer or a qualified workshop.
NOTE:
The inner surface of lens such as the headlights or the rear combination lights may be clouded or dew condensation may occur by driving on a rainy day or washing the vehicle. This is a temporary phenomenon caused by the temperature difference between the inside and the outside of the lights. (This is the same phenomenon as the windows are clouded on a rainy day.) Also, it sometimes seems that water gets into the lights because of waterdrops on the edge of the lens. This is a temporary phenomenon caused by water adherence to the outside of the lights. The above-mentioned phenomena are not vehicle malfunctions. However, if water is piled up in the lights or large waterdrop adheres to the inner surface of lens, have your vehicle inspected by an authorized SUZUKI dealer.
Non-disassembled Type Lights
Since the lights shown below are non-dis-assemble type, you cannot replace a bulb. Replace the target assembly if any bulb is defective.
If you need to replace the assembly, ask your SUZUKI dealer.
- Side turn signal light/hazard warning light on fender or outside rearview mirrors
- High mount stop light
- Tail/stop light
Headlight
Low beam
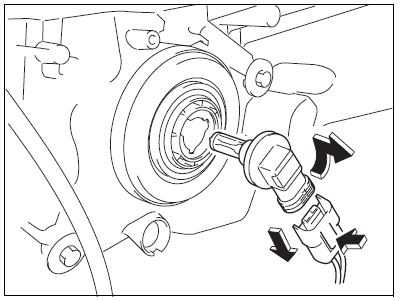
Open the engine food while the engine is stopped. Disconnect the coupler with pushing the lock release. Turn the bulb holder counter-clockwise and remove it.
High beam
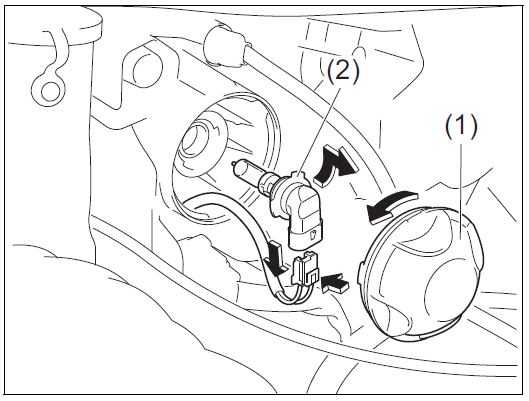
- Open the engine food while the engine is stopped.
- Turn the cover (1) counterclockwise and remove it.
- Turn the bulb (2) holder counterclockwise and remove it. Disconnect the coupler with pushing the lock release.
Front Turn Signal Light Front Position Light
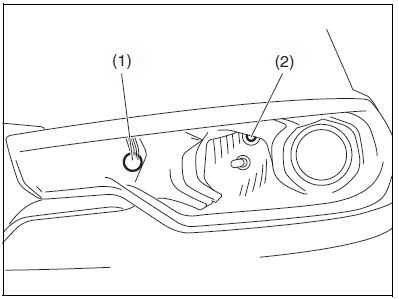
- Front turn signal light
- Front position light
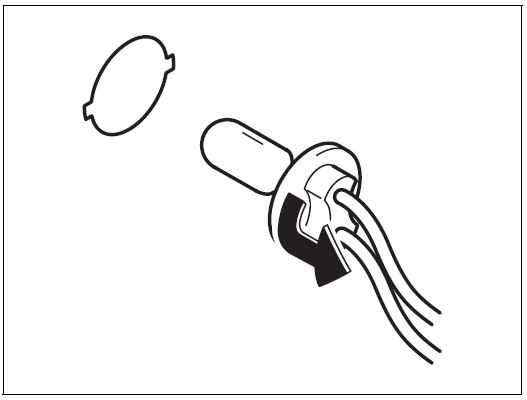
- Open the engine hood while the engine is stopped. To remove the bulb holder of the front turn signal light or the front position light from the light housing, turn the holder counterclockwise and pull it out.
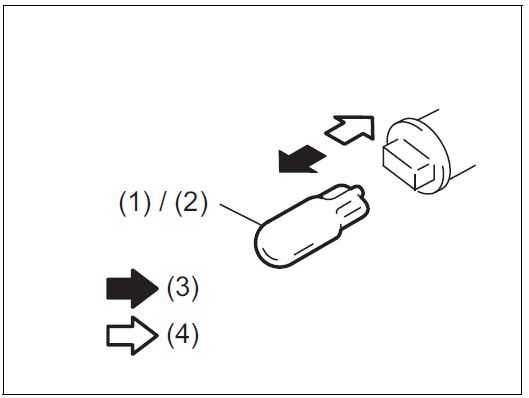
- Removal
- Installation
- To remove and install the bulb of the front turn signal light (1) or the front position light (2), simply pull out or push in the bulb.
Side Turn Signal Light
Outside rearview mirror type
LED is used. It is recommended that you take your vehicle to a SUZUKI dealer or a qualified workshop for bulb replacement since special procedures are required.
Fender type
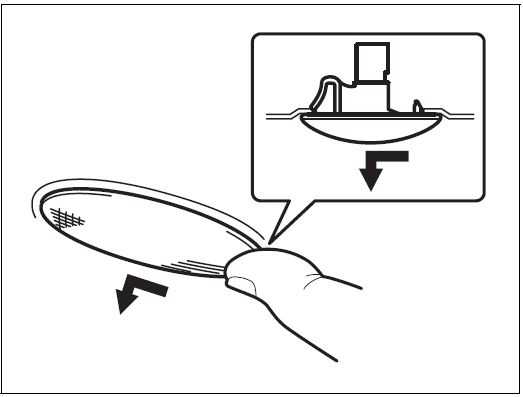 Since the bulb is built-in type, replace it as the light assembly. Remove the light assembly by sliding the light housing left-ward with your finger.
Front Fog Light (if equipped)
- Start the engine. Turn the steering wheel to the opposite side of the fog light to be replaced to replace the bulb easily. Then turn off the engine.
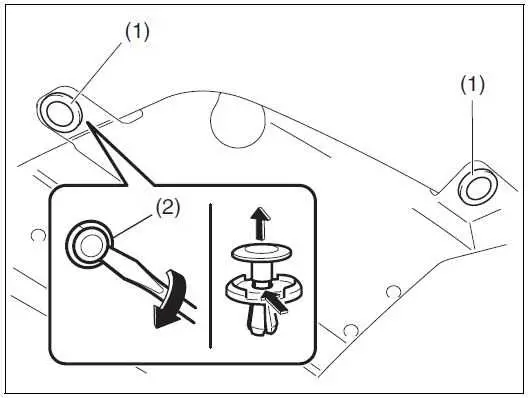
- Insert a flat-bladed screwdriver into the hole (2) and remove the clips (1) by twist the driver as shown in the illustration.

- Open the fender cover. Disconnect the coupler with pushing the lock release. Turn the bulb holder counterclockwise and remove it.
Rear Combination Light (Tail, Stop, Turn Signal, etc.)
For LED tail / stop light, it is recommended that you take your vehicle to a SUZUKI dealer or a qualified workshop for bulb replacement since special procedures are required.
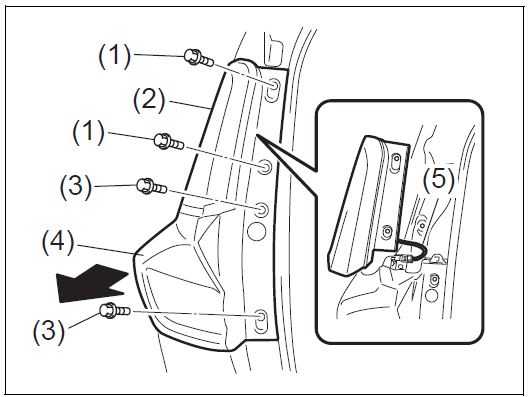
With the tailgate opened, remove the bolts (1) and pull the tail light (2) firmly to the rearward.
NOTICE
Do not pull the tail light (2) by force. In the case of the type which tail light turns on, it may cause an electric wiring (5) (if equipped) cutoff.
NOTE:
When it is difficult to remove the rear combination light from the body at a low temperature (10 deg. C or less), pour water between the body and the rear combination light to make the removal smooth.
Remove the bolts (3) and pull the rear combination light (4) firmly to the rearward.
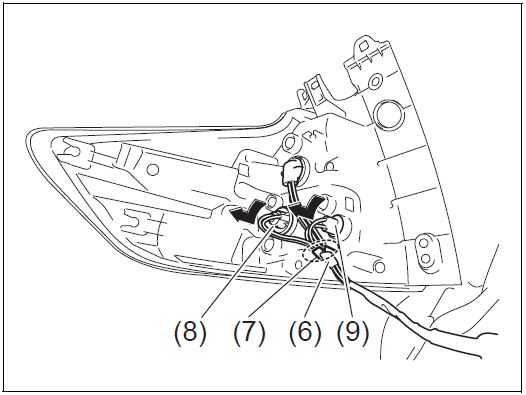
- Remove the wire (6) from a clamp (7).
- To remove the bulb holder of the rear turn signal light (8) or the reversing light (9) from the light housing, turn the holder counterclockwise and pull it out.
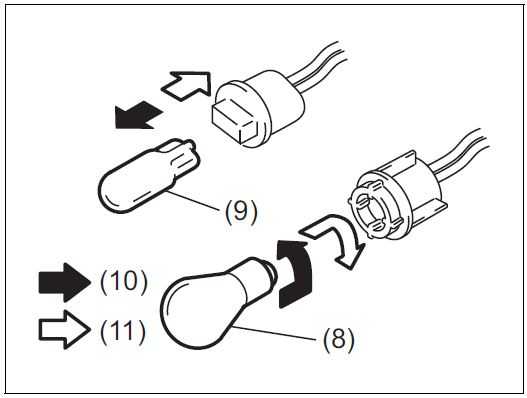 Removal
- Installation
- To remove the bulb of the rear turn signal light (8) from the bulb holder, push in the bulb and turn it counterclockwise. To install a new bulb, push it in and turn it clockwise. To remove and install the bulb of the reversing light (9), simply pull out or push in the bulb.
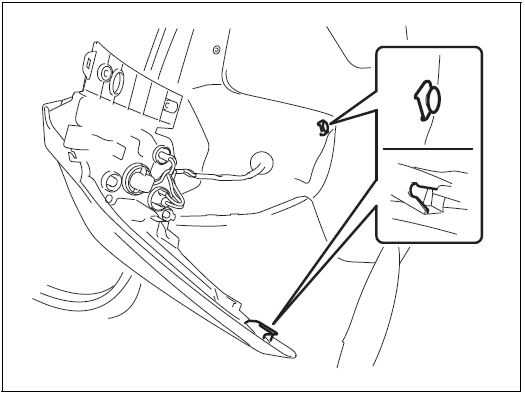
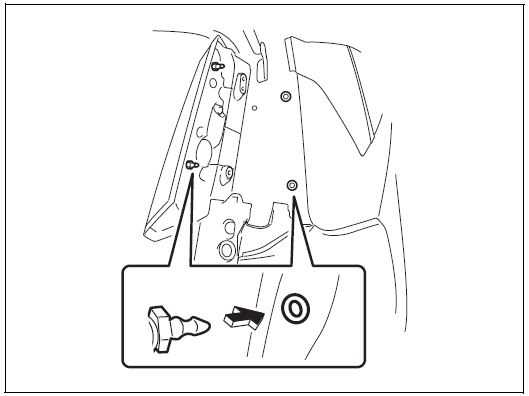
NOTE:
When reinstalling the light housing, check that the clips are properly attached.
License Plate Light
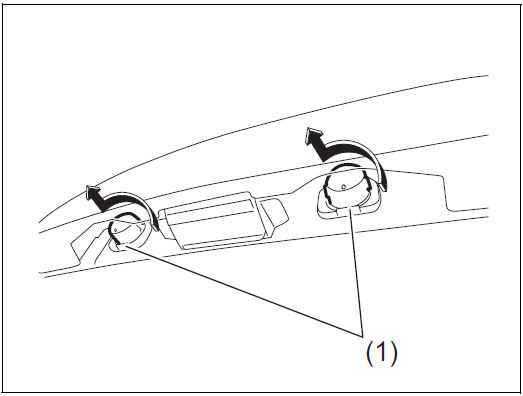
- Remove the cover (1) by turning it counterclockwise. 73R0192.
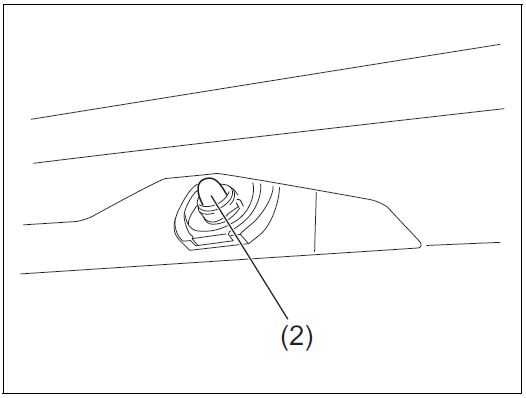
- To remove and install the bulb of the license plate light (2), simply pull out or push in the bulb.
High-mount Stop Light
LED is used. It is recommended that you take your vehicle to a SUZUKI dealer or a qualified workshop for bulb replacement since special procedures are required.
Interior Light
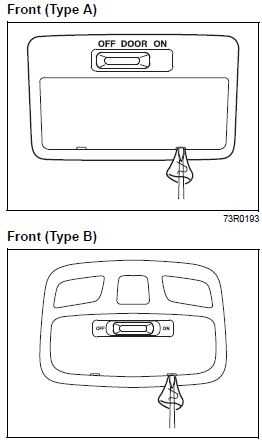
Rear
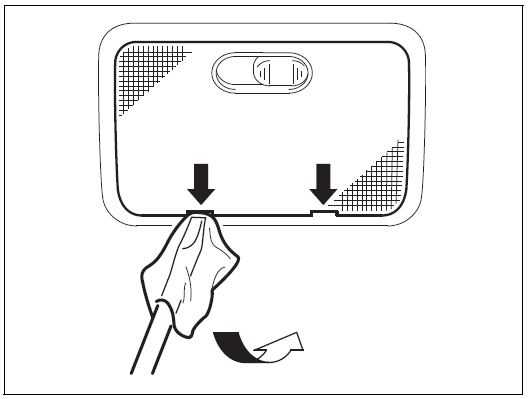
Remove the lens by using a flat-bladed screwdriver covered with a soft cloth as shown. To install it, simply push it back in. The bulb can be removed by simply pulling it out. When replacing the bulb, make sure that the contact springs are holding the bulb securely.
Wiper Blades
If the wiper blades become brittle or damaged, or make streaks when wiping, replace the wiper blades. To install new wiper blades, follow the procedures below.
NOTICE
To avoid scratching or breaking the window, do not let the wiper arm strike the window while replacing the wiper blade.
NOTE:
Some wiper blades may be different from the ones described here depending on vehicle specifications. If so, consult a SUZUKI dealer or a qualified workshop for proper replacement method.
For windshield wipers:
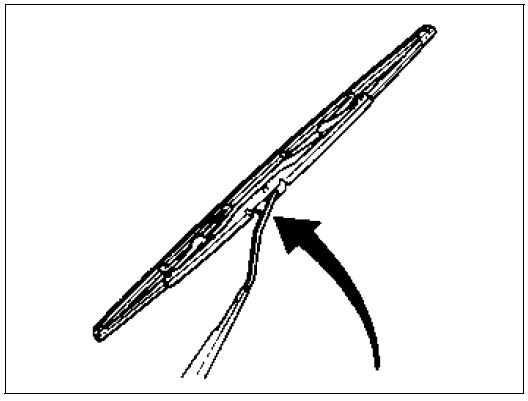
- Hold the wiper arm away from the window.
NOTE:
When raising both of the front wiper arms, pull the driver’s side wiper arm up first. When returning the wiper arms, lower the passenger’s side wiper arm first. Other-wise, the wiper arms may interfere with each other.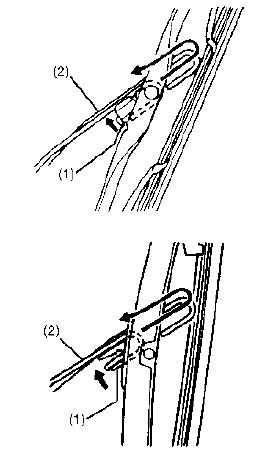
- Squeeze lock (1) towards wiper arm (2) and remove the wiper frame from the arm as shown.
- Unlock the lock end of the wiper blade and slide the blade out as shown.
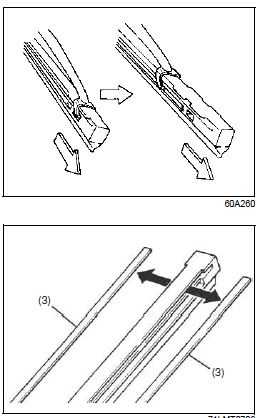
- If the new blade is provided without the two metal retainers (3), move them from the old blade to the new one.
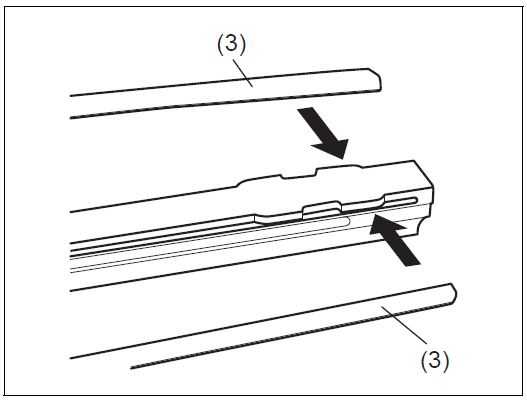

- Up
- Down
NOTE:
When you install the metal retainers (3), make sure the direction of metal retainers as shown in the above illustrations.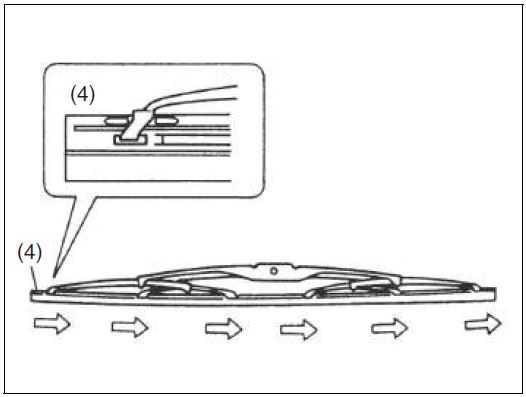
- Locked end
- Install the new blade in the reverse order of removal, with the locked end
- positioned toward the wiper arm. Make sure the blade is properly retained by all the hooks. Lock the blade end into place.
- Reinstall wiper frame to arm, making sure that the lock lever is snapped securely into the arm.
For rear wipers:
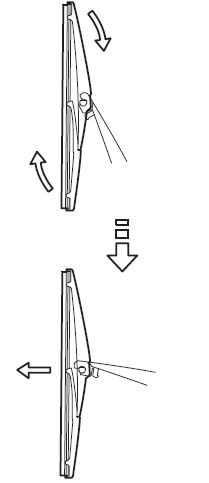
- Hold the wiper arm away from the window.
- Remove the wiper frame from the wiper arm as shown.
- Slide the blade out as shown.
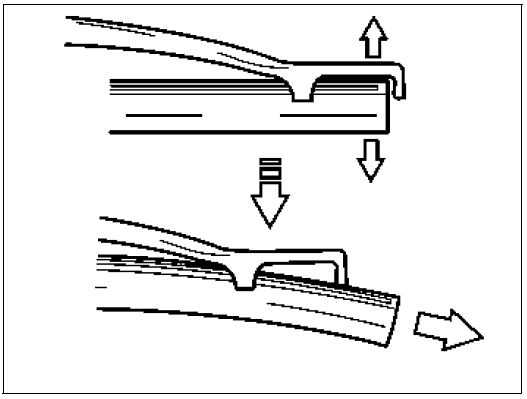
NOTE:
Do not flex the wiper blade frame end more than necessary. If you do, it can break off.
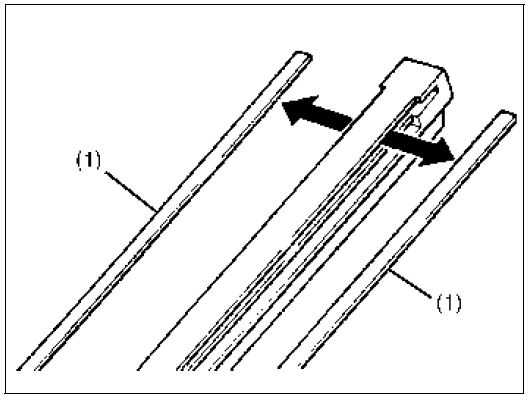
- If the new blade is provided without the two metal retainers, move them from the old blade to the new one.
- Install the new blade in the reverse order of removal.
Make sure the blade is properly retained by all the hooks. - Reinstall wiper frame to arm in the reverse order of removal.
Windshield Washer Fluid
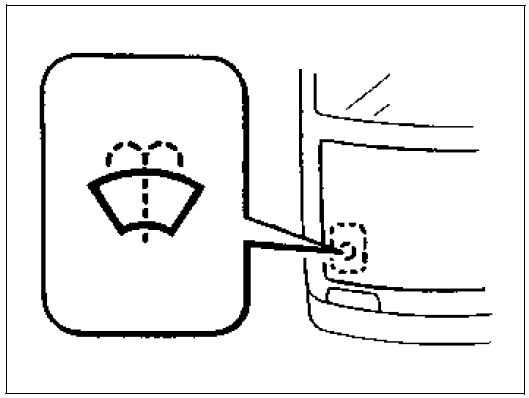
Check that there is washer fluid in the tank. Refill it if necessary. Use a good quality windshield washer fluid, diluted with water as necessary.
WARNING
Do not use radiator antifreeze solution in the windshield washer reservoir. This can severely impair visibility when sprayed on the wind-shield, and also can damage your vehicle’s paint.
NOTICE
Damage may result if the washer motor is operated with no fluid in the washer tank.
Air Conditioning System
If you do not use the air conditioner for a long period, such as during winter, it may not give the best performance when you start using it again. To help maintain optimum performance and durability of your air conditioner, it needs to be run periodically. Operate the air conditioner at least once a month for one minute with the engine idling. This circulates the refrigerant and oil and helps protect the internal components.
Air Conditioner Filter Replacement
Since special procedures are required, ask a SUZUKI dealer or a qualified workshop for this job.
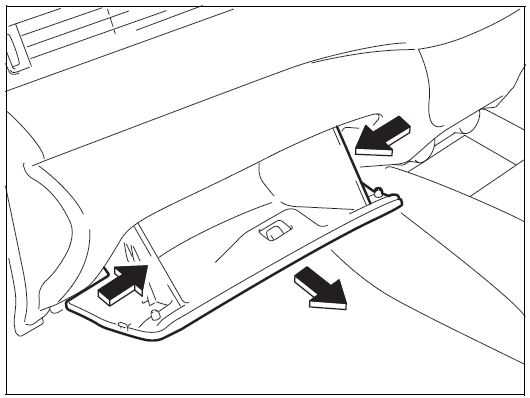
- To approach the air conditioner filter, remove the glove box by pressing both sides of the glove box inward and pulling it out. 73R0202.
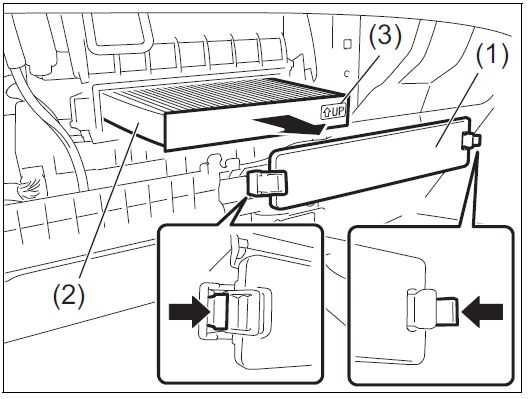
- Remove the cover (1) and pull out the air conditioner filter (2).
NOTE:
When you install a new filter, check that the UP mark (3) faces upward.
FAQ
A: It’s recommended to perform routine inspections on your Suzuki New Ertiga every 6,000 to 10,000 kilometers, or as indicated in the owner’s manual.
A: Regularly inspect components such as the engine oil, filters, brakes, tires, lights, and suspension for proper functioning.
A: The engine oil should be changed every 5,000 to 10,000 kilometers, or as per the manufacturer’s recommendations.
A: Rotate the tires every 10,000 to 15,000 kilometers to ensure even wear. Check the tire pressure monthly and keep it within the recommended range.
A: The air filter should typically be replaced every 20,000 to 30,000 kilometers, or when it appears dirty or clogged.
A: Inspect the brake fluid level and condition every 20,000 kilometers or as recommended in the owner’s manual.
A: Check and potentially replace spark plugs every 40,000 to 60,000 kilometers, or according to the manufacturer’s guidance.
A: Yes, check the battery terminals and connections for corrosion and ensure the battery is secured properly during routine inspections.
A: Replace the cabin air filter every 15,000 to 30,000 kilometers, or more frequently if driving in dusty environments.
A: Brake inspection and service should be done every 20,000 to 30,000 kilometers or when you notice decreased braking performance.
A: Yes, wheel alignment and balancing should be performed when you replace tires or notice uneven tire wear to maintain optimal handling and tire life.
A: Replace the transmission fluid every 60,000 to 100,000 kilometers or as specified in the owner’s manual.
A: In cold weather, check the battery charge, use the recommended cold-weather engine oil, and ensure proper tire pressure for better traction.
A: Yes, many basic maintenance tasks like checking fluid levels, replacing filters, and inspecting tires can be done by the owner. However, more complex tasks might require professional attention.
A: Yes, adhering to the manufacturer’s recommended maintenance schedule helps ensure the longevity, reliability, and performance of your Suzuki New Ertiga 2020.
Reference Links
View Full User Guide: Suzuki New ERTIGA 2020 User Manual
Suzuki New ERTIGA 2020 Thermometer (if equipped) User Manual

