Volvo S60 2021-2023 Displays and Voice Control User Manual
Displays and Voice Control
Displays and controls by the driver in a left-hand drive car
The overviews show where the displays and controls near the driver are located.
Steering wheel and instrument panel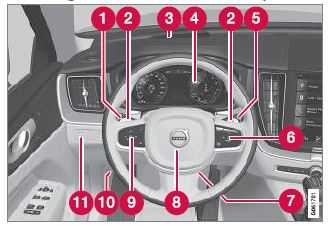
- Position lamps, daytime running lights, dipped beam, main beam, direction indicators, front fog lamps/cornering lights*, rear fog lamp, resetting the trip meter
- Steering wheel paddles for manual gear changing in an automatic gearbox*
- Head-up display*
- Driver display
- Wipers and washing, rain sensor*
- Right-hand steering wheel keypad
- Steering wheel adjustment
- Horn
- Left-hand steering wheel keypad Bonnet opening
- Display lighting, boot lid unlocking/open-ing, halogen headlamp levelling
Roof console
- Front reading lamps and interior lighting
- Panoramic roof*
- Display in roof console, ON CALL button*
- Manual dimming of interior rearview mirror
Centre and tunnel console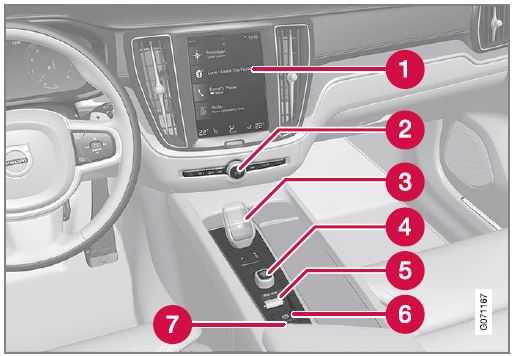
- Centre display
- Hazard warning flashers, defrosting, media
- Gear selector
- Start knob
- Drive mode control*
- Parking brake
- Automatic braking when stationary
Driver’s door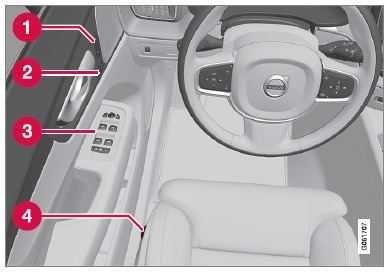
- Memories for power front seat*, door mirror and head-up display* settings
- Central locking
- Power windows, door mirrors, electric child lock*
- Adjusting front seat
Related information
- Manual front seat (p. 186)
- Adjusting the power* front seat (p. 187)
- Adjusting the steering wheel (p. 200)
- Lighting control (p. 152)
- Starting the car (p. 428)
- Driver display (p. 83)
- Overview of centre display (p. 108)
- Gearbox (p. 441)
Displays and controls by the driver in a right-hand drive car
The overviews show where the displays and controls near the driver are located. Steering wheel and instrument panel
- Position lamps, daytime running lights, dipped beam, main beam, direction indicators, front fog lamps/cornering lights*, rear fog lamp, resetting the trip meter
- Steering wheel paddles for manual gear changing in an automatic gearbox*
- Head-up display*
- Driver display
- Wipers and washing, rain sensor*
- Right-hand steering wheel keypad
- Display lighting, boot lid unlocking/opening, halogen headlamp levelling
- Bonnet opening
- Horn
- Steering wheel adjustment
- Left-hand steering wheel keypad
Roof console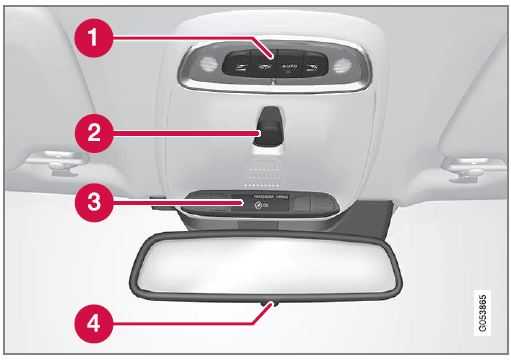
- Front reading lamps and interior lighting
- Panoramic roof*
- Display in roof console, ON CALL button*
- Manual dimming of interior rearview mirror
Centre and tunnel console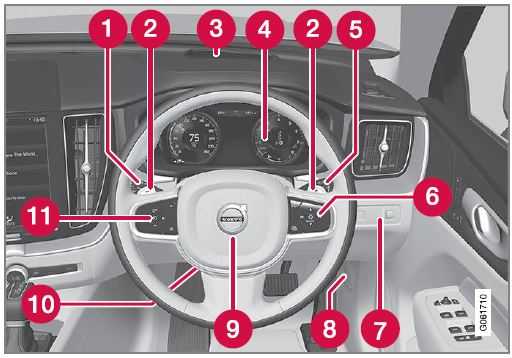
- Centre display
- Hazard warning flashers, defrosting, media
- Gear selector
- Start knob
- Drive mode control*
- Parking brake
- Automatic braking when stationary
Driver’s door
- Memories for power front seat*, door mirror and head-up display* settings
- Central locking
- Power windows, door mirrors, electric child lock*
- Adjusting front seat
Related information
- Manual front seat
- Adjusting the power* front seat
- Adjusting the steering wheel
- Lighting control
- Starting the car
- Driver display
- Overview of centre display
- Gearbox
Driver display
The driver display shows information about the car and driving. The driver display contains gauges, indicators and indicator and warning symbols. The con-tent of the driver display depends on the car’s equipment, settings and which functions are active at that time. The driver display is activated as soon as a door is opened, i.e. in ignition position 0. The driver display extinguishes after a while if it is not used. To reactivate it, proceed with one of the following:
- Depress the brake pedal.
- Activate ignition position I.
- Open one of the doors.
Location in the driver display:
| On the left | In the middle | On the right |
| Fuel gauge | Speedometer | Media player |
| Drive mode | Road Sign Information* | Phone |
| Gear shift indicator | Cruise control and speed limiter information | Navigation information* |
| Tachometer/ECO gaugeA | Door and seatbelt information | Clock |
| Distance to empty tank | Start/stop function status | App menu (activated via steering wheel keypad) |
| Outside temperature gauge | – | Instantaneous fuel consumption |
| On the left | In the middle | On the right |
| Indicator and warning symbols | – | OdometerB |
| – | – | Trip meter |
| – | – | Indicator and warning symbols |
| – | – | Voice recognition |
| – | – | Engine temperature gauge |
| – | – | Messages, in some cases with graphics |
- Depends on drive mode selected.
Accumulated mileage.
The driver display is available in two versions, 8-inch and 12-inch*.
WARNING
If the driver display should extinguish, not illuminate on activation/start or be fully or partially illegible, the car must not be used. You should visit a workshop immediately. Volvo recommends an Authorised Volvo workshop.
WARNING
In the event of a fault in the driver display the information on e.g. brakes, airbags or other safety systems may not be shown. In which case, the driver cannot check the status of the car’s systems or receive cur-rent warnings and information.
Driver display, 12-inch*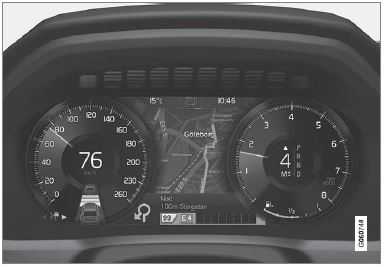
The figure is schematic – parts may vary depending on car model.
Location in the driver display:
| On the left | In the middle | On the right |
| Speedometer | Indicator and warning symbols | Tachometer/ECO gaugeA |
| Trip meter | Outside temperature gauge | Gear shift indicator |
| OdometerB | Clock | Drive mode |
| Cruise control and speed limiter information | Messages, in some cases with graphics | Fuel gauge |
| Road Sign Information* | Door and seatbelt information | Start/stop function status |
| – | Media player | Distance to empty tank |
| – | Navigation map* | Instantaneous fuel consumption |
| – | Phone | App menu (activated via steering wheel keypad) |
| – | Voice recognition | – |
- Depends on drive mode selected.
- Accumulated mileage.
Dynamic symbol
 The dynamic symbol in its basic form. The centre of the driver display contains a dynamic symbol that changes appearance for different types of message. An amber or red marker around the symbol indicates the degree of severity of a control or warning message.
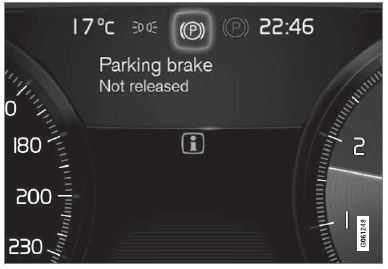
Examples of indicator symbol
With an animation, the basic shape can be turned into a graphic showing where a problem is situated, or in order to clarify information.
Related information
- Driver display settings (p. 87)
- Indicator and warning symbols (p. 94)
- Trip computer (p. 88)
- Messages in the driver display (p. 104)
- Managing the app menu in the driver dis-play (p. 103)
- Drive modes* (p. 450)
Driver display settings
Settings for the driver display’s display options can be made via the driver display’s app menu and via the centre display’s set-tings menu.
Settings via the driver display’s app menu
The figure is schematic – parts may vary depending on car model. The app menu is opened and controlled using the right-hand keypad on the steering wheel. In the app menu, you can choose which information is shown on the driver display from:
- trip computer
media player - phone
- navigation system
Settings via the centre display
Selecting information type
- Tap on Settings in the centre display’s top view.
- Press My Car Displays Driver Display Information.
- Select what should be shown in the back-ground:
- Show no information in background
- Show information for current playing media
- Show navigation even if no route is set1.
Selecting theme
- Tap on Settings in the centre display’s top view.
- Tap on My Car Displays Display Themes
- Select a theme (appearance) for the driver display:
- Glass
- Minimalistic
- Performance
- Chrome Rings
Fuel gauge
The fuel gauge in the driver display shows the fuel level in the tank.
The figure is schematic – parts may vary depending on car model.
Fuel gauge in the 12-inch driver display:
The beige zone in the fuel gauge indicates the quantity of fuel in the tank. When the fuel level is low, the fuel pump symbol illuminates and turns amber color. The trip computer also shows the distance to empty tank.
The figure is schematic – parts may vary depending on car model.
Fuel gauge in the 8-inch driver display:
The bars in the fuel gauge indicate the quantity of fuel in the tank.
When the fuel level is low, the fuel pump symbol illuminates and turns amber color. The trip computer also shows the distance to empty tank.
Related information
- Driver display (p. 83)
- Filling fuel (p. 463)
- Fuel tank – volume (p. 665
Examples of trip computer information in the 12-inch driver display*. The figure is schematic – parts may vary depending on car model.
Examples of trip computer information in the 8-inch driver display. The figure is schematic – parts may vary depending on car model.
The following meters are included in the trip computer:
- Trip meter
- Odometer
- Instantaneous fuel consumption
- Distance to empty tank
- Tourist – alternative speedometer
Units for distance, speed, etc. can be changed via system settings in the centre display.
Trip meter
There are two trip meters, TM and TA. TM can be reset manually and TA is reset automatically if the car is not used for at least four hours. The following information is registered while driving:
- Mileage
- Driving time
- Average speed
- Average fuel consumption
The values apply from the trip meter’s latest reset.
Odometer
The odometer records the car’s total mileage. This value cannot be reset to zero.
Instantaneous fuel consumption
This gauge shows the fuel consumption that the car has at the moment. The value is updated approximately every second.
Distance to empty tank
![]() The trip computer calculates the remaining mileage with the fuel available in the tank.
The trip computer calculates the remaining mileage with the fuel available in the tank.
The calculation is based on the average fuel consumption over the last 30 km (20 miles) and the remaining drivable fuel quantity. When the gauge shows “—-“, there is not enough fuel left to be able to calculate the remaining mileage. Refuel as soon as possible.
NOTE
There may be a slight deviation if the driving style has been changed. An economic driving style generally results in a longer driving distance.
Tourist – alternative speedometer
The alternative digital speedometer makes it easier to drive in countries where speed limit signs are in a different unit than that shown in the car’s instruments. The digital speed is then shown in the opposite unit to that shown in the analog speedometer. If the analog speedometer is graduated in mph, the digital speedometer shows the corresponding speed in km/h and vice versa.
Related information
- Show trip data in the driver display (p. 90)
- Resetting the trip meter (p. 91)
- Show trip statistics in the centre display (p. 91)
- Driver display (p. 83)
- Changing system units (p. 131)
Show trip data in the driver display
The trip computer’s recorded and calculated values can be shown in the driver display. The values are saved in a trip computer app. Via the app menu, you can choose which information is shown on the driver display.
Open and navigate in the app menu2 using the righthand steering wheel keypad.
- App menu
- Left/right
- Up/down
- Confirm
- Open the app menu in the driver display by pressing (1).
(It is not possible to open the app menu while there is an unacknowledged message in the driver display. The message first has to be confirmed by pressing the O button (4) before the app menu can be opened.) - Navigate to the trip computer app to left or right with (2). > The top four menu rows show measured values for trip meter TM. The next four menu rows show measured values for trip meter TA. Scroll up or down in the list with (3).
- Scroll down to the option buttons to select which information to show in the driver display:
- Odometer
- Distance to empty tank
- Tourist (alternative speedometer)
- Mileage for trip meter TM, TA, or no display of mileage
- Instantaneous fuel consumption, aver-age consumption for TM or TA, alternatively, no display of fuel consumption.
Select or deselect an option with the O button (4). The change is made immediately.
Related information
- Trip computer (p. 88)
- Resetting the trip meter (p. 91)
Resetting the trip meter
Reset the trip meter using the left-hand stalk switch.
-
- Reset all information in trip meter TM (i.e.mileage, average consumption, average speed and driving time) with a long press on the RESET button on the left-hand stalk switch.
Pressing the RESET button resets only the mileage. - The trip meter TA can only be reset automatically when the car has not been used for four or more hours.
- Reset all information in trip meter TM (i.e.mileage, average consumption, average speed and driving time) with a long press on the RESET button on the left-hand stalk switch.
Related information
Show trip statistics in the centre display
Trip statistics from the trip computer are dis-played graphically in the centre display and provide an overview that facilitates more fuel-efficient driving.
Open the Driver
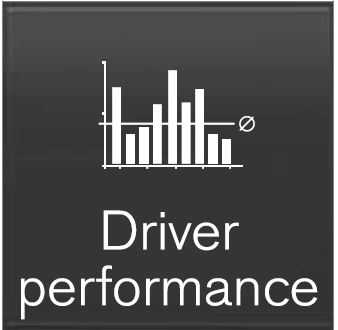 performance app in app view in order to show the trip statistics. Each bar in the diagram symbolizes a distance of 1, 10 or 100 km, alternatively miles. The bars are filled in from the right as driving progresses. The bar on the far right shows the value for the current distance. The average fuel consumption and total driving time are calculated since the last time the trip statistics were reset.
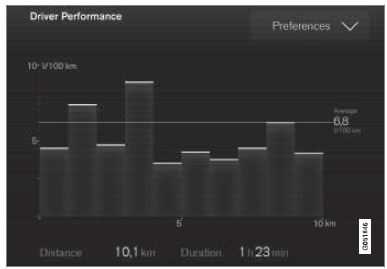
Trip statistics from the trip computer3.
Related information
- Settings for trip statistics
- Trip computer
Settings for trip statistics
- Open the Driver performance app in app view in order to show the trip statistics.
- Press Preferences to
- change graph scale. Select resolution 1, 10 or 100 km/miles for the bar.
- reset data after every trip. Performed when the car has been stationary for more than 4 hours.
- reset data for the current trip.
- Trip statistics, calculated average consumption and total driving time are always reset simultaneously.Units for distance, speed, etc. can be changed via system settings in the centre display.
Related information
- Show trip statistics in the center display (p. 91)
Trip computer (p. 88) - Resetting the trip meter (p. 91)
Date and time
The clock is shown in both the driver display and the centre display.
Clock location
Clock location in the 12-inch* and 8-inch driver display. The figure is schematic – parts may vary depending on car model. In certain situations, messages and information may cover the clock in the driver display. In the center display, the clock is located at the top right of the status bar.
Date and time settings
Select Settings System Date and Time in the center display’s top view to change settings for time and date format. Adjust the date and time by pressing the up or down arrow on the touch screen.
Automatic time for cars with GPS
When the car is equipped with a navigation system, Auto Time can be selected. The time zone is then adjusted automatically based on the location of the car. For certain types of navigation systems, the current location (country) must also be set to obtain the right time zone. If Auto Time is not selected, time and data are adjusted with arrow up or arrow down on the touch screen.
Summer time
In certain countries, it is possible to select the Auto Daylight Saving Time setting for automatic setting of summer time. For other coun-tries, the Daylight Saving Time setting can be selected manually.
Related information
- Driver display (p. 83)
- Other settings in the centre display’s top view (p. 131)
Outside temperature gauge
The outside temperature is shown in the driver display. A sensor detects the temperature outside of the car.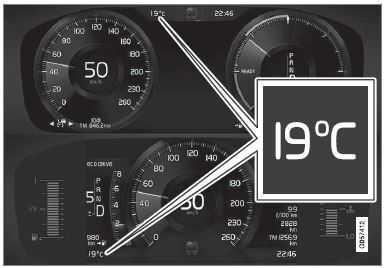
Outside temperature gauge location in the 12-inch* and 8-inch driver display. The figure is schematic -parts may vary depending on car model. If the car has been stationary, the gauge may display a temperature reading that is too high.
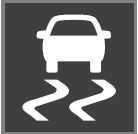
 When the outside temperature is in the range –5 °C to +2 °C (23 °F to 36 °F), a snowflake symbol lights up that warns of potentially slippery The symbol is also illuminated briefly in the head-up display*, if the car is equipped with one.
Indicator and warning symbols
The indicator and warning systems alert the driver to the fact that a function is activated, a system is working, or a defect or serious error has occurred.
|
|
Warning
The red warning symbol illuminates when a fault has been detected which could affect the safety or drivability of the car. An explanatory text is shown on the driver display at the same time The warning symbol can also illuminate in conjunction with other symbols. |
|
|
Seatbelt reminder Illuminates or flashes when someone in the car is not wearing a seatbelt. |
|
|
Airbags
An error has been detected in any of the car’s safety systems. Read the message on the driver display and contact a workshop. Volvo recommends that an Authorised Volvo workshop is contacted. |


|
|
Fault in brake system
An error has occurred on the braking system. Read the message on the driver display and contact a workshop. Volvo recommends that an authorized Volvo workshop is contacted. |
|
|
Parking brake
Light illuminated permanently: The parking brake is activated. Flashing: an error has occurred with the parking brake. Read the message in the driver display. |
|
|
Faults in the electrical system
An error has occurred on the electrical system. Read the message on the driver display and contact a workshop. Volvo recommends that an authorized Volvo workshop is contacted. |
|
|
High engine temperature
The engine temperature is too high. Read the message in the driver display. |


|
|
Collision risk
City Safety warns of a risk of collision with other vehicles, pedestrians, cyclists or large animals. |
|
|
Low oil pressure
The engine oil pressure is too low. Stop the engine immediately and check the engine oil level, top up if necessary. If the symbol lights up and the oil level is normal, read the message on the display and contact a workshop. Volvo recommends that an authorized Volvo work- shop is contacted. |


|
|
Information A fault has occurred in one of the car’s systems. Read the message in the driver display. The information symbol can also illuminate in conjunction with other symbols. |
|
|
Fault in brake system An error has occurred on the braking system. Read the message in the driver display. |


 |
ABS fault
The system is disengaged. The car’s regular brake system con- tinues to work, but without the ABS function. |
|
|
AdBlue system (diesel)
Low Able level or fault in Able system. |
|
|
Emissions system
Emissions systems fault. Drive to a workshop for checking. Volvo recommends that an authorised Volvo workshop is contacted. |
|
|
Rear fog lamp
The rear fog lamp is illuminated. |
|
|
Tyre pressure system
Low tyre pressure. If there is a fault in the tyre pres- sure system, the symbol will flash for approx. 1 minute and then illuminate with a constant glow. This may be because the system cannot detect or warn of low tyre pressure as intended. |


|
|
Fault in the headlamp system
A fault has occurred on the head- lamp system. Read the message in the driver display. |
|
|
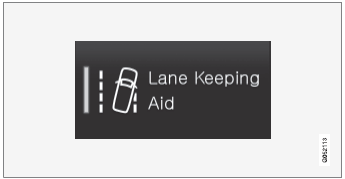
Lane assistance
Lane assistance warns/intervenes. |
|
|
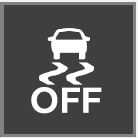
Stability system
Light on permanently: a fault has occurred in the system. Flashing: the system is working. |
|
|
Stability system, sport mode
Sport mode is selected. |

Blue symbols
|
|
Active main beam
Active main beam is activated and switched on. |
|
|
Main beam
Main beam is switched on. |


Green symbols
 Automatic brake
The function is activated and the service brake or parking brake is operating.
 Front fog lamps
The front fog lamp is switched on.
 Position lamps
The position lamps are switched on.
![]() Left and right-hand direction indicator
Left and right-hand direction indicator
The direction indicator is being used.
White grey symbols
|
|
Active main beam
Active main beam is activated, but does not come on. |
|
|
Preconditioning
Engine and compartment heater/air conditioning precondition the car. |

|
|
Lane assistance
White symbol: Lane assistance is on and road lines are detected. Grey symbol: Lane assistance is on but road lines are not detected. |
|
|
Rain sensor
The rain sensor is activated. |


Related information
Driver display (p. 83).
License agreement for the driver display
A license is an agreement for the right to operate a certain activity or the right to use someone else’s entitlement according to the terms and conditions in the agreement. The following text is Volvo’s agreement with the manufacturer or developer.
Boost Software License 1.0
Permission is hereby granted, free of charge, to any person or organization obtaining a copy of the software and accompanying documentation covered by this license (the “Software”) to use, reproduce, display, distribute, execute, and transmit the Software, and to prepare derivative works of the Software, and to permit third-parties to whom the Software is furnished to do so, all subject to the following: The copyright notices in the Software and this entire statement, including the above license grant, this restriction and the following disclaimer, must be included in all copies of the Software, in whole or in part, and all derivative works of the Software, unless such copies or derivative works are solely in the form of machine-executable object code generated by a source language processor. THE SOFTWARE IS PROVIDED “AS IS”, WITHOUT WARRANTY OF ANY KIND, EXPRESS OR IMPLIED, INCLUDING BUT NOT LIMITED TO THE WARRANTIES OF MERCHANTABILITY, FITNESS FOR A PARTICULAR PURPOSE, TITLE AND NON- INFRINGEMENT. IN NO EVENT SHALL THE COPYRIGHT HOLDERS OR ANYONE DISTRIBUTING THE SOFTWARE BE LIABLE FOR ANY DAMAGES OR OTHER LIABILITY, WHETHER IN CONTRACT, TORT OR OTHERWISE, ARISING FROM, OUT OF OR IN CONNECTION WITH THE SOFTWARE OR THE USE OR OTHER DEALINGS IN THE SOFTWARE.
BSD 4-clause “Original” or “Old” License
Copyright (c) 1982, 1986, 1990, 1991, 1993 The Regents of the University of California. All rights reserved. Redistribution and use in source and binary forms, with or without modification, are permitted provided that the following conditions are met:
- Redistributions of source code must retain the above copyright notice, this list of conditions and the following disclaimer.
- Redistributions in binary form must reproduce the above copyright notice, this list of conditions and the following disclaimer in the documentation and/or other materials provided with the distribution.
- All advertising materials mentioning features or use of this software must display the following acknowledgement: This product includes software developed by the University of California, Berkeley and its contributors.
- Neither the name of the University nor the names of its contributors may be used to endorse or promote products derived from this software without specific prior written permission.
THIS SOFTWARE IS PROVIDED BY THE REGENTS AND CONTRIBUTORS “AS IS” AND ANY EXPRESS OR IMPLIED
WARRANTIES, INCLUDING, BUT NOT LIMITED TO, THE IMPLIED WARRANTIES OF MERCHANTABILITY AND FITNESS FOR A PARTICULAR PURPOSE ARE DISCLAIMED. IN NO EVENT SHALL THE REGENTS OR CONTRIBUTORS BE LIABLE FOR ANY DIRECT, INDIRECT, INCIDENTAL, SPECIAL, EXEMPLARY, OR CONSEQUENTIAL DAMAGES (INCLUDING, BUT NOT LIMITED TO, PROCUREMENT OF SUBSTITUTE GOODS OR SERVICES; LOSS OF USE, DATA, OR PROFITS; OR BUSINESS INTERRUPTION) HOWEVER CAUSED AND ON ANY THEORY OF LIABILITY, WHETHER IN CONTRACT, STRICT LIABILITY, OR TORT (INCLUDING NEGLIGENCE OR OTHERWISE) ARISING IN ANY WAY OUT OF THE USE OF THIS SOFTWARE, EVEN IF ADVISED OF THE POSSIBILITY OF SUCH DAMAGE. BSD 3-clause “New” or “Revised” License Copyright (c) 2011-2014, Yann Collet. Redistribution and use in source and binary forms, with or without modification, are permitted provided that the following conditions are met:
- Redistributions of source code must retain the above copyright notice, this list of conditions and the following disclaimer.
- Redistributions in binary form must reproduce the above copyright notice, this list of conditions and the following the names of its contributors may be used to endorse or promote products derive from this software without specific prior written permission.
THIS SOFTWARE IS PROVIDED BY THE COPYRIGHT HOLDERS AND CONTRIBUTORS “AS IS” AND ANY EXPRESS OR IMPLIED WARRANTIES, INCLUDING, BUT NOT LIMITED TO, THE IMPLIED WARRANTIES OF MERCHANTABILITY AND FITNESS FOR A PARTICULAR PURPOSE ARE DISCLAIMED. IN NO EVENT SHALL THE COPYRIGHT HOLDER OR CONTRIBUTORS BE LIABLE FOR ANY DIRECT, INDIRECT, INCIDENTAL, SPECIAL, EXEMPLARY, OR CONSEQUENTIAL DAMAGES (INCLUDING, BUT NOT LIMITED TO, PROCUREMENT OF SUBSTITUTE GOODS OR SERVICES; LOSS OF USE, DATA, OR PROFITS; OR BUSINESS INTERRUPTION) HOWEVER CAUSED AND ON ANY THEORY OF LIABILITY, WHETHER IN CONTRACT, STRICT LIABILITY, OR TORT (INCLUDING NEGLIGENCE OR OTHERWISE) ARISING IN ANY WAY OUT OF THE USE OF THIS SOFTWARE, EVEN IF ADVISED OF THE POSSIBILITY OF SUCH DAMAGE.
BSD 2-clause “Simplified” license
Copyright (c) <YEAR>, <OWNER> All rights reserved. Redistribution and use in source and binary forms, with or without modification, are permitted provided that the following conditions are met:
- Redistributions of source code must retain the above copyright notice, this list of conditions and the following disclaimer.
- Redistributions in binary form must reproduce the above copyright notice, this list of conditions and the following disclaimer in the documentation and/or other materials provided with the distribution.
THIS SOFTWARE IS PROVIDED BY THE COPYRIGHT HOLDERS AND CONTRIBUTORS “AS IS” AND ANY EXPRESS OR IMPLIED WARRANTIES, INCLUDING, BUT NOT LIMITED TO, THE IMPLIED WARRANTIES OF MERCHANTABILITY AND FITNESS FOR A PARTICULAR PURPOSE ARE DISCLAIMED. IN NO EVENT SHALL THE COPYRIGHT OWNER OR CONTRIBUTORS BE LIABLE FOR ANY DIRECT, INDIRECT, INCIDENTAL, SPECIAL, EXEMPLARY, OR CONSEQUENTIAL DAMAGES (INCLUDING, BUT NOT LIMITED TO, PROCUREMENT OF SUBSTITUTE GOODS OR SERVICES; LOSS OF USE, DATA, OR PROFITS; OR BUSINESS INTERRUPTION) HOWEVER CAUSED AND ON ANY THEORY OF LIABILITY, WHETHER IN CONTRACT, STRICT LIABILITY, OR TORT (INCLUDING NEGLIGENCE OR OTHERWISE) ARISING IN ANY WAY OUT OF THE USE OF THIS SOFTWARE, EVEN IF ADVISED OF THE POSSIBILITY OF SUCH DAMAGE. The views and conclusions contained in the software and documentation are those of the authors and should not be interpreted as representing official policies, either expressed or implied, of the FreeBSD Project.
Free Type Project License
- Copyright 1996-1999 by David Turner, Robert Wilhelm, and Werner Led berg Introduction The Free Type Project is distributed in several archive packages; some of them may contain, in addition to the Free Type font engine, various tools and contributions which rely on, or relate to, the Free Type Project. This license applies to all files found in such packages, and which do not fall under their own explicit license. The license affects thus the Free Type font engine, the test programs, documentation and make files, at the very least. This license was inspired by the BSD, Artistic, and IJG
(Independent JPEG Group) licenses, which all encourage inclusion and use of free software in commercial and freeware products alike. As a consequence, its main points are that: o We don’t promise that this software works. However, we are be interested in any kind of bug reports. (`as is’ distribution) o You can use this software for whatever you want, in parts or full form, without having to pay us.(`royalty-free’ usage) o You may not pretend that you wrote this software. If you use it, or only parts of it, in a program, you must acknowledge somewhere in your documentation that you’ve used the Free Type code. (`credits’) We specifically permit and encourage the inclusion of this software, with or without modifications, in commercial products, provided that all warranty or liability claims are assumed by the product vendor. Legal Terms 0. Definitions Throughout this license, the terms `package’, `Free Type Project’, and `Free Type archive’ refer to the set of files originally distributed by the authors (David Turner, Robert Wilhelm, and Werner Limber) as the `Free Type project’, be they named as alpha, beta or final release. `You’ refers to the licensee, or person using the project, where `using’ is a generic term including compiling the project’s source code as well as linking it to form a `program’ or `executable’. This program is referred to as `a program using the Free Type engine’. This license applies to all files distributed in the original Free Type archive, including all source code, binaries and documentation, unless otherwise stated in the file in its original, unmodified form as distributed in the original archive. If you are unsure whether or not a particular file is covered by this license, you must contact us to verify this. The Free Type project is copyright (C) 1996-1999 by David Turner, Robert Wilhelm, and Werner Lekberg. All rights reserved except as specified below. - No Warranty THE FREETYPE ARCHIVE IS PROVIDED `AS IS’ WITHOUT WARRANTY OF ANY KIND, EITHER EXPRESSED OR IMPLIED, INCLUDING, BUT NOT LIMITED TO, WARRANTIES OF MERCHANTABILITY AND FITNESS FOR A PARTICULAR PURPOSE. IN NO EVENT WILL ANY OF THE AUTHORS OR COPYRIGHT HOLDERS BE LIABLE FOR ANY DAMAGES CAUSED BY THE USE OR THE INABILITY TO USE, OF THE FREETYPE PROJECT. As you have not signed this license, you are not required to accept it. However, as the Free Type project is copyrighted material, only this license, or another one contracted with the authors, grants you the right to use, distribute, and modify it. Therefore, by using, distributing, or modifying the Free Type project, you indicate that you understand and accept all the terms of this license.
- Redistribution Redistribution and use in source and binary forms, with or without modification, are permitted provided that the following conditions are met: o Redistribution of source code must retain this license file (`licence.txt’) unaltered; any additions, deletions or changes to the original files must be clearly indicated in accompanying documentation. The copyright notices of the unaltered, original files must be preserved in all copies of source files. o Redistribution in binary form must provide a disclaimer that states that the software is based in part of the work of the Free Type Team, in the distribution documentation. We also encourage you to put an URL to the Free Type web page in your documentation, though this isn’t mandatory. These conditions apply to any software derived from or based on the Free Type code, not just the unmodified files. If you use our work, you must acknowledge us. However, no fee need be paid to us.
3. Advertising The names of Free Type’s authors and contributors may not be used to endorse or promote products derived from this software without specific prior written permission. We suggest, but do not require, that you use one or more of the following phrases to refer to this software in your documentation or advertising materials: `Free Type Project’, `Free Type Engine’, `Free Type library’, or `Free Type Distribution’. - Contacts There are two mailing lists related to Free Type: o
freetype@freetype.org Discusses general use and applications of Free Type, as well as future and wanted additions to the library and distribution. If you are looking for support, start in this list if you haven’t found anything to help you in the documentation. o devel@freetype.org Discusses bugs, as well as engine internals, design issues, specific licenses, porting, etc. o http://www.freetype.org Holds the current FreeType web page, which will allow you to download our latest development version and read online documentation. You can also contact us individually at: David Turner <david.turner@freetype.org> Robert Wilhelm <robert.wilhelm@freetype.org> Werner Limber <werner.lemberg@freetype.org>. - Libpng License
This copy of the lipping notices is provided for your convenience. In case of any discrepancy between this copy and the notices in the file pg. that is included in the libpng distribution, the latter shall prevail.
COPYRIGHT NOTICE, DISCLAIMER, and LICENSE:
If you modify libpng you may insert additional notices immediately following this sentence. libpng versions 1.0.7, July 1, 2000, through 1.0.13, April 15, 2002, are Copyright (c) 2000-2002 Glenn Randers Pehrson and are distributed according to the same disclaimer and license as libpng 1.0.6 with the following individuals added to the list of Contributing Authors
Simon-Pierre Cadieux
Eric S. Raymond
Gilles Vollant
and with the following additions to the disclaimer: There is no warranty against interference with your enjoyment of the library or against infringement. There is no warranty that our efforts or the library will fulfill any of your particular purposes or needs. This library is provided with all faults, and the entire risk of satisfactory quality, performance, accuracy, and effort is with the user.
libpng versions 0.97, January 1998, through 1.0.6, March 20, 2000, are Copyright (c) 1998, 1999 Glenn Randers Pehrson, and are distributed according to the same disclaimer and license as libpng-0.96, with the following individuals added to the list of Contributing Authors:
Tom Lane
Glenn Randers Pehrson
Willem van Schaik
libpng versions 0.89, June 1996, through 0.96, May 1997, are Copyright (c) 1996, 1997 Andreas Diller Distributed according to the same disclaimer and license as libpng-0.88, with the following individuals added to the list of Contributing Authors:
- John Bowler
- Kevin Bracey
- Sam Bushell
- Magnus Holmgren
- Greg Roelofs
- Tom Tanner
- libpng versions 0.5, May 1995, through 0.88, January 1996, are Copyright (c) 1995, 1996 Guy Eric Salamat, Group 42, Inc.
- For the purposes of this copyright and license, “Contributing Authors” is defined as the following set of individuals:
- Andreas Dilger
- Dave Martindale
- Guy Eric Schalnat
- Paul Schmidt
- Tim Wegner
The PNG Reference Library is supplied “AS IS”. The Contributing Authors and Group 42, Inc. disclaim all warranties, expressed or implied, including, without limitation, the warranties of merchantability and of fitness for any purpose. The Contributing Authors and Group 42, Inc. assume no liability for direct, indirect, incidental, special, exemplary, or consequential damages, which may result from the use of the PNG Reference Library, even if advised of the possibility of such damage. Permission is hereby granted to use, copy, modify, and distribute this source code, or portions hereof, for any purpose, without fee, subject to the following restrictions:
- The origin of this source code must not be misrepresented.
- Altered versions must be plainly marked as such and must not be misrepresented as being the original source.
- This Copyright notice may not be removed or altered from any source or altered source distribution.
The Contributing Authors and Group 42, Inc. specifically permit, without fee, and encourage the use of this source code as a component to supporting the PNG file format in commercial products. If you use this source code in a product, acknowledgment is not required but would be appreciated. A “png get copyright” function is available, for convenient use in “about” boxes and the like: printf(“%s”,png_get_copyright(NULL)); Also, the PNG logo (in PNG format, of course) is supplied in the files “pngbar.png” and “pngbar.jpg (88×31) and “pngnow.png” (98×31). Libpng is OSI Certified Open Source Software. OSI Certified Open Source is a certification mark of the Open Source Initiative. Glenn Randers Pehrson randeg@alum.rpi.edu April 15, 2002.
MIT License
Copyright (c) <year> <copyright holders>
Permission is hereby granted, free of charge, to any person obtaining a copy of this software and associated documentation files (the “Software”), to deal in the Software without restriction, including without limitation the rights to use, copy, modify, merge, publish, distribute, sublicense, and/or sell copies of the Software, and to permit persons to whom the Software is furnished to do so, subject to the following conditions: The above copyright notice and this permission notice shall be included in all copies or substantial portions of the Software.
THE SOFTWARE IS PROVIDED “AS IS”, WITHOUT WARRANTY OF ANY KIND, EXPRESS OR IMPLIED, INCLUDING BUT NOT LIMITED TO THE WARRANTIES OF MERCHANTABILITY, FITNESS FOR A PARTICULAR PURPOSE, AND NONINFRINGEMENT. IN NO EVENT SHALL THE AUTHORS OR COPYRIGHT HOLDERS BE LIABLE FOR ANY CLAIM, DAMAGES OR OTHER LIABILITY, WHETHER IN AN ACTION OF CONTRACT, TORT OR OTHERWISE, ARISING FROM, OUT OF OR IN CONNECTION WITH THE SOFTWARE OR THE USE OR OTHER DEALINGS IN THE SOFTWARE.
zlib License
The zlib/libpng License Copyright (c) <year> <copyright holders> This software is provided ‘as-is’, without any express or implied warranty. In no event will the authors be held liable for any damages arising from the use of this software. Permission is granted to anyone to use this software for any purpose, including commercial applications, and to alter it and redistribute it freely, subject to the following restrictions:
- The origin of this software must not be misrepresented; you must not claim that you wrote the original software. If you use this software in a product, an acknowledgment in the product documentation would be appreciated but is not required.
- Altered source versions must be plainly marked as such, and must not be misrepresented as being the original software.
- This notice may not be removed or altered from any source distribution.
SGI Free Software B License Version 2.0.
SGI FREE SOFTWARE LICENSE B (Version 2.0, Sept. 18, 2008) Copyright (C) [dates of first publication] Silicon Graphics, Inc. All Rights Reserved. Permission is hereby granted, free of charge, to any person obtaining a copy of this software and associated documentation files (the “Software”), to deal in the Software without restriction, including without limitation the rights to use, copy, modify, merge, publish, distribute, sublicense, and/or sell copies of the Software, and to permit persons to whom the Software is furnished to do so, subject to the following conditions: The above copyright notice including the dates of first publication and either this permission notice or a reference to http://oss.sgi.com/projects/FreeB/ shall be included in all copies or substantial portions of the Software. THE SOFTWARE IS PROVIDED “AS IS”, WITHOUT WARRANTY OF ANY KIND, EXPRESS OR IMPLIED, INCLUDING BUT NOT LIMITED TO THE WARRANTIES OF MERCHANTABILITY, FITNESS FOR A PARTICULAR PURPOSE AND NONINFRINGEMENT. IN NO EVENT SHALL SILICON GRAPHICS, INC. BE LIABLE FOR ANY CLAIM, DAMAGES OR OTHER LIABILITY, WHETHER IN AN ACTION OF CONTRACT, TORT OR OTHERWISE, ARISING FROM, OUT OF OR IN CONNECTION WITH THE SOFTWARE OR THE USE OR OTHER DEALINGS IN THE SOFTWARE. Except as contained in this notice, the name of Silicon Graphics, Inc. shall not be used in advertising or otherwise to promote the sale, use or other dealings in this Software without prior written authorization from Silicon Graphics, Inc.
Related information
Driver display (p. 83)
App menu in the driver display
The app menu in the driver display provides quick access to commonly used functions for certain apps.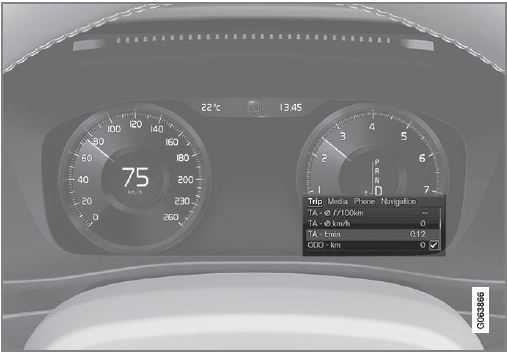
The figure is schematic. The app menu in the driver display can be used instead of the center display and is controlled using the right-hand keypad on the steering wheel. The app menu makes it easier to switch between different apps or functions within the apps without having to let go of the steering wheel.
App menu functions
Different apps give access to different types of functions. The following apps and their associated functions can be controlled from the app menu:
| App | Functions |
| Trip com- puter | Selection of trip meter, selec- tion of what to show in the driver display, etc. |
| Media player | Selection of active source for the media player. |
| Phone | Calling a contact from the call list. |
| Navigation | Guide to destination, etc. |
Related information
- Driver display
- Overview of the center display
- Managing the app menu in the driver display
Managing the app menu in the driver display
The app menu in the driver display is operated with the steering wheel’s right-hand keypad.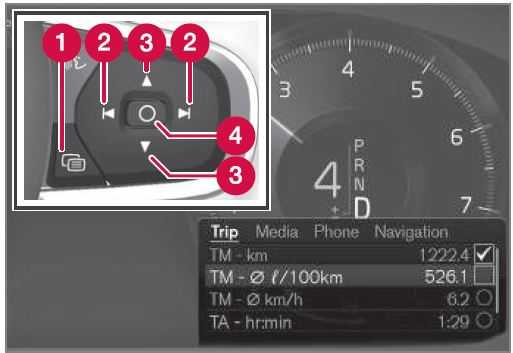
The app menu and the steering wheel’s right-hand keypad. The figure is schematic.
- Open/close
- Left/right
- Up/down
- Confirm
Opening/closing the app menu
Press on open/close (1). > The app menu opens/close.
NOTE
It is not possible to open the app menu while there is an unacknowledged message in the driver display. The message has to be confirmed first before the app menu can be opened.
The app menu closes automatically after a period of inactivity or after certain options have been selected.
Navigating and selecting in the app menu
- Navigate between the apps by pressing on the left or right (2). > Functions for previous/next app are shown in the app menu.
- Browse through the functions for the selected app by tapping on up or down (3).
- Confirm or highlight an option for the function by pressing on confirm (4). > The function is activated and for some options the app menu then closes.
- If the app menu is opened again, the functions of the most recently selected app are shown first.
- Related information
- App menu in the driver display
- Messages in the driver display
Messages in the driver display
The driver display can show messages to inform or assist the driver in the event of different events.
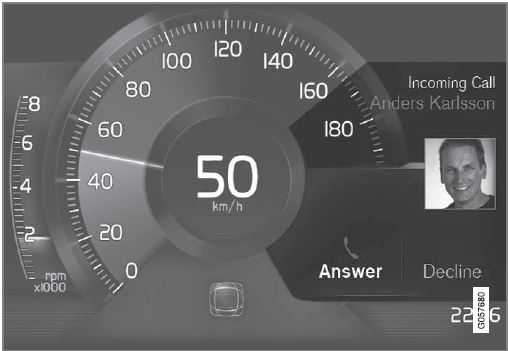 Example of message in the 8-inch driver display. The figure is schematic – parts may vary depending on car model.
Examples of messages in the driver display. The figure is schematic – parts may vary depending on car model. The driver display shows messages that are of high priority for the driver. Messages can be shown in different parts of the driver display depending on what other information is currently being displayed. After a while, or when the message has been acknowledged/action taken if required, the message disappears from the driver display. If a message needs to be saved, it is placed in the Car Status app, which is opened from the app view in the centre display. Message composition may vary and they can be shown together with graphics, symbols or buttons for acknowledging the message or accepting a request, for example.
Service messages
Shown below is a selection of important service messages and their meanings.
| Message | Specification |
| Stop safely A | Stop and switch off the engine. Serious risk of damage – consult a work- shop B. |
| Turn off engine A | Stop and switch off the engine. Serious risk of damage – consult a work- shop B. |
| Service urgent Drive to workshop A | Contact a workshop B to check the car immediately. |
| Service required A | Contact a workshop B to check the car as soon as possible. |
| Regular maintenance
Book time for maintenance |
Time for regular service – contact a workshop B. Shown before the next service date. |
| Regular maintenance
Time for maintenance |
Time for regular service – contact a workshop. Shown at the next service date. |
| Message | Specification |
| Regular maintenance
Maintenance overdue |
Time for regular service – contact a workshop B. Shown when the service date has passed. |
| Temporarily off | A function has been temporarily switched off and is reset automatically while driving or after starting again. |
- Part of the message, is shown together with information on where the problem has arisen.
- An authorized Volvo workshop is recommended.
- Related information
- Managing messages in the driver display
- Handling a message saved from the driver display
- Message in center display
Managing messages in the driver display
Messages in the driver display are handled using the steering wheel’s right-hand keypad.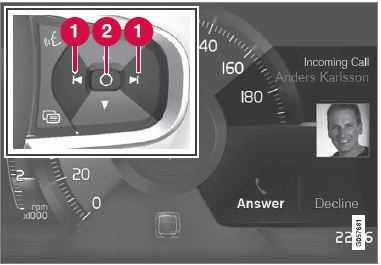
Examples of messages in the driver display4 and the steering wheel’s right-hand keypad. Examples of messages in the driver display5 and the steering wheel’s right-hand keypad. The figure is schematic – parts may vary depending on car model.
- Left/right
- Confirm
Some messages in the driver display contain one or more buttons for acknowledging the message or accepting a request, for example.
Managing a new message
For messages with buttons:
- Navigate between the buttons by pressing on the left or right (1).
- Confirm the selection by pressing on con-firm (2). > The message disappears from the driver display.
For messages without buttons:
Close the message by pressing on confirm (2), or allow the message to close automatically after a while.
The message disappears from the driver display.
If a message needs to be saved, it is placed in the Car Status app, which is opened from the app view in the centre display. The message Car message stored in Car Status application is shown in the centre display in conjunction with this.
Related information
- Messages in the driver display (p. 104)
- Handling a message saved from the driver display (p. 106)
- Message in centre display (p. 139)
Handling a message saved from the driver display
Whether saved from the driver display or the centre display, messages are managed in the centre display.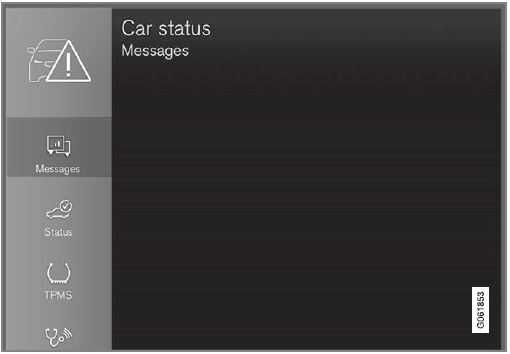
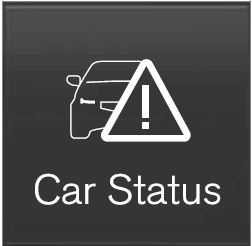 Saved messages can be seen in the Car Status app. Messages that are shown in the driver display and that need to be saved are added in the Car Status app in the centre display. The message Car message stored in Car Status application is shown in the centre display in conjunction with this.
Reading a saved message
To read a saved message immediately:
Press the button to the right of the Car message stored in Car Status application message in the centre display. > The saved message is shown in the Car Status app.
To read a saved message later:
- Open the Car Status app from the app view in the centre display. > The app is opened in the bottom sub-view of the home view.
- Select the Messages tab in the app. > A list of saved messages is shown.
- Tap on a message to expand/minimize. > More information on the message is shown in the list and the image to the left in the app shows information about the message graphically.
Managing a saved message
In maximized mode, some messages have two buttons available to book service or read the owner’s manual.
To book service for a saved message:
- In maximized mode for the message, press Request appoint. Call to make Appointment6 for help in booking service. > With Request appoint.: The Appointments tab opens in the app and creates a request to book service and repair work. With Call to make Appointment: The phone app is initiated and calls a service centre to book service and repair work.
To read the owner’s manual for a saved message:
In maximized mode for the message, press Owner’s manual to read about the message in the owner’s manual. > The owner’s manual opens in the centre display and shows information linked to the message.
Saved messages in the app are deleted automatically each time the engine is started.
Related information
- Messages in the driver display (p. 104)
- Managing messages in the driver display (p. 105)
- Message in centre display (p. 139)
Overview of centre display
Many of the car’s functions are controlled from the centre display. Presented here is the centre display and its options.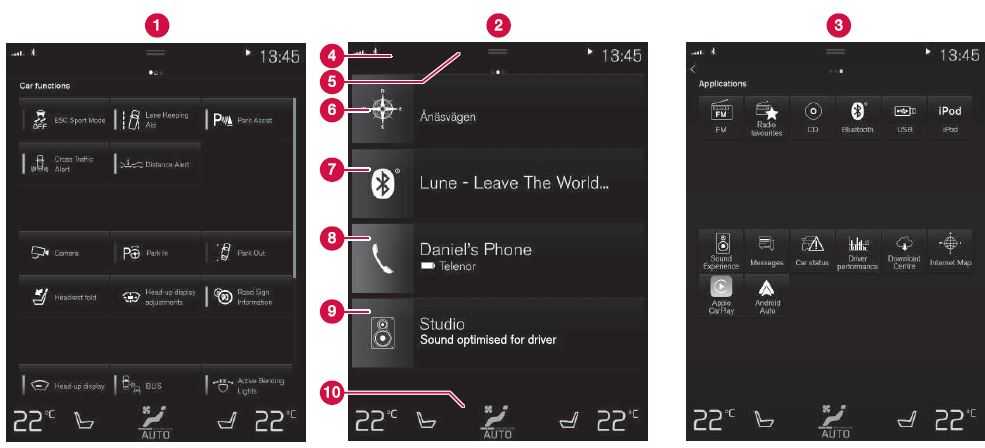
Three of the centre display’s basic views. Swipe right or left to access the function or app view respectively7.
- Function view – car functions that are activated or deactivated with a press. Certain functions are also so-called trigger functions, which means they open a window with setting options. Examples of these include Camera. Settings for the head-up. display* are also made from the function view, but adjustments are made using the steering wheel’s right-hand keypad.
- Home view – the first view that is shown when the screen is started.
- App view – apps that have been downloaded (third-party apps) and apps for embedded functions, such as FM radio. Tap on an app icon to open the app.
- Status bar – the activities in the car are shown right at the top of the screen. Net-work and connection information is shown on the left-hand side of the status bar, while media-related information,
- the clock and indication about on-going background activity are shown on the right.
- Top view – drag the tab down in order to access the top view. Settings, Owner’s manual, Profile and the car’s saved messages are accessed from here. In some cases contextual settings (e.g.
- Navigation Settings) and the contextual owner’s manual (e.g. Navigation Manual) can also be accessed in the top view.
- Navigation – leads to map navigation, with e.g. Senses Navigation*. Tap on the sub-view to expand it.
- Media – recently used apps associated with media. Tap on the sub view to expand it. Phone – the phone function can be reached from here. Tap on the sub view to expand it.
- Extra sub view – recently used apps or car functions that do not belong in any of the other sub views. Tap on the sub view to expand it.
- Climate row – information and direct inter-action to set temperature and seat heating for example*. Tap on the symbol in the centre of the climate row in order to open the climate view with more setting options.
NOTE
If necessary, the climate control can be used to cool the media system in the centre display. In these cases, the message Climate system Cooling the infotainment system is shown in the driver display.
Related information
- Managing the centre display (p. 111)
- Navigating in the centre display’s views (p. 114)
- Function view in centre display (p. 121)
Apps (p. 492)
Symbols in the centre display’s status bar (p. 123) - Other settings in the centre display’s top view (p. 131)
- Open contextual setup in the centre dis-play (p. 132)
- Owner’s manual in centre display (p. 19)
- Media player (p. 501)
- Phone (p. 517)
- Climate controls (p. 214)
- Switching off and changing the volume of the system sound in the centre display (p. 130)
- Changing the appearance in the centre display (p. 130)
- Changing system language (p. 131)Changing system units (p. 131)• Cleaning the centre display (p. 633)
- Message in centre display (p. 139)
Managing the centre display
Many of the car’s functions are controlled and regulated from the centre display. The centre display is a touch screen that reacts to touch.
Using the touch screen functionality in the centre display
The screen reacts differently depending on whether it is touched by dragging, swiping, or tapping. Actions such as browsing between different views, marking objects and scrolling in a list can be performed by touching the screen in different ways. An infrared light curtain just above the surface of the screen enables the screen to detect a finger that is just in front of the screen. This technology makes it possible to use the screen even with gloves on. Two people can interact with the screen at the same time, e.g. to adjust the climate for the driver and passenger side respectively.
IMPORTANT
Do not use sharp objects on the screen as they may scratch it. The table below presents the different procedures for operating the screen:
| Procedure | Execution | Result |
|
|
Press once. | Highlights an object, confirms a selection or activates a function. |
| Press twice in quick succession. | Zooms in on a digital object, such as the map. | |
| Press and hold. | Grabs an object. Can be used to move apps or map points on the map. Press and hold your finger against the screen and at the same time drag the object to the desired location. | |
|
|
Tap once with two fingers. | Zooms out from a digital object, such as the map. |


| Procedure | Execution | Result |
 |
Drag | Changes between different views, scrolls a list, text or view. Hold depressed and drag in order to move apps or map points on the map. Drag horizontally or vertically across the screen. |
|
|
Swipe/drag quickly | Changes between different views, scrolls a list, text or view. Drag horizontally or vertically across the screen.
Note that touching the upper section of the screen may cause the top view to open. |
|
|
Drag apart | Zooms in. |
|
|
Drag together | Zooms out. |


Returning to home view from another view
- Briefly press the home button below the center display.
> The last position of the home view is shown. - Briefly press again.
> All sub-views of the home view are set to their default mode.
NOTE
In-home view standard mode – briefly press the home button. An animation that describes access to the different views is shown on the screen.
Scrolling in a list, article or view
When a scroll indicator is visible in the screen, it is possible to scroll downward or upward in the view. Swipe downwards/upwards any-where in the view.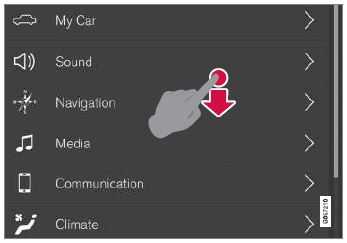 The scroll indicator appears in the center display when it is possible to scroll in the view.
Using the controls in the center display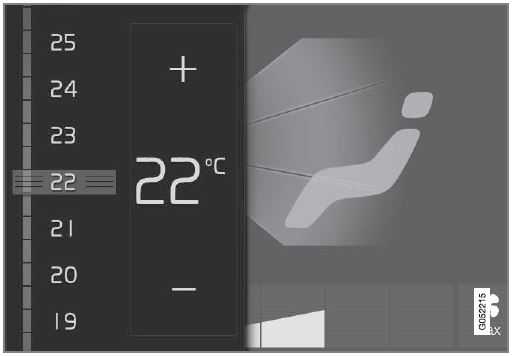
The control is used for many of the car’s functions. Regulate e.g. temperature by means of one of the following:
- drag the control to the desired temperature,
- tap on + or − in order to raise or lower the temperature gradually, or
- tap on the desired temperature on the control.
Related information
- Activating and deactivating centre display
- Moving apps and buttons in centre display (p. 123)
- Keyboard in centre display (p. 125)
Activating and deactivating centre display
The centre display can be dimmed and reactivated using the home button beneath the screen.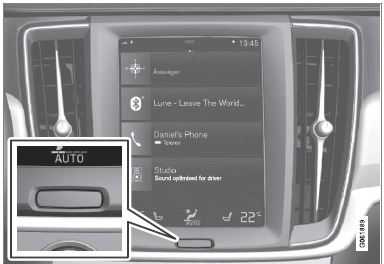
Home button for the centre display.
The effect of using the home button that the screen dims and the touchscreen no longer reacts to touch. The climate row will still be shown. All functions connected to the screen are still running, such as climate, audio, guidance* and apps. When the centre display is dimmed, it is a good opportunity to clean the screen. The dimming function can also be used to fade the screen so that it does not disturb while driving.
- Give a long press on the physical home button below the screen.
> The screen goes dark except for the cli-mate row, which continues to be shown. All functions connected to the screen are still running. - Reactivate the screen – briefly tap on the home button.
> The view that was displayed before the screen was switched off will be shown again.
NOTE
The screen cannot be deactivated when a prompt to perform an action is shown on the screen.
NOTE
The centre display deactivates automatically when the engine is off and the driver’s door is opened.
Related information
- Cleaning the centre display (p. 633)
- Changing the appearance in the centre display (p. 130)
- Overview of centre display (p. 108)
Navigating in the centre display’s views
There are five different basic views in the centre display: home view, top view, climate view, app view and function view. The screen is started automatically when the driver’s door is opened.
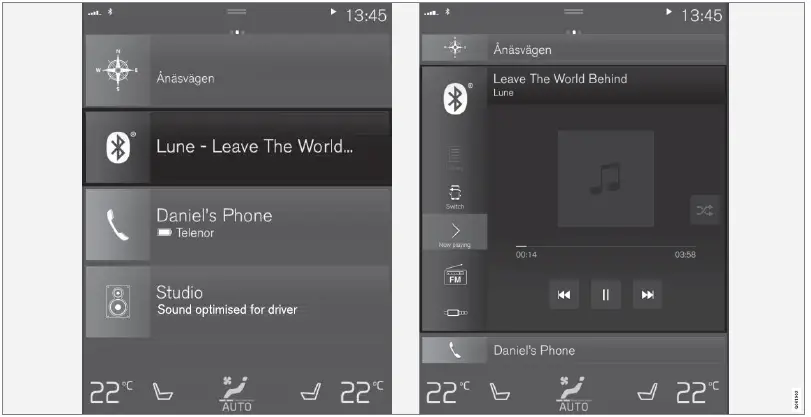
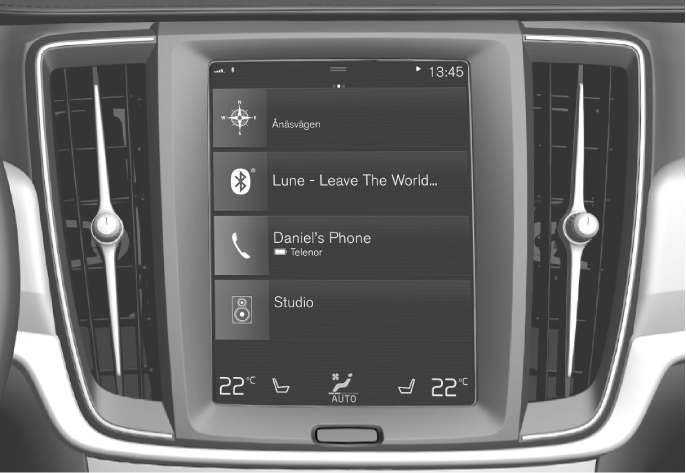
Home view
Home view is the view that is shown when the screen is started. It consists of four sub views: Navigation, Media, Phone and an extra sub-view. An app or car function selected from the app or function view starts in the respective sub-view of the home view. E.g. FM radio starts in the Media tile. The extra tile shows the last used app or car function that is not associated with any of the other three areas. The sub views show brief information about each different app.
NOTE
When the car is started, the home view’s various sub-views show information on the current status of apps.
NOTE
In home view standard mode – briefly press the home button. An animation that describes access to the different views is shown on the screen.
Status bar
The activities in the car are shown at the top of the screen. Network and connection information is shown on the left-hand side of the status bar, while media-related information, the clock and indication that background activity is in progress are shown on the right.
Top view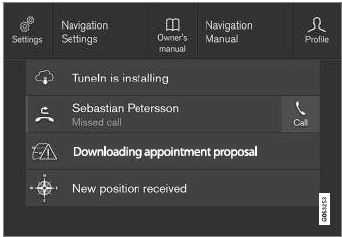
Top view dragged down
A tab is located in the centre of the status bar at the top of the screen. Open the top view by pressing on the tab or by dragging/swiping from the top downwards across the screen.
In the top view, access is always available to:
- Settings
- Owner’s manual
- Profile
- The car’s saved messages.
In the top view, access is given to the following in some cases:
- Contextual setting (e.g. Navigation Settings). Change settings directly in the top view when an app (e.g. navigation) is running.
- Contextual Owner’s Manual (e.g. Navigation Manual). Gain access directly in the top view to articles in the digital owner’s manual that are related to the content displayed on screen.
Exit the top view – press outside the top view, on the home button or at the bottom of the top view and drag upward. The underlying view is then visible and available for use again.
NOTE
The top view is not available during star-ting/shutdown or when a message is shown on the screen. It is also not available when climate view is shown.
Climate view
The climate row is always visible at the bottom of the screen. The most common climate settings can be made directly there, such as setting temperature and seat heating*.
 Press the symbol in the center of the climate row to open the climate view and gain access to more climate settings.
 Press the symbol to close the climate view and return to the previous view.
App view
Swipe from right to left8 across the screen in order to access the app view from the home view. Apps that have been downloaded (thirdparty apps) and apps for embedded functions, such as FM radio, are found here. Certain apps show brief information directly in the app view, such as the number of unread text messages for Messages. Tap on an app to open it. The app then opens in the tile to which it belongs, e.g. Media. You can scroll down in the app view, depending on the number of apps. Do this by swiping/ dragging from the bottom and up. Go back to the home view again by swiping from left to right8 across the screen, or by pressing the home button.
Function view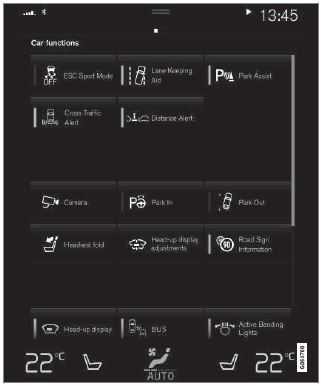
The function view with buttons for different car functions. Swipe from left to right8 across the screen in order to access the function view from the home view. From here you can activate or deactivate different car functions, e.g. BLIS*, Lane Keeping Aid* and Park Assist*. Depending on the number of functions, it is also possible here to scroll down in the view. Do this by swiping/dragging from the bottom and up. Unlike in app view, where an app is opened with a press, a function is activated or deactivated by pressing the relevant function button. Some functions (trigger functions) open in a new window when pressed. Go back to the home view again by swiping from right to left8 across the screen, or by pressing the home button.
Related information
- Managing sub views in centre display (p. 118)
- Symbols in the centre display’s status bar (p. 123)
- Other settings in the centre display’s top view (p. 131)
- Open contextual setup in the center display (p. 132)
- Owner’s manual in centre display (p. 19)
- Driver profiles (p. 135)
- Climate controls (p. 214)
- Apps (p. 492)
- Function view in the center display (p. 121)
- Overview of center display (p. 108)
Managing subviews in the center display
The home view consists of four sub-views: Navigation, Media, Phone, and an extra sub-view. These views can be expanded.
Managing subviews in centre display
Home view consists of four subviews: Navigation, Media, Phone and an extra sub-view. These views can be expanded.
Expanding a subview from default mode
Expanding a subview:
- For tiles Navigation, Media and Phone:
Press anywhere on the subview. When a tile is expanded, the extra tile in the home view is temporarily forced away. The other two tiles are minimised and only certain information is shown. When the extra tile is tapped, the other three tiles are minimised and only certain information is dis-played.
The expanded view provides access to the basic functions of the app.
Closing an expanded subview:
- The subview can be closed in three different ways.
- Tap on the upper part of the expanded subview.
- Tap on another tile (this tile will then open in expanded mode instead).
- Briefly press the physical home button below the centre display.
Opening or closing a subview in full screen mode
The extra tile9 and the tile for Navigation can be opened out in full screen mode, with even more information and more setting options.
When a new subview is opened in full-screen mode, no information from the other subviews is shown.
 In expanded mode, open the app in full screen – press on the symbol.
 Press on the symbol to go back to the expanded mode, or press the home button at the bottom of the screen.
Home button for the centre display.
There is always the option to go back to home view by pressing the home button. To go back to the home view’s standard view from full screen mode – press twice on the home button.
Related information
- Managing the centre display (p. 111)
- Activating and deactivating centre display (p. 114)
- Navigating in the centre display’s views (p. 114)
Function view in centre display
All the buttons for car functions are located in the function view, one of the centre display’s basic views. Navigate to the function view from home view by swiping from left to right across the screen10.
Different types of buttons
There are three different types of buttons for car functions; see below:
| Type of button | Property | Affects car function |
| Function buttons | Have on/off positions.
When a function is running, an LED indicator illuminates to the left of the icon for the but- ton. Press the button to activate/deactivate a function. |
Most buttons in function view are function buttons. |
| Trigger buttons | Do not have on/off positions.
When a trigger button is depressed, a window for the function is opened. For example, it may be a window to change seat position. |
• Camera
• Headrest Fold • Head-up Display Adjustments |
| Parking buttons | Have on, off and scan modes. Similar to the function buttons but with an extra position for parking scanning. |
• Park In
• Park Out |
The buttons’ different modes
When the LED indicator illuminates in green on a function or parking button, the function is activated. When a function is activated, extra text with an explanation for certain functions is shown. The text is shown for a few seconds and then the button is shown with the LED indicator illuminated.
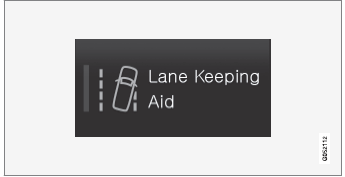
For Lane Keeping Aid, the text Works only at certain speeds is shown, for example, when the button is depressed.
Press the button once briefly to activate or deactivate the function.
The function is deactivated when the LED indicator is extinguished.
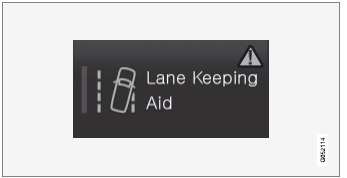
When a warning triangle is shown in the right-hand section of the button there is something not working as intended.
Related information
Moving apps and buttons in centre display
The apps and buttons for car functions in the app view and function view respectively can be moved and organised as desired.
- Swipe from right to left11 to access the app view, or swipe from left to right11 to access the function view.
- Tap on an app or button and hold it down.
- The app or button changes size and becomes slightly transparent. It is then possible to move it.
- Drag the app or button to a vacant space in the view.
The maximum number of rows available for use in order to position apps or buttons is 48. To move an app or button outside the visible view, drag it to the bottom of the view. New rows are then added, where the app or button can be located.
An app or button can thus be located further down and is then not visible in the normal mode for the view.
Swipe across the screen to scroll up or down in the view.
NOTE
Hide the apps that you rarely or never use by moving them to the bottom, off the visible screen. This way it will be easier to find the apps you use more often.
NOTE
Apps and car function buttons cannot be added to locations that are already occupied.
Related information
Symbols in the centre display’s status bar
Overview of the symbols that can be shown in the centre display’s status bar.
The status bar shows activities in progress and, in some cases, their status. Not all symbols are shown all the time due to the limited space in the status bar.
| Symbol | Specification |
 |
Connected to the Internet. |
| R | Roaming activated. |
 |
Signal strength in mobile phone network. |
 |
Bluetooth device connected. |
|
Bluetooth activated but no device connected. |
 |
Information sent to and from GPS. |
 |
Connected to Wi-Fi network. |
 |
Tethering activated (Wi-Fi hot- spot). The car then shares the available connection. |
| Symbol | Specification |
 |
Car modem activated. |
 |
USB sharing active. |
 |
Phone charging wirelessly. |
 |
Process in progress. |
 |
Timer for preconditioning active. |
 |
Audio source being played back. |
 |
Audio source stopped. |
 |
Phone call in progress. |
| Audio source muted. | |
|
NEW |
News is received from the radio channel. |
|
TIP |
Traffic information is received. |
| Clock. |
Related information
- Navigating in the centre display’s views (p. 114)
- Message in centre display (p. 139)
- Internet-connected car* (p. 532)
- Connecting a device via USB port (p. 508)
- Wireless phone charger* (p. 526)
- Phone (p. 517)
Date and time (p. 92)
Keyboard in centre display
The centre display keyboard makes it possible make entries using keys. It is also possible to “draw in” letters and characters on the screen by hand. The keyboard can be used to enter characters, letters and numbers, e.g. to write text messages from the car, enter passwords or search for articles in the digital owner’s manual .The keyboard is only shown when entries can be made on the screen.
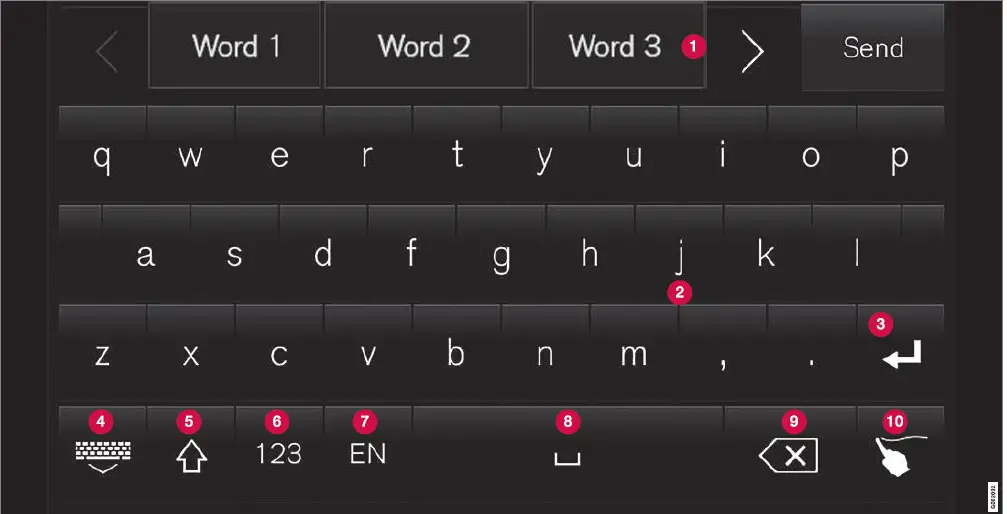
The image shows an overview of some of the buttons which may be shown in the keyboard. The appearance varies depending on language settings and the context in which the keyboard is being used.
- Row of suggested words or characters12. The suggested words are adjusted as new letters are being entered. Browse among the suggestions by pressing on the right and left arrows. Tap on a suggestion to select it. Note that this function is not sup-ported by all language selections. If not available, the row will not be shown on the keyboard.
- The characters available on the keyboard depend on which language was selected (see point 7). Tap on a character to enter it.
- The button works in different ways, depending on the context in which the keyboard is used – either to enter @ (when an email address is entered) or to create a new row (for normal text input).
- Hides the keyboard. If this is not possible, the button is not shown.
- Used to enter capital letters. Press again to enter one capital letter and then continue with lower-case letters. Another press makes all letters capital letters. The next press restores the keyboard to lower-case letters. In this mode, the first letter after a full stop, exclamation mark or question mark is a capital letter. The first letter in the text field is also a capital letter. In text fields intended for names or addresses, each word automatically starts with a capital letter. In text fields for pass-word, web address or email address entry, all letters are automatically lower case unless otherwise set with the button.
- Number entry. The keyboard (2) is then shown with numbers. Press ABC which in number mode is shown instead of 123 , to return to the letter keyboard, or to open the keyboard with special characters.
- Changes text input language, e.g. EN. The available characters and word suggestions (1) vary depending on the selected language. To make it possible to change languages for the keyboard, the languages must first be added under Settings.
Space.
Undoes entered text. Pressing briefly deletes one character at a time. Hold the but-ton depressed to delete characters more quickly. - Changes keyboard mode to write letters and characters by hand instead.
Pressing the confirmation button above the keypad (not visible in the illustration) confirms the entered text. The appearance of the button differs depending on context.
Variants of a letter or character
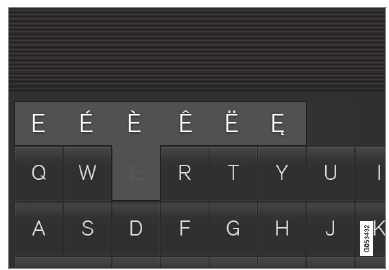
Variants of a letter or character, e.g. é or è, can be entered by holding down the letter or character. A box is displayed showing possible variants of letters or characters. Press the required variant. If no variant is selected, the original letter/character is entered.
Related information
- Changing keyboard language in centre display (p. 128)
- Enter the characters, letters and words manually in the centre display (p. 128)
- Managing the centre display (p. 111)
- Managing text messages (p. 523)
Changing keyboard language in centre display
To make it possible to switch between different languages for the keyboard, the languages must first be added under Settings.
Adding or deleting languages in settings
The keyboard is automatically set to the same languages as the system language. The key-board language can be manually adapted without affecting the system language.
- Press Settings in the top view.
- Press System System Languages and Units Keyboard Layouts.
- Select one or more languages from the list.
- It is now possible to switch between the selected languages directly from the keyboard for text input.
If no languages have been actively selected under Settings, the keyboard retains the same language as the car’s system language.
Switching between different languages in the keyboard
 When a number of languages have been selected in Settings, the button in the keyboard is used to switch between the different languages.
To change keyboard language with list:
- Give a long press on the button.
- A list opens.
- Select the required language. If more than four languages have been selected under Settings, it is possible to scroll in the list from the keyboard.
- The keyboard is adapted to the selected language and other word suggestions are given.
To change the keyboard language without displaying the list:
- One short press of the button.
- The keyboard is adapted to the next language in the list without displaying the list.
Related information
Enter the characters, letters and words manually in the centre display
The centre display keyboard allows you to enter characters, letters and words on the screen by “drawing” by hand.
 Press the button on the key-board to change from typing with the keys to entering letters and characters by hand.
- Area for writing characters/letters/words/parts of word.
- The text field where the characters or word suggestions13 appear as they are written on screen (1).
- Suggestions for characters/letters/word/part of word. It is possible to scroll through the list.
- Space. A space can also be created by entering a dash (-) in the area for hand-written letters (1). See the heading “Enter-ing a space in the free text field with hand-writing recognition” below.
- Undo entered text. Press briefly to delete one character/one letter at a time. Wait a moment before pressing again to delete the next character/letter, etc.
- Return to the keyboard with regular character input.
- Switch off/on sound when entering.
- Hide the keyboard. If this is not possible, the button is not shown.
- Change text input language.
Writing characters/letters/words by hand
- Write a character, a letter, a word or parts of a word in the area for hand-written let-ters (1). Write a word or parts of a word above each other or on a line.
- A number of suggested characters, let-ters or words is shown (3). The most likely choice is found at the top of the list.
IMPORTANT
Do not use sharp objects on the screen as they may scratch it.
- A number of suggested characters, let-ters or words is shown (3). The most likely choice is found at the top of the list.
- Enter the character/letters/word by waiting a moment.
- The character/letter/word at the top of the list is entered. It is also possible to select a different character by pressing the required character, letter or word in the list.
Deleting/changing characters/letters written by hand

Delete all characters in the text field (2) by swiping across the handwriting field (1).
- There are several options for deleting/changing characters/letters:
- Press the intended letter or word in the list (3).
- Press the text undo button (5) to delete the letter and begin again.
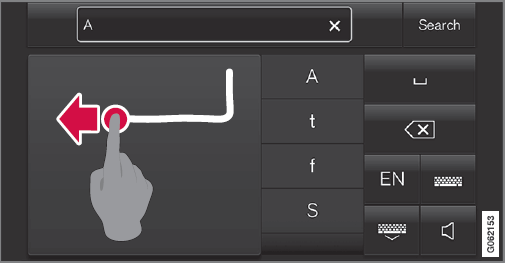
- Swipe horizontally from right to left14 over the area for handwritten letters (1). Delete multiple letters by swiping over the area several times.
- Pressing the X in the text field (2) deletes all of the entered text.
Changing row in the free text field with handwriting
Change row by hand by drawing the above character in the handwriting field15.
Entering a space in the free text field with handwriting recognition
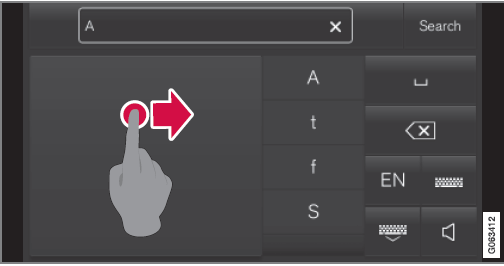
Enter a space by drawing a dash from left to right16.
Related information
- Keyboard in centre display (p. 125)
Changing the appearance in the centre display
The appearance of the screen in the centre display can be changed by selecting a theme.
- Press Settings in the top view.
- Press My Car Displays Display Themes.
- Then select a theme, e.g. Minimalistic or Chrome Rings.
As a supplement to these appearances, it is possible to choose between Normal and Bright. With Normal, the screen background is dark and the text is light. This alternative is the default for all themes. A light variant can also be selected, in which the background is light and the text is dark. This alternative can be useful in e.g. strong daylight.
This alternative is always available for the user and is not affected by the surrounding lighting.
Related information
- Other settings in the centre display’s top view (p. 131)
Activating and deactivating centre display (p. 114)
Cleaning the centre display (p. 633)
Switching off and changing the volume of the system sound in the centre display
The centre display can be used to change the volume of the system sound or switch off the system sound altogether.
- Open the top view by pressing on the tab at the top or by dragging/swiping from the top downwards across the screen.
- Press Settings to open the settings menu.
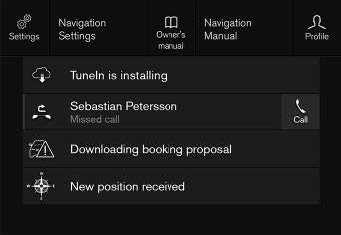 Top view with button for Settings.
 - Press on one of the categories and the subcategories to navigate to the required setting.
- Change one or more settings. Different types of setting are changed in different ways.
- The changes are saved immediately.
A subcategory in the settings menu with different types of settings (here, a multi-selector button and radio buttons).
Related information
- Overview of centre display (p. 108)
- Resetting settings in the centre display (p. 133)
- Table showing centre display settings (p. 134)
Open contextual setup in the centre display
It is possible to use contextual setup for most of the car’s basic apps so that you can change settings directly in the top view in the centre display.
Changing system language
Language settings are defined in the centre display menu Settings.
NOTE
Changing the language in the centre display may mean that some owner’s information is not compliant with national or local laws and regulations. Do not switch to a language that is difficult to understand as this may make it difficult to find your way back through the screen structure.
- Press Settings in the top view in the centre display.
- Continue to System System Languages and Units.
- Select System Language.
Languages that support voice recognition have a voice recognition symbol.- The language in the driver display, centre display and head-up display is changed.
Related information
- Overview of centre display (p. 108)
- Other settings in the centre display’s top view (p. 131)
- Changing system units (p. 131)
Other settings in the centre display’s top view
You can change settings and information for many of the car’s functions via the centre display.
- Open the top view by pressing on the tab at the top or by dragging/swiping from the top downwards across the screen.
- Press Settings to open the settings menu.
Top view with button for Settings. - Press on one of the categories and the subcategories to navigate to the required setting.
- Change one or more settings. Different types of setting are changed in different ways.
- The changes are saved immediately.
- Overview of centre display (p. 108)
Resetting settings in the centre display (p. 133)
Table showing centre display settings (p. 134)
Open contextual setup in the centre display
It is possible to use contextual setup for most of the car’s basic apps so that you can change settings directly in the top view in the centre display.

Top view with button for contextual setting.
Contextual setting is a shortcut for accessing a specific setting relating to the active function shown on screen. The apps installed in the car from the beginning, e.g. FM radio and USB, are a part of Sensus and are part of the car’s embedded functions. The settings for these apps can be changed directly via contextual setting in the top view.
When contextual setup is available:
- Drag down top view when an app is in expanded mode, e.g. Navigation.
- Press Navigation Settings.
- A navigation settings page opens.
- Change settings as desired and confirm the selections.
Press Close or the physical home button beneath the centre display to close setup view.
Most of the car’s basic apps have this contextual setting option, but not all.
Third party apps
Third party apps are not included in the car’s system from the beginning, but are the type that can be downloaded e.g. Volvo ID. Here the settings are always made inside the app and not from the top view.
Related information
- Other settings in the centre display’s top view (p. 131)
- Overview of centre display (p. 108)
- Resetting settings in the centre display (p. 133)
- Downloading apps (p. 493)
Resetting user data for change of ownership
In the event of a change of ownership, user data and system settings should be restored to factory settings.
The settings in the car can be reset at different levels. Restore all user data and system set-tings to the original factory settings in the event of a change of ownership. In the event of a change of ownership it is also important to change the owner of the Volvo On Call* service.
Related information
- Resetting settings in the centre display (p. 133)
- Resetting settings in the driver profiles (p. 138)
Resetting settings in the centre display
It is possible to reset the defaults for all set-tings defined in the centre display settings menu.
Two types of reset
There are two different types of restore operation in the settings menu:
- Factory reset – clears all data and files and resets all settings to their default values.
Reset Personal Settings – clears personal data and resets personal settings to their default values.
Resetting settings
Follow these instructions to reset your set-tings.
NOTE
Factory reset is only possible when the car is stationary.
- Tap on Settings in the centre display’s top view.
- Continue to System Factory reset.
- Select the required reset type.
- A pop-up window is shown.
- Press OK to confirm the reset.
For Reset Personal Settings, the reset must be confirmed by pressing Reset for the active profile or Reset for all profiles.- Selected settings are reset.
Related information
- Overview of centre display (p. 108)
- Other settings in the centre display’s top view (p. 131)
- Table showing centre display settings (p. 134)
Table showing centre display settings
The settings menu in the centre display has a number of main categories and subcategories where settings and information for many of the car’s functions are collected.
There are seven main categories: My Car, Sound, Navigation, Media, Communication, Climate and System.
In turn, each category contains a number of subcategories and setting options. The tables below show the first level of subcategories. The setting options for a function or area are described in more detail in the corresponding section of the owner’s manual. Some settings are personal, which means that they can be saved to Driver Profiles. Other settings are global, which means they are not linked to a driver profile.
My Car
Subcategories
Displays
IntelliSafe
Drive Preferences/Individual Drive
Mode*
Lights and Lighting
Mirrors and Convenience
Subcategories
Locking
Parking Brake and Suspension
Wipers
Sound
Subcategories
Tone
Balance
System Volumes
Navigation
Subcategories
Map
Route and Guidance
Traffic
Media
Subcategories
AM/FM radio
DAB*
Gracenote®
Subcategories
TV*
Video
Communication
Subcategories
Phone
Text Messages
Android Auto*
Apple CarPlay*
Bluetooth Devices
Wi-Fi
Car Wi-Fi Hotspot
Car Modem Internet*
Volvo On Call*
Volvo Service Networks
Climate
The main category Climate has no subcategories.
System
Subcategories
Driver Profile
Date and Time
System Languages and Units
Privacy and Data
Keyboard Layouts
Voice Control*
Factory reset
System Information
Related information
- Overview of centre display (p. 108)
- Other settings in the centre display’s top view (p. 131)
- Resetting settings in the centre display (p. 133)
Driver profiles
Many of the settings made in the car can be adapted according to the driver’s personal preferences and can be saved in one or more driver profiles.
The personal settings are automatically saved in the active driver profile. Each key can be linked to a driver profile. When the linked key is used, the car is adapted to the settings of that specific driver profile.
What settings are saved in the driver profiles?
Many of the settings defined in the car will be saved automatically in the active driver profile unless the profile is protected. In the car, the settings defined are either personal or global. Only personal settings are saved in driver profiles.
Settings that can be saved in a driver profile include, amongst other things, screens, mirrors, front seats, navigation*, audio and media system, language and voice control.
Some settings, referred to as global settings, can be changed but are not saved to a specific driver profile. Changes to global settings affect all profiles.
Global settings
The global settings are not changed when changing between driver profiles. They remain the same regardless of which driver profile is active.
Keyboard layout settings are an example of global settings. If driver profile X is used to add additional languages to the keyboard, these remain available for use even if driver profile Y is used. The keyboard layout settings are not saved to a specific driver profile – the settings are global.
Personal preferences
If driver profile X was used to e.g. set centre display brightness, driver profile Y is not affec-ted by this setting. It has been saved to driver profile X – the brightness setting is a personal setting.
Related information
- Selecting driver profile (p. 136)
- Renaming a driver profile (p. 136)
- Linking remote control key to driver profile (p. 137)
- Protect driver profile (p. 137)
- Resetting settings in the driver profiles (p. 138)
- Table showing centre display settings (p. 134)
Selecting driver profile
When the centre display has been started, the selected driver profile is shown at the top of the screen. The driver profile last used is the one that will be active next time the car is unlocked. It is possible to change to another driver profile after the car has been unlocked. However, if the remote control key has been linked to a driver profile then this is what is selected when the car is started.
There are three options for changing to another driver profile.
Option 1:
- Tap on the name of the driver profile shown in the top of the centre display when the display has been started.
- A list of selectable driver profiles is shown.
- Select the driver profile required.
- Press Confirm.
- The driver profile is selected and the system loads the settings for the new driver profile.
Option 2:
- Drag down the top view in the centre dis-play.
- Press Profile.
- The same list as for Option 1 is shown.
- Select the driver profile required.
- Press Confirm.
- The driver profile is selected and the system loads the settings for the new driver profile.
Option 3:
- Drag down the top view in the centre dis-play.
- Press Settings in the top view in the centre display.
- Press System Driver Profiles.
- A list of selectable driver profiles is shown.
- Select the driver profile required.
- The driver profile is selected and the system loads the settings for the new driver profile.
Related information
- Driver profiles (p. 135)
- Navigating in the centre display’s views (p. 114)
- Renaming a driver profile (p. 136)
- Linking remote control key to driver profile (p. 137)
Renaming a driver profile
It is possible to change the name of the different driver profiles used in the car.
- Press Settings in the top view in the centre display.
- Press System Driver Profiles.
- Select Edit Profile.
- A menu opens, where the profile can be edited.
- Tap in the box Profile Name.
- A keyboard appears, and it is possible to change the name. Tap on to close the keyboard.
- Save the name change by pressing Back or Close.
- The name has now been changed.
NOTE
A profile name cannot start with a space, as the profile name will not then be saved.
Related information
Protect driver profile
In some cases it is preferable not to save various settings defined in the car to the active driver profile. In this case, it is possible to protect the driver profile.
NOTE
Protecting a driver profile is only possible when the car is stationary.
To protect a driver profile:
- Press Settings in the top view in the centre display.
- Press System Driver Profiles.
- Select Edit Profile.
- A menu opens, where the profile can be edited.
- Select Protect Profile to protect the pro-file.
- Save your profile protection option by pressing Back/Close.
- When the profile is protected, settings defined in the car will not be saved automatically to the profile. Instead, your changes must be saved manually under Settings System Driver Profiles Edit Profile by pressing Save current settings to the profile. When the profile is unprotected, on the other hand, your settings will be saved automatically to the profile.
Related information
- Driver profiles (p. 135)
Linking remote control key to driver profile
It is possible to link your key to a driver pro-file. The driver profile along with all of its settings will then be automatically selected every time the car is used with that specific remote control key.
The first time the remote control key is used, it is not linked to any specific driver profile. When the car is started, the Guest profile will automatically be activated.
A driver profile can be selected manually with-out linking it to the key. When the car is unlocked, the last active driver profile is activated. Once the key has been linked to a driver profile, a driver profile does not need to be selected when that specific key is used.
Linking a remote control key to a driver profile
NOTE
Connecting a remote control key to a driver profile is only possible when the car is stationary.
First select the profile to be linked to the key, if the profile to be linked is not already active.
The active profile can then be linked to the key.
- Press Settings in the top view in the centre display.
- Press System Driver Profiles.
- Select the desired profile. The display returns to the home view. The Guest pro-file cannot be linked to a key.
- Drag down the top view again and tap on Settings System Driver Profiles Edit Profile.
- Select Connect key to link the profile with the key. It is not possible to link a driver profile to a different key than the one currently being used in the car. If there are multiple keys in the car, the message More than one key is found, put the key you want to connect on backup reader will be displayed.
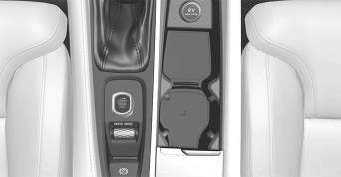 Backup reader’s location in the tunnel console.
- When the message Profile connected to key is shown, the key and the driver profile are linked.
- Press OK.
- This key is now linked to the driver pro-file and will remain linked as long as the Connect key box is not unticked.
Related information
Resetting settings in the driver profiles
Settings that have been saved to one or more driver profiles can be reset if the car is stationary.
NOTE
Factory reset is only possible when the car is stationary.
- Press Settings in the top view.
- Press System Factory reset Reset Personal Settings.
- Select one of the options Reset for the active profile, Reset for all profiles or Cancel.
Message in centre display
The centre display can show messages to inform or assist the driver in the event of different events.

Example of a message in the centre display’s top view.
The centre display shows messages that are of lower priority for the driver.
Most messages are shown above the centre display’s status bar. After a while, or when any required action related to the message has been taken, the message disappears from the status bar. If a message needs to be saved, it is positioned in the top view in the centre dis-play.
Message composition may vary and they can be shown together with graphics, symbols or a button for activating/deactivating a function linked to the message.
Pop-up messages
In some cases, a message is shown in the form of a pop-up window. Pop-up messages have higher priority than messages shown in the status bar and require acknowledgement/action before they disappear.
Related information
- Managing messages in the centre display (p. 139)
Handling a message saved from the centre display (p. 140)
Messages in the driver display (p. 104)
Managing messages in the centre display
Messages in the centre display are handled in centre display views.
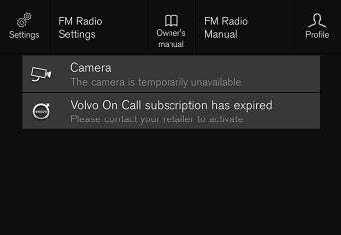
- Example of a message in the centre display’s top view.
Some messages in the centre display have a button (or several buttons in pop-up messages) for e.g. activating/deactivating a function linked to the message.
Managing a new message
For messages with buttons
- Press the button to perform the action or allow the message to close automatically after a while.
- The message disappears from the status bar.
For messages without buttons:
- Close the message by tapping on it, or allow the message to close automatically after a while.
- The message disappears from the status bar.
- If a message needs to be saved, it is positioned in the top view in the centre display.
Related information
- Message in centre display (p. 139)
Handling a message saved from the centre display (p. 140)
Messages in the driver display (p. 104)
Handling a message saved from the centre display
Whether saved from the driver display or the centre display, messages are managed in the centre display.
Examples of saved messages and possible options in the top view.
Messages that are shown in the centre display that need to be saved are added in the top view of the centre display.
Reading a saved message
- Open the top view in the centre display.
- A list of saved messages is shown. Messages with an arrow to the right can be maximised.
- Tap on a message to expand/minimise.
- More information on the message is shown in the list and the image to the left in the app shows information about the message graphically.
Managing a saved message
Some messages have a button for e.g. activating/deactivating a function linked to the message.
Press the button to perform the action.
Saved messages in the top view are deleted automatically when the car is switched off.
Related information
- Message in centre display (p. 139)
Managing messages in the centre display (p. 139)
Messages in the driver display (p. 104)
Head-up display*
The head-up display supplements the car’s driver display and projects information from the driver display onto the windscreen. The projected image can only be seen from the driver position.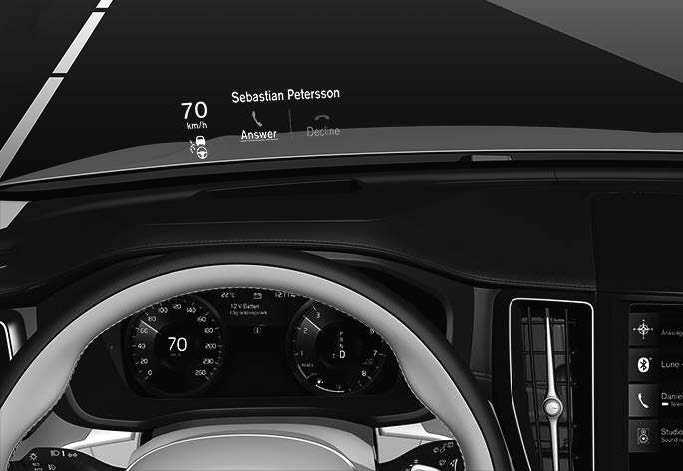
The head-up display shows warnings and information relating to speed, cruise control functions, navigation, etc. in the driver’s field of vision. Road Sign Information and incoming phone calls can also be shown in the head up display.
NOTE
The driver’s ability to see the information in the head-up display is impaired by the following
- Use of polarizing sunglasses
Arriving position which means that the driver is not sitting centred in the seat Objects on the display unit’s cover glass Unfavourable light conditions.
IMPORTANT
The display unit from which the information is projected is located in the instrument panel. To avoid damage to the dis-play unit’s cover glass do not store any objects on the cover glass and make sure that no objects fall down onto it.
Examples of what can be shown in the display.
- Speed
- Cruise control
- Navigation
Road signs
A number of symbols can be shown temporarily in the head-up display e.g.:
If the warning symbol illuminates -read the warning message in the driver display.
If the information symbol illuminates – read the message in the driver dis-play.
The snowflake symbol illuminates in the event of a risk of icy conditions.
NOTE
Certain visual defects may cause headaches and a feeling of stress during the use of the head-up display.
City Safety in the head-up display
In the event of a collision warning, the information in the head-up display is replaced by the warning symbol for City Safety. This graphic is illuminated even if the head-up dis-play is switched off.
The warning symbol for City Safety flashes in order to attract the driver’s attention if there is a risk of collision.
Related information
- Activating and deactivating the head-up display* (p. 142)
Cleaning the Head-up display* and driver display (p. 634)
Head up display when replacing the wind-screen* (p. 602)
Activating and deactivating the head-up display*
The head-up display can be activated and deactivated when the car has been started.
Press the Head-up Display button in the centre display function view. An indicator in the button illuminates when the function is activated.
Related information
Settings for head-up display*
Adjust the settings for the head-up display’s projection onto the windscreen.
Settings can be defined when the car has been started and a projected image is shown on the windscreen.
Selecting display options
Select which functions are to be shown in the head-up display.
- Tap on Settings in the centre display’s top view.
- Press My Car Displays Head-Up Display Options.
- Select one or more functions:
- Show Navigation
- Show Road Sign Information
- Show Driver Support
- Show Phone
The setting is saved as a personal setting in the driver profile.
Adjusting brightness and vertical position
- Press the Head-up Display Adjustments button in the centre display function view.
- Adjust the brightness and vertical position of the projected image in the driver’s field of vision using the steering wheel’s right-hand keypad.
- Reducing the brightness
Increasing the brightness - Raising the position
- Lowering the position
- Confirm
The brightness of the graphics is automatically adapted to their background light conditions. The brightness is also affected by the adjustment of the brightness in the car’s other dis-plays.
The height position can be stored in the memory function for the power* front seat using the keypad in the driver’s door.
Calibrate the horizontal position
The head-up display’s horizontal position may need to be calibrated if the windscreen or dis-play unit is replaced. Calibration means that the projected image is rotated clockwise or anticlockwise.
- Tap on Settings in the centre display’s top view.
- Select My Car Displays Head-Up Display Options Head-Up Display Calibration.
- Calibrate the image’s horizontal position with the steering wheel’s right keypad.
- Rotate anticlockwise
- Rotate clockwise
- Confirm
Related information
- Head-up display* (p. 141)
Activating and deactivating the head-up display* (p. 142)
Driver profiles (p. 135)
Storing position for seat, door mirrors and head-up display* (p. 188)
Voice recognition
Voice control17 allows you to control functions in the car, e.g. climate system, radio or a Bluetooth-connected phone with spoken commands. In cars equipped with Sensus Navigation*, the navigation system can also be controlled with voice recognition.
What is voice control?
Voice control is an aid that can facilitate the use of different commands in your car. In principle, it works like a normal application in which you enter information in a fixed sequence in order to perform a task, but instead of typing on a keyboard you use voice commands. It may therefore be a good idea to learn how, and in what order, a voice command should be spoken in order to achieve the desired result.
The voice control system allows you to control certain infotainment and climate functions using voice commands. The system can respond with speech and by showing information in the driver display.
WARNING
The driver always holds overall responsibility for driving the vehicle in a safe manner and complying with all applicable rules of the road.
NOTE
Not all system languages support voice recognition. The ones that do are high- lighted with the symbol in the list of available system languages. Read more about where the information can be found in the section on settings for voice recognition.
In general, the system works by listening for a basic command which is followed by more detailed commands that specify what you want the system to do.
To change the system audio volume, turn the rotary volume knob when the voice speaks. It is possible to use other buttons during voice control. However, other sounds will be silenced during dialogue with the system, which means that it is not possible to execute any functions linked with audio using the buttons.
Cancel voice control
Voice control can be cancelled in different ways:
Voice control is also cancelled if you do not reply during a dialogue. The system will first ask for a reply three times and if there is still no response then voice control will be cancel-led automatically.
To speed up communication and skip the prompts from the system, press the steering wheel button for voice control . This cancels the system voice and you can say the next command.
Example of voice recognition control
- Press .
- Say “Call [Forename] [Surname] [number category]”, e.g. “Call Robin Smith Mobile”.
The system dials the selected contact from the phonebook. If the contact has several phone numbers (e.g. home, mobile, work), the right category must be referred to.
Commands/phrases
The following commands can generally be used, regardless of the situation:
- “Repeat” – repeats the last voice instruction in the ongoing dialogue.
- “Cancel” – discontinue the dialogue.19
- “Help” – starts a help dialogue. The system replies with the commands available in the current situation, a prompt or an example.
Commands for specific functions such as phone and radio are described in specific sections.
Digits
The number commands are stated differently depending on the function to be controlled:
- Phone numbers and postcodes must be spoken individually, number by number, e.g. “zero, three, one, two, two, four, four, three” (03122443).
House numbers can be spoken individually or in groups, e.g. “two, two” or “twenty-two” (22). For English and Dutch, several groups can be said in sequence, e.g. “twenty-two, twenty-two” (22 22). For English, double or triple can be used, e.g. “double zero” (00). Numbers can be given within the range 0-2300. - Frequencies can be spoken as “ninety eight point eight” (98.8), “a hundred and four point two” or “hundred four point two” (104.2).
Speed and repetition mode
It is possible to adjust the speed if the system is speaking too quickly.
Repetition mode can be enabled so that the system repeats what you have said.
To change the speed or activate/deactivate repetition mode:
- Press Settings in the top view.
- Press System Voice Control and select settings.
- Repeat Voice Command
- Speech Rate
Related information
- Voice recognition (p. 144)
- Controlling a telephone with voice recognition (p. 147)
- Voice control of radio and media (p. 148)
- Controlling the climate control system using voice control (p. 204)
- Settings for voice recognition (p. 149)
Controlling a telephone with voice recognition20
Call a contact, have messages read aloud or dictate brief messages with voice control commands to a Bluetooth connected telephone.
To specify a contact in the phone book, the voice recognition command must include contact information that is entered in the phone book. If a contact, e.g. Robyn Smith, has several phone numbers then the number category can also be stated, e.g. Home or Mobile:
“Call Robin Smith Mobile”.
Press and say one of the following commands:
- “Call [contact]” – dials the selected con-tact from the phone book.
- “Call [phone number]” – dials the phone number.
- “Recent calls” – displays the call list.
- “Read message” – message is read out. If there are several messages – select which message should be read out.
- “Message to [contact]” – the user is requested to say a brief message. The message is then repeated aloud and the user can choose to send21 or revise the message. For this function to work, the car must be connected to the Internet.
NOTE
Not all system languages support voice recognition. The ones that do are high-
lighted with the symbol in the list of available system languages. Read more about where the information can be found in the section on settings for voice recognition.
Related information
- Voice recognition (p. 144)
Using voice recognition (p. 145)
Voice control of radio and media (p. 148)
Controlling the climate control system using voice control (p. 204)
Settings for voice recognition (p. 149)
Internet-connected car* (p. 532)
Voice control of radio and media22
Commands for radio and media player device control are shown below.
Tap on and say one of the following commands:
- “Media” – starts a dialogue for media and radio and shows examples of commands.
“Play [artist]” – plays back music by the selected artist.
“Play [song title]” – plays back the selected song.
“Play [song title] from [album]” – plays back the selected song from the selected album.
“Play [radio station]” – starts playing back the selected radio channel.
“Tune to [frequency]” – starts the selected radio frequency in the current frequency band. If no radio source is active, the FM band is started by default.
“Tune to [frequency] [wavelength]” -starts the selected radio frequency in the selected frequency band.
“Radio” – starts FM radio.
“Radio FM” – starts FM radio.
“Radio AM” – starts AM radio.23 - • “DAB ” – starts DAB radio*.
• “USB” – starts playback from USB.
• “iPod” – starts playback from iPod.
• “Bluetooth” – starts playback from a Bluetooth-connected media source.
• “Similar music” — plays back music similar to the music currently playing back from USB devices.
NOTE
Not all system languages support voice recognition. The ones that do are high-
lighted with the symbol in the list of available system languages. Read more about where the information can be found in the section on settings for voice recognition.
Related information
- Voice recognition (p. 144)
- Using voice recognition (p. 145)
- Controlling a telephone with voice recognition (p. 147)
- Controlling the climate control system using voice control (p. 204)
Settings for voice recognition (p. 149)
Settings for voice recognition24
Settings for the voice control system are selected here.
Settings System Voice Control
Settings can be made within the following areas:
- Repeat Voice Command
Gender
Speech Rate
Audio settings
Select audio settings under:
Settings Sound System Volumes Voice Control
Language settings
Voice recognition is not possible for all languages. Languages available for voice recognition are marked with an icon in the language list – .
Changing the language also affects menu, message and help texts.
Settings System System Languages and Units System Language
Related information
- Voice recognition (p. 144)
- Using voice recognition (p. 145)
- Controlling a telephone with voice recognition (p. 147)
- Controlling the climate control system using voice control (p. 204)
- Voice control of radio and media (p. 148)
- Audio settings (p. 490)
- Changing system language (p. 131)
Reference Link
- View Full PFD: Volvo S60 2021-2023 User Manual
Download link: https://autouserguide.com/wp-admin/