Winnebago Adventurer 2022 User Manual
Winnebago Adventurer 2022 INTRODUCTION User Manual
INTRODUCTION
Congratulations! We welcome you to the exciting world of motorhome travel and camping. You will find it convenient and enjoyable to have all the comforts of home and still enjoy the great outdoors wherever you choose to go. Before sliding into the driver’s seat, please become familiar with operations and features. In addition, spend some time with the dealer when you take delivery to learn all you can about your new motorhome.
ABOUT THIS MANUAL
This operator’s manual was prepared to aid you in the proper care and operation of the vehicle and equipment.
Please read this manual completely to understand how everything in your motorhome works before taking it on its “maiden voyage”. In addition, please become familiar with the New Vehicle Limited Warranty.
NOTE: This manual describes many features of your motorhome and includes instructions for its safe use. This manual, including photographs and illustrations, is of a general nature only. Some equipment and features described or shown in this manual may be optional or unavailable on your model. Because of Winnebago Industries®’ continuous program of product improvement, it is possible that recent product changes and information may not be included. The instructions included in this manual are intended as a guide, and in no way extend the responsibilities of Winnebago Industries beyond the standard written warranty as presented in this manual. The descriptions, illustrations, and specifications in this manual were correct at the time of printing. We reserve the right to change specifications or design without notice, and without incurring obligation to install the same on products previously manufactured. The materials in your Info Case contain warranty information and operating and maintenance instructions for the various appliances and components in your motorhome.
NOTE
Many of the instruction sheets and manuals for the various appliances and components have been incorporated into the Operator’s Manual Supplement for your convenience. Please read the FAQ in Section 1 of the Operator’s Manual Supplement for more details.
Throughout this manual, frequent references are made to the vehicle chassis manual that is provided by the manufacturer of the chassis on which this motorhome is built. Consult the chassis manual for operating, safety, and maintenance instructions pertaining to the chassis section of the motorhome.
SAFETY MESSAGES USED IN THIS MANUAL
Throughout this manual, certain items are labeled Danger, Warning, Caution, Notice, or Note. These terms alert you to precautions that may involve damage to your vehicle or a risk to your personal safety. Read and follow them carefully.
DANGER
DANGER indicates a hazardous situation which, if not avoided, will result in death or serious personal injury.
WARNING
WARNING indicates a hazardous situation which, if not avoided, could result in death or serious personal injury.
CAUTION
CAUTION indicates a hazardous situation which, if not avoided, could result in minor or moderate personal injury.
FRONT AXLE TIRE ALIGNMENT
We recommend that you have the front suspension and steering alignment checked and adjusted after you have fully loaded the vehicle according to your needs. Thereafter, have alignment inspected periodically to maintain vehicle steering performance and prevent uneven tire wear.
HEADLIGHT ALIGNMENT
Headlights on this motorhome were aligned at the factory in an unloaded state. We recommend you have the high and low beam alignment checked after fully loading the vehicle to your needs. Thereafter, have the alignment inspected periodically to maintain visibility.
SERVICE AND ASSISTANCE
Your dealer will be glad to provide any additional information you need, as well as answer any questions you might have about operating the equipment in your motorhome. When it comes to service, remember that your dealer knows your vehicle best and is interested in your satisfaction. Your dealer will provide quality maintenance and any other assistance that you may require during your ownership of this vehicle. If you need warranty repairs while traveling, you may take your vehicle to any authorized Winnebago Industries® dealership and request their assistance.
See the Service Dealer Directory in your Info Case.
REPORTING SAFETY DEFECTS
If you believe that your vehicle has a defect which could cause a crash or could cause injury or death, you should immediately inform the National Highway Traffic Safety Administration (NHTSA) in addition to notifying Winnebago Industries, Inc.
If NHTSA receives similar complaints, it may open an investigation, and if it finds that a safety defect exists in a group of vehicles, it may order a recall and remedy campaign. However, NHTSA cannot become involved in individual problems between you, your dealer, or Winnebago Industries, Inc.
To contact NHTSA, you may either call the Vehicle Safety Hotline toll-free at:
1-888-327-4236; (TTY: 1-800-424-9153)
or go to http://www.safercar.gov
or write to:
Administrator, NHTSA 1200 New Jersey Avenue S.E. Washington, D.C. 20590
You can also obtain other information about motor vehicle safety at http://www.safercar.gov.
OCCUPANT AND CARGO CARRYING CAPACITY LABEL
This label is affixed in the driver’s area next to or near the Vehicle Certification Label. It contains vehicle occupant and cargo carrying capacity along with the number of seat belt positions in the vehicle. The label also provides the weight of a full load of water and advises that this weight, along with the tongue weight counts as cargo.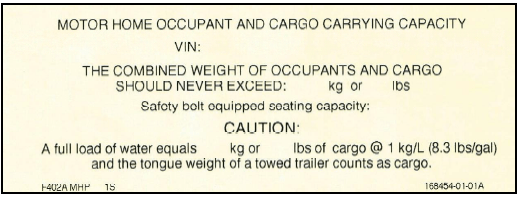
If any weight exceeding 45.4 kg (100 lbs.) is added to your motorhome between final vehicle certification and first retail sale, the occupant and cargo carrying capacity must be corrected and a label similar to the one shown in the following photo will be affixed inside your motorhome.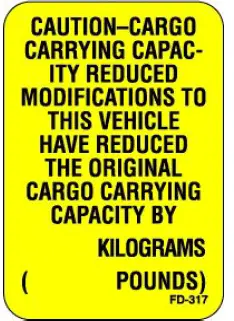
VEHICLE CERTIFICATION LABEL
This label is affixed to the lower driver side armrest panel, driver door, or the driver side door jamb, depending on model. It contains vehicle identification numbers and other important reference information.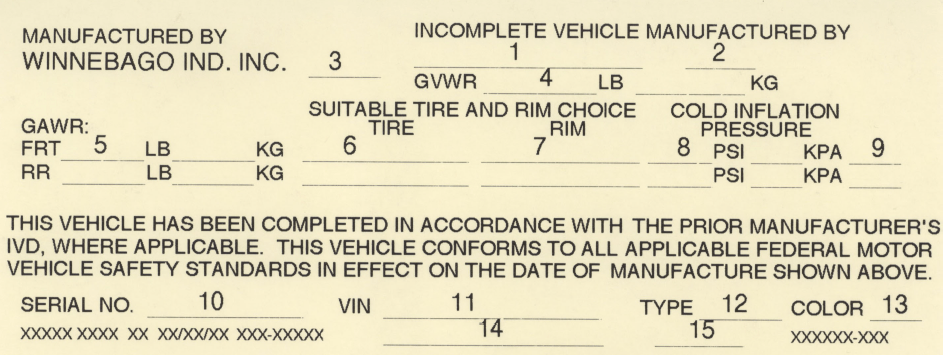
EXPLANATION OF DATA
- Chassis manufacturer.
- Chassis manufacture date.
- Month and year of manufacture at Winnebago Industries®.
- Gross Vehicle Weight Rating: Total permissible weight of the vehicle, including driver, passengers, total cargo carried
(including all liquids), and equipped with all options. - Gross Axle Weight Rating: Total permissible weight allowed for the front and rear axles (listed in pounds and kilograms).
- Suitable Tire Choice: Tires recommended to meet handling and safety requirements. When replacing any of the tires on your vehicle, always replace with a tire that meets these specifications.
- Suitable Rim Choice: Wheel rims recommended to meet handling and safety requirements. When replacing any of the rims on your vehicle, always replace with a rim that meets these specifications.
- Cold Inflation Pressure: Inflation pressures at Gross Axle Weight Ratings recommended (while cold) for the tires originally equipped on your vehicle. These pressure levels must be maintained to assure proper handling, safety, and fuel economy.
- Rear Axle Wheel Configuration: Single or Dual as it relates to the inflation.
- Serial Number: This is the serial number assigned to the completed vehicle by Winnebago Industries.
- Vehicle Identification Number (VIN): This number identifies the chassis on which the motorhome is built. The 10th digit of the VIN designates the chassis model year (J=2018, K=2019, L=2020 etc.). This information is useful when ordering chassis repair parts.
- Type: States the NHTSA designated usage classification for your motorhome. MPV signifies a Multi-purpose Passenger Vehicle.
- Color: Signifies the color code number of the decor used throughout the vehicle. This number is necessary for ordering replacement cushions, curtains, carpet, etc.
Read all Instructions for INTRODUCTION User Manual
Winnebago Adventurer 2022 SAFETY AND PRECAUTIONS User Manual
SAFETY AND PRECAUTIONS
GENERAL WARNINGS
- Only seats equipped with seat belts are to be occupied while the vehicle is moving. Make sure all passengers have seat belts fastened. Lap belts should fit low on the hips and upper thighs. The shoulder belt should be positioned snug over the shoulder.
- For pregnant women: Never place the shoulder belt behind your back or under your arm. Adjust the lap belt across your hips/pelvis, and below your belly. Place the shoulder belt across your chest (between your breasts) and away from your neck.
Child restraints should be installed properly according to manufacturer’s instructions. See “Child Restraints”.
All moveable or swiveling seats should be placed and locked in travel position while the vehicle is moving.
Never let passengers stand or kneel on seats while the vehicle is moving.
Sleeping facilities are not to be utilized while vehicle is moving.
Examine the escape window and be familiar with its operation.
Inspect the fire extinguisher monthly for proper charge and operating condition. This should also be done before beginning a vacation or any extended trip.
WARNING
Operating, servicing and maintaining this vehicle can expose you to chemicals including engine exhaust, carbon monoxide, phthalates, and lead, which are known to the State of California to cause cancer and birth defects or other reproductive harm. To minimize exposure, avoid breathing exhaust, do not idle the engine except as necessary, service your vehicle in a well-ventilated area and wear gloves or wash your hands frequently when servicing your vehicle. For more information go to
www.P65Warnings.ca.gov/passenger-vehicle.
DRIVING SAFETY
WARNING
This motorhome has been designed, manufactured and tested with concern for the protection of it’s occupants. We recommend you perform the following inspections for your safety and the safety of your passengers before starting your vehicle.
- LP GAS SYSTEM – Turn off at tank for traveling. Test for leaks upon arrival at destination before lighting pilots.
WHEELS – Inspect for damage and check lug nuts for tightness.
TIRES – Inspect for wear and damage and check for recommended air pressure. - LIGHTING – Test for proper operation of all interior and exterior lights including dash lights, headlights, tail lights, brake lights, clearance lights, and turn signals.
- EXITS – Inspect the release mechanism on emergency exit window, test both locks on the main entrance door for ease of operation and instruct passengers how to use both means of exit.
- SEAT BELTS – Direct passengers to designated seats, be certain swivel seats are locked into position, and require use of a seat belt. See the operator’s manual for occupancy and weight restrictions. APPLIANCES – Turn off and latch or lock doors where provided.
- LOOSE PARCELS – Store securely.
- UTILITY SUPPLY LINES – Disconnect all electrical, sewer, and water lines and secure them properly.
- ENTRANCE DOOR STEP – Assure the step is in the retracted position for traveling.
Read your motorhome and chassis owner’s manual for further precautions.
- Do not attempt to adjust the driver’s seat while the vehicle is moving.
- Do not adjust tilt steering in a moving vehicle.
- Do not operate the cruise control on icy or extremely wet roads, winding roads, in heavy traffic, or in any other traffic situation where a constant speed cannot be maintained.
- Use care when accelerating or decelerating on a slippery surface. Abrupt speed changes can cause skidding and loss of control.
- Never drive the vehicle with a slideout room extended.
- Driving through water deep enough to wet the brakes may affect the stopping distance or cause the vehicle to pull to one side. Check brake operation in a safe area to be sure they have not been affected. Never operate any vehicle if a difference in braking efficiency is noticeable.
- Adverse weather conditions and extremes in terrain may affect the handling and/or performance of your vehicle. Refer to your chassis manual for complete and related information on driving your vehicle.
- Doors – Verify all interior and exterior doors are shut and/or stowed and latches are in place where provided.
FUEL AND PROPANE GAS
DANGER
All pilot lights, appliances, and their ignitors (see operating instructions) shall be turned off before refueling of motor fuel tanks and/or propane containers. Can cause ignition of flammable vapors, which can lead to a fire or explosion and result in death or serious injury.
WARNING
Do not fill propane container(s) to more than 80 percent of capacity.
A properly filled container contains approximately 80 percent of its volume as liquid propane.
Overfilling propane container(s) can result in uncontrolled propane flow, which could lead to a fire or explosion and result in death or serious injury.
WARNING
Do not place propane cylinders inside the vehicle.
Propane cylinders are equipped with safety devices that relieve excessive pressure by discharging propane to the atmosphere.
Propane gas is highly flammable.
Can lead to a fire or explosion and result in death or serious injury.
- Do not place or store gasoline or other flammable liquid containers inside the vehicle.
All pilot lights must be extinguished and appliances turned off while refilling the fuel tank or propane gas tank.
Never smoke while refilling vehicle fuel tank or propane gas tank.
Never use an open flame to test for propane gas leaks. Replace all protective covers and caps on propane system after filling. Make sure valve is closed and the door is latched securely.
Never connect natural gas to the propane gas system.
Do not turn burner controls to “On” and allow gas to escape before using ignitor or lighting a match. - Portable fuel-burning equipment, including wood and charcoal grills and stoves shall not be used inside the recreational vehicle. The use of this equipment inside the recreational vehicle may cause fires or asphyxiation.
Propane gas regulators must always be installed with the diaphragm vent facing downward. Regulators are equipped with a protective cover. Make sure that the regulator vent faces downward and that the cover is kept in place to minimize vent blockage, which could result in excessive gas pressure causing fire or explosion.
The following warning label is located in the cooking area to remind you to provide an adequate supply of fresh air for combustion.
DANGER
Do not use gas cooking appliances for comfort heating. Can lead to carbon monoxide poisoning, which can lead to death or serious injury.
WARNING
Gas cooking appliances need fresh air for safe operation.
Before operating:
Open vents or windows slightly or turn on exhaust fan prior to using cooking appliance. Gas flames consume oxygen, which should be replaced to ensure proper combustion. Improper use can result in death or serious injury. Unlike homes, the amount of oxygen supply is limited due to the size of the recreational vehicle, and proper ventilation when using the cooking appliance(s) avoids dangers of asphyxiation. It is especially important that cooking appliances not be used for comfort heating, as the danger of asphyxiation is greater when the appliance is used for long periods of time. Failure to comply could result in death or serious injury.
PROPANE GAS LEAKS
Check propane gas system for leaks yearly, or as necessary.
The following label is located in the vehicle near the range area. If you smell gas within the vehicle, quickly and carefully perform the procedures listed.
DANGER
IF YOU SMELL PROPANE
- Extinguish any open flames and all smoking materials.
- Shut off the propane supply at the container valve(s) or propane supply connection.
- Do not touch electrical switches.
- Open doors and other ventilating openings.
- Leave the area until odor clears.
- Have the propane system checked and leakage source corrected before using again.
Ignition of flammable vapors could lead to a fire or explosion and result in death or serious injury.
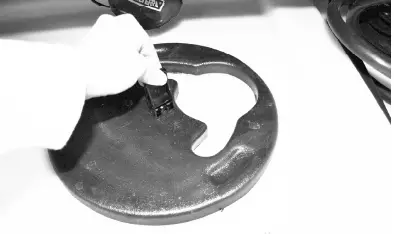
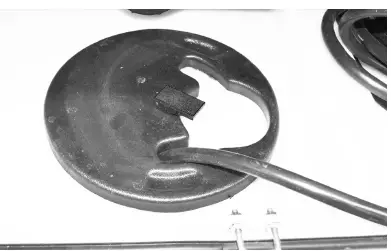
Propane Gas Leak Detector
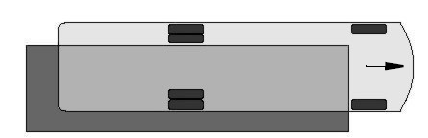
Your motorhome is equipped with a Propane Gas Leak Detector, similar to the one shown in the following photo. The leak detector sounds an alarm if an unsafe amount of propane gas is present inside the motorhome.
Read all Instructions for SAFETY AND PRECAUTIONS User Manual
Winnebago Adventurer 2022 CONNECTED COACH User Manual
CONNECTED COACH
Many of your motorhome’s system functions and monitoring are now conveniently observed and controlled using a LED touchscreen monitor and command center. This monitor is typically located in the central interior area of the floor plan. The following are general descriptions of the typical command screens and their functions. More detailed operational information can be found in specific functional areas within this manual.
NOTE
Each motorhome is unique in it’s specific features, equipment, systems and floor plan design, and each command center is programmed for that specific model’s configuration. As a result your motorhome’s configuration may vary somewhat from the illustrations shown here, but the basic navigation and user experience will be similar.
CONNECTED COACH HOME SCREEN
The Home Screen is indicated by the house shaped button located on the selector row at the top.
The Home Screen displays the fresh water and holding tank levels, propane gas tank level, as well as the chassis battery and house battery condition. You can turn on the water pump and water heater, as well as some other basic user function controls described in the following section.
Water and Holding Tank Levels
The approximate fluid levels are measured by electronic sensors on the sides of the tanks. Tank levels are displayed in 5% increments: Empty (0%), and Full (100%). There is generally more fluid in a tank than indicated on the monitor panel.
Holding tank levels on the Home Screen
-Typical View
Tank Capacities
See “Tank Capacities” in Section 1 – Introduction.
Water Pump Switch
When use of the self-contained water system is desired, turn the Water Pump switch on. The “Pump On” light will illuminate when the pump switch is on and the system is operable. Water will be available as soon as a faucet is opened. Refer to the Water Pump information elsewhere in this section for additional information on the water pump and initial start-up.
Water Pump Button
Tap Water Pump to turn off/on
-Typical View
NOTE
Some models may be equipped with a Water Pump switch in the water service center on the outside of the motorhome or within the bathroom area for your convenience.
Water Heater Controls
The water heater controls are located on the lower left of the Home Screen next to the water pump button. Press the buttons to turn off and on. Selection is between gas and electric.
Water heater controls on the Home Screen
-Typical View
Battery Voltage
The Battery Voltage section on the Home Screen is used to monitor the House and the Engine (chassis) batteries. It also indicated the current power source being used and the total generator hours. The Auto Gen Start lockout button is located at the lower right of the home screen. Some models may display in percent of battery “state of charge” for the house battery rather than the voltage level.
Battery Voltage section on the Home Screen
-Typical View
Weather Section
The Weather Section on the Home Screen will show the local weather and forecast (when connected to Wi-Fi or cellular service).
 Weather section on the Home Screen
-Typical View
Light Master
The Light Master button turns on all the inside lights that are included in the master light circuitry.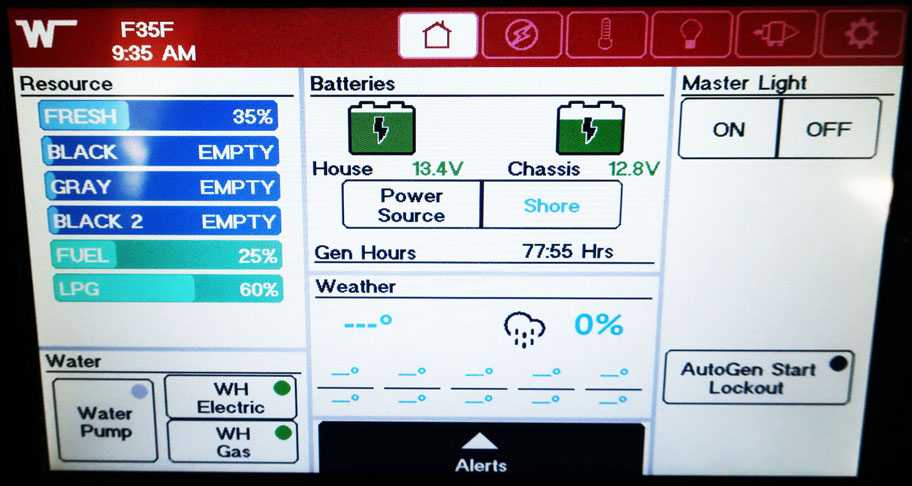
Light Master on the Home Screen
-Typical View
Alerts Viewer
The lower bottom of the Home Screen has an alerts viewer that when selected will display any trouble areas or faults. When selected the Alerts tab will raise up and the information will be displayed in the tab.
Alerts tab on the Home Screen
(Any alerts will be displayed in this space)
-Typical View
CONNECTED COACH ELECTRICAL SCREEN
The Electrical Screen is indicated by the lightning bolt shaped button located on the selector row at the top.
Electrical Main Screen
From the main screen of the electrical section you can start and stop the generator, customize generator and inverter settings, and check if shore power is connected. On the right side of the screen the individual electrical systems are listed and if they are being used are indicated by the circles.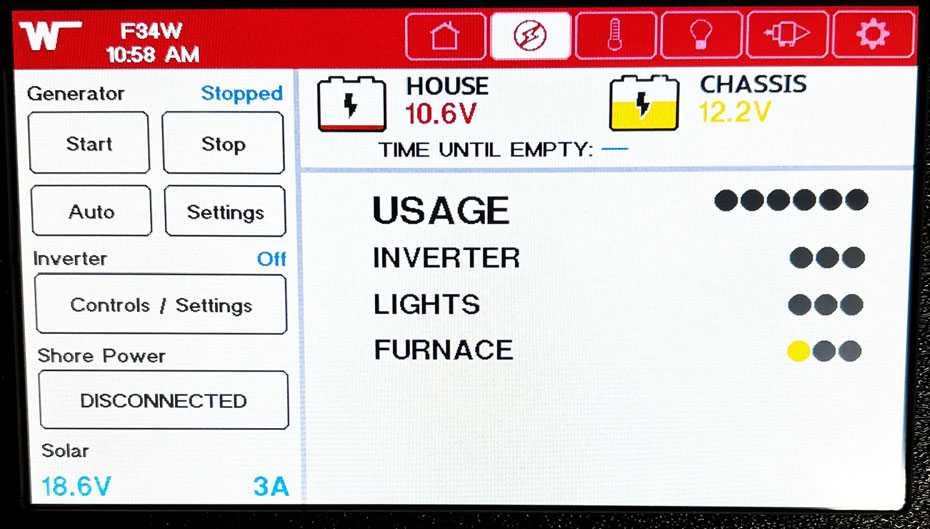
Electrical Main Screen
-Typical View
Generator Controls
The generator controls are located on the top left of the Electrical Main Screen. To start the generator hold the start button for a minimum of 1 second, the generator will start up. Press the stop button to stop the generator. The generator settings button will take you to the generator settings screen. The generator auto button will set the generator to turn on automatically according to the generator auto settings.
Further Information
Refer to the Electrical Generator section in this manual’s electrical chapter and the generator manufacturer’s user guide provided in your Info Case for complete operating instructions, specific recommendations, troubleshooting tips, safety precautions, and maintenance information.
Generator Start Button
-Typical View
Generator Settings Button
-Typical View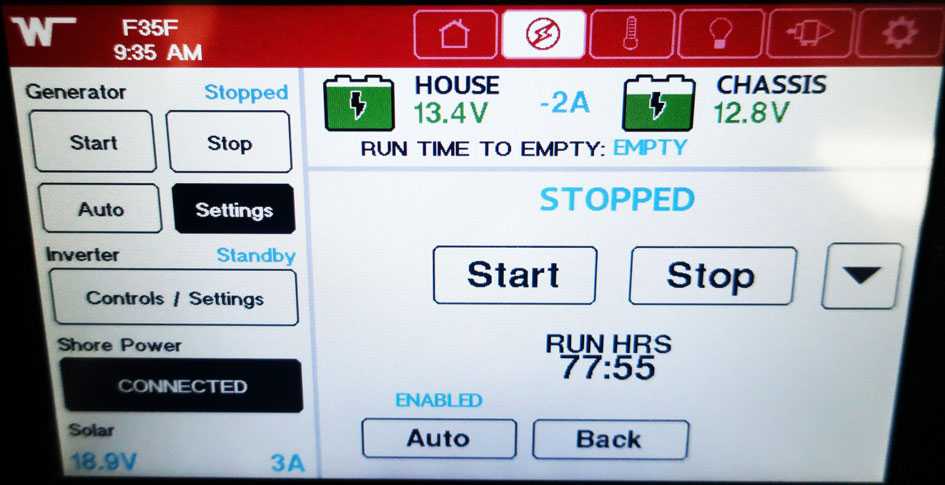
Read all Instructions for CONNECTED COACH User Manual
Winnebago Adventurer 2022 DRIVING YOUR MOTORHOME User Manual
DRIVING YOUR MOTORHOME
The information in this section refers only to features installed or adapted to the dash and driver compartment area by Winnebago Industries®. It also includes passenger seating in the living area of the motorhome.
Further Information
See the chassis manual in your InfoCase for all original chassis related controls, instrumentation, switches, and other features. This includes items such as transmission, parking brakes, cruise control, gauges, wipers, lights, etc.
SEATS – DRIVER/CO-PILOT
The driver and co-pilot seats may be independently adjusted to suit individual preference.
The seats may be swiveled to provide easy entrance and exit. The swivel feature also allows the seats on most models to be turned toward the living area for additional seating while the unit is parked.
WARNING
Assure seat is in its forward and locked position for travel. Do not adjust seat while vehicle is in motion. Failure to comply may result in injuries.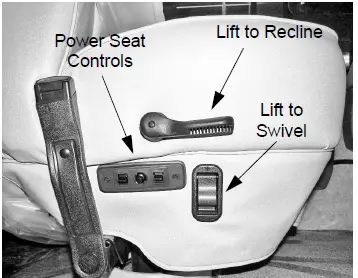
Driver Seat
-Typical View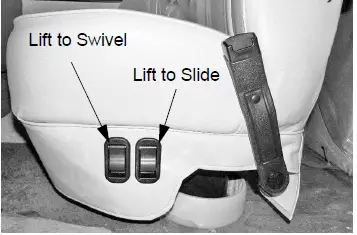
Passenger Seat
-Typical View
Multi-Adjustable Power Seat –If Equipped
The power seat controls are located on the lower right hand side of the driver seat base.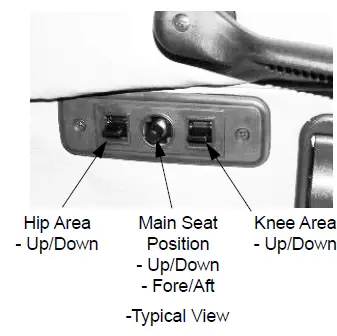
To Face Driver Seat Rearward
Manual Seat
- Tilt the steering wheel all the way up.
- Put the left armrest down.
- Swivel the seat to the right until it just contacts the steering wheel, then slide the seat ahead all the way.
- Lift the recliner lever and let the seat back tilt ahead to clear the steering wheel.
- Swivel the seat the rest of the way to face the living area.
- Tilt the steering wheel down.
- Reverse the procedure to face the seat forward.
Power Seat
- Tilt the steering wheel all the way up and put the left armrest down.
- Move the seat rearward fully and then ahead a few inches.
- Swivel the seat to the right until it just contacts the steering wheel, then move the seat ahead all the way to clear the steering wheel.
- Swivel the seat the rest of the way to face the living area.
- Position the tilt wheel down and to provide maximum clearance to recline the seat.
- Reverse the procedure to face the seat forward.
Armrest Adjustment –If Equipped
The armrests may be swung upward out of the way for easy exit or access to the front seats. A roller on the underside of the front of the armrest also lets you adjust the resting angle for personal comfort, whether the seat is upright or reclined.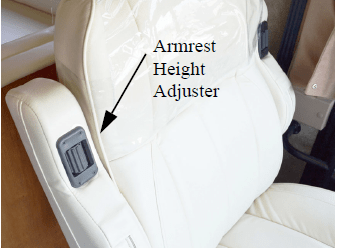
-Typical View
CO-PILOT FOOTREST
–If Equipped
The co-pilot seat may be equipped with a manual footrest that provides greater utility to be used as a lounge chair when rotated for television viewing or as part of a lounge conversational area.
- To extend footrest, lift black footrest lever (located on right-hand side of seat).
To retract footrest, push downward with your legs and the footrest will close.
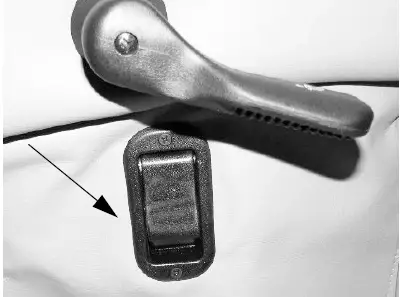
Footrest Lever
(Located on right-hand side of co-pilot seat)
-Typical View
SEAT BELTS
Seats intended for occupancy while the vehicle is in motion are equipped with seat belts for the protection of the driver and passengers.
Lap Belts
The lap belts must be worn as low as possible and fit snugly across the hip area. Always sit erect and well back into the seat. To gain full protection of the safety belt, never let more than one person use the same safety belt at any one time, and do not let the safety belts become damaged by pinching them in the doors or in the seat mechanism. After any serious accident, any seat belts which were in use at the time must be inspected and replaced if necessary.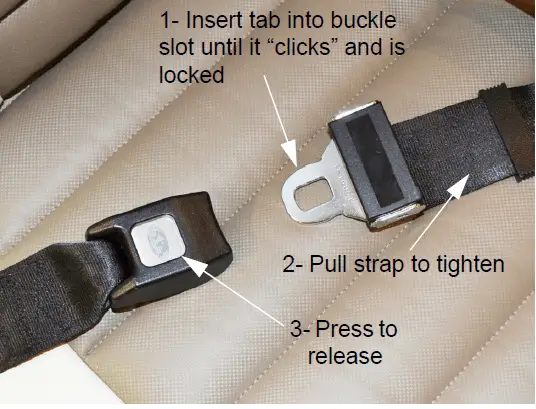
Adjustment
To lengthen belt, swivel the tab end at a right angle to belt and pull strap to desired length. To shorten, pull loose end of belt.
To Fasten
Be sure belt is not twisted. Grasp each part of the belt assembly and push tongue into buckle. Adjust to a snug fit by pulling the loose end away from the tongue.
To Release
Press button in center of the buckle and slide tongue out of the buckle.
WARNING
Snug and low belt positions are essential. This will ensure that the force exerted by the lap belt in a collision is spread over the strong hip area and not across the abdomen, which could result in serious injury.
Only seats equipped with seat belts are to be occupied while vehicle is in motion. Swivel seats must be in the locked, forward facing position while vehicle is in motion.
Read all Instructions for DRIVING YOUR MOTORHOME User Manual
Winnebago Adventurer 2022 APPLIANCES AND SYSTEMS User Manual
APPLIANCES AND SYSTEMS
The appliances installed in your motorhome are manufactured by reputable RV appliance makers and have been tested by independent laboratories to meet all applicable standards and codes set for RV appliances. See Section 2 – Safety and Precautions of this manual for any safety and precautions you need to take regarding the operation of your appliances.
REFRIGERATOR
–If Equipped
The refrigerator in your motorhome can operate from either of two energy sources available to the motorhome:
- 120-Volt AC Electric
- Propane Gas
To be able to use both types of energy, the refrigerator does not have a compressor like household refrigerators. Instead, it uses an ammonia-water solution for cooling. Basically, ammonia vapor is distilled from the solution by heat produced from either propane gas flame or electrical heat element. The ammonia vapor is then carried to the finned condenser where it liquefies. The liquid then flows to an evaporator where it creates cooling by evaporation. The ammonia circulates back into the water solution and the cooling cycle continues.
WARNING
Do not let children play inside the motorhome unattended. Unlike your home refrigerator/freezer that one could push open the door from the inside, your motorhome refrigerator has a travel latch and when engaged would trap a child inside resulting in suffocation leading to death or serious injury.
Leveling
Before operating the refrigerator when the motorhome is stationary, place a small level on the bottom of the refrigerator and make certain the unit is level. If over 1/2 of the bubble is inside the circle in any direction, the motorhome is level enough for continuous operation of the refrigerator while parked.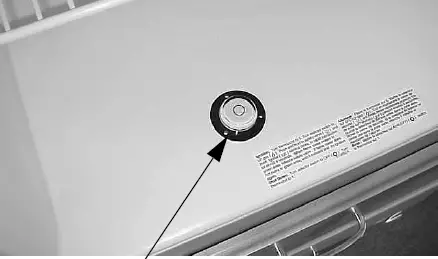
Place bubble level in bottom of refrigerator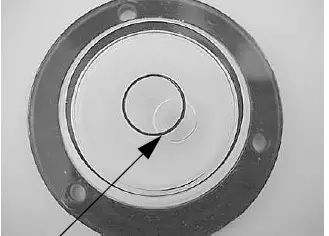
Bubble must be at least 1/2 inside circle
Normal vehicle leveling to provide comfort for the occupants is satisfactory for refrigerator operation.
NOTICE
The refrigerator is made to operate within 3 off level side-to-side and 6 off level front-to-back (as looking at the front of the refrigerator). Operating it at more than these limits can cause damage to the cooling system. Make sure the vehicle is level before you operate the refrigerator.
Your motorhome is equipped with one of the following refrigerators. See the instructions for the refrigerator in your motorhome.
Further Information
Refer to the manufacturer’s user guide provided in your InfoCase for complete operating instructions, safety precautions, and maintenance information.
REFRIGERATOR – RESIDENTIAL
–If Equipped
Your motorhome may be equipped with a “residential style” refrigerator. This refrigerator operates off of the 120-volt electrical system in your motorhome.
In order to operate, the refrigerator requires either the shoreline to be plugged in, the generator running, or inverter power.
The inverter is intended to power your 120-volt residential refrigerator primarily when driving your vehicle. The house batteries will drain quickly if the refrigerator is powered from the inverter when the engine is not running. Other 120-volt appliances and other 120-volt devices are not intended to operate with inverter power for long periods of time as they too will quickly drain your house batteries.
NOTE: The refrigerator operates off of 120-volt power. When power is off, the ice maker drain valve (located behind the sidewall access compartment) needs to be in the ON position. This will ensure that water does not discharge from the water dispenser when power is reconnected to the appliance.
WARNING
At the refrigerator/freezer or motorhome End of Life remove the travel latch. Failure to remove the travel latch could result in trapping a child inside resulting in suffocation leading to death or serious injury.
Do not let children play inside the motorhome unattended. Unlike your home refrigerator/freezer, one could push open the door from the inside, your motorhome refrigerator has a travel latch and when engaged would trap a child inside.
Travel Latch
To engage the travel latch, rotate the handle to the lock position. To disengage the travel latch, rotate the handle to the unlock position.
(Latch shown in lock position)
-Typical View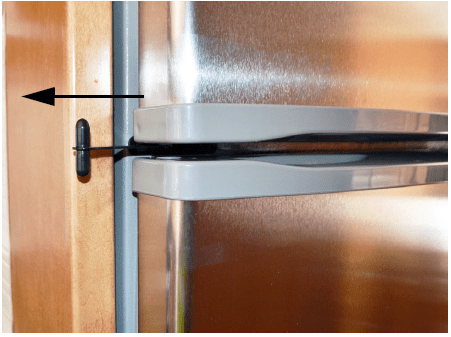
(Latch shown in unlock position)
-Typical View
Basic Refrigerator Operation
Temperature controls are factory preset for your convenience. When you first use your refrigerator, make sure the controls are still set to the recommended setting as shown.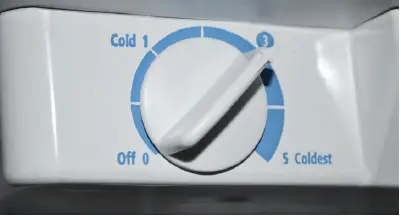
The recommended setting is “Mid-setting 3”
See the manufacturer’s user guide provided in your InfoCase for information on adjusting refrigerator/freezer temperatures to best suit your needs.
NOTE: Allow 24 hours for your refrigerator to cool completely before storing food.
Ice Maker Operation
To turn the ice maker on, lower the wire shut-off arm.
NOTE: Do not force the wire shut-off arm up or down.
To manually turn the ice maker off, lift the wire shut-off arm to the OFF (arm up) position until it clicks.
Read all Instructions for APPLIANCES AND SYSTEMS User Manual
Winnebago Adventurer 2022 PROPANE GAS User Manual
APPLIANCES AND SYSTEM
The appliances installed in your motorhome are manufactured by reputable RV appliance makers and have been tested by independent laboratories to meet all applicable standards and codes set for RV appliances. See Section 2 – Safety and Precautions of this manual for any safety and precautions you need to take regarding the operation of your appliances.
REFRIGERATOR
–If Equipped
The refrigerator in your motorhome can operate from either of two energy sources available to the motorhome:
- 120-Volt AC Electric
Propane Gas
To be able to use both types of energy, the refrigerator does not have a compressor like household refrigerators. Instead, it uses an ammonia-water solution for cooling. Basically, ammonia vapor is distilled from the solution by heat produced from either propane gas flame or electrical heat element. The ammonia vapor is then carried to the finned condenser where it liquefies. The liquid then flows to an evaporator where it creates cooling by evaporation. The ammonia circulates back into the water solution and the cooling cycle continues.
WARNING
Do not let children play inside the motorhome unattended. Unlike your home refrigerator/freezer that one could push open the door from the inside, your motorhome refrigerator has a travel latch and when engaged would trap a child inside resulting in suffocation leading to death or serious injury.
Leveling
Before operating the refrigerator when the motorhome is stationary, place a small level on the bottom of the refrigerator and make certain the unit is level. If over 1/2 of the bubble is inside the circle in any direction, the motorhome is level enough for continuous operation of the refrigerator while parked.
Place bubble level in bottom of refrigerator
Bubble must be at least 1/2 inside circle
Normal vehicle leveling to provide comfort for the occupants is satisfactory for refrigerator operation.
NOTICE
The refrigerator is made to operate within 3 off level side-to-side and 6 off level front-to-back (as looking at the front of the refrigerator). Operating it at more than these limits can cause damage to the cooling system. Make sure the vehicle is level before you operate the refrigerator.
Your motorhome is equipped with one of the following refrigerators. See the instructions for the refrigerator in your motorhome.
Further Information
Refer to the manufacturer’s user guide provided in your InfoCase for complete operating instructions, safety precautions, and maintenance information.
REFRIGERATOR – RESIDENTIAL
–If Equipped
Your motorhome may be equipped with a “residential style” refrigerator. This refrigerator operates off of the 120-volt electrical system in your motorhome.
In order to operate, the refrigerator requires either the shoreline to be plugged in, the generator running, or inverter power.
The inverter is intended to power your 120 volt residential refrigerator primarily when driving your vehicle. The house batteries will drain quickly if the refrigerator is powered from the inverter when the engine is not running. Other 120 volt appliances and other 120 volt devices are not intended to operate with inverter power for long periods of time as they too will quickly drain your house batteries.
NOTE: The refrigerator operates off of 120-volt power. When power is off, the ice maker drain valve (located behind sidewall access compartment) needs to be in the ON position. This will ensure that water does not discharge from the water dispenser when power is reconnected to the appliance.
WARNING
At refrigerator/freezer or motorhome End of Life remove travel latch. Failure to remove travel latch could result in trapping a child inside resulting in suffocation leading to death or serious injury.
Do not let children play inside the motorhome unattended. Unlike your home refrigerator/freezer that one could push open the door from the inside, your motorhome refrigerator has a travel latch and when engaged would trap a child inside.
Travel Latch
To engage the travel latch, rotate the handle to lock position. To disengage the travel latch, rotate the handle to the unlock position.
(Latch shown in lock position)
-Typical View
(Latch shown in unlock position)
-Typical View
Basic Refrigerator Operation
Temperature controls are factory preset for your convenience. When you first use your refrigerator, make sure the controls are still set to the recommended setting as shown.
Recommended setting is “Mid-setting 3”
See the manufacturer’s user guide provided in your InfoCase for information on adjusting refrigerator/freezer temperatures to best suit your needs.
NOTE: Allow 24 hours for your refrigerator to cool completely before storing food.
Ice Maker Operation
To turn the ice maker on, lower the wire shut-off arm.
- NOTE: Do not force the wire shut-off arm up or down.
- To manually turn the ice maker off, lift the wire shut-off arm to the OFF (arm up) position until it clicks.
NOTE: Your ice maker is equipped with an automatic shutoff. As ice cubes fill the storage bin, the wire arm is raised to the OFF (arm up position).
Further Information
Refer to the manufacturer’s user guide provided in your InfoCase for complete operating instructions, safety precautions, and maintenance information.
ICE MAKER
–If Equipped
Some refrigerators are equipped with an automatic ice maker system. The ice maker unit is installed in the freezer compartment of the refrigerator.
NOTE: A water shut-off valve for the ice maker is located near the water faucet filter inside the galley cabinet beneath the sink.
REFRIGERATOR SERVICE ACCESS COMPARTMENT
(Exterior)
–If Equipped
The exterior refrigerator service compartment allows access to the rear of the refrigerator for inspection, maintenance, and service.
To Open
- Use a screwdriver or coin to turn the latch knobs to the vertical position as shown.
- Remove the door from the opening.
Read all Instructions for PROPANE GAS User Manual
Winnebago Adventurer 2022 ELECTRICAL User Manual
ELECTRICAL
- Careless handling of electrical components can be fatal. Never touch or use electrical components or appliances while feet are bare, while hands are wet, or while standing in water or on wet ground.
- Improper grounding of the vehicle can cause personal injury. Do not plug the utility power cord into an outlet which is not grounded and do not adapt the plug to connect to a receptacle for which it is not designed.
Do not attach an extension cord to the utility power cord. - Be sure that all electrical appliances to be used contain 3-prong plugs for proper grounding.
Avoid overloading electrical circuits. Replace fuses or circuit breakers with those of the same size and amperage rating only. Never use a higher rated fuse or breaker.
Use caution when handling or working near electrical storage batteries. Always remove jewelry and wear protective clothing and eye covering. Avoid creating sparks.
ELECTRICAL SYSTEM – HOUSE 120-VOLT AC
The 120-volt system operates from the shoreline cord connected to an outside 120-volt utility service, such as those at campgrounds or from the 120-volt generator. When the shoreline cord is connected to an outside power source, or when the auxiliary electric generator is running, the power converter automatically changes a portion of the 120-volt current to 12-volt DC current. All equipment in the motorhome that is normally powered by the house batteries is then powered through the converter.
In addition, the following equipment is entirely dependent on 120-volt current: air conditioner, microwave oven, and any 120-volt electrical equipment used at convenience outlets.
POWER CORD – EXTERNAL
(Shoreline)
The external power cord (commonly referred to as a “shoreline”) is stored in the utility compartment on the left (driver’s) side of the motorhome.
WARNING
Do not use an extension cord. Improper sized cords, damaged cords, and poor connections can lead to fire, which can result in death or serious injury.
WARNING
Do not connect the external power cord to any receptacle until you have verified proper polarity and grounding. Be sure all prongs of the supply cord are properly plugged into the receptacle. Failure to observe can result in death or serious injury.
The power cord is designed to ground the electrical system through the receptacle. It is also designed to carry the amperage output of most campground outlets. If the electrical receptacle to be used is designed to mate with the prongs of the power cord plug, the electrical connection can be expected to carry rated load.
Connecting the Power Cord
To connect to an external source, remove the cord from the utility compartment and plug it into a suitable power outlet to provide external power to the motorhome and converter/charger system.
Your motorhome may be equipped with either a standard 30-amp system or an optional 50-amp system.
NOTE: Some parks do not have 50-amp service available, so you will need to connect to a standard 30-amp service pole using an adapter.
If your motorhome is equipped with standard 30-amp system, you cannot connect to a 50-amp service. Do not use adapters to connect 30-amp systems to a 50-amp service or you may cause an overload on electrical system components.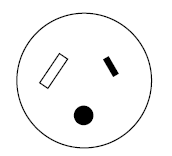
30 Amp Receptacle
WARNING
This connection is for 110/125 Volt AC, 60 Hz 30 Ampere supply.
Do not exceed circuit rating. Exceeding the circuit rating may cause a fire and result in death or serious injury.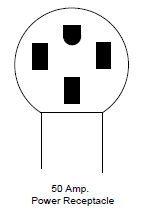
WARNING
This connection is for 208Y/120-Volt or 120/240 Volt AC, 3-pole, 4 wire, 60 Hz 50 Ampere supply.
Do not exceed circuit rating. Exceeding the circuit rating may cause a fire and result in death or serious injury.
A rotating hatch in the compartment floor lets you route the shoreline cord through a passage in the bottom of the compartment so you can shut the compartment door while the shoreline is connected.
- Flip the retainer in the center of the cover straight up.
- Rotate the cover to the largest hole to pass the cord end through.

- Then rotate to the smaller opening to enclose the cord.
The power cord is designed to ground the electrical system through the receptacle. It is also designed to carry the amperage output of most campground outlets. If the electrical receptacle to be used is designed to mate with the three prongs on the power cord plug, the electrical connection can be expected to carry rated load.
WARNING
Service inlet access must be closed when utility connections are not in use.
Park Fuses or Breakers
Most campgrounds are equipped with a fuse or circuit breaker at the receptacle (which we recommend shutting off before engaging or disengaging the power cord.) This protects the park’s wiring, as well as the power cord on your vehicle from electrical damage. If electrical power fails, contact the park attendants and have them check the fuse or breaker for your supply receptacle.
INVERTER/CHARGER UNIT – 2000W
–If Equipped
The 2000-watt inverter/charger has an AC input circuit breaker to protect the inverter/charger from overloads. The inverter/charger also has “built in” features that protect the system from abnormal conditions. See the inverter/charger information included in your InfoCase for a complete explanation of the system and operating instructions.
NOTE: The inverter is not intended for steady use while “dry camping”. Batteries will deplete quickly with use of the inverter. The inverter is intended for limited, short term power usage when not connected to shoreline or generator power. The inverter can also be used while driving the motorhome because the engine alternator will charge the batteries while driving.
Read all Instructions for ELECTRICAL User Manual
Winnebago Adventurer 2022 PLUMBING User Manual
PLUMBING
FRESH WATER SYSTEM
The Fresh Water System provides water to the galley sink, shower, bathroom lavatory, toilet, and water heater. Water may be supplied by either of two sources:
- A fresh water tank and water pump located within the motorhome, or
- Any external fresh water source to which the motorhome may be connected, known as “city water”.
- There are two ways to fill the fresh water tank on your motorhome – City Fill or Gravity Fill.
Water Pressure Regulators
Because city water pressure varies from location to location, we recommend obtaining an in-line water pressure regulator to prevent damage to any components, connections, and seals in your fresh water system. These devices simply connect in-line between the supply hose and the city water input on the motorhome. We recommend regulators that control water pressure to 50 psi. max. Water pressure regulators are commonly available at most RV dealerships and many large retail discount or home supply centers.
Method 1 – Filling the Fresh Water Tank Through City Fill Connection
WARNING
Potable water only. Sanitize, flush, and drain water tank before using. See owner’s manual for instructions, care, and maintenance information. Failure to maintain tank can result in death or serious injury.
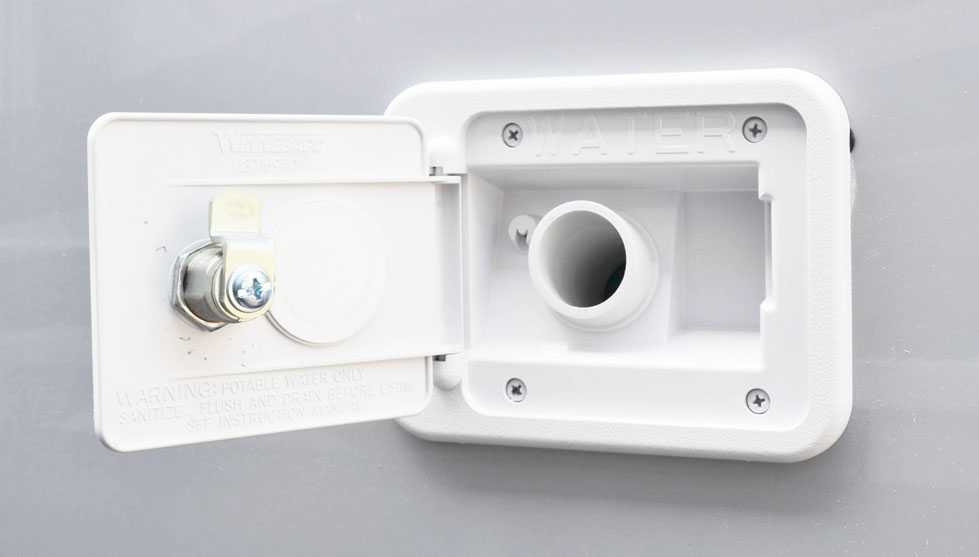
Always fill the fresh water tank at an approved potable water filling facility or a known purified drinking water source. The tank is filled through the City Water Connection (Fresh Water Inlet) located inside the water service center. The Fresh Water valve (located in the water service center) routes the water from the city water hose to the fresh water tank for filling.
- Attach hose to the Fresh Water Inlet.
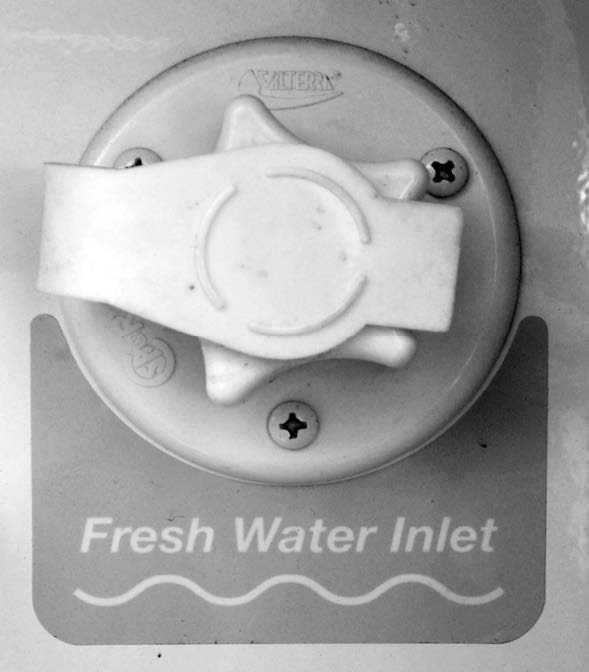
Fresh (City) Water Connection
“Fresh Water Inlet”
(Located in the water service center)
-Typical View
- Open the Gravity Fill door (located behind a small, lockable door on the driver or passenger sidewall or backwall – depending on model) to aid in tank venting and as an overflow when the tank is full.
Water Tank Gravity Fill
-Typical View
Turn the Fresh Water valve to the Tank Fill position.
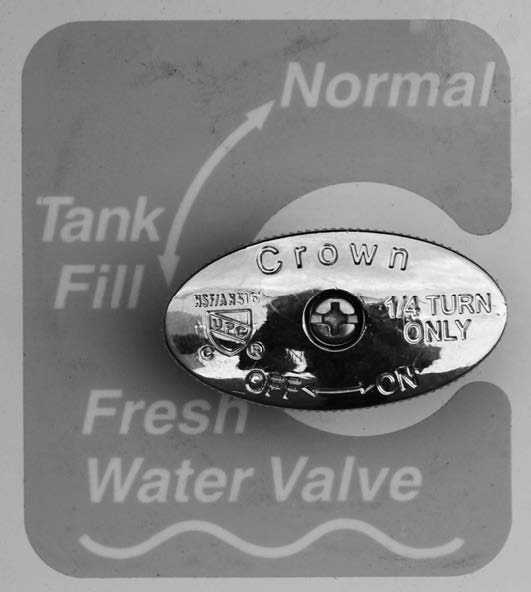 Fresh Water Valve
(Located in water service center)
-Typical View
- Turn city water supply ON.
- Use the level display on the monitor panel to oversee filling of the tank, or when the tank is full, water will flow from tank vent tube beneath the motorhome and out of the Gravity Fill door.
NOTICE
Do not leave fresh water connection unattended when filling tank. Failure to comply may result in tank expansion and property damage.
- Turn OFF city water supply and disconnect hose from the Fresh Water Inlet.
- Turn the Fresh Water valve to Normal position to use the water pump. The Tank Fill position is only for pressure filling the water tank from the city water hose connection.
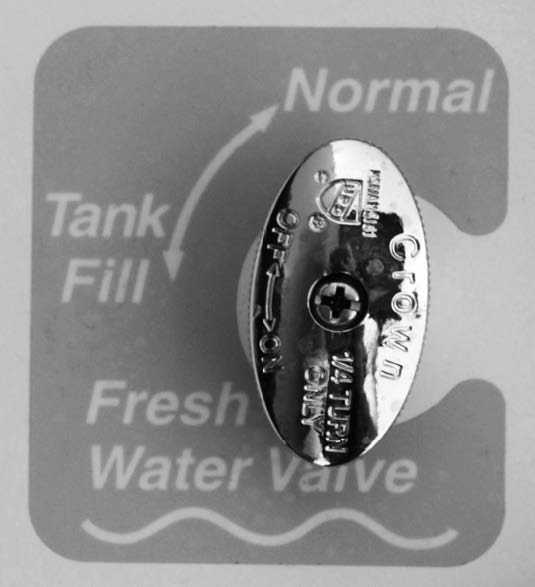
Fresh Water Valve
(Located in water service center)
-Typical View
Using City Water
When connected to an outside source of water, the water bypasses the water pump and storage tank and supplies pressure directly to individual faucets and toilet. A check valve built into the pump prevents water from entering the pump and filling the storage tank.
- Read all Instructions for PLUMBING User Manual
-
Winnebago Adventurer 2022 ENTERTAINMENT User Manual
-
ENTERTAINMENT
ON-BOARD WIFI SYSTEM
-If Equipped
Quick Setup- Turn on the power switch to the Winegard Gateway indoor unit (IDU). The power switch is typically located in the overhead above the entry door.
- Turn on the WiFi-enabled device (tablet, smartphone, or laptop) you want to connect to the Gateway and scan for wireless networks. It may take a few minutes for the Winegard network to appear.
- The label located on the front of the Winegard User Manual lists the unique default SSID and password. You can also find this information on the back of the Gateway Router (see photo below) located on the coach ceiling. Select the WiFi signal that matches the SSID from the list if wireless networks and connect. Once the correct SSID has been selected, enter the password. It is recommended to set your device(s) to automatically connect with the Winegard Gateway.
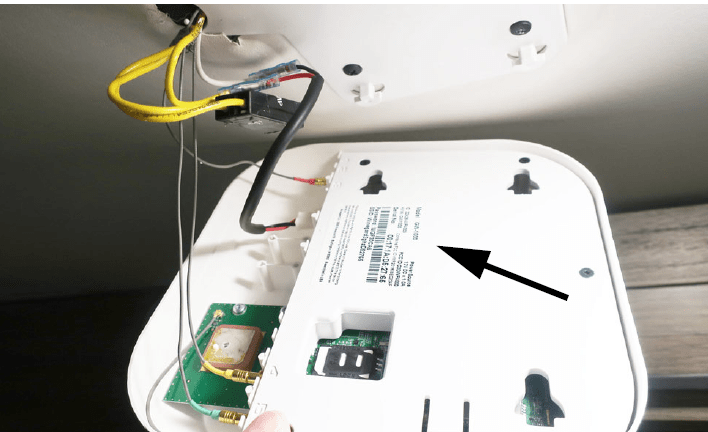 Factory SSID and password shown on the back of the router. (Located on the coach ceiling).
-Typical View - Once connected. Open an internet browser and type 10.11.12.1 into the address bar and press enter. This will take you to the Admin Login Screen.
Login using the following credentials:
Username: admin Password: admin
Note: For reference, the Winegard Gateway system automatically connects with the most recently used service (WiFi or 4G LTE).
Connecting to WiFi Access Point
- Select SCAN FOR WIFI to find WiFi signals in range (This could take up to 30 seconds). Select the desired network and click CONTINUE.
- Enter the network password, if prompted. When INTERNET STATUS shows CONNECTED, then the system is ready.
Connecting to WiFi Access Point (4G LTE)
Note: Connecting to the internet through 4G/ LTE will use data from your Winegard-subscribed data plan or other selected data plan if you installed your own SIM card.- To connect to a 4G/LTE network, select 4G/ LTE from the internet access menu. Then click SELECT.
Further Information
See the Wineguard Gateway manufacturer’s information in your supplement manual in your InfoCase for complete operating instructions.FRONT TV IGNITION SWITCH INTERLOCK
–If Equipped
If your motorhome is equipped with a front overhead TV, it is plugged into a special electrical outlet with a built-in ignition switch interlock. The device allows the front overhead TV to operate only when the ignition key is in the Off or Accessory positions.AUDIO/VIDEO SYSTEM BASIC OPERATION
NOTE: For your convenience, we have also included a handy, tear-out version of this “A/V System Basic Operation” guide in Section 8 of your Operator’s Manual Supplement.
See your InfoCase for specific operating guides for audio and video components.DVD PLAYER
–If Equipped
The DVD Player is a selectable function of the multi-featured audio system. The player unit contains DVD/CD, MP3, AM/FM, USB, and Bluetooth Stereo. It also accepts portable audio player inputs and functions as an alarm clock.
This stereo receives Bluetooth streaming audio from Bluetooth enabled audio sources such as a cellphone.
The player is connected directly to the TV and can output sound to either the stereo speakers in the TV or to the Exterior speakers.Exterior Speaker System
Zones Button
- To connect or disconnect the exterior speaker system, press Zones and select Zone A, B, or C to turn on/off.
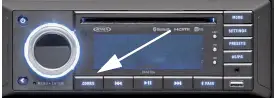
Set TV Video Input

- Turn TV and Radio/DVD player ON.
Press the MODE button on the TV or the SOURCE button on the remote to select “INPUT 2”.
The TV screen will display the DVD player logo when the correct input is selected.
Play DVD
- Insert a DVD “face up” into slot on lower face of the player.
- The DVD will begin to load automatically. The TV screen will typically display “Reading” or “Loading”.
- The DVD may load directly to the main title/menu screen or it may begin to play previews. You may be able to skip previews if desired by pressing the “Next” button on the DVD remote until you see the main menu screen.
- When the main menu screen appears, press the “Enter” button on the remote or “Play/Pause” button on DVD player to begin playing the main feature. Use the arrow buttons on the DVD remote to select another feature to play.
- Volume is adjusted with the DVD remote.
TV Sound through Exterior Speakers
When watching TV programs alone, the TV normally plays sound through its own built-in stereo speakers. If you wish to connect TV stereo sound output to the Exterior speakers for a richer sound quality, follow these steps:
- Turn the TV ON.
- Press the Mode input selection button (located in the top right corner of radio) and choose AUX. This will route the TV stereo sound output through the Radio/DVD Player and out to the Deluxe Sound speakers.
- Select TV channels and adjust volume using the TV remote.
Further Information
See the manufacturer’s quick reference guide provided in your InfoCase for complete feature descriptions and operating instructions.AUDIO/VIDEO SYSTEM CABLES
An HDMI Cable is provided for connection of your choice of DVD player, home theater system, or satellite receiver.
The cable (located inside cabinet above entrance door) is connected to all equipped TVs. - Read all Instructions for ENTERTAINMENT User Manual
-
Winnebago Adventurer 2022 FURNITURE AND SOFTGOODS User Manual
-
FURNITURE AND SOFTGOODS
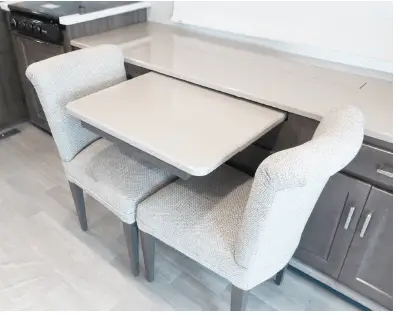
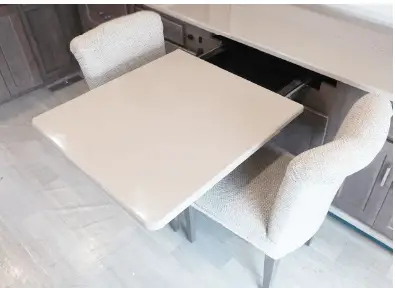
SLIDING BUFFET TABLE AND CHAIRS
–If Equipped
(Typical View – Your motorhome may differ in appearance)Buffet Chairs
The Buffet Chairs are free-standing to allow greater freedom of movement. Before driving, always return Buffet Chairs to their storage location.WARNING
This chair not intended for occupancy when vehicle is in motion and must be returned to the stowed position.Folding chairs are also provided for additional seating when needed. The folding chairs are typically stored in an exterior compartment, under the bed, inside cabinet near the table, or inside the wardrobe, depending on model. Free-standing chairs are not intended for occupancy while the vehicle is in motion and must be stored before driving.
WARNING
Properly secure all free-standing chairs, furniture, and loose items prior to driving. Moving items can cause driver distraction, possibly resulting in an accident that can result in death or serious injury.Storing Buffet Chairs
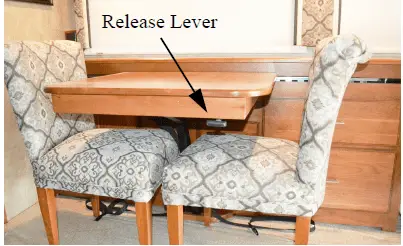
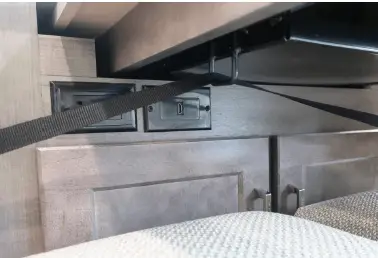
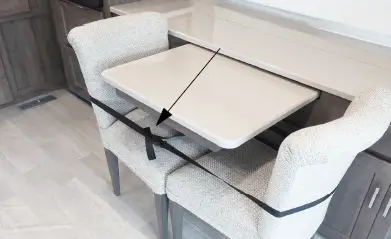
NOTE: Table Extension Leaf must be removed before storing dinette table and chairs.- Pull release lever and slide the table to the center position until it locks into place.
- Push chairs against opposite sides of the buffet table (as shown in Step 4).

- Bind chairs together with the provided strap, ensuring the strap goes through the ring located on the bottom side of the buffet table.
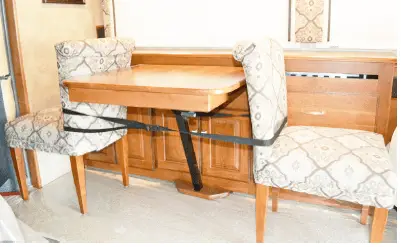
- Latch strap and tighten as necessary for security.
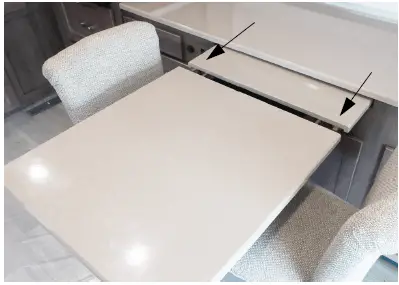
Buffet Table Extension
- Grasp the edge of the buffet table and pull all the way out.
- Remove table leaf extension from storage location.
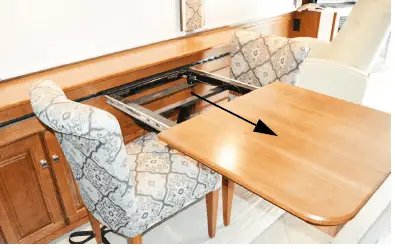
NOTE: The table extension leaf is stored in the rear wardrobe, in a cabinet near the dinette, or beneath the bed. - Insert table extension leaf onto table frame and align the table extension pegs. Push together table and leaf.
NOTE: Your motorhome may have one or two table leaves, depending on model.
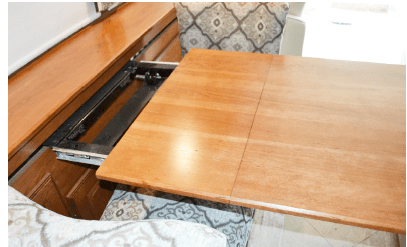
- Push edge of buffet table in until it locks into place.

- Reverse steps to store table extension leaf. Sliding Table
- Pull release lever.
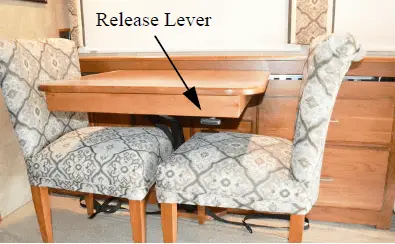
- Slide the table to the desired location.
BUFFET TABLE AND CHAIRS
–If Equipped
(Typical View – Your motorhome may differ in appearance)Buffet Chairs
The Buffet Chairs are free-standing to allow greater freedom of movement. Before driving, always return Buffet Chairs to their storage location.
WARNING
This chair not intended for occupancy when vehicle is in motion and must be returned to the stowed position.
Folding chairs are also provided for additional seating when needed. The folding chairs are located under the bed in the storage compartment. (Model 30T).
Free-standing chairs are not intended for occupancy while the vehicle is in motion and must be stored before driving.WARNING
Properly secure all free-standing chairs, furniture, and loose items prior to driving. Moving items can cause driver distraction, possibly resulting in an accident that can result in death or serious injury.Storing Buffet Chairs
- Push chairs against opposite sides of the buffet table.
- Bind chairs together with the provided strap, ensuring the strap goes through the ring located on the bottom side of the buffet table.
- Latch strap and tighten as necessary for security.
Buffet Table Extension
- Grasp the edge of the buffet table and pull all the way out until it locks into place.
- Insert buffet table extension with the tabs facing the table.
NOTE: The buffet table extension is located inside the buffet cabinet.
- Push extension into the buffet table until the tabs lock into place..
- Reverse steps to store buffet table extension.
SLEEPING FACILITIES
WARNING
Sleeping facilities are not intended for use while vehicle is in motion. For safety, passengers must use safety belted seating positions while vehicle is in motion. - Pull release lever and slide the table to the center position until it locks into place.
- Read all Instructions for FURNITURE AND SOFTGOODS User Manual
-
Winnebago Adventurer 2022 SLIDEOUT ROOMS AND LEVELING User Manual
-
SLIDEOUT ROOMS AND LEVELING
The ignition key must be placed in the on or run position to operate the slideout room(s). The park brake must be applied for the room(s) to run. Winnebago recommends running the engine whenever you run the slideout rooms in or out, the engine alternator should insure the rooms have adequate 12-volt DC power to operate correctly.
SLIDEOUT ROOM OPERATION – ELECTRIC
WARNING
Your motorhome may have more than one slideout room. Understand which button operates which slideout room prior to operation. Make sure all slideout rooms are clear of people who could be harmed or obstacles that could cause damage prior to operating any slideout rooms. Failure to observe can result in death or serious injury.Slideout rooms provide a spacious living area at the push of a button. Front and Rear slideout room buttons are located on the Awning screen in the Connected coach control panel.
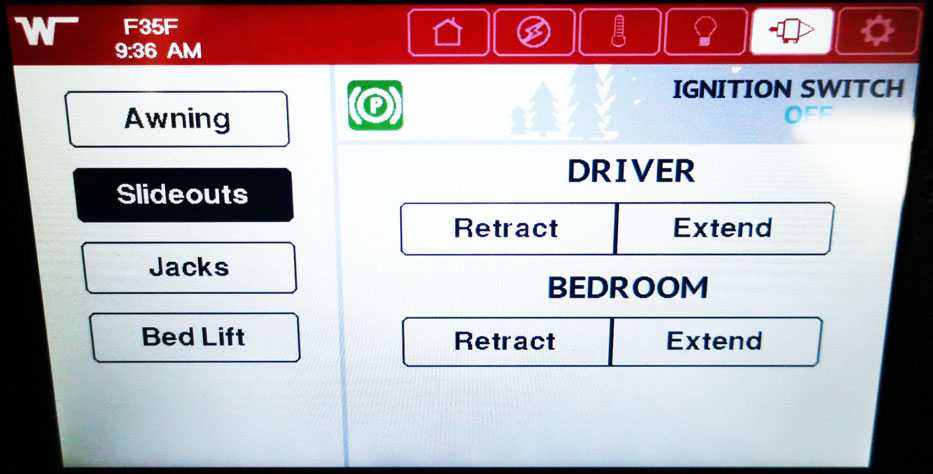
Slide-out Controls
After reading the warning message, click on the accept button to access the slide-out controls.
-Typical ViewCAUTION
Never drive the vehicle with a slideout room extended!The slideout room system uses 12-volt DC motorized mechanisms with an electronic control system to provide smooth operation and positive weather seal.
NOTE: We recommend that you KEEP THE ENGINE RUNNING WHILE EXTENDING OR RETRACTING SLIDEOUT ROOMS so the engine alternator can provide maximum power for proper operation of the slideout mechanisms.WARNING
CRUSH HAZARD. Keep people and objects clear of the inside and outside of the slideout room when operating. Failure to comply could result in death or serious injury.To Extend Slideout Room Before Extending!
- Level the motorhome and set the Parking Brake.
- Ensure exterior compartment doors are closed so that they will not interfere with slideout operation.
- Ensure driver and co-pilot seat backs are clear of slideout trim before extending slideout.
- Check inside and outside the vehicle to make sure that there are no people who could be harmed or obstacles that could cause damage due to room extension.
- If the slideout room has a couch or other furniture, make sure no people or pets are seated on them until the room has been fully extended.
Extend Procedure:
See “Before Extending!” before proceeding.- Engage the parking brake.
- Start the engine so the alternator can provide maximum power for proper operation of slideout mechanisms.
- Press the Slideout Room “EXTEND” button and hold until the room is fully extended, then release the button.
- To stop extending the room during operation, release the button.
- Remove and Secure the Ignition Key.
To Retract Slideout Room Before Retracting!
- Be sure the motorhome is level and the Parking Brake is set.
- Ensure exterior compartment doors are closed so that they will not interfere with slideout operation.
- Ensure driver and co-pilot seat backs are clear of slideout trim before retracting slideout.
- Check inside and outside the vehicle to make sure that there are no people who could be harmed or obstacles that could cause damage due to room retraction.
- Stow all furniture extensions before retracting slideout rooms to avoid property damage.
- If the slideout room has a couch or other furniture, make sure no people or pets are seated on them until the room has been fully retracted.
- Remove all items from the motorhome living room floor and close cabinet doors and drawers. Be sure there are no items at the end of the bed, behind the driver seat, or protruding from compartments, which could be crushed or cause damage to floor covering or cabinets when the room is retracted.
NOTICE
Because the slideout roof is drawn into the interior of the motorhome when retracted, be sure there is no debris, such as excessive dirt, tree seeds, twigs, leaves, etc. on the roof before retracting.Retract Procedure:
See “Before Retracting!” before proceeding.- Engage the parking brake.
- Start the engine so the alternator can provide maximum power for proper operation of slideout mechanisms.
- Press the Slideout Room “RETRACT” button and hold until the room is fully retracted, then release the switch.
- To stop retracting the room during operation, release the button.
- After the room is retracted, Remove and Secure the Ignition Key.
SLIDEOUT ROOM – EXTREME WEATHER PRECAUTION
Certain extreme weather conditions, such as heavy rains, heavy snow, and high winds, or any combination of these, could cause damage to the slideout room cover-awning (if equipped) or reduce effectiveness of the slideout room weather seals. Also, freezing rain and snow can prevent the slideout cover-awning (if equipped) from closing and may cause damage to the cover-awning, slideout room, weather seals, and mechanisms. To avoid potential damage, we recommend retracting your slideout room during extreme weather conditions.
SLIDEOUT ROOM TROUBLESHOOTING (POWER GEAR®) IN WALL SLIDEOUT –If Equipped
Battery Voltage or Circuit Breaker Problems
If the slideout room will not work:- Turn the Chassis Battery Disconnect switch OFF (leave off for 20 seconds) and then turn ON again. This will, in many cases, reset power to the slideout system.
- he chassis battery may be low on charge. Press and Hold the Battery Boost switch
(located on the dash) while pressing the interior slideout control switch. This momentarily connects the house batteries to assist in slideout room operation. - The circuit breaker may be tripped. The circuit breaker, labeled “Slideout Power” is located on a panel on an interior wall of the passenger side storage compartment just behind or ahead of the entrance door.
Problems Retracting or Extending the Room

- Fault Code LED
Slideout Control Box
(Located in the driver or passenger side compartment on the 24D and 24J, and located behind the couch on the 24V) If an error is detected on your slide system, the LED light on the control panel will blink an error code. If an error code appears, see the In Wall Slideout manufacturer’s user guide in your Info Case to determine the problem. The error code must be cleared prior to operating the room. - Read all Instructions for SLIDEOUT ROOMS AND LEVELING User Manual
-
Winnebago Adventurer 2022 MAINTENANCE AND STORAGE User Manual
-
MAINTENANCE AND STORAGE
SEALANTS – INSPECTION AND GENERAL INFORMATION
Water is a recreational vehicle’s worst enemy when it is allowed to enter where it is not intended. Sealants perform a very important function and should be inspected closely and maintained regularly. Winnebago Industries® utilizes many different types of sealants. Refer to the “Sealants Call-Out Sheet” provided in your InfoCase for further information.
Sealants, in general, do not have “set” lifetimes. Varying environmental factors affect the pliability and adhesiveness of sealants. You or your dealer must:- Inspect all sealants, a minimum of every six months.
Inspect the moldings, windows, clearance lights, exterior compartment doors, and all their attachments. - Also, inspect weather seals around entrance door, etc., and if necessary, have a dealer replace them immediately.
- Check for cracks, voids, gaps, breaks, adhesion, and any sign of physical deterioration.
NOTE: Proper sealant inspection includes not just visual observation but running a finger along sealant seams to verify proper adhesion to the surface. Any loosened areas must be replaced.
- Have the sealant replaced if you notice any of the above. Your local Winnebago Industries dealer has the correct and necessary parts and experience to help you maintain your sealants. See “Sealants Call-Out Sheet” provided in your InfoCase.
Always use the same type sealant that was removed.
Immediately have dealership check moldings, windows, and exterior attachments for leak source if you notice water inside of unit.
NOTICE
Sealants must be inspected every 6 months and replaced if necessary.ROOF
WARNING
STAY OFF ROOF. Surface may be slippery. Falling could result in death or serious injury.The roof is made of Thermo-Panel materials like the walls and floor. It will support the weight of an average adult for periodic maintenance or repair of the roof or roof mounted components.
Walking or working on the roof should be left to qualified service personnel using proper safety equipment in a safe environment. You should only walk or work on the roof if you are qualified and have created a safe environment. For your safety, it is not recommended that you store or carry items on the roof.
Always have damage to the roof area repaired immediately. Damaged or detached sealant around the vents, air conditioner, body-to-roof seams, etc., should also receive immediate attention. Delaying these repairs may allow water leakage and result in damage to interior ceiling and body panels, upholstery, etc., which is not covered by the limited warranty (see” New Vehicle Limited Warranty” provided at the beginning of this manual).UNDERCARRIAGE
Buildup of mud and dirt under the body of the vehicle can cause damaging rust or corrosion on steel or aluminum parts and can add needless weight to the vehicle. This, in effect, reduces the amount of cargo you can carry and remain within GVWR and GAWR limits.
Corrosive materials, such as those used for ice and snow removal and dust control, can also accumulate on the underside of a vehicle. These materials should be removed by flushing the undercarriage regularly with water, especially horizontal surfaces, cavities, and other areas where mud and other deposits may collect.EXTERIOR AUTOMOTIVE PAINT FINISH
The exterior finish of your motorhome is fully or partially finished with the highest quality automotive paint and clearcoat.
Follow these precautions to keep the finish looking its best and preserve maximum gloss and durability.Parking
- Avoid parking under trees – When this happens you should rinse the bird droppings and tree sap off as soon as possible. Tree sap is a form of sugar and will dissolve after a couple of rinses. Bird droppings can eat into a painted surface if left unattended and need removed as soon as possible. Lukewarm soapy water can help speed up the cleaning process.
Avoid parking near salt spray – When this happens you need to rinse off the salt mineral residue to minimize the corrosiveness of the salt.
Avoid parking near factories with heavy smoke or industrial fallout – Industrial fallout can eat into your exterior finish when dew or rain mixes with it to create nitric or sulfuric acid that gets magnified by the intensity of the sun. As the water evaporates, the acid becomes more powerful and attacks the painted surface.
Rinsing and washing the surface helps remove the fallout and neutralize the acid. After the initial 60-day cure stage, a coat of wax or polish can help protect the surface from these types of contaminates. - Do not scrape ice or snow from the painted surface. Brush off gently with a soft-bristled snow brush – avoid being forceful with the brush.
If brush scratches show after the motorhome thaws out, it may be possible to remove them by hand waxing with a silicone-free liquid wax.
Avoid covering painted surface. When paint is covered (especially in outdoor conditions), water may appear between the cover and the motorhome due to rapid temperature fluctuations. The water may vaporize under certain conditions and migrate into the painted surface, possibly resulting in blisters and/or bubbles in the paint. These blisters/bubbles are not covered under warranty.
Covering your motorhome is at owner’s risk.
Driving
- Avoid driving on gravel roads.
Rinse off bugs and bird droppings with water daily.
Antifreeze, fuel, or windshield/window solution spilled on the painted surface should be rinsed off immediately with water and allowed to air dry. Wiping dry with a towel may create fine scratches due to the solvent nature of these types of fluids.
Fuel cannot be diluted and dissipated with water. It must be removed with a mineral spirit type cleaner (such as SEAFOAM Bugs-B-Gone, or equivalent) or a silicone-free spray wax and microfiber cloth to remove the stain left by fuels.
Ensure that all motorhome fluids (such as gas, oil, grease, antifreeze, transmission fluid, brake fluid, etc.) are completely wiped off of painted surfaces. Failure to comply may cause the paint to blister and/or peel.
NOTE: When driving in wintry conditions, the road surface may be covered with heavy salts or small rocks to improve traction.
These types of road conditions may cause surface damage to your motorhome. If possible, it is best to avoid these types of exposures. However, if you do use your motorhome under these types of conditions, you may want to consider, among other things, washing both the undercarriage and the body of your motorhome after exposure to these types of conditions.
Washing
Commercial vehicle wash facilities should be strictly avoided! They will scratch your motorhome!Truck-style wash centers have high-pressure wands that emit higher than necessary water pressures and the brushes are very aggressive.
Most truck wash brushes are made from a heavy plastic for durability and are under heavy pressure. They are designed to clean heavy road films on semi trailers and are often dirty. They are not designed for custom painted motorhome’s and they will scratch the clearcoat finish. Many times these scratches can penetrate the clearcoat finish, possibly causing delamination and/or other paint related issues that are not covered under warranty.- Wash your motorhome with cool or lukewarm water using a quality automotive detergent that does not contain bleach solution. Most auto stores offer car wash detailing soaps that are similar and do not have bleach in the formulation (such as Meguiars #62).
Never use a bristled brush or broom to wash the painted surface. This will cause scratches in the finish. Using a microfiber cloth, mitt, or mop is strongly recommended.
Be sure your cloth or applicator is clean. A dirty applicator can scratch your motorhome.
Washing Procedure
- Rinse area to be washed with cold water to remove surface residue. Ensure you are not in direct sunlight.
With area to be washed still wet from the rinse, use the recommended soapy mixture to clean the area. To avoid scratching painted surfaces, a microfiber cloth, mitt, or mop is strongly recommended to apply soapy water.
Rinse washed area before soap evaporates.
Dry the rinsed area before the water evaporates.
- Inspect all sealants, a minimum of every six months.
-
Read all Instructions for MAINTENANCE AND STORAGE User Manual
-
Winnebago Adventurer 2022 MISCELLANEOUS User Manual
-
MISCELLANEOUS
LOADING THE VEHICLE
NOTE: Your motorhome’s load capacity is designated by weight, not by volume, so you cannot necessarily use all available space when loading your motorhome.
- Store or secure all loose items inside the motorhome before traveling. Possible overlooked items such as canned goods or small appliances on the countertop, cooking pans on the range, or free-standing furniture items can become dangerous projectiles during a sudden stop or evasive maneuver.
Be aware of GVWR, GAWR, and individual load limit on each tire or set of duals. When loading the vehicle, distribute the cargo load equally so that you do not exceed either the Front or Rear Gross Axle Weight Rating (GAWR) or the Gross Vehicle Weight Rating (GVWR). The Gross Axle Weight Rating (GAWR) means the weight value specified by the chassis manufacturer as the load carrying capacity of a single axle system as measured at the tire-to-ground interfaces. This is the total weight a given axle is capable of carrying. Each axle has its own rating. - Have your vehicle weighed to determine the proper load distribution for your vehicle. Also distribute cargo side-to-side so the weight on each tire or dual set does not exceed one half of the GAWR for either axle.
For example, if the Front GAWR is 6,000 lbs., there should be no more than 3,000 lbs. on each tire. (If the left side weighs 3,100 lbs. and the right side weighs 2,700 lbs., at least 100 lbs. of the load must be shifted from the left side to the right side.) The GVWR is listed on the Vehicle Certification Label. (See sample in Section 1 – Introduction).
The GCWR (Gross Combination Weight Rating) means the maximum allowable loaded weight of this motorhome and any towed trailer or towed vehicle.
NOTE: We recommend that you dump all holding tanks before traveling to avoid carrying unnecessary weight.
WARNING
The weight of the loaded vehicle (including options, attachments, passengers, water, fuel, luggage, and all other cargo) must not exceed the GVWR or GAWR of either axle.WEIGHING YOUR LOADED VEHICLE
To check the weight of your fully loaded motorhome, locate a commercial weighing scale that is capable of weighing large trucks.
NOTE: Sales literature may give approximate or standard weights. Your actual motorhome weight may differ based on added factory and/or dealer options.Loading
Load your vehicle completely as if you were going on a long trip with everything you would carry, including food, clothing, bedding, lawn chairs, etc., a full fuel tank, full propane tank, and a partial tank of fresh water, but empty holding tanks. Remember, tongue weight must be included in the GVWR.Finding a Scale
In urban areas, the most common places to find a public access scale are commercial truck stops. In rural areas, most grain storage elevators have scales available. Most scales charge a nominal fee for weighing a vehicle.Weighing
There is typically a scale operator to direct you but the basic routine is to take three separate weights – front axle, whole vehicle, and rear axle. You will first drive only your front wheels onto the scale pad, then drive ahead so that the whole vehicle is on the scale, then finally pull off until just the rear wheels are on the pad.
Front GAWR (Front Axle Only)
GVWR – Whole Vehicle (All Axles)
Rear GAWR (Rear Axle Only)
You will receive a weight “ticket” that states your current Front Gross Axle Weight, Rear Gross Axle Weight, and Gross Vehicle Weight. You can compare these weights to the weight ratings listed on your Vehicle Certification Label to use as a guideline for future loading limits and weight distribution. The gross weight of the vehicle must not exceed the Gross Vehicle Weight Rating (GVWR) specified on the Vehicle Certification Label. The front and rear axle weight also should not exceed the corresponding Axle Weight Rating specified on the Vehicle Certification Label.
Corner Weighing (Side-to-Side)
The most accurate method of weighing a motorhome is to weigh each “corner” of the motorhome separately (single L/R front wheels or L/R rear dual sets.) This method will help you determine how to distribute your cargo to avoid overloading, especially on tires. To determine the weight distribution on each tire or dual set, you will need to find a scale capable weighing side-to-side, or all four “corners” of the vehicle, separately. A truck scale may be used if the ground is level with the scale surface and the scale has clearance to drive one side of the motorhome onto the scale as shown. Drive the motorhome on the level area next to the scale and straddle the scale so that only one side of the motorhome will be on the scale pad.
NOTE: Wind and precipitation can also cause weight inaccuracies. Pull only the right front wheel onto the scale pad as shown.
Weighing Right Front Corner
When the front wheel has been weighed, pull the motorhome straight ahead until only the right rear wheel/dual set is on the scale pad as shown.
Weighing Right Rear Corner
Now, turn the motorhome around and repeat the process for the other side. The load on each wheel or dual-wheel set should not exceed one-half of the corresponding GAWR. For example, if the GAWR for the rear axle is 12,000 lbs., then the load on each rear dual set (left rear duals or right rear duals) should not exceed 6,000 lbs. Tires must be filled to the recommended air pressure for the highest loaded tire set on that axle. For example, on the rear axle, if the left side weighs more than the right, fill the left tires to the pressure required for that weight, then fill the right tires to the same pressure as the left ones. If your actual weight is considerably less than GAWR, you may be able to lower your tire pressure. See a tire dealer for a load/pressure chart.
NOTE: The Hitch Load from a Towed Vehicle or carrier box must also be counted on the Rear GAWR and subtracted from the rear axle cargo capacity. Be aware that hitch load can affect handling characteristics. The more weight on the hitch, the lighter the front end will feel at the steering wheel.
CAR OR TRAILER TOWING
Hitch Capacity 5,000 lbs. max. Tongue Weight* 500 lbs. max
The factory installed towing hitch on this motorhome is capable of pulling 5,000 lbs. load (max.), however, the vertical (tongue) weight may vary according to chassis and model combinations (*see label on hitch). Towing capacity may be less than hitch rating. When towing a trailer or vehicle, do not exceed either the GVWR, the rear axle GAWR, or the chassis GCWR (the combined loaded weight of the motorhome and the towed vehicle). See preceding items “Loading the Vehicle” and “Weighing Your Loaded Vehicle” for explanation of weight ratings. Because of individual vehicle use and loading habits, we recommend weighing the vehicle while fully loaded to avoid exceeding any of the listed Gross Weight Ratings. See “Vehicle Certification Label” in the Introduction section for information on gross weight ratings. Towing will affect vehicle handling, durability, and fuel economy. Exceeding any of the listed Gross Weight Ratings will result in unacceptable overall vehicle performance. Maximum safety and satisfaction when towing depends on the proper use of correct equipment. When towing a vehicle behind your motorhome, the tow bar should be level or pointing slightly upward towards the tow vehicle.
When coupling the vehicle tow bar to the Factory Receiver Hitch using a “drop receiver” or a conventional “ball mount” (commonly referred to as a “stinger” or a “drawbar”), do not exceed a 4” drop, nor one that the centerline of the hitch pin to the centerline of the ball exceeds 8”. See the following Hitch Assembly illustration. - Store or secure all loose items inside the motorhome before traveling. Possible overlooked items such as canned goods or small appliances on the countertop, cooking pans on the range, or free-standing furniture items can become dangerous projectiles during a sudden stop or evasive maneuver.
- Read all Instructions for MISCELLANEOUS User Manual
Reference Link
Download link: https://www.winnebago.com/owners/owner-resources/manuals-and-diagrams/operator-manuals
Winnebago 2023 Top Accessories
[amalinkspro_table id=”32452″ new-window=”on” nofollow=”on” addtocart=”off” /]