Nissan ARMADA 2022 Precautions when starting and driving and Driving the vehicle
In the world of the 2022 Nissan Armada, getting from the ignition to your destination isn’t just a matter of hitting pedals and turning keys. It’s a balance of knowledge, responsibility, and safety. As the excitement of starting and driving this huge SUV begins, a symphony of safety measures play out. The Armada requires its drivers to be aware of the finer points of vehicle operation and the current weather. For example, they need to know how to properly fasten their seats and let the engine warm up. Every move in the cockpit is responsible, whether it’s dealing with bad weather or setting the cruise control. The electronic parking brake acts as a watchful guardian and the Traffic Sign Recognition system as a compass. We will go on a journey to understand the ins and outs of these safety measures, showing how important they are for promoting safe, responsible, and well-informed driving in the 2022 Armada, where every mile is a test of hard work and being ready for the open road.
2023 Nissan Armada Specs, Price, Features and Mileage (Brochure)
Precautions when starting and driving
WARNING
- Do not leave children or adults who would normally require the support of others alone in your vehicle. Pets should not be left alone either. They could accidentally injure themselves or others through inadvertent operation of the vehicle. Also, on hot, sunny days, temperatures in a closed vehicle could quickly become high enough to cause severe or possibly fatal injuries to people or animals.
- Properly secure all cargo to help prevent it from sliding or shifting. Do not place cargo higher than the seatbacks. In a sudden stop or collision, unsecured cargo could cause personal injury.
EXHAUST GAS (carbon monoxide)
WARNING
- Do not breathe exhaust gases; they contain colourless and odour-less carbon monoxide. Carbon monoxide is dangerous. It can cause unconsciousness or death.
- If you suspect that exhaust fumes are entering the vehicle, drive with all windows fully open, and have the vehicle inspected immediately.
- Do not run the engine in closed
spaces such as a garage. - Do not park the vehicle with the engine running for any extended length of time.
- Keep the liftgate closed while driving, otherwise exhaust gases could be drawn into the passenger compartment. If you must drive with the liftgate open, follow these precautions:
- Open all the windows.
- Set the air recirculation to off and the fan control to high to circulate the air.
- If electrical wiring or other cable connections must pass to a trailer through the seal on the liftgate or the body, follow the manufacturer’s recommendation to pre-vent carbon monoxide entry into the vehicle.
- The exhaust system and body should be inspected by a qualified mechanic whenever:
- The vehicle is raised for service.
- You suspect that exhaust fumes are entering into the passenger compartment.
- You notice a change in the sound of the exhaust system.
- You have had an accident involving damage to the exhaust system, underbody, or rear of the vehicle.
THREE-WAY CATALYST
The three-way catalyst is an emission control device installed in the exhaust system. Exhaust gases in the three-way catalyst are burned at high temperatures to help reduce pollutants.
WARNING
- The exhaust gas and the exhaust system are very hot. Keep people, animals or flammable materials away from the exhaust system components.
- Do not stop or park the vehicle over flammable materials such as dry grass, waste paper or rags. They may ignite and cause a fire.
CAUTION
- Do not use leaded gasoline. Deposits from leaded gasoline seriously reduce the three-way catalyst’s ability to help reduce exhaust pollutants.
- Keep your engine tuned up. Malfunctions in the ignition, fuel injection, or electrical systems can cause over-rich fuel flow into the three-way catalyst, causing it to overheat. Do not keep driving if the engine misfires, or if a noticeable loss of performance or other unusual operating conditions are detected. Have the vehicle inspected? It is recommended you visit a NISSAN dealer for this service.
- Avoid driving with an extremely low fuel level. Running out of fuel could cause the engine to misfire, damaging the three-way catalyst.
- Do not race the engine while warming it up.
- Do not push or tow your vehicle to start the engine.
TIRE PRESSURE MONITORING SYSTEM (TPMS)
Each tire, including the spare (if provided), should be checked monthly when cold and inflated to the inflation pressure recommended by the vehicle manufacturer on the vehicle placard or tire inflation pressure label. (If your vehicle has tires of a different size than the size indicated on the vehicle placard or tire inflation pressure label, you should determine the proper tire inflation pressure for those tires.)
As an added safety feature, your vehicle has been equipped with a Tire Pressure Monitoring System (TPMS) that illuminates a low tire pressure telltale when one or more of your tires is significantly under-inflated. Accordingly, when the low tire pressure telltale illuminates, you should stop and check your tires as soon as possible, and inflate them to the proper pressure. Driving on a significantly under-inflated tire causes the tire to overheat and can lead to tire failure. Underinflation also reduces fuel efficiency and tire tread life, and may affect the vehicle’s handling and stopping ability.
Please note that the TPMS is not a substitute for proper tire maintenance, and it is the driver’s responsibility to maintain correct tire pressure, even if under-inflation has not reached the level to trigger illumination of the TPMS low tire pressure telltale.
Your vehicle has also been equipped with a TPMS malfunction indicator to indicate when the system is not operating properly. The TPMS malfunction indicator is combined with the low tire pressure tell-tale. When the system detects a malfunction, the telltale will flash for approximately one minute and then re-main continuously illuminated. This sequence will continue upon subsequent vehicle start-ups as long as the malfunction exists. When the malfunction indicator is illuminated, the system may not be able to detect or signal low tire pressure as intended. TPMS malfunctions may occur for a variety of reasons, including the installation of replacement or alternate tires or wheels on the vehicle that prevent the TPMS from functioning properly. Always check the TPMS malfunction telltale after replacing one or more tires or wheels on your vehicle to ensure that the replacement or alternate tires and wheels allow the TPMS to continue to function properly.
Additional information
- Since the spare tire is not equipped with the TPMS, the TPMS does not monitor the tire pressure of the spare tire.
- The TPMS will activate only when the vehicle is driven at speeds above 16 MPH (25 km/h). Also, this system may not detect a sudden drop in tire pressure (for example, a flat tire while driving).
- The low tire pressure warning light does not automatically turn off when the tire pressure is adjusted. After the tire is inflated to the recommended pressure, the vehicle must be driven at speeds above 16 MPH (25 km/h) to activate the TPMS and turn off the low tire pressure warning light. Use a tire pressure gauge to check the tire pressure.
- The “Tire Pressure Low Add Air” warning appears in the vehicle information display when the low tire pressure warning light is illuminated and low tire pressure is detected. The “Tire Pressure Low Add Air” warning turns off when the low tire pressure warning light turns off.
The “Tire Pressure Low Add Air” warning appears each time the ignition switch is placed in the ON position as long as the low tire pressure warning light remains illuminated.
The “Tire Pressure Low Add Air” warning does not appear if the low tire pressure warning light illuminates to indicate a TPMS malfunction. - Tire pressure rises and falls depending on the heat caused by the vehicle’s operation and the outside temperature. Do not reduce the tire pressure after driving because the tire pressure rises after driving. Low outside temperature can lower the temperature of the air inside the tire which can cause a lower tire inflation pressure. This may cause the low tire pressure warning light to illuminate. If the warning light illuminates in low ambient temperature, check the tire pres-sure for all four tires.
- You can also check the pressure of all tires (except the spare tire) on the vehicle information display.
WARNING
- If the low tire pressure warning light illuminates or Low-Pressure information is displayed on the monitor screen while driving, avoid sudden steering maneuvers or abrupt braking, reduce vehicle speed, pull off the road to a safe location and stop the vehicle as soon as possible. Driving with under-inflated tires may permanently damage the tires and increase the likelihood of tire failure. Serious vehicle damage could occur and may lead to an accident and could result in serious personal injury. Check the tire pressure for all four tires. Adjust the tire pressure to the recommended COLD tire pressure shown on the Tire and Loading Information label to turn the low tire pressure warning light OFF. If the light still illuminates while driving after adjusting the tire pressure, a tire may be flat or the TPMS may be malfunctioning. If you have a flat tire, replace it with a spare tire as soon as possible. If no tire is flat and all tires are properly inflated, it is recommended you consult a NISSAN dealer.
- Since the spare tire is not equipped with the TPMS, when a spare tire is mounted or a wheel is replaced, the TPMS will not function and the low tire pressure warning light will flash for approximately 1 minute. The light will remain on after 1 minute. Have your tires replaced and/or TPMS system reset as soon as possible. It is recommended you visit a NISSAN dealer for these services.
- Replacing tires with those not originally specified by NISSAN could affect the proper operation of the TPMS.
- Do not inject any tire liquid or aerosol tire sealant into the tires, as this may cause a malfunction of the tire pressure sensors.
CAUTION
- The TPMS may not function properly when the wheels are equipped with tire chains or the wheels are buried in snow.
- Do not place metalized film or any metal parts (antenna, etc.) on the windows. This may cause poor reception of the signals from the tire pressure sensors, and the TPMS will not function properly.
Some devices and transmitters may temporarily interfere with the operation of the TPMS and cause the low tire pressure warning light to illuminate. Some examples are:
- Facilities or electric devices using similar radio frequencies are near the vehicle.
- If a transmitter set to similar frequencies is being used in or near the vehicle.
- If a computer (or similar equipment) or a DC/AC converter is being used in or near the vehicle.
- Low tire pressure warning lights may illuminate in the following cases.
- If the vehicle is equipped with a wheel and tire without TPMS.
- If the TPMS has been replaced and the ID has not been registered.
- If the wheel is not originally specified
FCC Notice:
For the USA:
This device complies with Part 15 of the FCC Rules. Operation is subject to the following two conditions: (1) This device may not cause harmful interference, and (2) this device must accept any interference received, including interference that may cause undesired operation.
Note: Changes or modifications not expressly approved by the party responsible for compliance could void the user’s authority to operate the equipment.
For Canada:
This device complies with Industry Canada licence-exempt RSS standard(s). Operation is subject to the following two conditions: (1) this device may not cause interference, and (2) this device must accept any interference, including interference that may cause undesired operation of the device.
TPMS with Easy Fill Tire Alert
When adding air to an under-inflated tire, the TPMS with Easy Fill Tire Alert provides visual and audible signals outside the vehicle to help you inflate the tires to the recommended COLD tire pressure.
Vehicle set-up:
-
Park the vehicle in a safe and level place.
-
Apply the parking brake and place the shift lever in the P (Park) position.
- Place the ignition switch in the ON position. Do not start the engine
Operation:
- Add air to the tire.
- After a few seconds, the hazard indicators will start flashing.
- When the designated pressure is reached, the horn beeps once and the hazard indicators stop flashing.
- Perform the above steps for each tire.
- If the tire is over-inflated by more than approximately 4 psi (30 kPa), the horn beeps and the hazard indicators flash 3 times. To correct the pressure, push the core of the valve stem on the tire briefly to release pressure. When the pressure reaches the designated pressure, the horn beeps once.
- If the hazard indicator does not flash within approximately 15 seconds after starting to inflate the tire, it indicates that the TPMS with Easy Fill Tire Alert is not operating.
- The TPMS will not activate the Easy Fill Tire Alert under the following conditions:
- If there is interference from an external device or transmitter
- The air pressure from the inflation device such as those using a power socket is not sufficient to inflate the tire
- If electrical equipment is being used in or near the vehicle
- There is a malfunction in the TPMS system
- There is a malfunction in the horn or hazard indicators
- If the TPMS with Easy Fill Tire Alert does not operate due to TPMS interference, move the vehicle about 3 ft (1m) backward or forward and try again.
If the TPMS with Easy Fill Tire Alert is not working, use a tire pressure gauge.
AVOIDING COLLISION AND ROLL-OVER
WARNING
Failure to operate this vehicle in a safe and prudent manner may result in loss of control or an accident.
Be alert and drive defensively at all times. Obey all traffic regulations. Avoid excessive speed, high-speed cornering, or sudden steering maneuvers, because these driving practices could cause you to lose control of your vehicle. As with any vehicle, a loss of control could result in a collision with other vehicles or objects, or cause the vehicle to roll over, particularly if the loss of control causes the vehicle to slide sideways. Be attentive at all times, and avoid driving when tired. Never drive when under the influence of alcohol or drugs (including prescription or over-the-counter drugs which may cause drowsiness).
Seat belts help reduce the risk of injury in collisions and rollovers. In a rollover crash, an unbelted or improperly belted person is significantly more likely to be injured or killed than a person properly wearing a seat belt.
ON-PAVEMENT AND OFF-ROAD DRIVING PRECAUTIONS
Utility vehicles have a significantly higher rollover rate than other types of vehicles.
They have higher ground clearance than passenger cars making them capable of performing in a variety of on-pavement and off-road applications. This gives them a higher center of gravity than ordinary cars. An advantage of higher ground clearance is a better view of the road, allowing you to anticipate problems. However, they are not designed for cornering at the same speeds as conventional passenger cars any more than low-slung sports cars are designed to perform satisfactorily under off-road conditions. If at all possible, avoid sharp turns or abrupt maneuvers, particularly at high speeds. As with other vehicles of this type, failure to operate this vehicle correctly may result in loss of control or vehicle rollover. Seat belts help reduce the risk of injury in collisions and rollovers. In a rollover crash, an unbelted or improperly belted person is significantly more likely to be injured or killed than a person properly wearing a seat belt.
2023 Nissan Armada Specs, Price, Features and Mileage (Brochure)
OFF-ROAD RECOVERY
While driving, the right side or left side wheels may unintentionally leave the road surface. If this occurs, maintain control of the vehicle by following the procedure below. Please note that this procedure is only a general guide. The vehicle must be driven as appropriate based on the conditions of the vehicle, road, and traffic.
- Remain calm and do not overreact.
- Do not apply the brakes.
- Maintain a firm grip on the steering wheel with both hands and try to hold a straight course.
- When appropriate, slowly release the accelerator pedal to gradually slow the vehicle.
- If there is nothing in the way, steer the vehicle to follow the road while the vehicle speed is reduced. Do not attempt to drive the vehicle back onto the road surface until vehicle speed is reduced.
- When it is safe to do so, gradually turn the steering wheel until both tires return to the road surface. When all tires are on the road surface, steer the vehicle to stay in the appropriate driving lane.
- If you decide that it is not safe to return the vehicle to the road surface based on vehicle, road or traffic conditions, gradually slow the vehicle to a stop in a safe place off the road.
RAPID AIR PRESSURE LOSS
Rapid air pressure loss or a “blow-out” can occur if the tire is punctured or is damaged due to hitting a curb or pothole. Rapid air pressure loss can also be caused by driving on under-inflated tires.
Rapid air pressure loss can affect the handling and stability of the vehicle, especially at highway speeds.
Help prevent rapid air pressure loss by maintaining the correct air pressure and visually inspecting the tires for wear and damage.
If a tire rapidly loses air pressure or “blows out” while driving maintain control of the vehicle by following the procedure below. Please note that this procedure is only a general guide. The vehicle must be driven as appropriate based on the conditions of the vehicle, road and traffic.
WARNING
The following actions can increase the chance of losing control of the vehicle if there is a sudden loss of tire air pressure. Losing control of the vehicle may cause a collision and result in personal injury.
- The vehicle generally moves or pulls in the direction of the flat tire.
- Do not rapidly apply the brakes. . Do not rapidly release the accelerator pedal.
- Do not rapidly turn the steering wheel
- Remain calm and do not overreact.
- Maintain a firm grip on the steering wheel with both hands and try to hold a straight course.
- When appropriate, slowly release the accelerator pedal to gradually slow the vehicle.
- Gradually steer the vehicle to a safe location off the road and away from traffic if possible.
- Lightly apply the brake pedal to gradually stop the vehicle.
- Turn on the hazard warning flashers and either contact a roadside emergency service to change the tire.
ABOUT LOWERING OF THE REAR OF THE VEHICLE
If the loaded vehicle is not moved for a long time, the vehicle’s rear body may be to lower. But it is normal. Once the engine starts, It will automatically adjust vehicle height.
DRINKING ALCOHOL/DRUGS AND DRIVING
WARNING
Never drive under the influence of alcohol or drugs. Alcohol in the bloodstream reduces coordination, delays reaction time and impairs judgement. Driving after drinking alcohol increases the likelihood of being involved in an accident and injuring yourself and others. Additionally, if you are injured in an accident, alcohol can increase the severity of the injury.
NISSAN is committed to safe driving. However, you must choose not to drive under the influence of alcohol. Every year thousands of people are injured or killed in alcohol-related accidents. Although the local laws vary on what is considered to be legally intoxicated, the fact is that alcohol affects all people differently and most people underestimate the effects of alcohol.
Remember, drinking and driving don’t mix! And that is true for drugs, too (over-the-counter, prescription, and illegal drugs). Don’t drive if your ability to operate your vehicle is impaired by alcohol, drugs, or some other physical condition.
DRIVING SAFETY PRECAUTIONS
Your NISSAN is designed for both normal and off-road use. However, avoid driving in deep water or mud as your NISSAN is mainly designed for leisure use, unlike a conventional off-road vehicle. Remember that Two-Wheel Drive (2WD) models are less capable than Four-Wheel Drive (4WD) models for rough road driving and extrication when stuck in deep snow, mud, or the like.
Please observe the following precautions:
WARNING
- Drive carefully when off the road and avoid dangerous areas. Every person who drives or rides in this vehicle should be seated with their seat belt fastened. This will keep you and your passengers in position when driving over rough terrain.
- Do not drive across steep slopes. Instead drive either straight up or straight down the slopes. Off-road vehicles can tip over side-ways much more easily than they can forward or backward.
- Many hills are too steep for any vehicle. If you drive up them, you may stall. If you drive down them, you may not be able to control your speed. If you drive across them, you may roll over.
- Do not shift ranges while driving on downhill grades as this could cause loss of control of the vehicle.
- Stay alert when driving to the top of a hill. At the top there could be a drop-off or other hazard that could cause an accident.
- If your engine stalls or you cannot make it to the top of a steep hill, never attempt to turn around. Your vehicle could tip or roll over. Always back straight down in R (Reverse) range. Never back down in N (Neutral), using only the brake, as this could cause loss of control.
- Heavy braking going down a hill could cause your brakes to over-heat and fade, resulting in loss of control and an accident. Apply brakes lightly and use a low range to control your speed.
- Unsecured cargo can be thrown around when driving over rough terrain. Properly secure all cargo so it will not be thrown forward and cause injury to you or your passengers.
- To avoid raising the center of gravity excessively, do not exceed the rated capacity of the roof rack (if so equipped) and evenly dis-tribute the load. Secure heavy loads in the cargo area as far forward and as low as possible. Do not equip the vehicle with tires larger than specified in this man-ual. This could cause your vehicle to roll over.
- Do not grip the inside or spokes of the steering wheel when driving off-road. The steering wheel could move suddenly and injure your hands. Instead drive with your fingers and thumbs on the outside of the rim.
- Before operating the vehicle, ensure that the driver and all passengers have their seat belts fastened.
- Always drive with the floor mats in place as the floor may became hot.
- Lower your speed when encountering strong crosswinds. With a higher center of gravity, your NISSAN is more affected by strong side winds. Slower speeds ensure better vehicle control.
- Do not drive beyond the performance capability of the tires, even with 4WD engaged.
- For 4WD-equipped vehicles, do not attempt to raise two wheels off the ground and shift the transmission to any drive or re-verse position with the engine running. Doing so may result in drivetrain damage or unexpected vehicle movement which could result in serious vehicle damage or personal injury.
- Do not attempt to test a 4WD-equipped vehicle on a 2-wheel dynamometer (such as the dynamometers used by some states for emissions testing), or similar equipment even if the other two wheels are raised off the ground. Make sure you inform test facility personnel that your vehicle is equipped with 4WD before it is placed on a dynamometer. Using the wrong test equipment may result in drive-train damage or unexpected vehicle movement which could result in serious vehicle damage or personal injury (4WD models).
- When a wheel is off the ground due to an unlevel surface, do not spin the wheel excessively.
- Accelerating quickly, sharp steering manoeuvres or sudden braking may cause loss of control.
- If at all possible, avoid sharp turning manoeuvres, particularly at high speeds. Your vehicle has a higher centre of gravity than a conventional passenger car. The vehicle is not designed for cornering at the same speeds as conventional passenger cars. Failure to operate this vehicle correctly could result in loss of control and/or a rollover accident.
- Always use tires of the same type, size, brand, construction (bias, bias-belted or radial), and tread pattern on all four wheels. Install tire chains on the rear wheels when driving on slippery roads and drive carefully.
- Be sure to check the brakes immediately after driving in mud or water.
- Avoid parking your vehicle on steep hills. If you get out of the vehicle and it rolls forward, backwards or sideways, you could be injured.
- Whenever you drive off-road through sand, mud or water as deep as the wheel hub, more frequent maintenance may be required. See the maintenance schedule shown in the “9. Maintenance and schedules” section.
- Spinning the rear wheels on slippery surfaces may cause the 4WD warning light to flash. The 4WD system may also automatically switch from the 4WD mode to the 2WD mode. This could reduce traction. Be especially careful when towing a trailer (4WD models).
PUSH-BUTTON IGNITION SWITCH
WARNING
Do not operate the push-button ignition switch while driving the vehicle except in an emergency. (The engine will stop when the ignition switch is pushed 3 consecutive times or the ignition switch is pushed and held for more than 2 seconds.) If the engine stops while the vehicle is being driven, this could lead to a crash and serious injury.
Before operating the push-button ignition switch, be sure to move the shift lever to the P (Park) position.
OPERATING RANGE FOR ENGINE
START FUNCTION
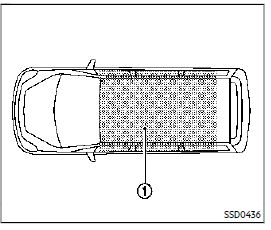
The operating range for starting the engine inside the vehicle is shown in the illustration.
If the Intelligent Key is on the instrument panel, cargo area, inside the glove box or door pocket, or the corner of interior compartment, it may not be possible to start the engine.
- If the Intelligent Key is near the door or door glass outside the vehicle, it may be possible to start the engine.
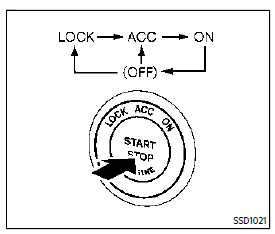
When the ignition switch is pushed with-out depressing the brake pedal, the ignition switch position will change as follows:
- Push center once to change to ACC.
- Push center two times to change to ON.
- Push center three times to change to FF. (No position illuminates.)
- Push center four times to return to ACC.
- Open or close any door to return to LOCK during the OFF position.
The ignition lock is designed so that the ignition switch position cannot be switched to LOCK until the shift lever is moved to the P (Park) position.
When the ignition switch cannot be pushed toward the LOCK position, proceed as follows:
- Move the shift lever into the P (Park) position.
- Push the ignition switch to the OFF position. The ignition switch position indicator will not illuminate.
- Open the door. The ignition switch will change to the LOCK position.
The shift lever can be moved from the P (Park) position if the ignition switch is in the ON position and the brake pedal is depressed.
If the battery of the vehicle is dis-charged, the push-button ignition switch cannot be turned from the LOCK position.
Some indicators and warnings for operation are displayed on the vehicle information display between the speedometer and tachometer.
PUSH-BUTTON IGNITION SWITCH POSITIONS
LOCK (Normal parking position)
The ignition switch can only be locked in this position.
The ignition switch will be unlocked when it is pushed to the ACC position while carrying the Intelligent Key.
ACC (Accessories)
This position activates electrical accessories such as the radio, when the engine is not running.
ACC has a battery saver feature that will turn the ignition switch to the OFF position after a period of time under the following conditions:
- all doors are closed.
- shift lever is in P (Park).
- turn signal/hazard indicator lights are not flashing.
The battery saver feature will be cancelled if any of the following occur:
- any door is opened.
- shift lever is moved out of P (Park).
- ignition switch changes position.
ON (Normal operating position)
This position turns on the ignition system and electrical accessories.
ON has a battery saver feature that will turn the ignition switch to the OFF position, if the vehicle is not running, after some time under the following conditions:
- all doors are closed.
- shift lever is in P (Park).
- turn signal/hazard indicator lights are not flashing.
The battery saver feature will be cancelled if any of the following occur:
- any door is opened.
- shift lever is moved out of P (Park). ignition switch changes position.
OFF
The engine can be turned off in the position.
The ignition lock is designed so that the ignition switch cannot be switched to the LOCK position until the shift lever is moved to the P (Park) position.
CAUTION
Do not leave the vehicle with the push-button ignition switch in ACC or ON positions when the engine is not running for an extended period. This can discharge the battery.
ACC (Accessories) delay timer function
When the ignition switch is placed in the OFF position, the ACC (Accessories) delay timer function is activated. This function keeps the power supply to the electrical accessories for up to 10 minutes. When the driver’s door is opened, this function is canceled and the electrical power supply is stopped. The ACC (Accessories) delay time function can be enabled or disabled.
EMERGENCY ENGINE SHUT OFF
To shut off the engine in an emergency situation while driving, perform the following procedure:
- Rapidly push the push-button ignition switch 3 consecutive times in less than 1.5 seconds, or
- Push and hold the push-button ignition switch for more than 2 seconds.
INTELLIGENT KEY BATTERY DIS- CHARGE
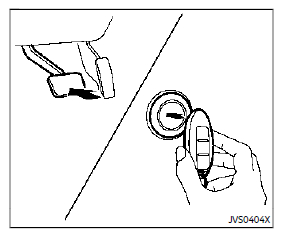
If the battery of the Intelligent Key is discharged, or environmental conditions interfere with the Intelligent Key operation, start the engine according to the following procedure:
- Move the shift lever to the P (Park) position.
- Firmly apply the foot brake.
- Touch the ignition switch with the Intelligent Key as illustrated. (A chime will sound.)
- Push the ignition switch while depressing the brake pedal within 10 seconds after the chime sounds. The engine will start.
After step 3 is performed, when the ignition switch is pushed without depressing the brake pedal, the ignition switch position will change to ACC.
NOTE:
- When the ignition switch is pushed to the ACC or ON position or the engine is started by the above procedures, the Key Battery Low message appears on the vehicle information display even if the Intelligent Key is inside the vehicle. This is not a malfunction. To turn off the Intelligent Key battery discharge indicator, touch the ignition switch with the Intelligent Key again.
- If the Key Battery Low message appears, replace the battery as soon as possible.
BEFORE STARTING THE ENGINE
- Make sure the area around the vehicle is clear.
- Check fluid levels such as engine oil, coolant, brake fluid and window washer fluid as frequently as possible, or at least whenever you refuel.
- Check that all windows and lights are clean.
- Visually inspect tires for their appearance and condition. Also check tires for proper inflation.
- Lock all doors.
- Position seat and adjust head restraints/headrests.
- Adjust inside and outside mirrors.
- Fasten seat belts and ask all passengers to do likewise.
- Check the operation of warning lights when the ignition switch is pushed to the ON position.
STARTING THE ENGINE
- Apply the parking brake.
- Move the shift lever to the P (Park) or N (Neutral) position. (P is recommended.) The starter is designed not to operate unless the shift lever is in either of the above positions.
- Push the ignition switch to the ON position. Firmly depress the brake pedal and push the ignition switch to start the engine.
To start the engine immediately, push and release the ignition switch while depressing the brake pedal with the ignition switch in any position.- If the engine is very hard to start in extremely cold weather or when restarting, depress the accelerator pedal a little (approximately 1/3 to the floor) and while holding, crank the engine. Release the accelerator pedal when the engine starts.
- If the engine is very hard to start because it is flooded, depress the accelerator pedal all the way to the floor and hold it. Push the ignition switch to the ON position to start cranking the engine. After 5 or 6 seconds, stop cranking by pushing the ignition switch to OFF. After cranking the engine, release the accelerator pedal. Crank the engine with your foot off the accelerator pedal by depressing the brake pedal and pushing the push-button ignition switch to start the engine. If the engine starts, but fails to run, repeat the above procedure.
CAUTION
Do not operate the starter for more than 15 seconds at a time. If the engine does not start, push the ignition switch to OFF and wait 10 seconds before cranking again, otherwise the starter could be damaged.
- Warm-up
Allow the engine to idle for at least 30 seconds after starting. Do not race the engine while warming it up. Drive at moderate speed for a short distance first, especially in cold weather. In cold weather, keep the engine running for a minimum of 2 – 3 minutes before shutting it off. Starting and stopping the engine over a short period of time may make the vehicle more difficult to start.
When racing the engine up to 4,000 rpm or more under the no load condition, the engine will enter the fuel cut mode. - To stop the engine, shift the shift lever to the P (Park) position and push the ignition switch to the OFF position.
In preparation for the next engine start, the engine may have a slightly delayed shutoff after placing the ignition switch in the OFF position, depending on the driving conditions.
NOTE:
Care should be taken to avoid situations that can lead to potential battery dis-charge and potential no-start conditions such as:
- Installation or extended use of electronic accessories that consume battery power when the engine is not running (Phone chargers, GPS, DVD players, etc.)
- Vehicle is not driven regularly and/or only driven short distances.
In these cases, the battery may need to be charged to maintain battery health.
REMOTE ENGINE START (if so equipped)
Vehicles started with the remote engine start function require the ignition switch to be placed in the ON position before the shift lever can be moved from the P (Park) position. To place the ignition switch in In these cases, the battery may need to be charged to maintain battery health.
- Make sure that the Intelligent Key is on you.
- Firmly depress the brake pedal.
- Push the ignition switch once to the ON position.
DRIVING THE VEHICLE ENGINE PROTECTION MODE
The engine has an engine protection mode to reduce the chance of damage if the coolant temperature becomes too high (for example, when climbing steep grades in high temperature with heavy loads, such as when towing a trailer).
When the engine temperature reaches a certain level:
- The engine coolant temperature gauge will move toward the H position.
- Engine power may be reduced.
- The air conditioning cooling function may be automatically turned OFF for a short time (the blower will continue to operate).
Engine power and, under some conditions, vehicle speed will decrease. Vehicle speed can be controlled with the accelerator pedal, but the vehicle may not accelerate at the desired speed. The transmission will downshift or upshift as it reaches prescribed shift points. You can also shift manually.
As driving conditions change and engine coolant temperature is reduced, vehicle speed can be increased using the accelerator pedal, and air conditioning cooling function will automatically be turned back ON.
- The engine coolant temperature is not reduced.
- The air conditioning cooling function does not turn back ON.
- The engine oil pressure warning light illuminates or engine coolant temperature gauge does not return to the normal range from the H position, this may indicate a malfunction. Move the vehicle off the road to a safe area and allow the engine to cool. If after checking the oil and coolant, the remains on or engine coolant temperature does not return to the normal range, do not continue to drive. It is recommended you contact a NISSAN dealer.
illuminates or engine coolant temperature gauge does not return to the normal range from the H position, this may indicate a malfunction. Move the vehicle off the road to a safe area and allow the engine to cool. If after checking the oil and coolant, the remains on or engine coolant temperature does not return to the normal range, do not continue to drive. It is recommended you contact a NISSAN dealer.
WARNING
Overheating can result in reduced engine power and vehicle speed. The reduced speed may be lower than other traffic, which could increase the chance of a collision. Be especially careful when driving. If the vehicle cannot maintain a safe driving speed, pull to the side of the road in a safe area. Allow the engine to cool and return to normal operation.
CAUTION
Running the engine with the engine oil pressure warning light on could cause serious damage to the engine almost immediately. Such damage is not covered by warranty. Turn off the engine as soon as it is safe to do so.
2023 Nissan Armada Specs, Price, Features and Mileage (Brochure)
AUTOMATIC TRANSMISSION
7 speed automatic transmission
The automatic transmission in your vehicle is electronically controlled by a transmission control module to produce maximum efficiency and smooth operation.
Shown on the following pages are the recommended operating procedures for this transmission. Follow these procedures for maximum vehicle performance and driving enjoyment.
Starting the vehicle
After starting the engine, fully depress the foot brake pedal and push the shift lever button before shifting the shift lever to the R (Reverse), N (Neutral), D (Drive) or Manual shift mode position. Be sure the vehicle is fully stopped before attempting to shift the shift lever.
This automatic transmission model is designed so that the foot brake pedal must be depressed before shifting from P (Park) to any drive position while the ignition switch position is ON.
The shift lever cannot be moved out of the P (Park) position and into any of the other gear positions if the ignition switch is pushed to the LOCK, OFF or ACC position.
- Keep the foot brake pedal depressed and push the shift lever button to shift into a driving gear.
- Release the parking brake and foot brake, then gradually start the vehicle in motion.
WARNING
- Do not depress the accelerator pedal while shifting from P (Park) or N (Neutral) to R (Reverse), D (Drive) or manual shift mode. Always depress the brake pedal until shifting is completed. Failure to do so could cause you to lose control and have an accident.
- Cold engine idle speed is high, so use caution when shifting into a forward or reverse gear before the engine has warmed up.
- Never shift to either the P (Park) or R (Reverse) position while the vehicle is moving forward and P (Park), D (Drive) position or manual shift mode while the vehicle is moving rearward. This could cause an accident or damage the transmission.
- Do not downshift abruptly on slippery roads. This may cause a loss of control.
CAUTION
- Except in an emergency, do not shift to the N (Neutral) position while driving. Coasting with the transmission in the N (Neutral) position may cause serious da-mage to the transmission.
- To avoid possible damage to your vehicle; when stopping the vehicle on an uphill grade, do not hold the vehicle by depressing the accelerator pedal. The foot brake should be used for this purpose.
To move the shift lever,
- Push the button while depressing the brake pedal,
- Push the button,
- Just move the shift lever.
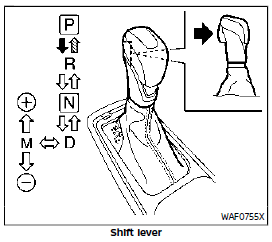
Shifting
The shift lever position indicator light (next to the shift lever) will be illuminated for approximately 30 minutes after the ignition switch is turned off. The indicator light may also illuminate when the vehicle receives radio waves. This is not a malfunction.
After starting the engine, fully depress the brake pedal and shift the shift lever from P (Park) to R (Reverse), N (Neutral), D (Drive) or Manual shift mode position.
Push the button to shift into P (Park) or R (Reverse). All other positions can be selected without pushing the button.
WARNING
Apply the parking brake if the shift lever is in any position while the engine is not running. Failure to do so could cause the vehicle to move unexpectedly or roll away and result in serious personal injury or property damage.
CAUTION
Make sure the vehicle is completely stopped and the transmission is in the P (Park) position.
P (Park) position:
Use this position when the vehicle is parked or when starting the engine. Make sure the vehicle is completely stopped. The brake pedal must be depressed and the shift lever button pushed in to move the shift lever from the N (Neutral) position or any drive position to the P (Park) position. Apply the parking brake. When parking on a hill, apply the parking brake first, then move the shift lever to the P (Park) position.
CAUTION
Use this position only when the vehicle is completely stopped.
R (Reverse):
Use this position to back up. Always be sure the vehicle is completely stopped before selecting the R (Reverse) position. The brake pedal must be depressed and the shift lever button pushed in to move the shift lever from the P (Park) position, the N (Neutral) position or any drive position to the R (Reverse) position.
N (Neutral):
Neither forward nor reverse gear is engaged. The engine can be started in this position. You may shift to the N (Neutral) position and restart a stalled engine while the vehicle is moving.
D (Drive):
Use this position for all normal forward driving.
Manual shift mode
When the shift lever is in the manual shift gate, the transmission is ready for the manual shift mode. Shift ranges can be selected manually by moving the shift lever up or down.
When shifting up, move the shift lever to the + (up) side. The transmission shifts to the higher range.
When shifting down, move the shift lever to the − (down) side. The transmission shifts to the lower range.
When cancelling the manual shift mode, return the shift lever to the D (Drive) position. The transmission returns to the normal driving mode.
In the manual shift mode, the shift range is displayed on the position indicator in the meter.
Shift ranges up or down one by one as follows:
M7 (7th):
Use this position for all normal forward driving at highway speeds.
M6 (6th) and M5 (5th):
Use these positions when driving up long slopes, or for engine braking when driving down long slopes.
M4 (4th), M3 (3rd) and M2 (2nd):
Use these positions for hill climbing or engine braking on downhill grades.
M1 (1st):
Use this position when climbing steep hills slowly or driving slowly through deep snow, or for maximum engine braking on steep downhill grades.
- Remember not to drive at high speeds for extended periods of time in lower than 7th gear. This reduces fuel economy.
- Moving the shift lever rapidly to the same side twice will shift the ranges in succession.
- In the manual shift mode, the transmission may not shift to the selected gear or may automatically shift to the other gear. This helps maintain driving performance and reduces the chance of vehicle damage or loss of control.
- When the transmission does not shift to the selected gear, the Automatic Transmission (AT) position indicator light (in the vehicle information display) will blink and the buzzer will sound.
- In the manual shift mode, the transmission automatically shifts down to 1st gear before the vehicle comes to a stop. When accelerating again, it is necessary to shift up to the desired range.
Accelerator downshift — In D (Drive) position —
For passing or hill climbing, fully depress the accelerator pedal to the floor. This shifts the transmission down into the lower gear, depending on the vehicle speed.
Fail-safe
When the fail-safe operation occurs, note that the transmission will be locked in any of the forward gears according to the condition.
If the vehicle is driven under extreme conditions, such as excessive wheel spinning and subsequent hard braking, the fail-safe system may be activated. This will occur even if all electrical circuits are functioning properly. In this case, push the switch to the OFF position and wait for 3 seconds. Then push the ignition switch back to the ON position. The vehicle should return to its normal operating condition. If it does not return to its normal operating condition, have the transmission checked and repaired, if necessary. It is recommended you visit a NISSAN dealer for this service.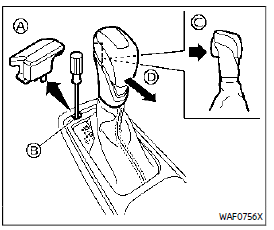
Shift lock release
If the battery charge is low or discharged, the shift lever may not be moved from the P (Park) position even with the brake pedal depressed and the shift lever but-ton pushed.
To move the shift lever, perform the following procedure:
- Place the ignition switch in the OFF or LOCK position.
- Apply the parking brake.
- Remove the shift lock cover using a suitable tool.
- Push down the shift lock as illustrated.
- Push the shift lever button and move the shift lever to N (Neutral) position while holding down the shift lock.
Push down the shift lock as illustrated.
Push the shift lever button and move the shift lever to N (Neutral) position while holding down the shift lock.
FAQ
A: Before starting and driving the Armada, ensure that you are familiar with its controls, safety features, and driving conditions. Always wear your seatbelt and follow safe driving practices.
A: Modern engines do not require a lengthy warm-up period. You can start driving the Armada after a few seconds of idling to let the engine oil circulate.
A: Insert the key (or use the push-button start, depending on the model) and turn it to the “Start” position, or press the brake pedal and press the push-button start to start the engine.
A: If the engine doesn’t start, ensure the vehicle is in “Park” or “Neutral,” and check the battery, key position, and fuel level.
A: No, the Armada should always be in “Park” or “Neutral” when starting the engine. Do not shift into gear until the engine is running.
A: In extreme weather, such as snow or ice, use appropriate tires, drive at reduced speeds, and maintain a safe following distance. Also, clear all windows and lights of snow and ice before driving.
A: The Armada is capable of towing, but the towing capacity and requirements vary by model. Always consult the owner’s manual for towing guidelines.
A: Yes, it’s advisable to engage the parking brake whenever parking the Armada, especially on inclines, to prevent the vehicle from moving.
A: If the vehicle begins to overheat, reduce speed, turn off the air conditioner, and turn on the heater. Pull over safely, and allow the engine to cool before checking coolant levels.
A: To accelerate smoothly, apply gradual pressure to the accelerator pedal. To brake smoothly, apply firm and even pressure to the brake pedal. Avoid sudden or aggressive actions.
A: Use engine braking and downshift gears when driving downhill to maintain control and reduce brake wear. Do not ride the brakes continuously.
A: Set the cruise control at a safe and appropriate speed, and do not use it in heavy traffic or on slippery roads. Always be ready to take control of the vehicle if needed.
A: Using headlights during the day can enhance visibility for other drivers. Many vehicles include daytime running lights (DRLs) that automatically illuminate when the engine is running.
A: If the tire pressure warning light illuminates, check the tire pressures as soon as it’s safe to do so and inflate them to the recommended levels. This warning light indicates low tire pressure.
A: When using the 4WD system, follow the manufacturer’s guidelines, and engage or disengage 4WD mode as recommended for driving conditions. Avoid using 4WD on dry pavement to prevent drivetrain damage.
Useful Link
View Full User Guide: Nissan ARMADA 2022 User Guide
Download Manuals: https://www.nissanusa.com/owners/ownership/manuals-guides.html
2023 Nissan Armada Specs, Price, Features and Mileage (Brochure)