Nissan ARMADA 2022 User Guide
The Nissan Armada is a full-size SUV that offers a spacious and luxurious interior, powerful performance, and advanced features. It is known for its towing capacity, off-road capabilities, and comfortable ride.
For the Nissan Armada 2022, you can anticipate potential updates in the following areas:
- Design: The 2022 model may receive exterior design updates, such as refreshed front and rear styling, new grille designs, updated headlights, and taillights. Interior enhancements might include improved materials, updated infotainment systems, and revisions to the dashboard and seating configurations.
- Technology: Nissan is likely to introduce the latest infotainment and connectivity features to keep up with modern expectations. This could include larger touchscreens, smartphone integration, upgraded audio systems, and advanced driver-assistance systems (ADAS) such as adaptive cruise control, lane-keeping assist, and automated emergency braking.
- Powertrain: The Armada might see updates to its powertrain to enhance performance and efficiency. This could include improvements to the existing V8 engine, transmission upgrades, and potentially the introduction of hybrid or electrified powertrain options to increase fuel economy and reduce emissions.
- Safety: Nissan has been prioritizing safety features in its vehicles, and the Armada 2022 is expected to offer the latest safety technologies. This might include features like blind-spot monitoring, rearview cameras, parking assist systems, and other driver-assistance features to enhance overall safety.
Please note that the information provided above is speculative, and for the most accurate and up-to-date information about the Nissan Armada 2022 model, I recommend checking Nissan’s official website or contacting a Nissan dealership.
Nissan ARMADA 2022 Seats, Head Restraints/Headrests and Seat Belts User Guide
2022 Nissan ARMADA Seats, Headrests and Seat Belts Guidelines
SEATS
WARNING
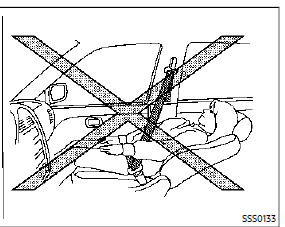
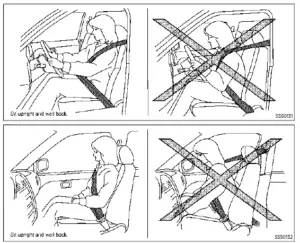
- Do not ride in a moving vehicle when the seatback is reclined. This can be dangerous. The shoulder belt will not be against your body. In an accident, you could be thrown into it and receive neck or other serious injuries. You could also slide under the lap belt and receive serious internal injuries.
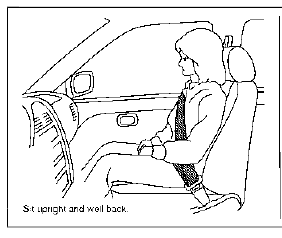
- For the most effective protection when the vehicle is in motion, the seat should be upright. Always sit well back and upright in the seat with both feet on the floor and adjust the seat belt properly. See “Precautions on seat belt usage” (P.1-20).
- After adjustment, gently rock in the seat to make sure it is securely locked.
- Do not leave children unattended inside the vehicle. They could unknowingly activate switches or controls. Unattended children could become involved in serious accidents.
- To help avoid the risk of injury or death through the unintended operation of the vehicle and/or its systems, do not leave children, people who require the assistance of others or pets unattended in your vehicle. Additionally, the temperature inside a closed vehicle on a warm day can quickly become high enough to cause a significant risk of injury or death to people and pets.
- The seatback should not be reclined any more than needed for comfort. Seat belts are most effective when the passenger sits well back and straight up in the seat. If the seatback is reclined, the risk of sliding under the lap belt and being injured is increased.
FRONT SEATS
Front power seat adjustment
Operating tips:
- The power seat motor has an auto-reset overload protection circuit. If the motor stops during operation, wait 30 seconds, then reactivate the switch.
- . Do not operate the power seat switch for a long period of time when the engine is off. This will discharge the battery.
See “Memory seat” (P.3-40) for the seat position memory function.
CAUTION
When adjusting the seat positions, be sure not to contact any moving parts to avoid possible injuries and/or damages.
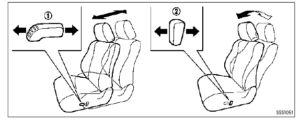
Forward and backward:
Moving the switch forward or backward will slide the seat forward or backward to the desired position.
Reclining:
Move the recline switch backward until the desired angle is obtained. To bring the seatback forward again, move the switch
forward.
The reclining feature allows adjustment of the seatback for occupants of different sizes for added comfort and to help obtain proper seat belt fit. (See “Precautions on seat belt usage” (P.1-20).) Also, the seatback can be reclined to allow occupants to rest when the vehicle is stopped and the transmission is in the P (Park) position.
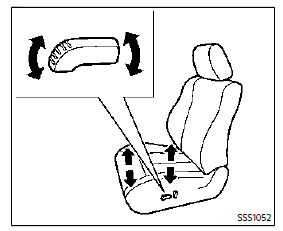
Seat lifter:
- Pull up or push down the adjusting switch to adjust the seat height until the desired position is achieved.
- Tilt up or down the adjusting switch to adjust the front angle of the seat until the desired position is achieved (for the driver’s seat).
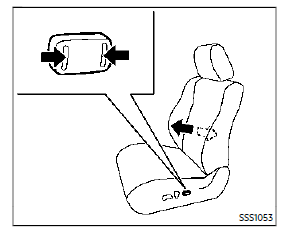
Lumbar support:
The lumbar support feature provides lower back support to the occupants.
Push the front or back end of the switch to adjust the seatback lumbar area.
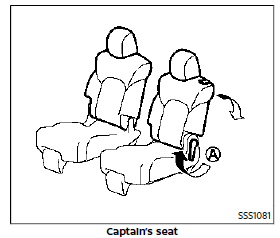
2ND ROW SEATS
WARNING
- Never allow anyone to ride in the cargo area or on the rear seat when it is in the fold-down position. Use of these areas by passengers without proper restraints could result in serious injury in an accident or sudden stop.
- When returning the seatbacks to the upright position, be certain they are completely secured in the latched position. If they are not completely secured, passengers may be injured in an accident or sudden stop.
- Properly secure all cargo to help prevent it from sliding or shifting. Do not place cargo higher than the seatbacks. In a sudden stop or collision, unsecured cargo could cause personal injury.
Read all Instructions for Seats, Head Restraints/Headrests and Seat Belts User Guide
Nissan ARMADA 2022 Child Safety and Child Restraints User Guide
Child safety
WARNING
Do not allow children to play with the seat belts. Most seating positions are equipped with Automatic Locking Retractor (ALR) mode seat belts. If the seat belt becomes wrapped around a child’s neck with the ALR mode activated, the child can be seriously injured or killed if the seat belt retracts and becomes tight. This can occur even if the vehicle is parked. Unbuckle the seat belt to release the child. For the center of the 3rd row bench seat, the connector tongue may also be released. Release the connector tongue by inserting a suitable tool (such as a key) into the connector buckle .If the seat belt cannot be unbuckled or is already unbuckled, release the child by cutting the seat belt with a suitable tool (such as a knife or scissors) to release the seat belt.
Children need adults to help protect them.
They need to be properly restrained.
In addition to the general information in this manual, child safety information is available from many other sources, including doctors, teachers, government traffic safety offices, and community organizations. Every child is different, so be sure to learn the best way to transport your child.
There are three basic types of child restraint systems:
- Rear-facing child restraint
- Forward-facing child restraint
- Booster seat
The proper restraint depends on the child’s size. Generally, infants up to about 1 year and less than 20 lbs (9 kg) should be placed in rear-facing child restraints. Forward-facing child restraints are available for children who outgrow rear-facing child restraints and are at least 1 year old. Booster seats are used to help position a vehicle lap/shoulder belt on a child who can no longer use a forward-facing child restraint.
WARNING
Infants and children need special protection. The vehicle’s seat belts may not fit properly. The shoulder belt may come too close to the face or neck. The lap belt may not fit over their small hip bones. In an accident, an improperly fitting seat belt could cause serious or fatal injury. Always use appropriate child restraints.
All U.S. states and Canadian provinces or territories require the use of approved child restraints for infants and small children. See “Child restraints” (P.1-32).
A child restraint may be secured in the vehicle by using either the LATCH (Lower Anchor and Tethers for CHildren) system or with the vehicle seat belt. See “Child restraints” (P.1-32) for more information.
NISSAN recommends that all pre-teens and children be restrained in the rear seat. Studies show that children are safer when properly restrained in the rear seat than in the front seat.
This is especially important because your vehicle has a supplemental restraint system (Air bag system) for the front passenger. See “Supplemental restraint system” ((P.1-54).
INFANTS
Infants up to at least 1 year old should be placed in a rear-facing child restraint. NISSAN recommends that infants be placed in child restraints that comply with Federal Motor Vehicle Safety Standards or Canadian Motor Vehicle Safety Standards. You should choose a child restraint that fits your vehicle and always follow the manufacturer’s instructions for installation and use.
SMALL CHILDREN
Children that are over 1 year old and weigh at least 20 lbs (9 kg) should remain in a rear-facing child restraint as long as possible up to the height or weight limit of the child restraint. Children who outgrow the height or weight limit of the rear-facing child restraint and are at least 1 year old should be secured in a forward-facing child restraint with a harness. Refer to the manufacturer’s instructions for minimum and maximum weight and height recommendations. NISSAN recommends that small children be placed in child restraints that comply with Federal Motor Vehicle Safety Standards or Canadian Motor Vehicle Safety Standards. You should choose a child restraint that fits your vehicle and always follow the manufacturer’s instructions for installation and use.
LARGER CHILDREN
Children should remain in a forward-facing child restraint with a harness until they reach the maximum height or weight limit allowed by the child restraint manufacturer.
Once a child outgrows the height or weight limit of the harness-equipped forward-facing child restraint, NISSAN recommends that the child be placed in a commercially available booster seat to obtain proper seat belt fit. For a seat belt to fit properly, the booster seat should raise the child so that the shoulder belt is properly positioned across the chest and the top, and middle portions of the shoulder. The shoulder belt should not cross the neck or face and should not fall off the shoulder. The lap belt should lie snugly across the lower hips or upper thighs, not the abdomen.
A booster seat can only be used in seating positions that have a three-point type seat belt. The booster seat should fit the vehicle seat and have a label certifying that it complies with Federal Motor Vehicle Safety Standards or Canadian Motor Vehicle Safety Standards.
Read all Instructions for Child Safety and Child Restraints User Guide
Nissan ARMADA 2022 Supplemental Restraint System (SRS) User Guide
SUPPLEMENTAL RESTRAINT SYSTEM
PRECAUTIONS ON SUPPLEMENTAL RESTRAINT SYSTEM
This Supplemental Restraint System (SRS) section contains important information concerning the following systems.
- Driver and passenger supplemental front-impact air bag (NISSAN Advanced Air Bag System)
- Driver and front passenger supplemental knee airbag
- Front seat-mounted side-impact supplemental airbag
- Roof-mounted curtain side-impact and rollover supplemental airbag
- Seat belt with pre-tensioner Supplemental front-impact air bag system: The NISSAN Advanced Air Bag System can help cushion the impact force to the head and chest of the driver and front passenger in certain frontal collisions.
Driver and front passenger supplemental knee air bag system: This system can help cushion the impact force to the driver’s and front passenger’s knees in certain collisions.
Front seat-mounted side-impact supplemental air bag system: This system can help cushion the impact force to the chest and pelvis area of the driver and front passenger in certain side-impact collisions. The supplemental side airbag is designed to inflate on the side where the vehicle is impacted.
Roof-mounted curtain side-impact and rollover supplemental air bag system: This system can help cushion the impact force to the head of occupants in front and rear (2nd and 3rd) outboard seating positions in a certain side impact or rollover collision. In a side impact, the curtain airbags are designed to inflate on the side where the vehicle is impacted. In a rollover, the curtain airbags on both sides are designed to inflate. Under both side-impact and rollover situations, the curtain airbags will remain inflated for a short period of time.
These supplemental restraint systems are designed to supplement the crash protection provided by the driver and passenger seat belts and are not a substitute for them. Seat belts should always be correctly worn and the occupant seated a suitable distance away from the steering wheel, instrument panel, and door finishers. (See “Seat belts” (P.1-20) for instructions and precautions on seat belt usage.) The supplemental airbags operate only when the ignition switch is in the ON position.
After placing the ignition switch in the ON position, the supplemental air bag warning light illuminates. The supplemental air bag warning light will turn off after about 7 seconds if the systems are operational.
WARNING
- The front air bags ordinarily will not inflate in the event of a side impact, rear impact, rollover, or lower-severity frontal collision. Always wear your seat belts to help reduce the risk or severity of injury in various kinds of accidents.
- The front passenger air bag and front passenger knee air bag will not inflate if the front passenger air bag status light is lit or if the front passenger seat is unoccupied. See “Front passenger air bag and status light” (P.1-63).
- The seat belts and the front air bags are most effective when you are sitting well back and upright in the seat. The front air bags inflate with great force. Even with the NISSAN Advanced Air Bag System, if you are unrestrained, leaning forward, sitting sideways or out of position in any way, you are at greater risk of injury or death in a crash. You may also receive serious or fatal injuries from the front air bag if you are up against it when it inflates. Always sit back against the seat-back and as far away as practical from the steering wheel or instrument panel. Always use seat belts.
- The driver and front passenger seat belt buckles are equipped with sensors that detect if the seat belts are fastened. The Advanced Air Bag System monitors the severity of a collision and seat belt usage then inflates the air bags. Failure to properly wear seat belts can increase the risk or severity of injury in an accident.
- The front passenger seat is equipped with occupant classification sensors (weight sensors) that turn the front passenger air bag and front passenger knee air bag OFF under some conditions. These sensors are only used in this seat. Failure to be properly seated and wearing the seat belt can increase the risk or severity of injury in an accident. See “Front passenger air bag and status light” (P.1-63).
- Keep hands on the outside of the steering wheel. Placing them in-side the steering wheel rim could increase the risk of injury if the front air bag inflates.
WARNING
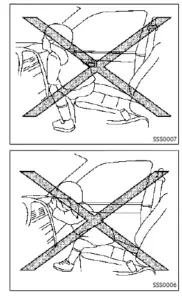
- Never let children ride unrestrained or extend their hands or face out of the window. Do not attempt to hold them in your lap or arms. Some examples of dangerous riding positions are shown in the illustrations.
- Children may be severely injured or killed when the front airbags, side air bags or curtain airbags inflate if they are not properly restrained. Pre-teens and children should be properly restrained in the rear seat, if possible.
- Even with the NISSAN Advanced Air Bag System, never install a rear-facing child restraint in the front seat. An inflating front airbag could seriously injure or kill your child. See “Child restraints” (P.1-32) for details.
WARNING
Front seat-mounted side-impact supplemental airbags and roof-mounted curtain side-impact and rollover supplemental air bags:
- The side airbags ordinarily will not inflate in the event of a front impact, rear impact, rollover, or lower severity side collision. Always wear your seat belts to help reduce the risk or severity of injury in various kinds of accidents.
- The curtain air bags ordinarily will not inflate in the event of a front impact, rear impact, or lower severity side collision. Always wear your seat belts to help reduce the risk or severity of injury in various kinds of accidents.
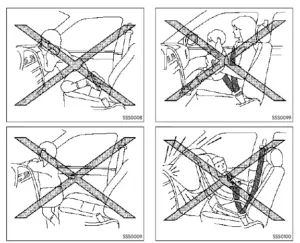
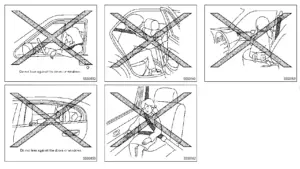
- The seat belts, the side air bags and curtain airbags are most effective when you are sitting well back and upright in the seat. The side air bags and curtain air bags inflate with great force. Do not allow anyone to place their hand, leg or face near the side air bags on the side of the seatback of the front seat or near the side roof rails. Do not allow anyone sitting in the front seats or rear outboard seats to extend their hand out of the window or lean against the door. Some examples of dangerous riding positions are shown in the previous illustrations.
- When sitting in the rear seat, do not hold onto the seatback of the front seat. If the side air bag inflates, you may be seriously injured. Be especially careful with children, who should always be properly restrained. Some examples of dangerous riding positions are shown in the illustrations.
- Do not use seat covers on the front seatbacks. They may interfere with side air bags inflation.
Read all Instructions for Supplemental Restraint System (SRS) User Guide
Nissan ARMADA 2022 Cockpit and Instrument panel and Meters and gauges User Guide
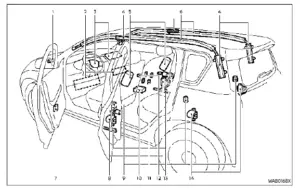
COCKPIT

- Power liftgate switch (if so equipped)
- Heated steering wheel switch (if so equipped)
- Instrument brightness control switch
- TRIP/RESET switch for twin trip odometer
- Headlight, fog light and turn signal switch— Headlight
- Turn signal
- Fog light (if so equipped)
- Steering-wheel-mounted controls (left side)
- Audio control steering switch (See NissanConnect® Owner’s Manual)
- Vehicle information display control
- Trip computer switch
- Wiper and washer switch
- Steering-wheel-mounted controls (right side)
- Intelligent Cruise Control (ICC) system— Intelligent Lane Intervention (I-LI) system
- Intelligent Blind Spot Intervention (I-BSI) system
- Hands-Free Phone System switch (See NissanConnect® Owner’s Manual)/Voice Recognition system switch (See Nissan-Connect® Owner’s Manual)
- Shift lever
- Four-Wheel Drive (4WD) shift switch (if so equipped)/SNOW mode switch/TOW MODE switch/Vehicle Dynamic Control (VDC) OFF switch
- Display Commander (See NissanConnect® Owner’s Manual)
- Power liftgate main switch (if so equipped)
- Warning systems switch (if so equipped)— Lane Departure Warning (LDW)
- Blind Spot Warning (BSW)
- Electric tilting/telescopic steering wheel switch
INSTRUMENT PANEL
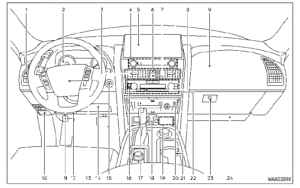
- Side ventilator
- Meters and gauges
- Center ventilator
- Audio system (See NissanConnect® Owner’s Manual)
- Touch screen display (See NissanConnect® Owner’s Manual)
- Intelligent Around View® Monitor (if so equipped)
- RearView Monitor (if so equipped)
- Navigation system (if so equipped) (See NissanConnect® Owner’s Manual)
- Front passenger air bag status light
- Hazard warning flasher switch
- Defroster switch/Deicer switch (if so equipped)
- Front passenger supplemental air bag
- Fuse box
- Parking brake
- Hood release handle
- Steering wheel
- Horn
- Driver supplemental air bag
- Power steering
- Driver supplemental knee air bag
- Push-button ignition switch
- Climate controlled seat switch (if so equipped)/Heated seat switch (if so equipped)
- Wireless charger (if so equipped)
- Trailer Brake Controller Unit (TBCU) (if so equipped)
- USB connection ports (See NissanCon-nect® Owner’s Manual)
- Power outlet
- Cup holder
- Heater and air conditioner
- Glove box
- Front passenger supplemental knee air bag
METERS AND GAUGES
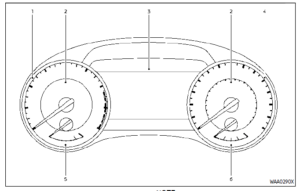
- Tachometer
- Warning and indicator lights
- Vehicle information display/Odometer/twin trip odometer
- Speedometer
- Engine coolant temperature gauge
- Fuel gauge
NOTE:
The needle indicators may move slightly after the ignition switch is placed in the OFF position. This is not a malfunction.
CAUTION
- For cleaning, use a soft cloth, dampened with water. Never use a rough cloth, alcohol, benzine, thinner or any kind of solvent or paper towel with a chemical cleaning agent. They will scratch or cause discoloration to the lens.
- Do not spray any liquid such as water on the meter lens. Spraying liquid may cause the system to malfunction.
TACHOMETER
The tachometer indicates engine speed in revolutions per minute (RPM). Do not rev the engine into the red zone .
CAUTION
When engine speed approaches the red zone, shift to a higher gear or reduce engine speed. Operating the engine in the red zone may cause serious engine damage.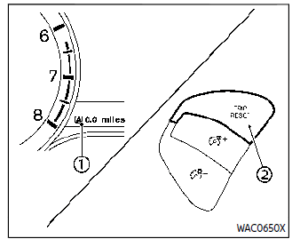
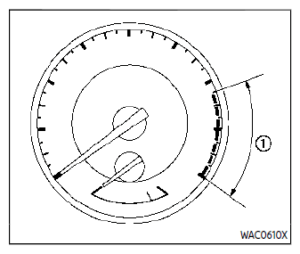
ENGINE COOLANT TEMPERATURE GAUGE
The gauge indicates the engine coolant temperature.
The engine coolant temperature is within the normal range when the gauge needle points within the zone shown in the illustration.
The engine coolant temperature varies with the outside air temperature and driving conditions.
CAUTION
If the gauge indicates engine coolant temperature near the hot (H) end of the normal range, reduce vehicle speed to decrease temperature. If the gauge is over the normal range, stop the vehicle as soon as safely possible. If the engine is overheated, continued operation of the vehicle may seriously damage the engine. See “If your vehicle overheats” (P.6-14) for immediate action required.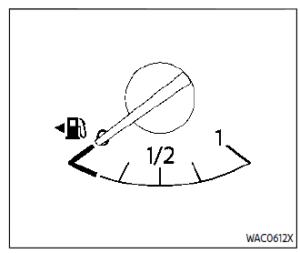
Read all Instructions for Cockpit and Instrument panel and Meters and gauges User Guide
Nissan ARMADA 2022 “Warning lights, indicator lights and audible reminders and Vehicle information display” User Guide
2022 Nissan ARMADA Warning, Indicator Lights and Display Setup
WARNING LIGHTS, INDICATOR LIGHTS AND AUDIBLE REMINDERS
- Automatic Transmission (AT) oil temperature warning light
- Automatic Transmission (AT) park warning light
- Brake warning light
- Charge warning light
- Engine oil pressure warning light
- Master warning light
- Seat belt warning light
- Security indicator light Supplemental air bag warning light
- Anti-lock Braking System (ABS) warning light
- Automatic Emergency Braking (AEB) system warning light
- Automatic transmission check warn-ing light
- Check suspension indicator light
- Front passenger air bag status light
- Four-Wheel Drive (4WD) warning light (4WD models)
- Low tire pressure warning light
- Malfunction Indicator Light (MIL)
- Master warning light
- Rear Automatic Braking (RAB) system warning light
- Vehicle Dynamic Control (VDC) off indicator light
- Vehicle Dynamic Control (VDC) warn-ing light
- Exterior light indicator
- Front fog light indicator light (if so equipped)
- High beam assist indicator light
- High beam indicator light
- TOW mode indicator light
- Turn signal/hazard indicator lights
CHECKING LIGHTS
With all doors closed, apply the parking brake, fasten the seat belts and place the ignition switch in the ON position without starting the engine. The following lights (if so equipped) will come on:
If any light does not come on or operates in a way other than described, it may indicate a burned-out bulb and/or a system malfunction. It is recommended you have the system checked by a NISSAN dealer.
Some indicators and warnings are also displayed on the vehicle information dis-play between the speedometer and tachometer. (See “Vehicle information display” (P.2-20).)
WARNING/INDICATOR LIGHTS (red)
Automatic Transmission (AT)
oil temperature warning light
This light illuminates when the Automatic Transmission (AT) oil temperature is too high. If the light illuminates while driving, reduce the vehicle speed as soon as safely possible until the light turns off.
CAUTION
Continued vehicle operation when the AT oil temperature warning light is on may damage the AT.
Automatic Transmission (AT)
park warning light (4WD models)
This light indicates that the Automatic Transmission (AT) parking function is not engaged. If the transfer control is not secured in any driving position while the AT shift lever is in the “P” (Park) position, the transmission will disengage and the wheels will not lock.
If the AT park warning light illuminates with the shift lever in the P (Park) position, shift the Four-Wheel Drive (4WD) shift switch to the AUTO, 4H or 4L position again with the shift lever in the N (Neutral) position. (See “NISSAN all-mode 4WD®” (P.5-124).)
Brake warning light
This light functions for both the parking brake and the foot brake systems.
Parking brake indicator:
When the ignition switch is in the ON position, the light comes on when the parking brake is applied.
Low brake fluid warning light:
When the ignition switch is in the ON position, the light warns of a low brake fluid level. If the light comes on while the engine is running with the parking brake not applied, stop the
vehicle and perform the following:
- Check the brake fluid level. If brake fluid is low, add fluid and have the system checked. It is recommended you have this service performed by a NISSAN dealer. (See “Brake fluid” (P.8-9).)
- If the brake fluid level is correct, have the warning system checked. It is recommended you have this service performed by a NISSAN dealer.
Low hydraulic pressure warning indicator:
If the brake warning light illuminates when the engine is running, or while driving with the parking brake is released, check the brake fluid level. If the brake fluid level is sufficient, it may indicate low hydraulic pressure in the brake booster. It is recommended that you have the brake system checked by a NISSAN dealer promptly.
Anti-lock Braking System (ABS) warning indicator:
When the parking brake is released and the brake fluid level is sufficient, if both the brake warning light and the Anti-lock Braking System (ABS) warning light illuminate, it may indicate the ABS is not functioning properly. Have the brake system checked, and if necessary re-paired. It is recommended you visit a NISSAN dealer for this service. (See “Anti-lock Braking System (ABS) warning light” (P.2-15).)
WARNING
- Your brake system may not be working properly if the warning light is on. Driving could be dangerous. If you judge it to be safe, drive carefully to the nearest service station for repairs. Other-wise, have your vehicle towed because driving it could be dangerous.
- Pressing the brake pedal with the engine stopped and/or low brake fluid level may increase your stopping distance and braking will require greater pedal effort as well as pedal travel.
- If the brake fluid level is below the minimum or MIN mark on the brake fluid reservoir, do not drive until the brake system has been checked. It is recommended you visit a NISSAN dealer for this service.
Charge warning light
When the ignition switch is in the ON position, the charge warning light illuminates and then turns off.
If the light comes on while the engine is running, it may indicate the charging system is not functioning properly. Turn the engine off and check the alternator belt. If the belt is loose, broken, missing or if the light remains on, have your vehicle serviced immediately. It is recommended
Nissan ARMADA 2022 Security systems and Wiper and washer switch User Guide
2022 Nissan ARMADA Security systems and Wiperwasher switch Instructions
SECURITY SYSTEMS
Your vehicle has two types of security systems, as follows:
- Vehicle security system
- NISSAN Vehicle Immobilizer System The security condition will be shown by the security indicator light.
VEHICLE SECURITY SYSTEM
The vehicle security system provides visual and audio alarm signals if someone opens the doors, hood, or liftgate when the system is armed. It is not, however, a motion detection type system that activates when a vehicle is moved or when a vibration occurs.
The system helps deter vehicle theft but cannot prevent it, nor can it prevent the theft of interior or exterior vehicle components in all situations. Always secure your vehicle even if parking for a brief period. Never leave your Intelligent Key(s) in the vehicle, and always lock it when unattended. Be aware of your surroundings, and park in secure, well-lit areas whenever possible.
Many devices offering additional protection, such as component locks, identification markers, and tracking systems, are available at auto supply stores and specialty shops. Your NISSAN dealer may also offer such equipment. Check with your insurance company to see if you may be eligible for discounts for various theft protection features.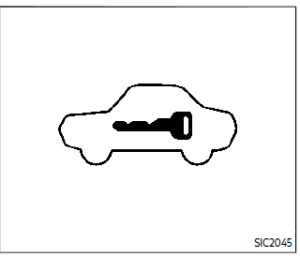
How to arm the vehicle security system
- Close all windows.
The system can be armed even if the windows are open. - Push the ignition switch to the OFF position.
- Remove the Intelligent Key from the vehicle.
- Close all doors, hood and liftgate. Lock all doors. The doors can be locked with the Intelligent Key, door handle request switch, power door lock switch or mechanical key.
- Confirm that the security indicator light comes on. The security indicator light stays on for about 30 seconds. The vehicle security system is now pre-armed. After about 30 seconds the vehicle security system automatically shifts into the armed phase. The security light begins to flash once every approximately 3 seconds. If during this 30-second pre-arm time period, the door is unlocked, or the ignition switch is pushed to ACC or ON, the system will not arm.
Even when the driver and/or passengers are in the vehicle, the system will activate with all doors, hood, and lift-gate locked with the ignition switch in the LOCK position. When pushing the ignition switch to the ACC or ON position, the system will be released.
Vehicle security system activation
The vehicle security system will give the following alarm:
- The headlights blink and the horn sounds intermittent.
- The alarm automatically turns off after approximately 50 seconds. However, the alarm reactivates if the vehicle is tampered with again.
The alarm is activated by: - Unlocking the door or opening the liftgate without using the button on the Intelligent Key, the door handle request switch or the mechanical key.(Even if the door is opened by releasing the door inside the lock knob, the alarm will activate.)
- Opening the hood.
How to stop an activated alarm
The alarm will stop when a door is unlocked by pushing the unlock button on the Intelligent Key, the door handle request switch or using the mechanical key, or when the ignition switch is pushed to the ACC or ON position.
If the system does not operate as described above, it is recommended you have it checked by a NISSAN dealer.
NISSAN VEHICLE IMMOBILIZER SYS- TEM
The NISSAN Vehicle Immobilizer System will not allow the engine to start without the use of the registered Intelligent Key. Never leave these keys in the vehicle.
FCC Notice:
For USA:
This device complies with Part 15 of the FCC Rules. Operation is subject to the following two conditions: (1) This device may not cause harmful interference, and (2) this device must accept any interference received, including interference that may cause undesired operation.
NOTE:
Changes or modifications not expressly approved by the party responsible for compliance could void the user’s authority to operate the equipment.
For Canada:
This device complies with Industry Ca-nada license-exempt RSS standard(s). Operation is subject to the following two conditions: (1) this device may not cause interference, and (2) this device must accept any interference, including interference that may cause undesired operation of the device.
Security indicator light
The security indicator light is located on the meter panel. It indicates the status of the NISSAN Vehicle Immobilizer System.
The light blinks after the ignition switch was in the ACC, OFF, and LOCK positions. This function indicates the security systems equipped on the vehicle are operational.
If the NISSAN Vehicle Immobilizer System is malfunctioning, this light will remain on while the ignition switch is in the ON position.
If the light still remains on and/or the engine will not start, seek service for the NISSAN Vehicle Immobilizer System as soon as possible. Please bring all registered keys that you have. It is recommended you visit a NISSAN dealer for this service.
WIPER AND WASHER SWITCH
WARNING
In freezing temperatures the washer solution may freeze on the window and obscure your vision which may lead to an accident. Warm the window with the defroster before you wash the window.
CAUTION
- Do not operate the washer continuously for more than 30 seconds.
- Do not operate the washer if the reservoir tank is empty.
- Do not fill the window washer reservoir tank with washer fluid concentrates at full strength. Some methyl alcohol-based washer fluid concentrates may permanently stain the grille if spilled while filling the window washer reservoir tank.
- Pre-mix washer fluid concentrates with water to the manufacturer’s recommended levels before pouring the fluid into the window washer reservoir tank. Do not use the window washer reservoir tank to mix the washer fluid concentrate and water.
Read all Instructions for Security systems and Wiper and washer switch User Guide
Nissan ARMADA 2022 “Rear window and outside mirror defroster switch and Heated steering wheel and Heated seats” User Guide
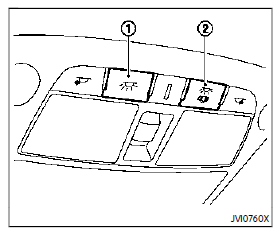
REAR WINDOW AND OUTSIDE MIRROR DEFROSTER SWITCH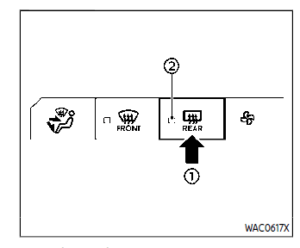
To defog/defrost the rear window glass and outside mirrors, start the engine and push the switch on. The indicator light will come on. Push the switch again to turn the defroster off. It will automatically turn off in approximately 15 minutes.
CAUTION
When cleaning the inner side of the rear window, be careful not to scratch or damage the rear window defroster.
WINDSHIELD DEICER SWITCH (if so equipped)

The windshield deicer switch (defroster switch) operates when the ignition switch is in the ON position.
The deicer is used to remove ice from the windshield when a wiper is frozen to the windshield. When the switch is pushed, the indicator light illuminates and the deicer operates for approximately 15 minutes. The rear window defroster will activate at the same time. After the preset time has passed, the deicer will turn off automatically. To turn off the deicer manually, push the deicer switch again, and the indicator light turns off.
CAUTION
- When operating the deicer continuously, be sure to start the engine. Otherwise, it may cause the battery to discharge.
- When cleaning the inner side of the window, be careful not to scratch or damage the electrical conductors on the surface of the window.
HEADLIGHT AND TURN SIGNAL SWITCH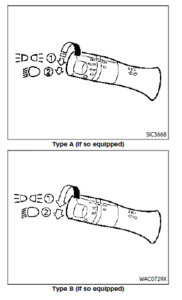
HEADLIGHT SWITCH
Lighting
- HEADLIGHT SWITCH Lighting position: The front parking, side marker, tail, license plate, and instrument lights will come on. The antilight system will be set (Type B).
- Turn the switch to the position: Headlights will come on and all the other lights remain on.

Intelligent Auto Headlight system
(Type A) (if so equipped)
The Intelligent Auto Headlight system allows the headlights to be set so they turn on and off automatically.
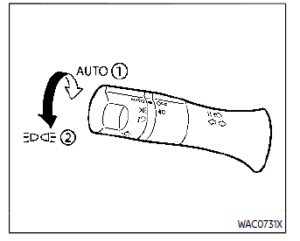
To set the Intelligent Auto Headlight system:
- Make sure the headlight switch is in the AUTO position.
- Place the ignition switch in the ON position.
- The Intelligent Auto Headlight system automatically turns the headlights on and off.
To turn the Intelligent Auto Headlight system off, turn the headlight switch to the OFF, or position.
The Intelligent Auto Headlight system can turn on the headlights automatically when it is dark and turn off the headlights when it is light.
The headlights will also be turned on automatically at twilight or in rainy weather (when the windshield wiper is operated continuously).
If the ignition switch is placed in the OFF position and one of the doors is opened and this condition is continued, the headlights remain on for 5 minutes.
Automatic headlights off delay:
You can keep the headlights on for up to 180 seconds after you place the ignition switch in the OFF position and open any door then close all the doors.
You can adjust the period of the automatic headlights off delay from 0 seconds (OFF) to 180 seconds. The factory default setting is 45 seconds.
See “Vehicle settings” (P.2-24).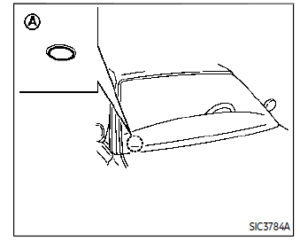
Be sure not to put anything on top of the photosensor located on the top of the instrument panel. The photo sensor controls the Intelligent Auto Headlight system; if it is covered, the photo sensor reacts as if it is dark and the headlights will illuminate.
Autolight system (Type B) (if so equipped)
The auto light system allows the headlights to be set so they turn on and off automatically.
To set the auto light system:
- Make sure the headlight switch is in the AUTO position or position.
- Place the ignition switch in the ON position.
- The antilight system automatically turns the headlights on and off.
To turn the antilight system off, turn the switch to the position. The antilight system can turn on the headlights automatically when it is dark and turn off the headlights when it is light. If the ignition switch is turned to the ON position when the parking brake is applied, the headlights remain off.
With the position selected, the headlights turn off when the ignition switch is placed in the OFF position, the shift lever is in the P (Park) position, or the parking brake is applied.
Nissan ARMADA 2022 Climate-controlled seats and TOW mode switch and Power outlet User Guide
2022 Nissan ARMADA Climate controlled seats and Power outlet Guidelines
CLIMATE CONTROLLED SEATS (if so equipped)
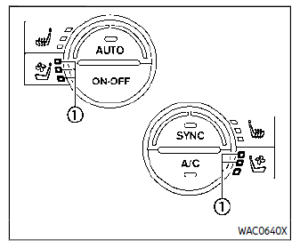
The climate controlled seat cools down the front seats by blowing cool air from the surface of the seat. The switches located on the instrument panel can be operated independently of each other.
- Start the engine.
- Push the climate controlled seat switch to cool the seat. The indicator light on the corresponding switch will illuminate depending on the cool level.
- Adjust the desired amount of air by pushing the switch again. The climate controlled seat blower remains on low speed for approximately 60 seconds after pushing the switch on.
- When the vehicle’s interior is warmed or cooled, or before you leave the vehicle, be sure to turn off the climate controlled seats. To turn off the cli-mate controlled seats, push the switch until the indicator light turns off.
To check the air filters for the climate controlled seat, it is recommended you visit a NISSAN dealer.
WARNING
Do not use or allow occupants to use the climate controlled seats if you or the occupants cannot monitor seat temperatures or have an inability to feel pain in those body parts in contact with the seat. Use of the climate controlled seats by such people could result in serious injury.
CAUTION
- The battery could run down if the climate-controlled seat is operated while the engine is not running.
- Do not use the climate-controlled seat for extended periods or when no one is using the seat.
- Do not put anything on the seat which insulates heat, such as a blanket, cushion, seat cover, etc. Otherwise, the seat may become overheated.
- Do not place anything hard or heavy on the seat or pierce it with a pin or similar object. This may result in damage to the climate-controlled seat.
- Any liquid spilled on the seat should be removed immediately with a dry cloth.
- The climate-controlled seat has an air filter. Do not operate climate controlled seat without an air filter. This may result in damage to the system.
- When cleaning the seat, never use gasoline, thinner, or any similar materials.
- If any malfunctions are found or the climate-controlled seat does not operate, turn the switch off and have the system checked. It is recommended you visit a NISSAN dealer for this service.
WARNING SYSTEMS SWITCH (if so equipped)
The warning systems switch is used to turn on and off the warning systems (Lane Departure Warning (LDW) and Blind Spot Warning (BSW) systems) that are activated using the “Driver Assistance” menu displayed in the vehicle information display. (See “Driver Assistance” (P.2-22).)
When the warning systems switch is turned off, the indicator on the switch is off. The indicator will also be off if all of the warning systems are deactivated using the settings menu.
The LDW system will vibrate the steering wheel and blink the Lane Departure Warning (LDW) indicator light (orange) to alert the driver if the vehicle is traveling close to either the left or the right of a traveling lane with detectable lane markers. (See “Lane Departure Warning (LDW)” (P.5-26).)
The BSW system will turn on the side indicator lights, on the outside mirrors, if the radar sensors detect a vehicle in the detection zone. If the turn signal is activated in the direction of the detected vehicle, a chime sounds twice and the side indicator light will flash. (See “Blind Spot Warning (BSW)” (P.5-38).)
SNOW MODE SWITCH
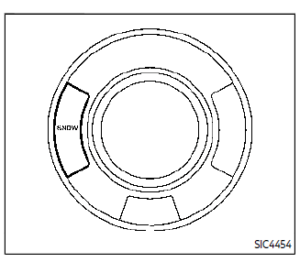
For driving or starting the vehicle on snowy roads or slippery areas, push on the SNOW mode switch. The SNOW mode indicator will illuminate. When the SNOW mode is activated, engine output is controlled to avoid wheel spin. Push off the SNOW mode for normal driving.
NOTE:
When the SNOW mode is activated, the I-LI, I-BSI, and ICC systems will be turned off automatically.
TOW MODE SWITCH
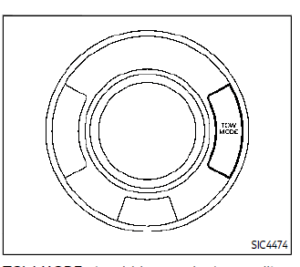
TOW MODE should be used when pulling a heavy trailer or hauling a heavy load. Driving the vehicle in TOW MODE with no trailer/load or light trailer/light load will not cause any damage. However, fuel economy may be reduced, and the transmission/engine driving characteristics may feel unusual.
Push the TOW MODE switch to activate TOW MODE. The indicator light on the TOW MODE switch illuminates when TOW MODE is selected. Push the TOW MODE switch again to turn TOW MODE OFF.
TOW MODE is automatically canceled when the ignition switch is placed in the OFF position.
VEHICLE DYNAMIC CONTROL (VDC) OFF SWITCH
The vehicle should be driven with the Vehicle Dynamic Control (VDC) system on for most driving conditions.
If the vehicle is stuck in mud or snow, the VDC system reduces the engine output to reduce wheel spin. The engine speed will be reduced even if the accelerator is depressed to the floor. If maximum engine power is needed to free a stuck vehicle, turn the VDC system off.
To turn off the VDC system, push the VDC OFF switch. The indicator will illuminate.
Read all Instructions for Climate-controlled seats and TOW mode switch and Power outlet User Guide
Nissan ARMADA 2022 Storage User Guide
Storage
CUP HOLDERS
CAUTION
- Avoid abrupt starting and braking when the cup holder is being used to prevent spilling the drink. If the liquid is hot, it can scald you or your passenger.
- Use only soft cups in the cup holder. Hard objects can injure you in an accident.
- Do not recline the rear seatback . Do not recline the rear seatback
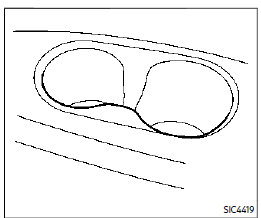
Front
To open the cup holder, push the lid .
To close, lower the cup holder lid and push it down lightly.
The cup holder is not designed to store personal items.
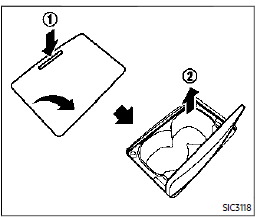
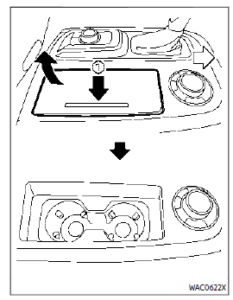
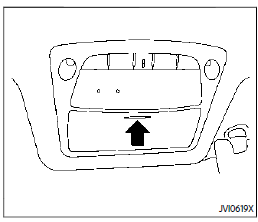
2nd-row seat
Type A (if so equipped):
- To open the cup holder, push the lid .
- The flap will be folded down when insert-ing a large container.
- To close, lower the cup holder lid and push it down lightly.
- To clean the cup holder, pull up the inside tray and remove it.
- The cup holder is not designed to store personal items.
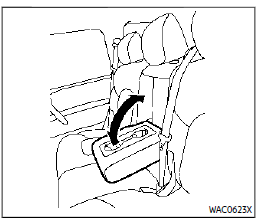
Type B (if so equipped):
The cup holder is located in the rear fold-down armrest.
3rd row seat
Soft bottle holder
CAUTION
- Do not use bottle holder for any other objects that could be thrown about in the vehicle and possibly injure people during sudden braking or an accident.
- Do not use bottle holder for open liquid containers.
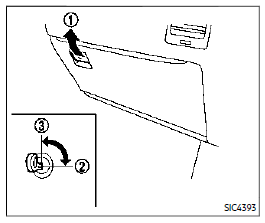
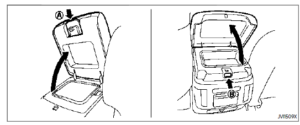
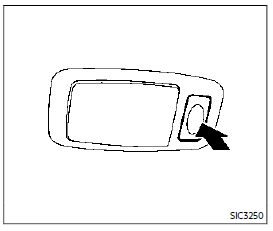
SUNGLASSES HOLDER
To open the sunglasses holder, push and release. Only store one pair of sunglasses in the holder.
WARNING
Keep the sunglasses holder closed while driving to avoid obstructing the driver’s view and to help prevent an accident.
CAUTION
- Do not use for anything other than glasses.
- Do not leave glasses in the sunglasses holder while parking in direct sunlight. The heat may damage the glasses.
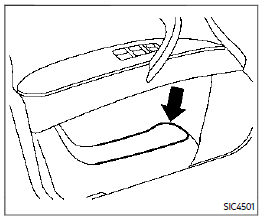
GLOVE BOX
WARNING
Keep glove box lid closed while driving to help prevent injury in an accident or a sudden stop.
To open the glove box, pull the handle .
To close, push the lid in until the lock latches.
To lock /unlock the glove box, use the mechanical key. For the mechanical key usage, see “Keys” (P.3-2).
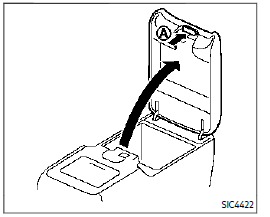
CONSOLE BOX
Front
- To open the console box lid from the front seat, push up the knob and pull up the lid.
- To open the console box lid from the 2nd row seat, push the knob .
- To close, push the lid down until the lock latches.
Read all Instructions for Storage User Guide
Nissan ARMADA 2022 Windows and Moonroof User Guide
WINDOWS
The sound with a feeling of oppression may occur with the rear windows open and front windows close. To reduce the sound, slightly open either a front window or the moonroof (if so equipped).
POWER WINDOWS
WARNING
The driver is always responsible for all the power window operations including passenger operations. Be sure to observe the following warnings for safety.
- Never allow anyone to extend any portion of their body or objects out of the opening while the vehicle is in motion. Otherwise they may be seriously damaged by coming into contact with objects outside the vehicle or when abruptly braking.
- Make sure that all passengers have their hands, etc. inside the vehicle before operating the power windows. Do not intentionally activate the auto-reverse function. If their hands or faces are caught in the windows, it could cause serious injury.
- Never allow children to operate the power window. Improper operation by children could lead to an accident. Depress the window lock button since children or other persons could be caught in the power window and this may cause serious damage.
- When operating the power windows, let children know it and make sure that their hands, arms, etc. are not placed near the power windows. Otherwise, they may be caught in the power windows.
- Make sure that the ignition switch is in the OFF position and do not leave the Intelligent Key and children unattended inside the vehicle. They could unknowingly activate switches or controls. Unattended children could become involved in serious accidents.
- To help avoid risk of injury or death through the unintended operation of the vehicle and or its systems, including entrapment in windows or inadvertent door lock activation, do not leave children, people who require the assistance of others or pets unattended in your vehicle. Additionally, the temperature inside a closed vehicle on a warm day can quickly become high enough to cause a significant risk of injury or death to people and pets.
The power windows operate when the ignition switch is in the ON position, or for a period of time after the ignition switch is placed in the OFF position. If the driver’s or front passenger’s door is opened during this period of time, power to the windows is canceled.
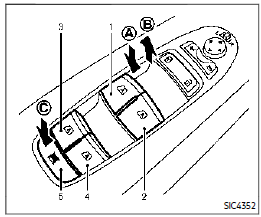
- Driver side window
- Front passenger side window
- Rear left passenger side window
- Rear right passenger side window
- Window lock button
Main power window switch (driver’s side)
To open or close the window, push down or pull up the switch and hold it. The main switch (driver-side switch) will open or close all the windows.
Locking rear passenger’s windows
When the window lock button is pushed, the rear passenger’s windows cannot be operated with the rear passenger’s power window switch. The rear passenger’s windows can only be operated with the main switch (driver-side switches). To cancel the passenger’s windows lock, push the window lock button again.
Example
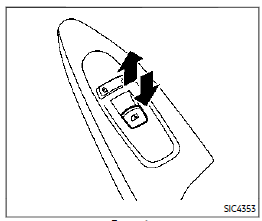
Passenger side power window switch
The passenger’s switch can control its corresponding window. When the window lock button on the driver’s switch is pushed, the rear passenger’s switch can-not be operated.
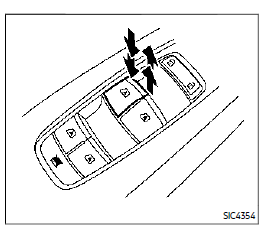
Automatic operation
To fully open or close the window, completely push down or pull up the switch and release it; it need not be held. The window will automatically open or close all the way. To stop the window, just push or lift the switch in the opposite direction.
A light push or pull on the switch will cause the window to open or close until the switch is released.
Auto reverse function
WARNING
There are some small distances immediately before the closed position which cannot be detected. Make sure that all passengers have their hands, etc., inside the vehicle before closing the window.
There are some small distances immediately before the closed position which cannot be detected. Make sure that all passengers have their hands, etc., inside the vehicle before closing the window.
If the windows do not close automatically If the power window automatic function (closing only) does not operate properly, perform the following procedure to initialize the power window system.
Read all Instructions for Windows and Moonroof User Guide
Nissan ARMADA 2022 Welcome and Interior lights and Vanity mirror and Cargo light User Guide
2022 Nissan ARMADA Welcome and Interior lights | Vanity mirror and Cargo light
WELCOME LIGHT (if so equipped)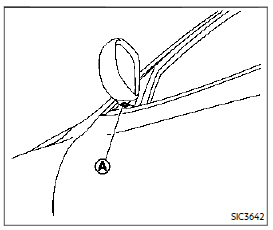
To activate or deactivate the welcome light function, perform the following procedure.
- Place the ignition switch in the ON position.
- Open the driver’s side door.
- Within 20 seconds after the ignition switch is placed in the ON position, push the door open request switch on the driver’s side door handle for more than 5 seconds with the driver’s door open.
- A chime sounds when the setting is completed. Once the welcome light function is active, the puddle light and the passenger cabin illumination will illuminate when you approach the vehicle with the Intelligent Key (within approximately 3.3 ft (1 m) of the antenna built inside the door handles) and the following conditions are met.
- All doors are closed and locked.
- The ignition switch is in the LOCK or OFF position.
- The Intelligent Key is outside the vehicle.
- The puddle light operates within a set duration.
BATTERY SAVER SYSTEM
The welcome light function will be deactivated automatically to prevent battery discharge under the following conditions. To activate the welcome light function again, unlock any door.
- If the welcome light function does not operate within a set duration. Note that the duration is set to 9 days as the factory default setting.
- If the welcome light function is activated 15 consecutive times when you approach and leave the vehicle with the Intelligent Key without the doors being unlocked.
INTERIOR LIGHTS
CAUTION
- Turn off the lights when you leave the vehicle.
- Do not use the lights for extended periods of time with the engine stopped. This could result in a discharged battery.
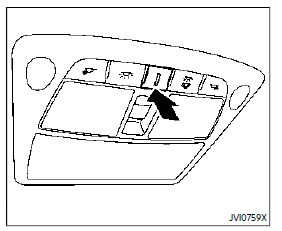
INTERIOR LIGHT SWITCH
- ON switch
When the ON switch is pushed in, the map lights and rear personal lights will illuminate. - DOOR OFF switch
When the switch is not pushed in, the map lights and rear personal lights will illuminate for a period of time under the following conditions:
- when the ignition switch is placed in the OFF position.
- when doors are unlocked by pushing the UNLOCK button on the Intelligent Key or door handle request switch with the ignition switch in the OFF position.
- when any door is opened and then closed with the ignition switch in the OFF position.
- when any door is opened with the ignition switch in the ACC or ON position.
- The lights will remain on while the door is opened. When the door is closed, the lights will turn off. When the “Auto Room Lamp” feature is set to be OFF (see “Vehicle settings” (P.2-24)), the lights will illuminate under the following condition:
- any door is opened with the ignition switch in any position
- remain on while the door is opened.
When the door is closed, the lights go off.
- remain on while the door is opened.
When the switch is pushed in, the map lights and rear personal lights will not illuminate under the above condition.
CONSOLE LIGHT
The console light will turn on whenever the front parking lights or headlights are illuminated.
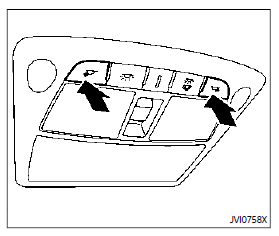
MAP LIGHTS
Push the button as illustrated to turn the light on or off.
REAR PERSONAL LIGHTS
Push the button as illustrated to turn the light on or off.
VANITY MIRROR LIGHTS
The light on the vanity mirror will turn on when the cover on the vanity mirror is opened.
When the cover is closed, the light will turn off.
The lights will also turn off after a period of time when the lights remain illuminated to prevent the battery from becoming discharged.
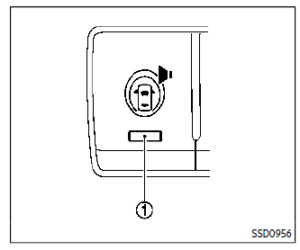
CARGO LIGHT
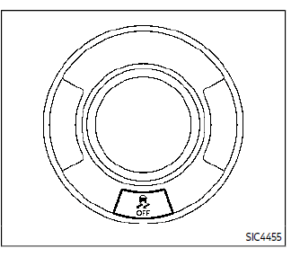
The cargo light switch has three positions: ON , center, and OFF.
ON position
When the switch is in the ON position, the cargo light will illuminate.
Center position
When the switch is in the center position, the cargo light will illuminate when the liftgate is opened.
OFF position
When the switch is in the OFF position, the cargo light will not illuminate.
Read all Instructions for Welcome and Interior lights and Vanity mirror and Cargo light User Guide
Nissan ARMADA 2022 HomeLink® Universal Transceiver User Guide
HomeLink® UNIVERSAL TRANSCEIVER (Type A) (if so equipped)
The HomeLink® Universal Transceiver provides a convenient way to consolidate the functions of up to three individual hand-held transmitters into one built-in device.
HomeLink® Universal Transceiver:
- Will operate most Radio Frequency (RF) devices such as garage doors, gates, home and office lighting, entry door locks and security systems.
- Is powered by your vehicle’s battery. No separate batteries are required. If the vehicle’s battery is discharged or is disconnected, HomeLink® will retain all programming.
When the HomeLink® Universal Transceiver is programmed, retain the original transmitter for future programming procedures (Example: new vehicle purchases). Upon sale of the vehicle, the programmed HomeLink® Universal Transceiver buttons should be erased for security purposes. For additional information, refer to “Programming HomeLink®”
(P.2-84).
WARNING
- Do not use the HomeLink® Universal Transceiver with any garage door opener that lacks safety stop and reverse features as required by federal safety standards. (These standards became effective for opener models manufactured after April 1, 1982). A garage door opener which cannot detect an object in the path of a closing garage door and then automatically stop and reverse does not meet current federal safety standards. Using a garage door opener without these features increases the risk of serious injury or death.
- During the programming procedure your garage door or security gate will open and close (if the transmitter is within range). Make sure that people or objects are clear of the garage door, gate, etc. that you are programming.
- Your vehicle’s engine should be turned off while programming the HomeLink® Universal Transceiver. Do not breathe exhaust gases; they contain colorless and odorless carbon monoxide. Carbon monoxide is dangerous. It can cause unconsciousness or death.
PROGRAMMING HomeLink®
The following steps show generic instructions how to program a HomeLink® button. If you have any questions or are having difficulty programming your HomeLink® buttons, refer to the HomeLink® web site at: www.homelink. com/Nissan or call 1-800-355-3515.
NOTE:
It is also recommended that a new battery be placed in the hand-held transmitter of the device being programmed to HomeLink® for quicker programming and accurate transmission of the radio frequency.
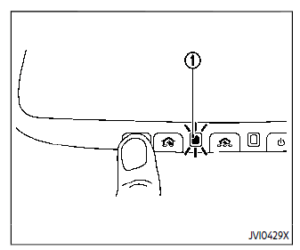
- Position the end of your hand-held transmitter 1-3 in (26-76 mm) away from the HomeLink® surface, keeping the HomeLink® indicator light in view.
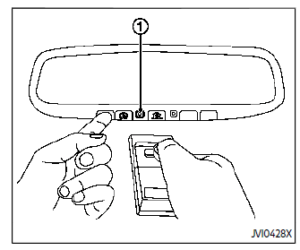
- Using both hands, simultaneously press and hold the desired HomeLink® button and handheld transmitter button. DO NOT release until the HomeLink® indicator light flashes slowly and then rapidly. When the indicator light flashes rapidly, both buttons may be released. (The rapid flashing indicates successful programming.)NOTE:
Some devices to be programmed may require you to replace Step 2 with the cycling procedure noted in the “Programming HomeLink® for Canadian customers and gate openers” (P.2-85).
- Press the button for 2 seconds up to 3 times.
- If the garage door responds, programing is completed.
- If the garage door does not respond, continue with Steps 4-6 for a rolling code device. A second person may make the following steps easier. Use a ladder or other device. Do not stand on your vehicle to perform the next steps.
- At the receiver located on the garage door opener motor in the garage, locate the “Learn” or “Set” button (the name and color of the button may vary by manufacturer but it is usually located near where the hanging antenna wire is attached to the unit). If there is difficulty locating the button, reference the garage door opener’s manual.
- Press and release the “Learn” or “Set” button.
NOTE:
Once the button is pressed, you have approximately 30 seconds to initiate the next step. - Return to the vehicle and firmly press and hold the programmed HomeLink® button for two seconds and release. Repeat the “press/hold/release” se-quence up to 3 times to complete the programming process. HomeLink® should now activate your rolling code equipped device.
- If you have any questions or are having difficulty programming your HomeLink® buttons, refer to the HomeLink® web site at: www. homelink.com/nissan or call 1-800-355-3515.
PROGRAMMING HomeLink® FO CANADIAN CUSTOMERS AND GATE OPENERS
Canadian radio-frequency laws require transmitter signals to “time-out” (or quit) after several seconds of transmission –which may not be long enough for HomeLink® to pick up the signal during programming. Similar to this Canadian law, some U.S. gate operators are de-signed to “time-out” in the same manner.
If you live in Canada or you are having difficulties programming a gate operator or garage door opener by using the “Programming HomeLink®” procedures, replace “Programming HomeLink®” Step 2 with the following:
Read all Instructions for HomeLink® Universal Transceiver User Guide
Nissan ARMADA 2022 Keys, Doors and Intelligent Key® System User Guide
Keys
A key number plate is supplied with your keys. Record the key number and keep it in a safe place (such as your wallet), not in the vehicle. If you lose your keys, it is recommended you visit a NISSAN dealer for duplicates by using the key number. NISSAN does not record any key numbers so it is very important to keep track of your key number plate.
A key number is only necessary when you have lost all keys and do not have one to duplicate from. If you still have a key, it can be duplicated without knowing the key number.
- Intelligent Key (2)
- Mechanical key (inside Intelligent Key) (2)
- Key number plate (1)
INTELLIGENT KEY
Your vehicle can only be driven with the Intelligent Keys which are registered to your vehicle’s Intelligent Key system components and NISSAN Vehicle Immobilizer System components. As many as 4 Intelligent Keys can be registered and used with one vehicle. The new keys must be registered by a NISSAN dealer prior to use with the Intelligent Key system and NISSAN Vehicle Immobilizer System of your vehicle. Since the registration process requires erasing all memory in the Intelligent Key components when registering new keys, be sure to take all Intelligent Keys that you have to the NISSAN dealer.
CAUTION
- Be sure to carry the Intelligent Key with you when driving. The Intelligent Key is a precision de-vice with a built-in transmitter. To avoid damaging it, please note the following.
- The Intelligent Key is water resistant; however, wetting may damage the Intelligent Key. If the Intelligent Key gets wet, immediately wipe until it is completely dry.
- Do not bend, drop or strike it against another object.
- If the outside temperature is below 14°F (−10°C), the battery of the Intelligent Key may not function properly.
- Do not place the Intelligent Key for an extended period in a place where temperatures exceed 140°F (60°C).
- Do not change or modify the Intelligent Key.
- Do not use a magnet key holder.
- Do not place the Intelligent Key near an electric appliance such as a television set or personal computer.
- Do not allow the Intelligent Key to come into contact with water or salt water, and do not wash it in a washing machine. This could affect the system function.
- If an Intelligent Key is lost or stolen, NISSAN recommends erasing the ID code of that Intelligent Key. This will prevent the Intelligent Key from unauthorized use to unlock the vehicle. For information regarding the erasing procedure, it is recommended you visit a NISSAN dealer.
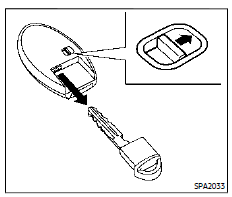
Mechanical key
To remove the mechanical key, release the lock knob at the back of the Intelligent Key.
To install the mechanical key, firmly insert it into the Intelligent Key until the lock knob returns to the lock position.
Use the mechanical key to lock or unlock the doors and the glove box.
See “Doors” (P.3-4) and “Storage” P.2-69.
CAUTION
Always carry the mechanical key installed in the Intelligent Key.
VALET HAND-OFF
When you have to leave a key with a valet, give them the Intelligent Key itself and keep the mechanical key with you to protect your belongings.
To prevent the glove box from being opened during valet hand-off, follow the procedures below.
- Remove the mechanical key from the Intelligent Key.
- Lock the glove box with the mechanical key.
- Hand the Intelligent Key to the valet, keeping the mechanical key in your pocket or bag for insertion into the Intelligent Key when you retrieve your vehicle. See “Storage” (P.2-69).
Read all Instructions for Keys, Doors and Intelligent Key® System User Guide
Nissan ARMADA 2022 Remote keyless entry system and Remote engine start and Hood and Liftgate User Guide
REMOTE KEYLESS ENTRY SYSTEM
WARNING
The Intelligent Key transmits radio waves when the buttons are pushed. The FAA advises that radio waves may affect aircraft navigation and communication systems. Do not operate the Intelligent Key while on an airplane. Make sure the buttons are not operated unintentionally when the unit is stored for a flight.
It is possible to lock/unlock all doors, fuel-filler door, activate the panic alarm and open the windows by pushing the but-tons on the Intelligent Key from outside the vehicle.
Before locking the doors, make sure the Intelligent Key is not left in the vehicle.
The LOCK/UNLOCK button on the Intelligent Key can operate at a distance of approximately 33 ft (10 m) from the vehicle. (The effective distance depends upon the conditions around the vehicle.)
As many as 4 Intelligent Keys can be used with one vehicle. For information concerning the purchase and use of additional Intelligent Keys, contact a NISSAN dealer.
The lock and unlock buttons on the
Intelligent Key will not operate when:
- the distance between the Intelligent Key and the vehicle is over 33 ft (10 m).
- the Intelligent Key battery runs down. After locking with the remote keyless entry function, pull the door handle to make sure the doors are securely locked.
The LOCK/UNLOCK operating range varies depending on the environment. To securely operate the lock and unlock buttons, approach the vehicle to about 3 ft (1 m) from the door.
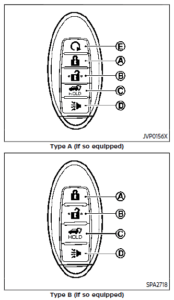
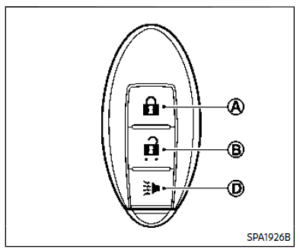
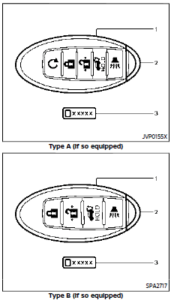
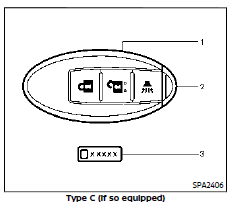
- LOCK button
- UNLOCK button
- Power liftgate button PANIC button
- Remote engine start button
HOW TO USE A REMOTE KEYLESS ENTRY SYSTEM
When you lock or unlock the doors or the liftgate, the hazard indicator will flash and the horn (or the outside chime) will sound as a confirmation. For details, see “Setting hazard indicator and horn mode” (P.3-17).
Locking doors
- Move the shift lever to the P (Park) position, push the ignition switch to the OFF position and make sure you carry the Intelligent Key with you.*
- Close all the doors and the liftgate.
- Push the LOCK button on the Intelligent Key.
- All the doors and the liftgate will lock.
- The hazard indicator flashes twice and the horn chirps once.
*: Doors will lock with the Intelligent Key while the ignition switch is in the ACC or ON position.
Unlocking doors
- Push the UNLOCK button on the Intelligent Key once.
- The hazard indicator flashes once. The driver’s door will unlock. The puddle light and the passenger cabin illumination will illuminate and stay on for a short period of time (if so equipped). (See “Welcome light” (P.2- 80).)
- Push the UNLOCK button on the Intelligent Key again within 60 seconds.
- The hazard indicator flashes once again. All the doors will unlock. All doors will be locked automatically unless one of the following operations is performed within 1 minute after pushing the UNLOCK button on the Intelligent Key while the doors are locked. If during this 1- minute time period, the UNLOCK button on the Intelligent Key is pushed, all doors will be locked automatically after another1 minute.
- Opening any door
- Pushing the ignition switch
NOTE:
The unlocking operation can be changed in selective unlock in the Vehicle Settings of the vehicle information display. See “Vehicle settings” (P.2-24).
Opening windows
To open the windows, push the door UNLOCK button on the Intelligent Key for about 3 seconds after the door is unlocked.
Nissan ARMADA 2022 Fuel-filler door and Tilt/telescopic steering and Sun visors User Guide
2022 Nissan ARMADA Fuel-filler door and Tilt telescopic steering
FUEL-FILLER DOOR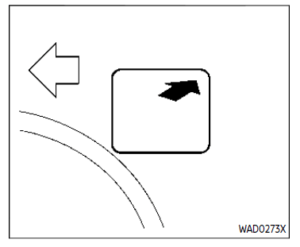
OPENING THE FUEL-FILLER DOOR
To open the fuel-filler door, push the upper right side of the fuel-filler door to release.
FUEL-FILLER CAP
WARNING
- Gasoline is extremely flammable and highly explosive under certain conditions. You could be burned or seriously injured if it is misused or mishandled. Always stop the engine and do not smoke or allow open flames or sparks near the vehicle when refueling.
- Do not attempt to top off the fuel tank after the fuel pump nozzle shuts off automatically. Continued refueling may cause fuel overflow, resulting in fuel spray and possibly a fire.
- Use only an original equipment-type fuel-filler cap as a replacement. It has a built-in safety valve needed for the proper operation of the fuel system and emission control system. An incorrect cap can result in a serious malfunction and possible injury. It could also cause the malfunction indicator light to come on.
- Never pour fuel into the throttle body to attempt to start your vehicle.
- Do not fill a portable fuel container in the vehicle or trailer. Static electricity can cause an explosion of flammable liquid, vapor or gas in any vehicle or trailer. To reduce the risk of serious injury or death when filling portable fuel containers:
- Always place the container on the ground when filling.
- Do not use electronic devices when filling.
- Keep the pump nozzle in contact with the container while you are filling it.
- Use only approved portable fuel containers for flammable liquid.
CAUTION
- If fuel is spilled on the vehicle’s body, flush it away with water to avoid paint damage.
- Insert the cap straight into the fuel-filler tube, then tighten it until the fuel-filler cap clicks. Failure to tighten the fuel-filler cap properly may cause the malfunction indicator light (MIL) to illuminate. If the light illuminates because the fuel-filler cap is loose or missing, tighten or install the cap and continue to drive the vehicle. The light should turn off after a few driving trips. If the light does not turn off after a few driving trips, have the vehicle inspected. It is recommended you visit a NISSAN dealer for this service.
- The Loose Fuel Cap warning will appear if the fuel-filler cap is not properly tightened. It may take a few driving trips for the message to be displayed. Failure to tighten the fuel-filler cap properly after the Loose Fuel Cap warning appears may cause the Malfunction Indicator Light (MIL) to illuminate.
Turn the cap counterclockwise to remove. To tighten, turn the cap clockwise until a single click is heard.
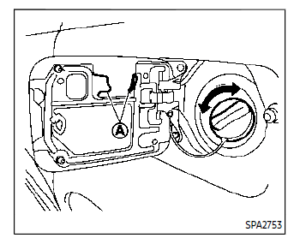
To remove the fuel-filler cap:
- Turn the fuel-filler cap countershock-wise to remove it.
- Put the fuel-filler cap on the cap holder while refueling.
To install the fuel-filler cap:
- Insert the fuel-filler cap straight into the fuel-filler tube.
- Turn the fuel-filler cap clockwise until a single click is heard.
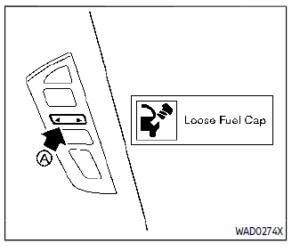
Loose Fuel Cap warning
The Loose Fuel Cap warning appears on the vehicle information display when the fuel-filler cap is not tightened correctly after the vehicle has been refueled. It may take a few driving trips for the warning to be displayed.
To turn off the warning, perform the following:
- Remove and install the fuel-filler caps as soon as possible. (See “Fuel-filler cap” (P.3-26).)
- Tighten the fuel-filler cap until it clicks.
- Push the switch on the steering wheel to turn off the Loose Fuel Cap warning after tightening the fuel-filler cap.
TILT/TELESCOPIC STEERING
WARNING
- Do not adjust the steering wheel while driving. You could lose control of your vehicle and cause an accident.
- Do not adjust the steering wheel any closer to you than is necessary for proper steering operation and comfort. The driver’s airbag inflates with great force. If you are unrestrained, leaning forward, sitting sideways or out of position in any way, you are at greater risk of injury or death in a crash. You may also receive serious or fatal injuries from the airbag if you are up against it when it inflates. Always sit back against the seatback and as far away as practical from the steering wheel. Always use seat belts.
ELECTRIC OPERATION
Tilt or telescopic operation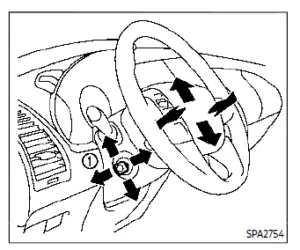 Move the lever to adjust the steering wheel up or down, forward or rearward to the desired position.
Entry/Exit function operation (if so equipped):
The memory seat system will make the steering wheel move up automatically when the driver’s door is opened with the ignition switch in the LOCK position. This lets the driver get into and out of the seat more easily.
For more information, see “Memory seat” (P.3-40).
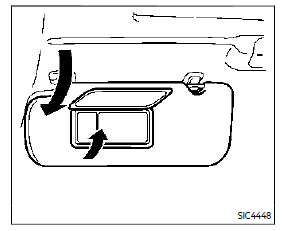
SUN VISORS
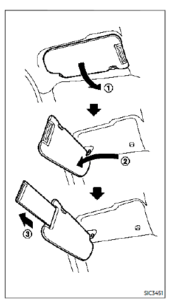
CAUTION
- Do not store the main sun visor before storing the extension sun visor.
- Do not pull the extension sun visor forcedly downward.
- To block out glare from the front, swing down the main sun visor .
- To block glare from the side, remove the main sun visor from the center mount and swing it to the side .
- Draw out the extension sun visor from the main sun visor to block from further glare.
Read all Instructions for Fuel-filler door and Tilt/telescopic steering and Sun visors User Guide
Nissan ARMADA 2022 Mirrors and Memory Seat User Guide
Mirrors
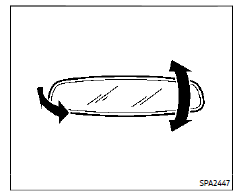
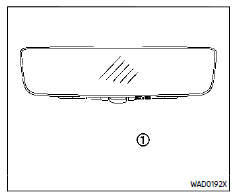
INSIDE MIRROR
Adjust the height and the angle of the inside mirror to the desired position.

Manual anti-glare type (if so equipped)
The night position will reduce glare from the headlights of vehicles behind you at night.
Use the day position when driving in daylight hours.
WARNING
Use the night position only when necessary, because it reduces rear view clarity.
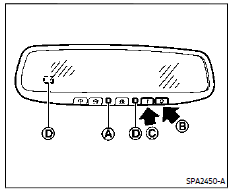
Automatic anti-glare type (if so equipped)
The inside mirror is designed so that it automatically changes reflection according to the intensity of the headlights of the following vehicle.
The anti-glare system will be automatically turned on when the ignition switch is placed in the ON position.
When the anti-glare system is turned on, the indicator light will illuminate and excessive glare from the headlights of the vehicle behind you will be reduced.
Push the “*” switch to make the inside rearview mirror operate normally. The indicator light will turn off. Push the “I” switch to turn the system on.
Do not allow any object to cover the sensors or apply glass cleaner on them. Doing so will reduce the sensitivity of the sensor, resulting in improper operation.
For the HomeLink® Universal Transceiver operation, see “HomeLink® Universal Transceiver (Type A)” (P.2-83).
Intelligent Rear View Mirror (if so equipped)
WARNING
Failure to follow the warnings and instructions for proper use of the Intelligent Rear View Mirror could result in serious injury or death.
- The Intelligent Rear View Mirror is a convenience feature but it is not a substitute for proper vehicle operation. The system has areas where objects cannot be viewed. Check the blind spot of the Intelligent Rear View Mirror before vehicle operation. The driver is always responsible for safe driving.
- Do not disassemble or modify the Intelligent Rear View Mirror, the camera unit or wirings. If you do, it may result in accidents or fire. In case you notice smoke or smell coming from the Intelligent Rear View Mirror, stop using the system immediately. It is recommended that you see a NISSAN dealer for servicing.
- Do not operate the Intelligent Rear View Mirror while driving. Doing so can be a distraction and it could lose control of your vehicle and cause an accident or serious injury.
- Do not gaze into the Intelligent Rear View Mirror display during driving. It may cause a distraction and it could lose control of your vehicle and cause an accident or serious injury.
- Do not put a cigarette or flames to the Intelligent Rear View Mirror, the camera unit or wirings. It may cause a fire.
- Be sure to adjust the Intelligent Rear View Mirror before driving. Switch the system to the conventional rearview mirror mode and be properly seated on the driver’s seat. Then adjust the mirror so as to see the rear window properly. Driving without adjusting the mirror may cause difficulty in watching the display at Intelligent Rear View Mirror mode (camera view mode) due to the reflection from the surface of the mirror.
- If the Intelligent Rear View Mirror malfunctions, immediately switch the system to the conventional rearview mirror mode.
- When strong light (for example, sunlight or high beams from following vehicles) enters the camera, a light beam or a glaring light may appear on the monitor screen of the Intelligent Rear View Mirror. In that case, switch the system to the conventional rearview mirror mode appropriately.
- If dirt, rain or snow accumulates on the exterior glass surface covering the camera, the Intelligent Rear View Mirror may not display objects clearly. Use of the rear window wiper/washer may improve visibility, but if not, switch the Intelligent Rear View Mirror to the conventional rearview mirror mode until a time the glass covering the camera can be cleaned.
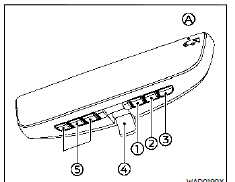
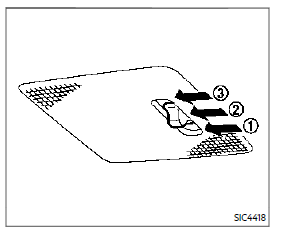
- MENU button
- Left button
- Right button
- Mode select lever HomeLink® buttons (1-3)
Components:
Intelligent Rear View Mirror provides a clear rearview from a camera located on the rear of the vehicle. Intelligent Rear View Mirror has two modes: conventional rearview mirror mode and Intelligent Rear View Mirror mode (camera view mode). You can switch these two modes by the mode select lever.
When the Intelligent Rear View Mirror mode is selected, the indicator is displayed.
For the operation of the HomeLink® buttons, see “HomeLink® Universal Transceiver (Type B)” (P.2-87).
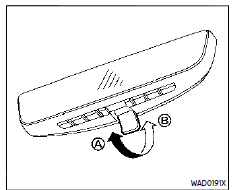
How to change the mode:
The mode can be switched when the ignition switch is in the ON position.
- Pull the mode select lever to switch to the Intelligent Rear View Mirror mode (camera view mode).
- Push the mode select lever to switch to the conventional rearview mirror mode.
How to make settings of Intelligent Rear View Mirror:
You can choose display settings of the Intelligent Rear View Mirror such as brightness, camera angle, textual indication ON or OFF and language.
When the Intelligent Rear View Mirror mode is on, the setting menu can be selected by pushing the MENU button. Each time the MENU button is pushed, the setting menu will change as follows:
MENU (initial screen) ?BRIGHTNESS?DOWN/UP? LEFT/RIGHT
Read all Instructions for Mirrors and Memory Seat User Guide
Nissan ARMADA 2022 NissanConnect Owner’s Manual and RearView Monitor User Guide
NISSANCONNECT® OWNER’S MANUAL SAFETY NOTE
For models with NissanConnect® and Services, refer to the NissanConnect® Owner’s Manual regarding the following information.
- Audio system
- Bluetooth® Hands-Free Phone
- NissanConnect® Services
- SiriusXM traffic
- SiriusXM® Travel Link
- SiriusXM® Radio
- Navigation system
- Voice Recognition System
- Information and settings viewable on NissanConnect®
- Android AutoTM
- Apple CarPlay®
WARNING
- Do not disassemble or modify this system. If you do, it may result in accidents, fire, or electric shock.
- Do not use this system if you notice any abnormality, such as a frozen screen or lack of sound. Continued use of the system may result in an accident, fire or electric shock.
- In case you notice any foreign object in the system hardware, spill liquid on it, or notice smoke or smell coming from it, stop using the system immediately. It is recommended you visit a NISSAN dealer for servicing. Ignoring such conditions may lead to accidents, fire, or electric shock.
- Park the vehicle in a safe location and apply the parking brake to view the images on the touchscreen display.
CAUTION
Do not use the system when the engine is not running for extended periods of time to prevent battery discharge.
Do not attempt to operate the system in extreme temperature conditions [below 4°F (−20°C) and above 158°F (70°C)]. Operating this system under these conditions may result in system malfunctions.
REARVIEW MONITOR (if so equipped)
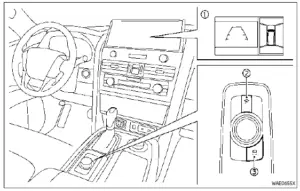
- Touch screen display
- MENU button
- CAMERA button
WARNING
- Failure to follow the warnings and instructions for proper use of the RearView Monitor could result in serious injury or death.
- RearView Monitor is a convenience feature and is not a substitute for proper backing. Always turn and look out the windows, and check mirrors to be sure that it is safe to move before operating the vehicle. Always back up slowly.
- The system is designed as an aid to the driver in showing large stationary objects directly behind the vehicle, to help avoid damaging the vehicle.
- The distance guide line and the vehicle width line should be used as a reference only when the vehicle is on a level paved surface. The distance viewed on the monitor is for reference only and may be different than the actual distance between the vehicle and displayed objects.
CAUTION
Do not scratch the camera lens when cleaning dirt or snow from the front of the camera.
The RearView Monitor system automatically shows a rear view of the vehicle when the shift lever is placed in the R (Reverse) position.
The radio can still be heard while the RearView Monitor is active.
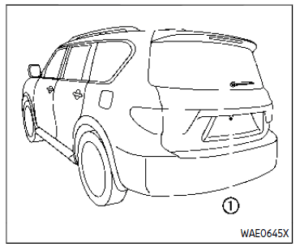
To display the rearview, the RearView Monitor system uses a camera located just above the vehicle’s license plate.
REARVIEW MONITOR SYSTEM OPERATION
When the ignition switch is placed in the ON position, move the shift lever to the R (Reverse) position to operate the Rear-View Monitor.

HOW TO READ THE DISPLAYED LINES
Guiding lines that indicate the vehicle width and distances to objects with reference to the bumper line are displayed on the monitor.
Distance guidelines – :
Indicate distances from the vehicle body.
- Red line : approximately 1.5 ft (0.5 m) .
- Yellow line: approximately 3 ft (1 m) .
- Green line : approximately 7 ft (2 m)
- Vehicle width guide lines :
Indicate the vehicle width when backing up.
Predictive course lines :
Indicate the predictive course when backing up. The predictive course lines will be displayed on the monitor when the shift lever is in the R (Reverse) position and if the steering wheel is turned. The predictive course lines will move depending on how much the steering wheel is turned and will not be displayed while the steering wheel is in the straight-ahead position.
The vehicle width guide lines and the width of the predictive course lines are wider than the actual width and course.
DIFFERENCE BETWEEN PREDICTIVE AND ACTUAL DISTANCES
The displayed guidelines and their locations on the ground are for approximate reference only. Objects on uphill or down-hill surfaces or projecting objects will be actually located at distances different from those displayed in the monitor relative to the guidelines (refer to illustrations). When in doubt, turn around and view the objects as you are backing up, or park and exit the vehicle to view the positioning of objects behind the vehicle.
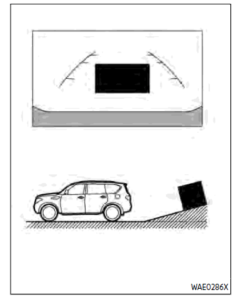
Backing up on a steep uphill
When backing up the vehicle up a hill, the distance guide lines and the vehicle width guide lines are shown closer than the actual distance. Note that any object on the hill is farther than it appears on the monitor.
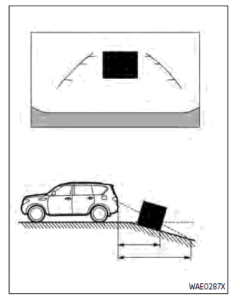
Backing up on a steep downhill
When backing up the vehicle down a hill, the distance guide lines and the vehicle width guide lines are shown farther than the actual distance. Note that any object on the hill is closer than it appears on the monitor.
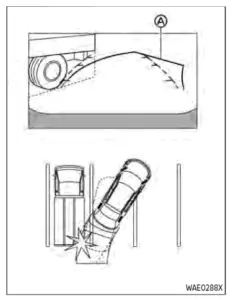
Backing up near a projecting object
The predictive course lines do not touch the object in the display. However, the vehicle may hit the object if it projects over the actual backing up course.
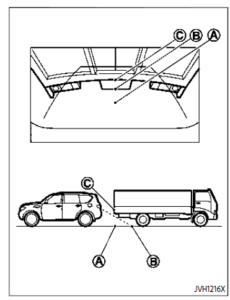
Backing up behind a projecting object
The position is shown farther than the position in the display. However, the position is actually at the same distance as the position. The vehicle may hit the object when backing up to the position if the object projects over the actual backing up course.
HOW TO PARK WITH PREDICTIVE COURSE LINES
WARNING
- If the tires are replaced with different-sized tires, the predictive course lines may be displayed incorrectly.
- On a snow-covered or slippery road, there may be a difference between the predictive course line and the actual course line.
- If the battery is disconnected or becomes discharged, the predictive course lines may be displayed incorrectly. If this occurs, please perform the following procedures:
- Turn the steering wheel from lock to lock while the engine is running.
- Drive the vehicle on a straight road for more than 5 minutes.
- When the steering wheel is turned with the ignition switch in the ON position, the predictive course lines may be displayed incorrectly.
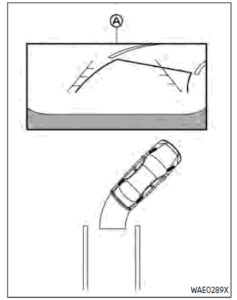
- Visually check that the parking space is safe before parking your vehicle.
- The rear view of the vehicle is displayed on the screen when the shift lever is moved to the R (Reverse) position.

Read all Instructions for NissanConnect Owner’s Manual and RearView Monitor User Guide
Nissan ARMADA 2022 Intelligent Around View® Monitor User Guide
2022 Nissan ARMADA Intelligent Around View Monitor Guidelines
Intelligent Around View® Monitor (if so equipped)
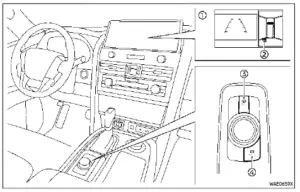
- Touch screen display
- MENU button
- CAMERA button
WARNING
Failure to follow the warnings and instructions for the proper use of the Intelligent Around View® Monitor system could result in serious injury or death.
- The Intelligent Around View® Monitor is a convenience feature and is not a substitute for proper vehicle operation because it has areas where objects cannot be viewed. The four corners of the vehicle in particular, are areas where objects do not always appear in the bird’s-eye, front, or rear views. Always check your surroundings to be sure that it is safe to move before operating the vehicle. Always operate the vehicle slowly. Always look out the windows and check mirrors to be sure that it is safe to move.
- The driver is always responsible for safety during parking and other maneuvers.
CAUTION
Do not scratch the lens when cleaning dirt or snow from the front of the camera.
The Intelligent Around View® Monitor system is designed as an aid to the driver in situations such as slot parking or parallel parking.
The monitor displays various views of the position of the vehicle in a split-screen format. All views are not available at all times.
Available views:
- Front view
An approximately 150-degree view of the front of the vehicle.
- Rearview An approximately 150-degree view of the rear of the vehicle.
- Bird’s-eye view
The surrounding view of the vehicle from above. - Front-side view
The view around and ahead of the front passenger’s side wheel. - Front-wide view
An approximately 180-degree view of the front of the vehicle. - Rear-wide view
An approximately 180-degree view of the rear of the vehicle.
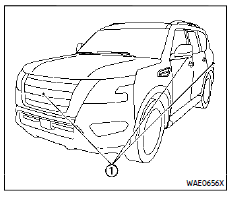
To display multiple views, the Intelligent Around View® Monitor system uses cameras located in the front grill, on the vehicle’s outside mirrors and one just above the vehicle’s license plate.
INTELLIGENT AROUND VIEW® MONITOR SYSTEM OPERATION
With the ignition switch in the ON position, move the shift lever to the R (Reverse) position or push the CAMERA button to operate the Intelligent Around View® Monitor.
The screen displayed on the Intelligent Around View® Monitor will automatically return to the previous screen 3 minutes after the CAMERA button has been pushed with the shift lever in a position other than the R (Reverse) position.
Available views
WARNING
- The distance guide line and the vehicle width line should be used as a reference only when the vehicle is on a paved, level sur-face. The distance viewed on the monitor is for reference only and may be different than the actual distance between the vehicle and displayed objects.
- Use the displayed lines and the bird’s-eye view as a reference. The lines and the bird’s-eye view are greatly affected by the number of occupants, fuel level, vehicle position, road condition and road grade.
- If the tires are replaced with different sized tires, the predictive course lines and the bird’s-eye view may be displayed incorrectly.
- When driving the vehicle up a hill, objects viewed in the monitor are farther than they appear. When driving the vehicle down a hill, objects viewed in the monitor are closer than they appear.
- Objects in the rear view will appear visually opposite compared to when viewed in the rear view and outside mirrors.
- Use the mirrors or actually look to properly judge distances to other objects.
- The distance between objects viewed in the rear view differs from actual distance because a wide-angle lens is used.
- On a snow-covered or slippery road, there may be a difference between the predictive course lines and the actual course line.
- The vehicle width and predictive course lines are wider than the actual width and course.
- The displayed lines on the rear view will appear slightly off to the right because the rearview camera is not installed in the rear center of the vehicle.
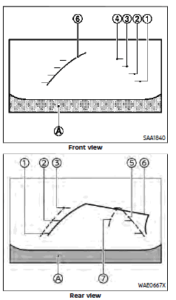
Predictive course lines ( and ) indicate the predictive course when operating the vehicle. The predictive course lines ( and ) will be displayed on the monitor when the steering wheel is turned. The predictive course lines ( and ) will move depending on how much the steering wheel is turned.
WARNING
- Objects in the bird’s-eye view will appear farther than the actual distance.
- Tall objects, such as a curb or vehicle, may be misaligned or not displayed at the seam of the views.
- Objects that are above the camera cannot be displayed.
- The view for the bird ’seye view may be misaligned when the camera position alters.
- A line on the ground may be misaligned and is not seen as being straight at the seam of the views. The misalignment will in-crease as the line proceeds away from the vehicle.
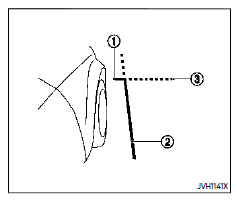
Front-side view:
Guiding lines:
Guiding lines that indicate the width and the front end of the vehicle are displayed on the monitor.
The front-of-vehicle line front part of the vehicle.
The side-of-vehicle line
shows the vehicle width including the outside mirror.
The extensions of both the front and side lines are shown with a green dotted line.
Read all Instructions for Intelligent Around View® Monitor User Guide
Nissan ARMADA 2022 Moving Object Detection User Guide
MOVING OBJECT DETECTION (MOD)
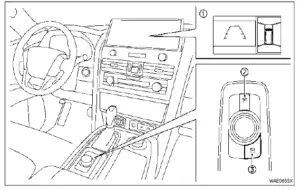
- Touch screen display
- MENU button
- CAMERA button
WARNING
Failure to follow the warnings and instructions for proper use of the Moving Object Detection system could result in serious injury or death.
- The MOD system is not a substitute for proper vehicle operation and is not designed to prevent contact with the objects surrounding the vehicle. When maneuvering, always use the outside mirror and rearview mirror and turn and check the surrounding to ensure it is safe to maneuver.
- The system is deactivated at speeds above 6 MPH (10 km/h). It is reactivated at lower speeds.
- The MOD system is not designed to detect the surrounding stationary objects.
The Moving Object Detection (MOD) system can inform the driver of the moving objects surrounding the vehicle when driving out of garages, maneuvering into parking lots and in other such instances.
The MOD system detects moving objects by using image processing technology on the image shown on the display.
MOD SYSTEM OPERATION
The MOD system will turn on automatically under the following conditions:
- When the shift lever is in the R (Reverse) position.
- When the CAMERA button is pushed to activate the camera view on the display.
- When vehicle speed decreases below approximately 5 MPH (8 km/h) and the camera screen is displayed.
The MOD system operates in the following conditions when the camera view is displayed: - When the shift lever is in the P (Park) or N (Neutral) position and the vehicle is stopped, the MOD system detects moving objects in the bird’s-eye view. The MOD system will not operate if the outside mirrors are moving in or out, in the stowed position, or if either front door is opened.
- When the shift lever is in the D (Drive) position and the vehicle speed is below approximately 5 MPH (8 km/h), the MOD system detects moving objects in the front view or front-wide view.
- When the shift lever is in the R (Reverse) position and the vehicle speed is below approximately 5 MPH (8 km/h), the MOD system detects moving objects in the rearview or rear-wide view.
The MOD system will not operate if the liftgate is open.
The MOD system does not detect moving objects in the front-side view. The MOD icon is not displayed on the screen when in this view.
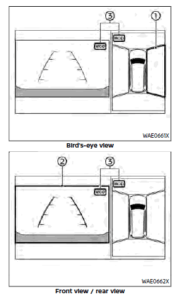
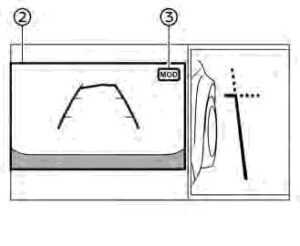
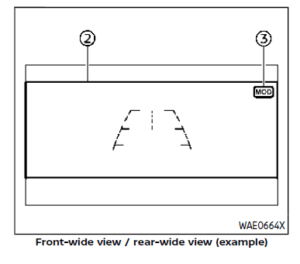
When the MOD system detects moving objects near the vehicle, a chime will be heard and a yellow frame will be displayed on the view where the objects are detected. While the MOD system continues to detect moving objects, the yellow frame continues to be displayed.
In the bird’s-eye view, the yellow frame is displayed on each camera image (front, rear, right, left) depending on where moving objects are detected.
The yellow frame is displayed on each view in the front view, front-wide view, rear view and rear-wide view modes.
A green MOD icon is displayed in the view where the MOD system is operative. A white MOD icon is displayed in the view where the MOD system is not operative.
If the MOD system is turned off, the MOD icon is not displayed.
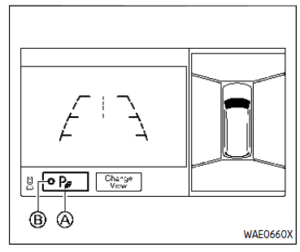
TURNING ON AND OFF THE MOD SYSTEM
When the “P” key is touched, the indicator light on the key will turn off and the MOD system will turn off temporarily. The sonar, the Rear Automatic Braking (RAB), and the Intelligent Back-up Intervention (I-BI) systems will also be turned off at the same time. See “Camera aiding sonar function (models with Intelligent Around View® Monitor)”
(P.4-26), “Rear Automatic Braking (RAB)” (P.5-116) and “Intelligent Back-up Intervention (I-BI)” (P.5-63).
When the “P” key is touched again, the indicator light will turn on and the MOD system will turn back on.
The sonar, the Rear Automatic Braking (RAB), and the Intelligent Back-up Intervention (I-BI) systems will also turn back on at the same time.
To enable or disable the MOD system, use the camera settings menu. See “MOD function settings” (P.4-34).
MOD FUNCTION SETTINGS
The MOD function settings can be changed using the following procedures.
- Push the MENU button on the Display Commander.
- Touch the “Settings” key on the touch screen display.
- Touch the “Camera” key.
- Touch the “Camera” key.
Available setting items:
Moving Object Detection:
When this item is turned on, the MOD system is activated. When this item is turned off (indicator turns off), the MOD system is deactivated.
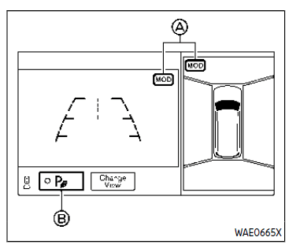
Read all Instructions for Moving Object Detection User Guide
Nissan ARMADA 2022 Ventilators and Heater and air conditioner User Guide
2022 Nissan ARMADA Ventilators and Heater | Air conditioner Guidelines
VENTILATORS
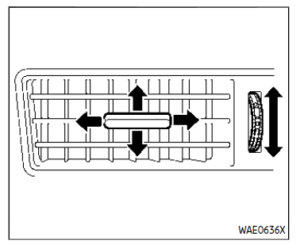
CENTER VENTILATORS
Open/close the ventilators by moving the control in either direction. Adjust the airflow direction of the ventilators by moving the center knob (up/down, left/right) until the desired position is achieved.
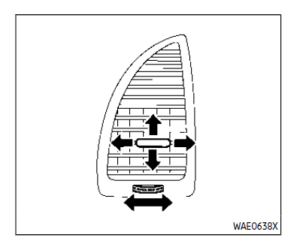
SIDE VENTILATORS
Open/close the ventilators by moving the control to either direction.
Adjust the air flow direction of the venti-lators by moving the center knob (up/down, left/right) until the desired position is achieved.
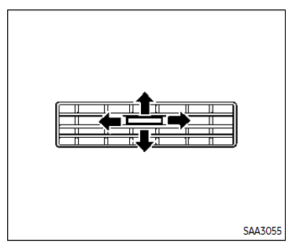
REAR VENTILATORS
Adjust the air flow direction of the venti-lators by moving the center knob (up/down, left/right) until the desired position is achieved.
HEATER AND AIR CONDITIONER
WARNING
- The air conditioner cooling function operates only when the engine is running.
- Do not leave children or adults who would normally require the support of others alone in your vehicle. Pets should not be left alone either. On hot, sunny days, temperatures in a closed vehicle could quickly become high enough to cause severe or possibly fatal injuries to people or animals.
- Do not use the recirculation mode for long periods as it may cause the interior air to become stale and the windows to fog up.
- Do not adjust the heating and air conditioning controls while driving so that full attention may be given to vehicle operation. vents.
- When parking, set the heater and air conditioner controls to turn off air recirculation to allow fresh air into the passenger compartment. This should help reduce odors inside the vehicle.
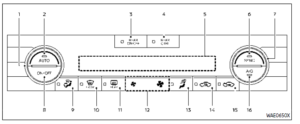
- Temperature control dial (driver’s side)
- AUTO (automatic) button
- REAR ON·OFF button
- REAR CTRL (rear control) button
- Display screen
- SYNC (synchronize) button
- Temperature control dial (passenger’s side)
- ON·OFF button
- (air flow control) button
- (front defroster) button
- (rear window defroster) button
(See “Rear window and outside mirror defroster switch” (P.2-45).) - (fan speed control) buttons
- Upper vent button
- (air recirculation) button
- (outside air circulation) button
- A/C (air conditioner) button
AUTOMATIC AIR CONDITIONER
Automatic operation
Cooling and/or dehumidified heating (AUTO):
This mode may be used all year round as the system automatically works to keep a constant temperature. Air flow distribution and fan speed are also controlled automatically.
- Push the AUTO button. (The indicator light on the button will illuminate.)
- Turn the temperature control dial on the corresponding side to set the desired temperature.
- You can individually set temperatures for the driver’s side and front passenger’s side when the indicator light on the SYNC button is not illuminated.
A visible mist may be seen coming from the ventilators in hot, humid conditions as the air is cooled rapidly. This does not indicate a malfunction.
Heating (A/C OFF):
The air conditioner does not activate in this mode. Use this mode when you only need to heat.
Read all Instructions for Ventilators and Heater and air conditioner User Guide
Nissan ARMADA 2022 Antenna and Car phone or CB radio User Guide
WINDOW ANTENNA
The antenna pattern is printed inside the rear side glass.
CAUTION
- Do not place metalized film near the 3rd row seat window or at-tach any metal parts to it. This may cause poor reception or noise.
- When cleaning the inside of the rear side window, be careful not to scratch or damage the rear side window antenna. Lightly wipe along the antenna with a dampened soft cloth.
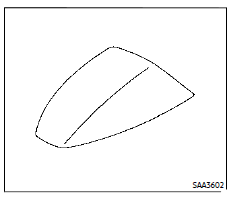
SATELLITE ANTENNA
There is a satellite antenna on the rear part of the vehicle roof.
CAR PHONE OR CB RADIO
When installing a car phone or a CB radio in your vehicle, be sure to observe the following cautions, otherwise, the new equipment may adversely affect the electronic control modules and electronic control system harness.
WARNING
- A cellular phone should not be used for any purpose while driving so full attention may be given to vehicle operation. Some juris-dictions prohibit the use of cellular phones while driving.
- If you must make a call while your vehicle is in motion, the hands-free cellular phone operational mode (if so equipped) is highly recommended. Exercise extreme caution at all times so full attention may be given to vehicle operation.
- If a conversation in a moving vehicle requires you to take notes, pull off the road to a safe location and stop your vehicle before doing so.
CAUTION
- Keep the antenna as far away as possible from the electronic control modules.
- Keep the antenna wire more than 8 in (20 cm) away from the electronic control system harness. Do not route the antenna wire next to any harness.
- Adjust the antenna standing-wave ratio as recommended by the manufacturer.. Connect the ground wire from the CB radio chassis to the body.
- For details, it is recommended you visit a NISSAN dealer.
Read all Instructions for Antenna and Car phone or CB radio User Guide
Nissan ARMADA 2022 Rear Seat Infotainment (RSI) User Guide
2022 Nissan ARMADA Rear Seat Infotainment (RSI) Installation
REAR SEAT INFOTAINMENT (RSI) (if so equipped)
WARNING
- It is unlawful in most jurisdictions for a person to drive a motor vehicle which is equipped with a television monitor or screen that is visible, directly or indirectly, to the driver while operating the vehicle. In the interest of safety, the unit should never be installed where it will be directly or indirectly visible, by the operator of the motor vehicle.
- For safety reasons when changing discs, it is recommended that the vehicle is not in motion, and that you do not allow children to unfasten safety belts to change discs or make any adjustments to the system. System adjustments can be accomplished using the remote control, while safety belts remain fastened.
- Enjoy your RSI system but re-member that safety of all passengers remains the number one priority. Devices installed in the USB, HDMI, or headphone jack may protrude and create a potential eye impact hazard for un- belted passengers during a vehicle accident. To reduce the risk of injury, use only SD cards (hidden on left side of driver side monitor) or low-profile USB storage de-vices.
CAUTION
- If your vehicle is equipped with a wireless rear seat audio system or any other wireless infrared device, make sure it is powered off when operating the RSI sys-tem. If both systems are powered on at the same time, the two systems may obstruct each other, possibly creating undesirable audio interference through the wireless headphones.
- Do not touch the inner pins of the jacks on the front panel. Electro-static discharge may cause permanent damage to the device.
- Caution children to avoid touching or scratching the screen, as it may become dirty or damaged.
- Be sure to run the vehicle engine while using the system. Using this system without running the engine can result in battery drain. To avoid the risk of battery drain, please remember to turn off the system when the vehicle is not in use.
WELCOME
This Rear Seat Infotainment (RSI) system, with built-in Wi-Fi, has some advanced features. Before operating this system, read this section thoroughly and retain it for future reference.
System features
- Twin 8-inch Color TFT-LCD Panels with 1024 x 600 Resolution
- Internal Wi-Fi Network
- Bluetooth® 4.1 Audio Streaming
- Miracast®/Smart View Capability
- SmartStream Content Sharing
- USB 2.0 Port, SDXC Card Input
- HDMI 1.4 Input with MHL 2.0 Support . Exclusive Slingplayer® Application
- 3.5mm Stereo Headphone Output
- Front Panel Capacitive Touch Controls . Infrared Wireless Headphones
- Full-Function Slimline Remote Control . Monitor Screen Sharing
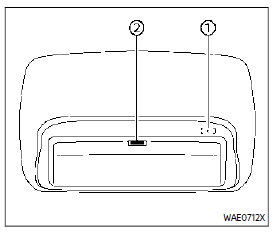
GETTING STARTED
Turning the monitor on or off
- Press the button on the top of the monitor or the remote control to turn the monitor on or off. When in use, the front panel controls will illuminate.
- After the monitor has been turned on and is displaying a picture, the up/down viewing angle can be adjusted to optimize the picture quality. Press the push-button latch located on the top of the monitor to pivot the screen.
Power up tips
- After the ignition switch is placed in the ON position, there is a 12-second delay before the monitor (power) button is operable.
- On some vehicles, after the ignition is turned off, the system will continue to work for 10 minutes, or until the driver’s door is opened.
- Remember to turn the monitor off and pivot the screen to the locked (latched) position when not in use.
Read all Instructions for Rear Seat Infotainment (RSI) User Guide
Nissan ARMADA 2022 Precautions when starting and driving and Driving the vehicle User Guide
2022 Nissan ARMADA Precautions Of Starting And Driving Vehicle
Precautions when starting and driving
WARNING
- Do not leave children or adults who would normally require the support of others alone in your vehicle. Pets should not be left alone either. They could accidentally injure themselves or others through inadvertent operation of the vehicle. Also, on hot, sunny days, temperatures in a closed vehicle could quickly become high enough to cause severe or possibly fatal injuries to people or animals.
- Properly secure all cargo to help prevent it from sliding or shifting. Do not place cargo higher than the seatbacks. In a sudden stop or collision, unsecured cargo could cause personal injury.
EXHAUST GAS (carbon monoxide)
WARNING
- Do not breathe exhaust gases; they contain colorless and odor-less carbon monoxide. Carbon monoxide is dangerous. It can cause unconsciousness or death.
- If you suspect that exhaust fumes are entering the vehicle, drive with all windows fully open, and have the vehicle inspected immediately.
- Do not run the engine in closed
spaces such as a garage. - Do not park the vehicle with the engine running for any extended length of time.
- Keep the liftgate closed while driving, otherwise exhaust gases could be drawn into the passenger compartment. If you must drive with the liftgate open, follow these precautions:
- Open all the windows.
- Set the air recirculation to off and the fan control to high to circulate the air.
- If electrical wiring or other cable connections must pass to a trailer through the seal on the liftgate or the body, follow the manufacturer’s recommendation to pre-vent carbon monoxide entry into the vehicle.
- The exhaust system and body should be inspected by a qualified mechanic whenever:
- The vehicle is raised for service.
- You suspect that exhaust fumes are entering into the passenger compartment.
- You notice a change in the sound of the exhaust system.
- You have had an accident involving damage to the exhaust system, underbody, or rear of the vehicle.
THREE-WAY CATALYST
The three-way catalyst is an emission control device installed in the exhaust system. Exhaust gases in the three-way catalyst are burned at high temperatures to help reduce pollutants.
WARNING
- The exhaust gas and the exhaust system are very hot. Keep people, animals or flammable materials away from the exhaust system components.
- Do not stop or park the vehicle over flammable materials such as dry grass, waste paper or rags. They may ignite and cause a fire.
CAUTION
- Do not use leaded gasoline. Deposits from leaded gasoline seriously reduce the three-way catalyst’s ability to help reduce exhaust pollutants.
- Keep your engine tuned up. Malfunctions in the ignition, fuel injection, or electrical systems can cause over-rich fuel flow into the three-way catalyst, causing it to overheat. Do not keep driving if the engine misfires, or if a noticeable loss of performance or other unusual operating conditions are detected. Have the vehicle inspected? It is recommended you visit a NISSAN dealer for this service.
- Avoid driving with an extremely low fuel level. Running out of fuel could cause the engine to misfire, damaging the three-way catalyst.
- Do not race the engine while warming it up.
- Do not push or tow your vehicle to start the engine.
TIRE PRESSURE MONITORING SYSTEM (TPMS)
Each tire, including the spare (if provided), should be checked monthly when cold and inflated to the inflation pressure recommended by the vehicle manufacturer on the vehicle placard or tire inflation pressure label. (If your vehicle has tires of a different size than the size indicated on the vehicle placard or tire inflation pressure label, you should determine the proper tire inflation pressure for those tires.)
As an added safety feature, your vehicle has been equipped with a Tire Pressure Monitoring System (TPMS) that illuminates a low tire pressure telltale when one or more of your tires is significantly under-inflated. Accordingly, when the low tire pressure telltale illuminates, you should stop and check your tires as soon as possible, and inflate them to the proper pressure. Driving on a significantly under-inflated tire causes the tire to overheat and can lead to tire failure. Underinflation also reduces fuel efficiency and tire tread life, and may affect the vehicle’s handling and stopping ability.
Please note that the TPMS is not a substitute for proper tire maintenance, and it is the driver’s responsibility to maintain correct tire pressure, even if under-inflation has not reached the level to trigger illumination of the TPMS low tire pressure telltale.
Your vehicle has also been equipped with a TPMS malfunction indicator to indicate when the system is not operating properly. The TPMS malfunction indicator is combined with the low tire pressure tell-tale. When the system detects a malfunction, the telltale will flash for approximately one minute and then re-main continuously illuminated. This sequence will continue upon subsequent vehicle start-ups as long as the malfunction exists. When the malfunction indicator is illuminated, the system may not be able to detect or signal low tire pressure as intended. TPMS malfunctions may occur for a variety of reasons, including the installation of replacement or alternate tires or wheels on the vehicle that prevent the TPMS from functioning properly. Always check the TPMS malfunction telltale after replacing one or more tires or wheels on your vehicle to ensure that the replacement or alternate tires and wheels allow the TPMS to continue to function properly.
Additional information
- Since the spare tire is not equipped with the TPMS, the TPMS does not monitor the tire pressure of the spare tire.
- The TPMS will activate only when the vehicle is driven at speeds above 16 MPH (25 km/h). Also, this system may not detect a sudden drop in tire pressure (for example, a flat tire while driving).
- The low tire pressure warning light does not automatically turn off when the tire pressure is adjusted. After the tire is inflated to the recommended pressure, the vehicle must be driven at speeds above 16 MPH (25 km/h) to activate the TPMS and turn off the low tire pressure warning light. Use a tire pressure gauge to check the tire pressure.
- The “Tire Pressure Low Add Air” warning appears in the vehicle information display when the low tire pressure warning light is illuminated and low tire pressure is detected. The “Tire Pressure Low Add Air” warning turns off when the low tire pressure warning light turns off.
The “Tire Pressure Low Add Air” warning appears each time the ignition switch is placed in the ON position as long as the low tire pressure warning light remains illuminated.
The “Tire Pressure Low Add Air” warning does not appear if the low tire pressure warning light illuminates to indicate a TPMS malfunction. - Tire pressure rises and falls depending on the heat caused by the vehicle’s operation and the outside temperature. Do not reduce the tire pressure after driving because the tire pressure rises after driving. Low outside temperature can lower the temperature of the air inside the tire which can cause a lower tire inflation pressure. This may cause the low tire pressure warning light to illuminate. If the warning light illuminates in low ambient temperature, check the tire pres-sure for all four tires.
- You can also check the pressure of all tires (except the spare tire) on the vehicle information display. (See “10. Tire pressures” (P.2-38).)
Read all Instructions for Precautions when starting and driving and Driving the vehicle User Guide
Nissan ARMADA 2022 Lane Departure Warning (LDW) and Intelligent Lane Intervention User Guide
2022 Nissan ARMADA Lane Departure Warning And Intelligent Lane Intervention Guidelines
LANE DEPARTURE WARNING (LDW)
WARNING
Failure to follow the warnings and instructions for proper use of the LDW system could result in serious injury or death.
- This system is only a warning device to inform the driver of a potential unintended lane departure. It will not steer the vehicle or prevent loss of control. It is the driver’s responsibility to stay alert, drive safely, keep the vehicle in the traveling lane, and be in control of the vehicle at all times.
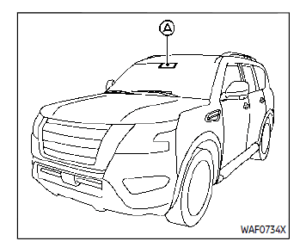
The LDW system will operate when the vehicle is driven at speeds of approximately 37 MPH (60 km/h) and above, and the lane markings are clearly visible on the road.
The LDW system monitors the lane markers on the traveling lane using the camera unit located above the inside mirror.
The LDW system warns the driver that the vehicle is beginning to leave the driving lane with an indicator and a steering wheel vibration. (See “LDW system operation” (P.5-27).)
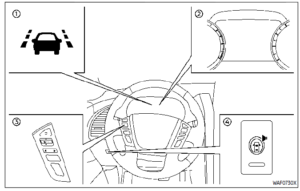
- LDW indicator (on the vehicle information display)
- Vehicle information display
- Steering-wheel-mounted controls (left side)
- Warning systems switch
LDW SYSTEM OPERATION
The LDW system provides a lane departure warning function when the vehicle is driven at speeds of approximately 37 MPH (60 km/h) and above and the lane markings are clear. When the vehicle approaches either the left or the right side of the traveling lane, the steering wheel will vibrate and the LDW indicator on the vehicle information display will blink to alert the driver. The warning function will stop when the vehicle returns to the lane markers.
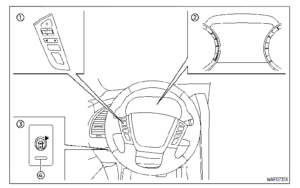
- Steering-wheel-mounted controls (left side)
- Vehicle information display
- Warning systems switch
- Warning systems ON indicator light
HOW TO ENABLE/DISABLE THE LDW SYSTEM
Perform the following steps to enable or disable the LDW system.
- Push the button until “Settings” appears in the vehicle information display and then push the button. Use the OK to select “Driver Assistance”. Then push the OK.
- Select “Lane” and push the OK.
- Select “Warning (LDW)” and push the OK.
The warning systems switch is used to turn on and off the LDW system when it is activated on the vehicle information display. When the warning systems switch is turned off, the warning systems ON indicator light on the switch is off. The warning systems switch will turn on and off the LDW and BSW systems at the same time.
NOTE:
If you disable the LDW system, the system will remain disabled the next time you start the vehicle’s engine.
LDW SYSTEM LIMITATIONS
WARNING
Listed below are the system limitations for the LDW system. Failure to follow the warnings and instructions for proper use of the LDW system could result in serious injury or death.
- The system will not operate at speeds below approximately 37 MPH (60 km/h) or if it cannot detect lane markers.
- Do not use the LDW system under the following conditions as it may not function properly:
- During bad weather (rain, fog, snow, etc.).
- When driving on slippery roads, such as on ice or snow.
- When driving on winding or uneven roads.
- When there is a lane closure due to road repairs.
- When driving in a makeshift or temporary lane.
- When driving on roads where the lane width is too narrow.
- When driving without normal tire conditions (for example, tire wear, low tire pressure, installation of spare tire, tire chains, non-standard wheels).
- When the vehicle is equipped with non-original brake parts or suspension parts.
- When towing a trailer or other vehicle.
- The system may not function properly under the following conditions:
- On roads where there are multiple parallel lane markers; lane markers that are faded or not painted clearly; yellow painted lane markers; non-standard lane markers; or lane markers covered with water, dirt, snow, etc.
- On roads where discontinued lane markers are still detectable.
- On roads where there are sharp curves.
- On roads where there are sharply contrasting objects, such as shadows, snow, water, wheel ruts, seams or lines remaining after road repairs. (The LDW system could detect these items as lane markers.)
- On roads where the traveling lane merges or separates.
- When the vehicle’s traveling direction does not align with the lane marker.
- When traveling close to the vehicle in front of you, which obstructs the lane camera unit detection range.
- When rain, snow, dirt or object adheres to the windshield in front of the lane camera unit.
- When the headlights are not bright due to dirt on the lens or if the aiming is not adjusted properly.
- When strong light enters the lane camera unit. (For example, the light directly shines on the front of the vehicle at sunrise or sunset.)
- When a sudden change in brightness occurs. (For example, when the vehicle enters or exits a tunnel or under a bridge.)
Read all Instructions for Lane Departure Warning (LDW) and Intelligent Lane Intervention User Guide
Nissan ARMADA 2022 Lane Departure Warning (LDW) and Intelligent Lane Intervention User Guide
2022 Nissan ARMADA Lane Departure Warning And Intelligent Lane Intervention Guidelines
LANE DEPARTURE WARNING (LDW)
WARNING
Failure to follow the warnings and instructions for proper use of the LDW system could result in serious injury or death.
- This system is only a warning device to inform the driver of a potential unintended lane departure. It will not steer the vehicle or prevent loss of control. It is the driver’s responsibility to stay alert, drive safely, keep the vehicle in the traveling lane, and be in control of the vehicle at all times.
The LDW system will operate when the vehicle is driven at speeds of approximately 37 MPH (60 km/h) and above, and the lane markings are clearly visible on the road.
The LDW system monitors the lane markers on the traveling lane using the camera unit located above the inside mirror.
The LDW system warns the driver that the vehicle is beginning to leave the driving lane with an indicator and a steering wheel vibration. (See “LDW system operation” (P.5-27).)
- LDW indicator (on the vehicle information display)
- Vehicle information display
- Steering-wheel-mounted controls (left side)
- Warning systems switch
LDW SYSTEM OPERATION
The LDW system provides a lane departure warning function when the vehicle is driven at speeds of approximately 37 MPH (60 km/h) and above and the lane markings are clear. When the vehicle approaches either the left or the right side of the traveling lane, the steering wheel will vibrate and the LDW indicator on the vehicle information display will blink to alert the driver. The warning function will stop when the vehicle returns to the lane markers.
- Steering-wheel-mounted controls (left side)
- Vehicle information display
- Warning systems switch
- Warning systems ON indicator light
HOW TO ENABLE/DISABLE THE LDW SYSTEM
Perform the following steps to enable or disable the LDW system.
- Push the button until “Settings” appears in the vehicle information display and then push the button. Use the OK to select “Driver Assistance”. Then push the OK.
- Select “Lane” and push the OK.
- Select “Warning (LDW)” and push the OK.
The warning systems switch is used to turn on and off the LDW system when it is activated on the vehicle information display. When the warning systems switch is turned off, the warning systems ON indicator light on the switch is off. The warning systems switch will turn on and off the LDW and BSW systems at the same time.
NOTE:
If you disable the LDW system, the system will remain disabled the next time you start the vehicle’s engine.
LDW SYSTEM LIMITATIONS
WARNING
Listed below are the system limitations for the LDW system. Failure to follow the warnings and instructions for proper use of the LDW system could result in serious injury or death.
- The system will not operate at speeds below approximately 37 MPH (60 km/h) or if it cannot detect lane markers.
- Do not use the LDW system under the following conditions as it may not function properly:
- During bad weather (rain, fog, snow, etc.).
- When driving on slippery roads, such as on ice or snow.
- When driving on winding or uneven roads.
- When there is a lane closure due to road repairs.
- When driving in a makeshift or temporary lane.
- When driving on roads where the lane width is too narrow.
- When driving without normal tire conditions (for example, tire wear, low tire pressure, installation of spare tire, tire chains, non-standard wheels).
- When the vehicle is equipped with non-original brake parts or suspension parts.
- When towing a trailer or other vehicle.
Read all Instructions for Lane Departure Warning (LDW) and Intelligent Lane Intervention User Guide
Nissan ARMADA 2022 Blind Spot Warning (BSW) and Rear Cross Traffic Alert (RCTA) User Guide
2022 Nissan ARMADA Blind Spot Warning and Rear Cross Traffic System
BLIND SPOT WARNING (BSW)
WARNING
Failure to follow the warnings and instructions for proper use of the BSW system could result in serious injury or death.
- The BSW system is not a replacement for proper driving procedure and is not designed to prevent contact with vehicles or objects. When changing lanes, al-ways use the side and rear mirrors and turn and look in the direction your vehicle will move to ensure it is safe to change lanes. Never rely solely on the BSW system.
The BSW system helps alert the driver of other vehicles in adjacent lanes when changing lanes.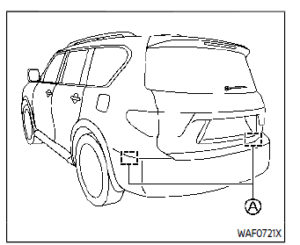
The BSW system uses radar sensors installed near the rear bumper to detect other vehicles in an adjacent lane.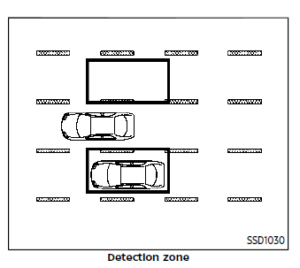
The radar sensors can detect vehicles on either side of your vehicle within the detection zone shown as illustrated. This detection zone starts from the outside mirror of your vehicle and extends approximately 10 ft (3.0 m) behind the rear bumper, and approximately 10 ft (3.0 m) sideways. When the turn signal is activated, the detection zone may extend more than approximately 10 ft (3.0 m).
- Side indicator light
- BSW system warning light (on the vehicle information display)
- Vehicle information display
- Steering-wheel-mounted controls (left side)
- Warning systems switch
BSW SYSTEM OPERATION
The BSW system operates above approximately 20 MPH (32 km/h). If the radar sensors detect a vehicle in the detection zone, the side indicator light illuminates.
If the turn signal is then activated, the system chimes (twice), and the side indicator light flashes. The side indicator light continues to flash until the detected vehicle leaves the detection zone.
The side indicator light illuminates for a few seconds when the ignition switch is placed in the ON position.
The brightness of the side indicator light is adjusted automatically depending on the brightness of the ambient light.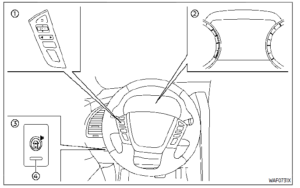
- Steering-wheel-mounted controls (left side)
- Vehicle information display
- Warning systems switch
- Warning systems ON indicator light
HOW TO ENABLE/DISABLE THE BSW SYSTEM
Perform the following steps to enable or disable the BSW system.
- Push the button until “Settings” appears in the vehicle information display and then push the OK. Use the button to select “Driver Assistance”. Then push the OK.
- Select “Blind Spot” and push the OK.
- Select “Warning (BSW)” and push the OK.
The warning systems switch is used to turn on and off the BSW system when it is activated on the vehicle information display. When the warning systems switch is turned off, the warning systems ON indicator light on the switch is off. The warning systems switch will turn on and off the LDW and BSW systems at the same time.
Read all Instructions for Blind Spot Warning (BSW) and Rear Cross Traffic Alert (RCTA) User Guide
Nissan ARMADA 2022 Intelligent Back-up Intervention and Intelligent Cruise Control User Guide
2022 Nissan ARMADA Intelligent Back-up Intervention and Intelligent Cruise Control
Intelligent Back-up Intervention (I-BI) (if so equipped)
WARNING
Failure to follow the warnings and instructions for proper use of the I-BI system could result in serious injury or death.
- The I-BI system is not a replacement for proper driving procedure, is not designed to prevent contact with vehicles or objects and does not provide full brake power. When backing out of parking spaces, always use the inside and rear mirrors and turn and look in the direction you will move. Never rely solely on the I-BI system.
- There is a limitation to the detection capability of the radar or the sonar. Using the I-BI system un-der some road, ground, traffic or weather conditions could lead to improper system operation. Al-ways rely on your own operation to avoid accidents.
The I-BI system can help alert the driver of an approaching vehicle or objects behind the vehicle when the driver is backing out of a parking space.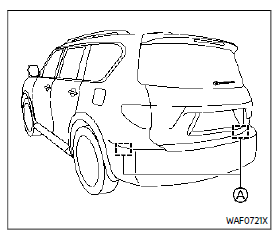
The I-BI system uses radar sensors installed on both sides near the rear bumper to detect an approaching vehicle and sonar sensors to detect objects in the rear.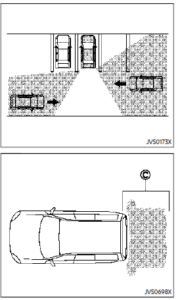
The radar sensors detect an approaching vehicle. The sonar sensors detect stationary objects behind the vehicle. Refer to the illustration for approximate zone coverage areas .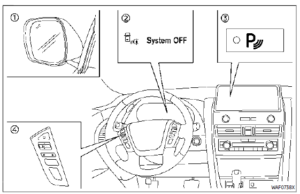
- Side indicator light
- I-BI OFF indicator
- “P” key (on the touch screen display) Steering-wheel-mounted controls (left side)
I-BI SYSTEM OPERATION
When the shift lever is in the R (Reverse) position and the vehicle speed is less than approximately 5 MPH (8 km/h), the I-BI system operates.
If the radar detects a vehicle approaching from the side or the sonar detects close stationary objects behind the vehicle, the system gives visual and audible warnings. If the driver does not apply the brakes, the system automatically applies the brake for a moment when the vehicle is moving backward. After the automatic brake application, the driver must depress the brake pedal to maintain brake pressure. If the driver’s foot is on the accelerator
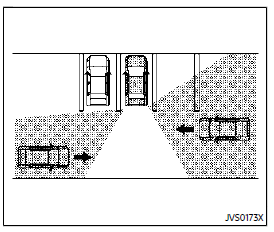
pedal, the system pushes the accelerator upward before applying the brake. If you continue to accelerate, the system will not engage the brake.
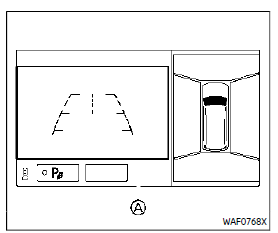 Touch screen display
When the shift lever is placed in the R (Reverse) position, the indicator on the “P” key illuminates on the touch screen display.
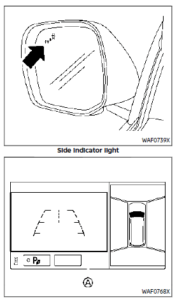
If the radar detects an approaching vehicle from the side, the system chimes (once), the side indicator light on the side the vehicle is approaching flashes and a yellow rectangular frame appears on the touchscreen display.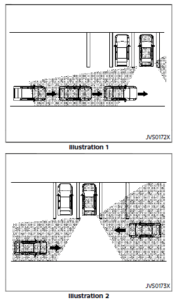
- In the case of several vehicles approaching in a row (Illustration 1) or in the opposite direction (Illustration 2), a chime may not be issued to the I-BI system after the first vehicle passes the sensors.
- The sonar system chime indicating there is an object behind the vehicle has a higher priority than the I-BI chime (single beep) indicating an approaching vehicle. If the sonar system detects an object behind the vehicle and the I-BI system detects an approaching vehicle at the same time, the following indications are provided:— The sonar system chime sounds— The side indicator light on the side
of the approaching vehicle flashes, and- A yellow rectangular frame appears in the touchscreen display.
If an approaching vehicle or close object behind the vehicle is detected when your vehicle is backing up, a red frame will appear in the touchscreen display and the system will chime three times. Then, the brakes will be applied momentarily. After the automatic brake application, the driver must depress the brake pedal to maintain brake pressure.
If the driver’s foot is on the accelerator pedal, the system moves the accelerator pedal upward before the braking is applied. However, if you continue to accelerate, the system will not engage the brakes.
The I-BI system does not operate if the object is very close to the bumper.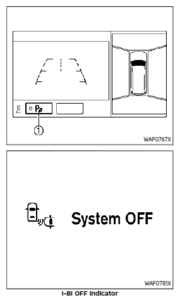
Read all Instructions for Intelligent Back-up Intervention and Intelligent Cruise Control User Guide
Nissan ARMADA 2022 “Automatic Emergency Braking with pedestrian detection, Intelligent Forward Collision Warning” User Guide
2022 Nissan ARMADA Automatic Braking | Intelligent Forward Collision Warning Guidelines
AUTOMATIC EMERGENCY BRAKING (AEB) WITH PEDESTRIAN DETECTION SYSTEM
WARNING
Failure to follow the warnings and instructions for proper use of the AEB with pedestrian detection system could result in serious injury or death.
- The AEB with pedestrian detection system is a supplemental aid to the driver. It is not a replacement for the driver’s attention to traffic conditions or responsibility to drive safely. It cannot prevent accidents due to carelessness or dangerous driving techniques.
- The AEB with pedestrian detection system does not function in all driving, traffic, weather and road conditions.
The AEB with pedestrian detection system can assist the driver when there is a risk of a forward collision with
- a vehicle ahead in the travelling lane
- a pedestrian ahead in the travelling lane
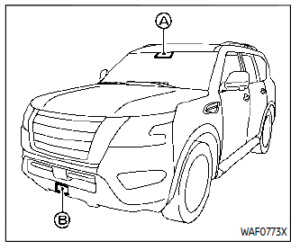
The AEB with pedestrian detection sys-tem uses a radar sensor located on the front of the vehicle to measure the distance to the vehicle ahead in the same lane.
For pedestrians, the AEB system uses a camera installed behind the windshield in addition to the radar sensor.
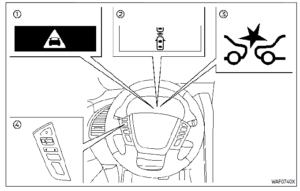
- AEB emergency warning indicator
- Vehicle ahead detection indicator (on the vehicle information display)
- AEB system warning light (on the meter panel)
- Steering-wheel-mounted controls (left side)
AEB WITH PEDESTRIAN DETECTION SYSTEM OPERATION
The AEB with pedestrian detection system will function when your vehicle is driven at speeds above approximately 3 MPH (5 km/h).
For the pedestrian detection function, the AEB with pedestrian detection system operates at speeds between 6 – 37 MPH (10 – 60 km/h).
If a risk of a forward collision is detected, the AEB with pedestrian detection system will first provide the warning to the driver by flashing the vehicle ahead detection indicator (yellow) in the vehicle information display and providing an audible alert. In addition, the system applies partial braking.
If the driver applies the brakes quickly and forcefully after the warning, and the AEB with pedestrian detection system detects that there is still the possibility of a forward collision, the system will automatically increase the braking force.
If the driver does not take action, the AEB with the pedestrian detection system issues the second visual (flashing) (red) and audible warning. Then the system applies partial braking.
If the risk of a collision becomes imminent, the AEB with pedestrian detection system applies harder braking automatically.
While the AEB with pedestrian detection system is operating, you may hear the sound of brake operation. This is normal and indicates that the AEB with pedestrian detection system is operating properly.
NOTE:
The vehicle’s stop lights come on when braking is performed by the AEB with a pedestrian detection system.
Depending on vehicle speed and distance to the vehicle or pedestrian ahead, as well as driving and roadway conditions, the system may help the driver avoid a forward collision or may help mitigate the consequences of a collision should one be unavoidable.
If the driver is handling the steering wheel, accelerating or braking, the AEB with pedestrian detection system will function later or will not function.
The automatic braking will cease under the following conditions:
- When the steering wheel is turned as far as necessary to avoid a collision.
- When the accelerator pedal is de- pressed.
- When there is no longer a vehicle, pedestrians are detected ahead.
If the AEB with pedestrian detection system has stopped the vehicle, the vehicle will remain at a standstill for approximately 2 seconds before the brakes are released.
When the brake pedal is depressed while the brake is applied by the system, you may feel the pedal effort is changed and may hear a sound and vibration noise. This is normal and does not indicate a malfunction. In addition, the braking force can be increased by adding the pedal effort.
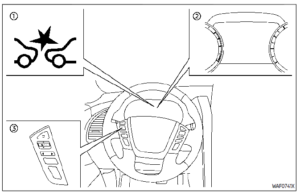
- AEB system warning light (on the meter panel)
- Vehicle information display
- Steering-wheel-mounted controls (left side)
Nissan ARMADA 2022 Intelligent Driver Alertness and Rear Automatic Braking User Guide
2022 Nissan ARMADA Driver Alertness and Rear Automatic Braking System
INTELLIGENT DRIVER ALERTNESS (I-DA)
WARNING
Failure to follow the warnings and instructions for proper use of the I-DA system could result in serious injury or death.
- The I–DA system is only a warning to inform the driver of a potential lack of driver attention or drowsiness. It will not steer the vehicle or prevent loss of control.
- The I–DA system does not detect and provide an alert of the driver’s lack of attention or fatigue in every situation.
- It is the driver’s responsibility to:
- Stay alert.
- Drive safely.
- Keep the vehicle in the traveling lane.
- Be in control of the vehicle at all times.
- Avoid driving when tired.
- Avoid distractions (texting,
The I–DA system helps alert the driver if the system detects a lack of attention or driving fatigue.
The system monitors driving style and steering behavior over a period of time, and it detects changes from the normal pattern. If the system detects that driver attention is decreasing over a period of time, the system uses audible and visual warnings to suggest that the driver take a break.
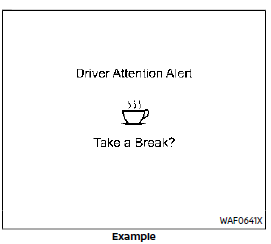 I-DA SYSTEM OPERATION
If the system detects driver fatigue or that driver attention is decreasing, the message “Take a Break?” appears in the vehicle information display and a chime sounds when the vehicle is driven at speeds above 37 MPH (60 km/h).
The system continuously monitors driver attention and can provide multiple warnings per trip.
The system resets and starts reassessing driving style and steering behavior when the ignition switch is cycled from the ON to the OFF position and back to the ON position.
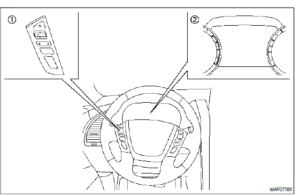
- Steering-wheel-mounted control (left side)
- Vehicle information display
HOW TO ENABLE/DISABLE THE I-DA SYSTEM
Perform the following steps to enable or disable the I–DA system.
- Push the button until “Settings” appears in the vehicle information display and push the OK. Use the to select “Driver Assistance.” Then push the OK.
- Select “Driver Attention Alert” and push the OK to turn the system on or off.
NOTE:
The setting will be retained even if the engine is restarted.
I-DA SYSTEM LIMITATIONS
WARNING
Listed below are the system limitations for the I–DA system. Failure to operate the vehicle in accordance with these system limitations could result in serious injury or death.
- The I-DA system may not operate properly and may not provide an alert in the following conditions:
- Poor road conditions such as uneven road surface or potholes.
- Strong side wind.
- If you have adopted a sporty driving style with higher cornering speeds or higher rates of acceleration.
- Frequent lane changes or changes to vehicle speed.
- The I–DA system will not provide an alert in the following conditions:
- Vehicle speeds lower than 37 mph (60 km/h).
- Short lapses of attention.
- Instantaneous distractions such as dropping an object.
SYSTEM MALFUNCTION
If the I–DA system malfunctions, the “Driver Attention Alert Malfunction” warning message will appear in the vehicle information display and the function will be stopped automatically.
Read all Instructions for Intelligent Driver Alertness and Rear Automatic Braking User Guide
Nissan ARMADA 2022 Break-in schedule Fuel efficient driving tips and NISSAN all-mode 4WD User Guide
2022 Nissan ARMADA Break-in Schedule And NISSAN All-Mode 4WD Features
BREAK-IN SCHEDULE
CAUTION
During the first 1,200 miles (2,000 km), follow these recommendations to obtain maximum engine performance and ensure the future reliability and economy of your new vehicle.
Failure to follow these recommendations may result in shortened engine life and reduced engine performance.
- Avoid driving for long periods at constant speed, either fast or slow. Do not run the engine over 4,000 rpm.
- Do not accelerate at full throttle in any gear.
- Avoid quick starts.
- Avoid hard braking as much as possible.
- Do not tow a trailer for the first 500 miles (805 km).
FUEL EFFICIENT DRIVING TIPS
Follow these easy-to-use Fuel Efficient Driving Tips to help you achieve the most fuel economy from your vehicle.
- Use smooth accelerator and brake pedal application.
- Avoid rapid starts and stops.
- Use smooth, gentle accelerator and brake application whenever possible.
- Maintain constant speed while commuting and coast whenever possible.
- Maintain constant speed.
- Look ahead to try and anticipate and minimize stops.
- Synchronizing your speed with traffic lights allows you to reduce your number of stops.
- Maintaining a steady speed can minimize red light stops and im-prove fuel efficiency.
- Use air conditioning (A/C) at higher vehicle speeds.
- Below 40 MPH (64 km/h), it is more efficient to open windows to cool the vehicle due to reduced engine load.
- Above 40 MPH (64 km/h), it is more efficient to use A/C to cool the vehicle due to increased aerodynamic drag.
- Recirculating the cool air in the cabin when the A/C is on reduces cooling load.
- Drive at economical speeds and distances.
- Observing the speed limit and not exceeding 60 MPH (97 km/h)(where legally allowed) can improve fuel efficiency due to reduced aero-dynamic drag.
- Maintaining a safe following distance behind other vehicles re-duces unnecessary braking.
- Safely monitoring traffic to anticipate changes in speed permits reduced braking and smooth acceleration changes.
- Select a gear range suitable to road conditions.
- Use cruise control.
- Using cruise control during highway driving helps maintain a steady speed.
- Cruise control is particularly effective in providing fuel savings when driving on flat terrains.
- Plan for the shortest route.
- Utilize a map or navigation system to determine the best route to save time.
- Avoid idling.
- Shutting off your engine when safe for stops exceeding 30-60 seconds saves fuel and reduces emissions.
- Buy an automated pass for toll roads.
- Automated passes permit drivers to use special lanes to maintain cruising speed through the toll and avoid stopping and starting.
- Winter warm up.
- Limit idling time to minimize impact to fuel economy.
- Vehicles typically need no more than 30 seconds of idling at start-up to effectively circulate the engine oil before driving.
- Your vehicle will reach its ideal operating temperature more quickly while driving versus idling.
- Keeping your vehicle cool.
- Park your vehicle in a covered N parking area or in the shade whenever possible.
- When entering a hot vehicle, opening the windows will help to reduce the inside temperature faster, resulting in reduced demand on your A/C system.
INCREASING FUEL ECONOMY
- Keep your engine tuned up.
- Follow the recommended scheduled maintenance.
- Keep the tires inflated to the correct pressure. Low tire pressure increases tire wear and lowers fuel economy.
- Keep the wheels in the correct alignment. Improper alignment increases tire wear and lowers fuel economy.
- Use the recommended viscosity engine oil. (See “Engine oil and oil filter recommendation” (P.10-6).)
NISSAN ALL-MODE 4WD® (if so equipped)
WARNING
- Do not attempt to raise two wheels off the ground and shift the transmission to any drive or reverse position with the engine running. Doing so may result in drivetrain damage or unexpected vehicle movement which could result in serious vehicle damage or personal injury.
- Do not attempt to test a 4WD
Nissan ARMADA 2022 Hill Start Assist system and Power steering User Guide
Nissan ARMADA 2022 Hill Start Assist system and Power steering User Guide
HILL START ASSIST SYSTEM
WARNING
- Never rely solely on the hill start assist system to prevent the vehicle from moving backward on a hill. Always drive carefully and attentively. Depress the brake pedal when the vehicle is stopped on a steep hill. Be especially careful when stopped on a hill on frozen or muddy roads. Failure to prevent the vehicle from rolling backwards may result in a loss of control of the vehicle and possible serious injury or death.
- The hill start assist system is not designed to hold the vehicle at a standstill on a hill. Depress the brake pedal when the vehicle is stopped on a steep hill. Failure to do so may cause the vehicle to roll backwards and may result in a collision or serious personal injury. so may result in a collision or serious personal injury.
The hill start assist system automatically keeps the brakes applied to help prevent the vehicle from rolling backwards in the time it takes the driver to release the brake pedal and apply the accelerator when the vehicle is stopped on a hill.
The hill start assist system will operate automatically under the following conditions:
- The transmission is shifted to a forward or reverse gear.
- The vehicle is stopped completely on a hill by applying the brake.
The maximum holding time is 2 seconds. After 2 seconds the vehicle will begin to roll back and the hill start assist system will stop operating completely.
The hill start assist system will not operate when the transmission is shifted to the N (Neutral) or P (Park) position or on a flat and level road.
When the Vehicle Dynamic Control (VDC) warning light illuminates in the meter, the hill start assist system will not operate.(See “Warning lights, indicator lights and audible reminders” (P.2-11).)
PARKING/PARKING ON HILLS
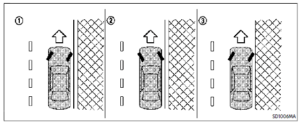
WARNING
- Do not stop or park the vehicle over flammable materials such as dry grass, waste paper or rags. They may ignite and cause a fire.
- Never leave the engine running while the vehicle is unattended.
- Do not leave children unattended inside the vehicle. They could unknowingly activate switches or controls. Unattended children could become involved in serious accidents.
- To help avoid risk of injury or death through unintended operation of the vehicle and/or its systems, do not leave children, people who require the assistance of others or pets unattended in your vehicle. Additionally, the temperature in-side a closed vehicle on a warm day can quickly become high enough to cause a significant risk of injury or death to people and pets.
- Safe parking procedures require that both the parking brake be applied and the transmission be placed in the P (Park) position. Failure to do so could cause the vehicle to move unexpectedly or roll away and result in an accident.
- Make sure the automatic transmission shift lever has been pushed as far forward as it can go and cannot be moved without depressing the foot brake pedal.
- Firmly apply the parking brake.
- Move the shift lever to the P (Park) position.
- To help prevent the vehicle from rolling into the street when parked on a sloping drive way, it is a good practice to turn the wheels as illustrated.
- HEADED DOWNHILL WITH CURB: Turn the wheels into the curb and move the vehicle forward until the curb side wheel gently touches the curb.
- HEADED UPHILL WITH CURB:
Turn the wheels away from the curb and move the vehicle back until the curb side wheel gently touches the curb. - HEADED UPHILL OR DOWNHILL, NO CURB:
- Turn the wheels toward the side of the road so the vehicle will move away from the center of the road if it moves.
- Push the ignition switch to the OFF position.
TOW MODE
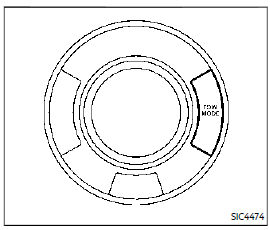
The TOW MODE should be used when pulling a heavy trailer or hauling a heavy load. Driving the vehicle in the TOW MODE with no trailer/load or light trailer/light load will not cause any damage. However, fuel economy may be reduced, and the transmission/engine driving characteristics may feel unusual.
Push the TOW MODE switch to activate TOW MODE. The indicator light on the TOW MODE switch illuminates when the TOW MODE is selected. Push the TOW MODE switch again to turn the TOW MODE OFF.
TOW MODE is automatically canceled when the ignition switch is placed in the OFF position.
SNOW MODE
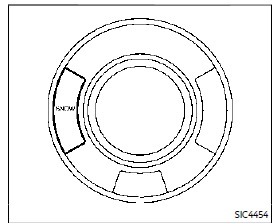
For driving or starting the vehicle on snowy roads or slippery areas, turn the SNOW mode on.
Read all Instructions for Hill Start Assist system and Power steering User Guide
Nissan ARMADA 2022 Brake system and Brake assist and Vehicle Dynamic Control (VDC) system User Guide
Nissan ARMADA 2022 Brake Assist And Vehicle Dynamic Control System
BRAKE SYSTEM
BRAKING PRECAUTIONS
The brake system has two separate hydraulic circuits. If one circuit malfunctions, you will still have braking ability at two wheels.
You may feel a small click and hear a sound when the brake pedal is fully depressed slowly. This is not a malfunction and indicates that the brake assist mechanism is operating properly.
Hydraulically-assisted brakes
The hydraulically-assisted brake system is designed to use a hydraulic pump driven electrically, to assist braking. If the engine stops, you can stop the vehicle by de-pressing the foot brake pedal. However, greater foot pressure on the foot brake pedal will be required to stop the vehicle. The stopping distance will be longer.
Wet brakes When the vehicle is washed or driven through water, the brakes may get wet. As a result, your braking distance will be longer and the vehicle may pull to one side during braking.
To dry brakes, drive the vehicle at a safe speed while lightly tapping the brake pedal to heat up the brakes. Do this until the brakes return to normal. Avoid driving the vehicle at high speeds until the brakes
5-142 Starting and driving function correctly.
PARKING BRAKE BREAK-IN
Break in the parking brake shoes whenever the stopping effect of the parking brake is weakened or whenever the parking brake shoes and/or drums/rotors are replaced, in order to assure the best braking performance.
This procedure is described in the vehicle service manual. It is recommended you visit a NISSAN dealer for this service.
Using the brakes
Avoid resting your foot on the brake pedal while driving. This will cause overheating of the brakes, wearing out the brake and pads faster and reducing gas mileage.
To help save the brakes and to prevent the brakes from overheating, reduce speed and downshift to a lower gear before going down a slope or long grade. Overheated brakes may reduce braking performance and could result in loss of vehicle control.
WARNING
- While driving on a slippery surface, be careful when braking, accelerating or downshifting. Abrupt braking or accelerating could cause the wheels to skid and result in an accident.
- If the engine is not running or is turned off while driving, the power assist for the brakes will not work. Braking will be harder.
BRAKE ASSIST
BRAKE ASSIST
When the force applied to the brake pedal exceeds a certain level, Brake Assist is activated generating greater braking force than a conventional brake booster even with light pedal force.
WARNING
The Brake Assist is only an aid to assist braking operation and is not a collision warning or avoidance device. It is the driver’s responsibility to stay alert, drive safely and be in control of the vehicle at all times.
ANTI-LOCK BRAKING SYSTEM (ABS)
WARNING
- The Anti-lock Braking System (ABS) is a sophisticated device, but it cannot prevent accidents resulting from careless or dangerous driving techniques. It can help maintain vehicle control during braking on slippery surfaces. Remember that stopping distances on slippery surfaces will be longer than on normal sur- faces even with ABS. Stopping distances may also be longer on rough, gravel or snow-covered roads, or if you are using tire chains. Always maintain a safe distance from the vehicle in front of you. Ultimately, the driver is responsible for safety.
- Tire type and condition may also affect braking effectiveness.
- When replacing tires, install the specified size of tires on all four wheels.
- When installing a spare tire, make sure that it is the proper size and type as specified on the Tire and Loading Information label. See “Tire and loading information label” (P.10-13).
- For detailed information, see “Wheels and tires” (P.8-28).
- The Anti-lock Braking System (ABS) controls the brakes so the wheels do not lock during hard braking or when braking on slippery surfaces. The system detects the rotation speed at each wheel and varies the brake fluid pressure to prevent each wheel from locking and sliding. By preventing each wheel from locking, the system helps the driver maintain steering control and helps to minimize swerving and spinning on slippery surfaces.
Using the system
Depress the brake pedal and hold it down. Depress the brake pedal with firm steady pressure, but do not pump the brakes. The ABS will operate to prevent the wheels from locking up. Steer the vehicle to avoid obstacles.
WARNING
Do not pump the brake pedal. Doing so may result in increased stopping distances.
Nissan ARMADA 2022 Cold weather driving User Guide
COLD WEATHER DRIVING
FREEING A FROZEN DOOR LOCK
To prevent a door lock from freezing, apply deicer through the key hole. If the lock becomes frozen, heat the key before inserting it into the key hole or use the Intelligent Key system.
ANTIFREEZE
In the winter when it is anticipated that the outside temperature will drop below 32°F (0°C), check antifreeze to assure proper winter protection. For additional information, see “Engine cooling system” (P.8-4).
BATTERY
If the battery is not fully charged during extremely cold weather conditions, the battery fluid may freeze and damage the battery. To maintain maximum efficiency, the battery should be checked regularly. For additional information, see “Battery” (P.8-11).
DRAINING OF COOLANT WATER
If the vehicle is to be left outside without antifreeze, drain the cooling system, including the engine block. Refill before operating the vehicle. For details, see “Engine cooling system” (P.8-4).
TIRE EQUIPMENT
SUMMER tires have a tread designed to provide superior performance on dry pavement. However, the performance of these tires will be substantially reduced in snowy and icy conditions. If you operate your vehicle on snowy or icy roads, NISSAN recommends the use of MUD & SNOW or ALL SEASON tires on all four wheels. It is recommended you consult a NISSAN dealer for the tire type, size, speed rating and availability information.
For additional traction on icy roads, studded tires may be used. However, some U.S. states and Canadian provinces prohibit their use. Check local, state and provincial laws before installing studded tires.
Skid and traction capabilities of studded snow tires, on wet or dry surfaces, may be poorer than that of non-studded snow tires.
Tire chains may be used. For details, see “Tire chains” (P.8-35).
For four-wheel drive
If you install snow tires, they must also be the same size, brand, construction and tread pattern on all four wheels.
SPECIAL WINTER EQUIPMENT
It is recommended that the following items be carried in the vehicle during winter:
- A scraper and stiff-bristled brush to remove ice and snow from the windows and wiper blades.
- A sturdy, flat board to be placed under the jack to give it firm support.
- A shovel to dig the vehicle out of snowdrifts.
- Extra window washer fluid to refill the reservoir tank.
DRIVING ON SNOW OR ICE
WARNING
- Wet ice (32°F, 0°C and freezing rain), very cold snow or ice can be slick and very hard to drive on. The vehicle will have much less traction or “grip” under these conditions. Try to avoid driving on wet ice until the road is salted or sanded.
- Whatever the condition, drive with caution. Accelerate and slow down with care. If accelerating or downshifting too fast, the drive wheels will lose even more traction.
- Allow more stopping distance under these conditions. Braking should be started sooner than on dry pavement.
- Allow greater following distances on slippery roads.
- Watch for slippery spots (glare ice). These may appear on an otherwise clear road in shaded areas. If a patch of ice is seen ahead, brake before reaching it. Try not to brake while on the ice, and avoid any sudden steering maneuvers.
- Do not use cruise control on slippery roads.
- Snow can trap dangerous exhaust gases under your vehicle. Keep snow clear of the exhaust pipe and from around your vehicle.
ENGINE BLOCK HEATER (if so equipped)
Engine block heaters are used to assist in cold temperature starting.
The engine block heater should be used when the outside temperature is 20°F (−7°C) or lower.
Read all Instructions for Cold weather driving User Guide
Nissan ARMADA 2022 Hazard warning flasher switch and Jump starting User Guide
2022 Nissan ARMADA Warning Flasher Switch And Jump starting Guidelines
Hazard warning flasher switch
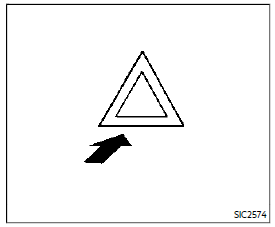
Push the switch on to warn other drivers when you must stop or park under emergency conditions. All turn signal lights will flash.
WARNING
- If stopping for an emergency, be sure to move the vehicle well off the road.
- Do not use the hazard warning flashers while moving on the highway unless unusual circum-stances force you to drive so slowly that your vehicle might become a hazard to other traffic.
- Turn signals do not work when the hazard warning flasher lights are on.
The flasher can be actuated with the ignition switch in any position.
When an impact that could activate the supplemental air bags is detected, the hazard warning flasher lights blink automatically. If the hazard warning flasher switch is pushed twice, the hazard warning flashers will turn off.
WARNING
Do not turn the hazard warning flasher switch to off until you can make sure that it is safe to do so. Also, the hazard flasher warning may not blink automatically depending on the force of impact.
Some state laws may prohibit the use of the hazard warning flasher switch while driving.
ROADSIDE ASSISTANCE PROGRAM
In the event of a roadside emergency, Roadside Assistance Service is available to you. Please refer to your Warranty Information Booklet (U.S.) or Warranty & Roadside Assistance Information Booklet (Canada) for details.
EMERGENCY ENGINE SHUT OFF
To shut off the engine in an emergency situation while driving, perform the following procedure:
- Rapidly push the push-button ignition switch 3 consecutive times in less than 1.5 seconds, or
- Push and hold the push-button ignition switch for more than 2 seconds.
FLAT TIRE
TIRE PRESSURE MONITORING SYS-TEM (TPMS)
This vehicle is equipped with the Tire Pressure Monitoring System (TPMS). It monitors tire pressure of all tires except the spare. When the low tire pressure warning light is lit and the “Tire Pressure Low Add Air” warning appears in the vehicle information display, one or more of your tires is significantly under-inflated. If the vehicle is being driven with low tire pressure, the TPMS will activate and warn you of it by the low tire pressure warning light. This system will activate only when the vehicle is driven at speeds above 16 MPH (25 km/h). For more details, see “Low tire pressure warning light” (P.2-16) and “Tire Pressure Monitoring System (TPMS)” (P.5-5).
WARNING
- If the low tire pressure warning light illuminates or Low-Pressure information is displayed on the monitor screen while driving, avoid sudden steering maneuvers or abrupt braking, reduce vehicle speed, pull off the road to a safe location and stop the vehicle as soon as possible. Driving with under-inflated tires may permanently damage the tires and increase the likelihood of tire failure. Serious vehicle damage could occur and may lead to an accident and could result in serious personal injury. Check the tire pressure for all four tires. Adjust the tire pressure to the recommended COLD tire pressure shown on the Tire and Loading Information label to turn the low tire pressure warning light OFF. If the light still illuminates while driving after adjusting the tire pressure, a tire may be flat. If you have a flat tire, replace it with a spare tire as soon as possible.
- Since the spare tire is not equipped with the TPMS, when a spare tire is mounted or a wheel is replaced, the TPMS will not function and the low tire pressure warning light will flash for approximately 1 minute. The light will remain on after 1 minute. Have your tires replaced and/or TPMS system reset as soon as possible. It is recommended you visit a NISSAN dealer for these services.
- Replacing tires with those not originally specified by NISSAN could affect the proper operation of the TPMS.
- Do not inject any tire liquid or aerosol tire sealant into the tires, as this may cause a malfunction of the tire pressure sensors.
CHANGING A FLAT TIRE
If you have a flat tire, follow the instructions below.
Stopping the vehicle
- Safely move the vehicle off the road and away from traffic.
- Turn on the hazard warning flashers.
- Park on a level surface and apply the parking brake. Move the shift lever to the P (Park) position.
- Turn off the engine.
- Raise the hood to warn other traffic, and to signal professional road assistance personnel that you need assistance.
- Have all passengers get out of the vehicle and stand in a safe place, away from traffic and clear of the vehicle.
WARNING
- Make sure the parking brake is securely applied and the automatic transmission is in the P (Park) position.
- Never change tires when the vehicle is on a slope, ice or slippery areas. This is hazardous.
- Never change tires if oncoming traffic is close to your vehicle. Wait for professional road assistance.
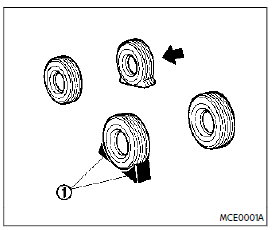
Blocking wheels
Place suitable blocks at both the front and back of the wheel diagonally opposite the flat tire to prevent the vehicle from moving when it is jacked up.
Read all Instructions for Hazard warning flasher switch and Jump starting User Guide
Nissan ARMADA 2022 Push starting and Towing your vehicle User Guide
2022 Nissan ARMADA Push starting and Towing your vehicle Guidelines
PUSH STARTING
Do not attempt to start the engine by pushing.
CAUTION
- Automatic transmission models cannot be push-started or tow-started. Attempting to do so may cause transmission damage.
- Three way catalyst equipped models should not be started by pushing since the three way catalyst may be damaged.
- Never try to start the vehicle by towing it; when the engine starts, the forward surge could cause the vehicle to collide with the tow vehicle.
IF YOUR VEHICLE OVERHEATS
CAUTION
- Do not continue to drive if your vehicle overheats. Doing so could cause engine damage or a vehicle fire.
- To avoid the danger of being scalded, never remove the radiator cap or coolant reservoir cap while the engine is still hot. When the radiator cap or coolant reservoir cap is removed, pressurized hot water will spurt out, possibly causing serious injury.
- Do not open the hood if steam is coming out.
If your vehicle is overheating (indicated by an extremely high-temperature gauge reading), or if you feel a lack of engine power, detect abnormal noise, etc., take the following steps:
- Move the vehicle safely off the road, apply the parking brake and move the shift lever to the P (Park) position. Do not stop the engine.
- Turn off the heater and air conditioner. Open all the windows, move the heater or air conditioner temperature control to maximum hot and fan control to high speed.
- If engine overheating is caused by climbing a long hill on a hot day, run the engine at a fast idle (approximately 1,500 rpm) until the temperature gauge indication returns to normal.
- Get out of the vehicle. Look and listen for steam or coolant escaping from the radiator before opening the hood.(If steam or coolant is escaping, turn off the engine.) Do not open the hood further until no steam or coolant can be seen.
- Open the engine hood.
WARNING
If steam or water is coming from the engine, stand clear to prevent getting burned. - Visually check drive belts for damage or looseness. Also, check if the cooling fan is running. The radiator hoses and radiator should not leak water. If cool-ant is leaking or the cooling fan does not run, stop the engine.
WARNING
Be careful not to allow your hands, hair, jewelry, or clothing to come into contact with, or get caught in, engine belts or the engine cooling fan. The engine cooling fan can start at any time. - After the engine cools down, check the coolant level in the reservoir tank with the engine running. Add coolant to the reservoir tank if necessary. Have your vehicle repaired. It is recommended you visit a NISSAN dealer for this service.
TOWING YOUR VEHICLE
When towing your vehicle, all State (Provincial in Canada) and local regulations for towing must be followed. Incorrect towing equipment could damage your vehicle. Towing instructions are available from a NISSAN dealer. Local service operators are familiar with the applicable laws and procedures for towing. To assure proper towing and to prevent accidental damage to your vehicle, NISSAN recommends that you have a service operator tow your vehicle. It is advisable to have the service operator carefully read the following precautions.
WARNING
- Never ride in a vehicle that is being towed.
- Never get under your vehicle after it has been lifted by a tow truck.
CAUTION
- When towing, make sure that the transmission, axles, steering system and powertrain are in working condition.
If any of these conditions apply, dollies or a flatbed tow truck must be used. - Always attach safety chains before towing.
For information about towing your vehicle behind a recreational vehicle (RV), see “Flat towing” (P.10-35).
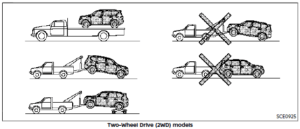
Read all Instructions for Push starting and Towing your vehicle User Guide
Nissan ARMADA 2022 Appearance and care User Guide
CLEANING EXTERIOR
In order to maintain the appearance of your vehicle, it is important to take proper care of it.
To protect the paint surface, wash your vehicle as soon as you can:
- after a rainfall to prevent possible damage from acid rain
- after driving on coastal roads
- when contaminants such as soot, bird droppings, tree sap, metal particles or bugs get on the paint surface
- when dust or mud builds up on the surface
Whenever possible, store or park your vehicle inside a garage or in a covered area.
When it is necessary to park outside, park in a shady area or protect the vehicle with a body cover.
Be careful not to scratch the paint surface when putting on or removing the body cover.
WASHING
Wash dirt off the vehicle with a wet sponge and plenty of water. Clean the vehicle thoroughly using a mild soap, a special vehicle soap or general purpose dishwashing liquid mixed with clean, lukewarm (never hot) water.
CAUTION
- Do not use car washes that use acid in the detergent. Some car washes, especially brushless ones, use some acid for cleaning. The acid may react with some plastic vehicle components, causing them to crack. This could affect their appearance, and also could cause them not to function properly. Always check with your car wash to confirm that acid is not used.
- Do not wash the vehicle with strong household soap, strong chemical detergents, gasoline or solvents.
- Do not wash the vehicle in direct sunlight or while the vehicle body is hot, as the surface may become water-spotted.
- Avoid using tight-napped or rough cloths, such as washing mitts. Care must be taken when removing caked-on dirt or other foreign substances so the paint surface is not scratched or damaged.
Rinse the vehicle again with plenty of clean water.
Inside flanges, seams and folds on the doors, hatches and hood are particularly vulnerable to the effects of road salt. Therefore, these areas must be regularly cleaned. Make sure that the drain holes in the lower edge of the door are open. Spray water under the body and in the wheel wells to loosen the dirt and wash away road salt.
Avoid leaving water spots on the paint surface by using a damp chamois to dry the vehicle.
WAXING
Regular waxing protects the paint surface and helps retain new vehicle appearance. Polishing is recommended to remove built-up wax residue and to avoid a weathered appearance before reapplying wax.
A NISSAN dealer can assist you in choosing the proper product.
- Wax your vehicle only after a thorough washing. Follow the instructions sup-plied with the wax.
- Do not use a wax containing any abrasives, cutting compounds or cleaners that may damage the vehicle finish.
Machine compound or aggressive polishing on a base coat/clear coat paint finish may dull the finish or leave swirl marks.
REMOVING SPOTS
Remove tar and oil spots, industrial dust, insects, and tree sap as quickly as possible from the paint surface to avoid lasting damage or staining. Special cleaning products are available at a NISSAN dealer or any automotive accessory stores.
UNDERBODY
In areas where road salt is used in winter, the underbody must be cleaned regularly. This will prevent dirt and salt from building up and causing the acceleration of corrosion on the underbody and suspension. Before the winter period and again in the spring, the underseal must be checked and, if necessary, re-treated.
GLASS
Use glass cleaner to remove smoke and dust film from the glass surfaces. It is normal for glass to become coated with a film after the vehicle is parked in the hot sun. Glass cleaner and a soft cloth will easily remove this film.
Read all Instructions for Appearance and care User Guide
Nissan ARMADA 2022 Do-it-Yourself User Guide
MAINTENANCE PRECAUTIONS
When performing any inspection or maintenance work on your vehicle, always take care to prevent serious accidental injury to yourself or damage to the vehicle. The following are general precautions that should be closely observed.
WARNING
- Park the vehicle on a level surface, apply the parking brake securely, and block the wheels to prevent the vehicle from moving. Move the shift lever to P (Park).
- Be sure the ignition switch is in the OFF or LOCK position when performing any parts replacement or repairs.
- Never connect or disconnect the battery or any transistorized component while the ignition switch is in the ON position.
- Never leave the engine or automatic transmission-related component harnesses disconnected while the ignition switch is in the ON position.
- If you must work with the engine running, keep your hands, clothing, hair and tools away from moving fans, belts and any other moving parts.
- It is advisable to secure or remove any loose clothing and remove any jewelry, such as rings, watches, etc. before working on your vehicle.
- Always wear eye protection whenever you work on your vehicle.
- If you must run the engine in an enclosed space such as a garage, be sure there is proper ventilation for exhaust gases to escape.
- Never get under the vehicle while it is supported only by a jack. If it is necessary to work under the vehicle, support it with safety stands.
- Keep smoking materials, flame and sparks away from the fuel tank and the battery.
- Your vehicle is equipped with an automatic engine cooling fan. It may come on at any time without warning, even if the ignition key is in the OFF position and the engine is not running. To avoid injury, always disconnect the negative battery cable before working near the fan.
- Because the fuel lines are under high pressure even when the engine is off, it is recommended you visit a NISSAN dealer for service of the fuel filter or fuel lines.
CAUTION
- Do not work under the hood while the engine is hot. Turn the engine off and wait until it cools down.
- Avoid direct contact with used engine oil and coolant. Improperly disposed engine oil, coolant, and/or other vehicle fluids can damage the environment. Always conform to local regulations for the disposal of vehicle fluid.
This “8. Do-it-yourself” section gives instructions regarding only those items which are relatively easy for an owner to perform.
A genuine NISSAN Service Manual is also available. (See “Owner’s Manual/Service Manual order information” (P.10-40).)
You should be aware that incomplete or improper servicing may result in operating difficulties or excessive emissions, and could affect your warranty coverage. If in doubt about any servicing, it is recommended you have it done by a NISSAN dealer.
ENGINE COMPARTMENT CHECK LOCATIONS
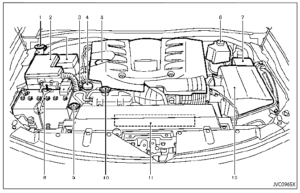
VK56VD ENGINE
- Window washer fluid reservoir
- Fuse/fusible link holder
- Engine oil dipstick
- Power steering fluid reservoir
- Engine oil filler cap
- Brake fluid reservoir
- Fuse/fusible link holder
- Battery
- Radiator filler cap
- Engine coolant reservoir
- Drive belts
- Air cleaner
ENGINE COOLING SYSTEM
The engine cooling system is filled at the factory with a pre-diluted mixture of 50%Genuine NISSAN Long Life Antifreeze/Coolant (blue) and 50% water to provide year-round anti-freeze and coolant protection. The antifreeze solution contains rust and corrosion inhibitors. Additional engine cooling system additives are not necessary.
WARNING
- Never remove the radiator or coolant reservoir cap when the engine is hot. Wait until the engine and radiator cool down. Serious burns could be caused by high-pressure fluid escaping from the radiator. See precautions in “If your vehicle overheats” (P.6-14).
- The radiator is equipped with a pressure-type radiator cap. To prevent engine damage, use only a genuine NISSAN radiator cap.
Read all Instructions for Do-it-Yourself User Guide
Nissan ARMADA 2022 Maintenance requirements and Explanation of scheduled maintenance items User Guide
MAINTENANCE REQUIREMENT
Some day-to-day and regular mainte-nance is essential to maintain your vehi-cle in good mechanical condition, as well as its emission and engine performance.
It is the owner’s responsibility to make sure that the scheduled maintenance, as well as general maintenance, is per-formed.
As the vehicle owner, you are the only one who can ensure that your vehicle receives the proper maintenance. You are a vital link in the maintenance chain.
GENERAL MAINTENANCE
General maintenance includes those items which should be checked during normal day-to-day operation. They are essential for proper vehicle operation. It is your responsibility to perform these procedures regularly as prescribed.
Performing general maintenance checks requires minimal mechanical skill and only a few general automotive tools.
These checks or inspections can be done by yourself, a qualified technician or, if you prefer, a NISSAN dealer.
SCHEDULED MAINTENANCE
The maintenance items listed in this section are required to be serviced at regular intervals. However, under severe driving conditions, additional or more frequent maintenance will be required.
WHERE TO GO FOR SERVICE
If maintenance service is required or your vehicle appears to malfunction, have the systems checked and serviced. It is re-commended you visit a NISSAN dealer for this service.
NISSAN technicians are well-trained spe-cialists and are kept up to date with the latest service information through technical bulletins, service tips and training programs. They are completely qualified to work on NISSAN vehicles before work begins.
If your vehicle is involved in a collision, it is recommended that you ask your NISSAN dealer where the nearest NISSAN Certified Collision Center is located, or go to http://collision.nissanusa.com.
You can be confident that a NISSAN dealer’s service department can perform the service needed to meet the maintenance requirements on your vehicle.
GENERAL MAINTENANCE
During the normal day-to-day operation of the vehicle, general maintenance should be performed regularly as pre-scribed in this section. If you detect any unusual sounds, vibrations or smells, be sure to check for the cause and have it checked promptly. In addition, it is re-commended you visit a NISSAN dealer if you think that repairs are required.
When performing any checks or maintenance work, closely observe “Maintenance precautions” (P.8-2) of this manual.
EXPLANATION OF MAINTENANCE ITEMS
Additional information on the following items with “*” is found in the “8. Do-it-yourself” section of this manual.
Outside the vehicle
The maintenance items listed here should be performed from time to time, unless otherwise specified.
Doors and engine hood: Check that all doors and the engine hood, operate properly. Also ensure that all latches lock securely. Lubricate hinges, latches, latch pins, rollers and links if necessary. Make sure that the secondary latch keeps the hood from opening when the primary latch is released.
When driving in areas using road salt or other corrosive materials, check lubrication frequently.
Lights*: Clean the headlights on a regular basis. Make sure that the headlights, stop lights, tail lights, turn signal lights, and other lights are all operating properly and installed securely. Also check the headlight aim.
Road wheel nuts (lug nuts)*: When checking the tires, make sure no wheel nuts are missing, and check for any loose wheel nuts. Tighten if necessary.
Tire rotation*: Rotate tires at the specified interval shown in the maintenance schedule.
Tires*: Check the pressure with a gauge often and always prior to long-distance trips. If necessary, adjust the pressure in all tires, including the spare, to the pressure specified. Check carefully for damage, cuts or excessive wear.
Tire Pressure Monitoring System (TPMS) transmitter components: Replace the TPMS transmitter grommet seal, valve core and cap when the tires are replaced due to wear or age.
Wheel alignment and balance: If the vehicle should pull to either side while driving on a straight and level road, or if you detect uneven or abnormal tire wear, there may be a need for wheel alignment.
If the steering wheel or seat vibrates at normal highway speeds, wheel balancing may be needed.
For additional information regarding tires, refer to “Important Tire Safety Information” (US) or “Tire Safety Information” (Canada) in the NISSAN Warranty Information Booklet.
Windshield: Clean the windshield on a regular basis. Check the windshield at least every six months for cracks or other damage. Have a damaged windshield repaired by a qualified repair facility. It is recommended that you have a damaged windshield repaired by a NISSAN dealer, or a NISSAN Certified Collision Center. To locate a collision center in your area, refer to http://collision.nissanusa.com.
Windshield wiper blades*: Check for cracks or wear if they do not wipe properly.
Inside the vehicle
The maintenance items listed here should be checked on a regular basis, such as when performing scheduled maintenance, cleaning the vehicle, etc.
Accelerator pedal: Check the pedal for smooth operation and make sure the pedal does not catch or require uneven effort. Keep the floor mat away from the pedal.
Automatic transmission P (Park) mechanism: On a fairly steep hill, check that your vehicle is held securely with the shift lever in the P (Park) position without applying any brakes.
Brake pedal: Check the pedal for smooth operation. If the brake pedal suddenly goes down further than normal, the pedal feels spongy or the vehicle seems to take longer to stop, have your vehicle checked immediately. It is recommended you visit a NISSAN dealer for this service. Keep the floor mat away from the pedal.
Brakes: Check that the brakes do not pull the vehicle to one side when applied.
Parking brake: Check the parking brake operation regularly. The vehicle should be securely held on a fairly steep hill with only the parking brake applied. If the parking brake needs adjusted, it is recommended you visit a NISSAN dealer for this service.
Nissan ARMADA 2022 Maintenance schedules User Guide
MAINTENANCE SCHEDULES
To help ensure smooth, safe and economical driving, NISSAN provides two maintenance schedules that may be used, depending upon the conditions in which you usually drive. These schedules contain both distance and time intervals, up to 120,000 miles (192,000 km)/96 months. For most people, the odometer reading will indicate when service is needed. However, if you drive very little, your vehicle should be serviced at the regular time intervals shown in the schedule.
After 120,000 miles (192,000 km)/96 months, continue maintenance at the same mileage/time intervals.
ADDITIONAL MAINTENANCE ITEM FOR SEVERE OPERATING CONDITIONS
Additional maintenance items for severe operating conditions; should be performed on vehicles that are driven under especially demanding conditions. Additional maintenance items should be performed if you primarily operate your vehicle under the following conditions:
- Repeated short trips of less than 5 miles (8 km).
- Repeated short trips of less than 10 miles (16 km) with outside tempera-tures remaining below freezing.
- Operating in hot weather in stop-and- go “rush hour” traffic.
- Extensive idling and/or low speed driving for long distances, such as police, taxi or door-to-door delivery use.
- Driving in dusty conditions.
- Driving on rough, muddy or salt spread roads.
- Towing a trailer, or using a camper or car-top carrier.
If your vehicle is mainly operated under the severe conditions, follow the severe maintenance intervals shown in the maintenance schedule.
NOTE:
For vehicles operated in Canada, both standard and severe maintenance items should be performed at every interval.
STANDARD MAINTENANCE
The following shows the maintenance schedule.
Choose the maintenance schedule needed based on your vehicle driving conditions.
After 120,000 miles (192,000 km)/96 months, continue maintenance at the same mileage/time interval.
5,000 Miles/6 Months/8,000 Km
Standard maintenance:
Not Applicable. Proceed to next interval. Severe maintenance:
- Inspect brake pads and rotors
- Inspect exhaust system
- Inspect propeller shaft (4WD models) . Inspect drive shaft boots (4WD models) . Inspect steering gear and linkage
- Inspect axle and suspension parts
- Replace engine oil and oil filter 7,500 Miles/6 Months/12,000 Km
Standard maintenance:
- Replace engine oil and filter
- Perform tire rotation
Severe maintenance:
Not Applicable. Proceed to next interval.
10,000 Miles/12 Months/16,000 Km
Standard maintenance:
Not Applicable. Proceed to next interval. Severe maintenance:
- 000Inspect brake pads and rotors
- Inspect exhaust system
- Inspect propeller shaft (4WD models)
- Inspect drive shaft boots (4WD models) . Inspect steering gear and linkage
- Inspect axle and suspension parts
- Replace engine oil and oil filter
- Replace brake fluid
15,000 Miles/12 Months/24,000 Km
Standard maintenance:
- Inspect brake lines and cables
- Inspect brake pads and rotors
- Inspect propeller shaft (4WD models)
- Inspect drive shaft boots (4WD models) . Inspect transfer fluid
- Inspect differential gear oil
- Replace engine oil and oil filter
- Replace in-cabin microfilter
- Perform tire rotation
- Lubricate propeller shaft grease (4WD models)
Read all Instructions for Maintenance schedules User Guide
Nissan ARMADA 2022 “Capacities and recommended fluids/lubricants and Specifications ” User Guide
CAPACITIES AND RECOMMENDED
FLUIDS/LUBRICANTS
The following are approximate capacities. The actual refill capacities may be a little different. When refilling, follow the procedure instructed in the “8. Do-it-yourself” section to determine the proper refill capacity.
| Fluid type | Capacity (approximate) | Recommended Fluids/Lubricants | |||
| Metric Measure | US
Measure |
Imperial Measure | |||
| Fuel | 98.4 L | 26 gal | 21-5/8 gal | ā See “Fuel information” (P.10-4). | |
| Engine oil*1
Drain and refill *1: For additional informa- tion, see “Changing engine oil and filter” (P.8-6). |
With oil filter change | 6.5 L | 6-7/8 qt | 5-3/4 qt | ā Genuine “NISSAN Motor Oil 0W-20 SN” (or equivalent) is recom- mended.
ā If the above motor oil (or engine oil) is not available, a synthetic 0W-20 GF-5 SN motor oil (or engine oil) may be used. Damage caused by the use of motor oil (or engine oil) other than as recommended is not covered under NISSAN’s New Vehicle Limited Warranty. |
| Without oil filter change | 6.2 L | 6-1/2 qt | 5-1/2 qt | ||
| Engine coolant with reservoir | 15.1 L | 16 qt | 13-1/4 qt | ā Pre-diluted Genuine NISSAN Long Life Antifreeze/Coolant (blue) or equivalent | |
| Automatic transmission fluid (ATF) | — | — | — | ā Genuine NISSAN Matic S ATF or equivalent ā NISSAN recommends using Genuine NISSAN Matic S ATF (or equivalent) ONLY in NISSAN automatic transmissions. Do not mix with other fluids. Using fluids that are not equivalent to Genuine NISSAN Matic S ATF may damage the automatic transmission. Damage caused by the use of fluids other than as recommended is not covered under the NISSAN’s New Vehicle Limited Warranty. |
|
| Transfer fluid | — | — | — | ā Genuine NISSAN Transfer Fluid for ATX90A transfer ā Using transfer fluid other than Genuine NISSAN Transfer Fluid may damage the transfer, which is not covered by the NISSAN New Vehicle Limited Warranty. | |
| Front differential gear oil | — | — | — | ā Genuine NISSAN Differential Oil Hypoid Super GL-5 80W-90 or equivalent conventional (non-synthetic) oil | |
| Rear differential gear oil | — | — | — | ā Genuine NISSAN Differential Oil Hypoid Super-S GL-5 synthetic 75W-90 or equivalent | |
| Power steering fluid (PSF) | Refill to the proper oil level according to the instructions in the “8. Do-it-yourself” section. | ā Genuine NISSAN PSF or equivalent ā DEXRONTM VI type ATF may also be used. |
|||
| Brake fluid | ā Genuine NISSAN Super Heavy Duty Brake Fluid*2 or equivalent DOT 3 *2: Available in mainland U.S.A through a NISSAN dealer. |
||||
| Multi-purpose grease | — | — | — | ā NLGI No. 2 (Lithium soap base) | |
| Air conditioning system refrigerant | — | — | — | ā HFO-1234yf (R-1234yf)
ā For additional information, see “Vehicle identification” (P.10-11) for air conditioner specification label. |
|
| Air conditioning system oil | — | — | — | ā NISSAN A/C System Oil VC100YF (PAG) or equivalent | |
|
Fluid type |
Capacity (approximate) | Recommended Fluids/Lubricants | ||
| Metric Measure | US
Measure |
Imperial Measure | ||
| Window washer fluid | — | — | — | ā Genuine NISSAN Windshield Washer Concentrate Cleaner & Antifreeze or equivalent |
FUEL INFORMATION
VK56VD engine
NISSAN recommends the use of unleaded premium gasoline with an octane rating of at least 91 AKI (Anti-Knock Index) number (Research octane number 96).
If unleaded premium gasoline is not available, you may use unleaded regular gasoline with an octane rating of at least 87 AKI number (Research octane number 91), but you may notice a decrease in performance.
CAUTION
- Using a fuel other than that specified could adversely affect the emission control system, and may also affect warranty cover-age.
- Under no circumstances should leaded gasoline be used, because this will damage the three-way catalyst.
- Do not use E-15 or E-85 fuel in your vehicle. Your vehicle is not designed to run on E-15 or E-85 fuel. Using E-15 or E-85 fuel in a vehicle not specifically designed for E-15 or E-85 fuel can adversely affect the emission control devices and systems of the vehicle. Damage caused by such fuel is not covered by the NISSAN new vehicle limited warranty.
- Do not use fuel that contains the octane booster methylcyclopentadienyl manganese tricarbonyl (MMT). Using fuel containing MMT may adversely affect vehicle performance and vehicle emissions. Not all fuel dispensers are labeled to indicate MMT content, so you may have to consult your gasoline retailer for more details. Note that Federal and California laws prohibit the use of MMT in reformulated gasoline.
- U.S. government regulations require ethanol dispensing pumps to be identified by a small, square, orange and black label with the common abbreviation or the appropriate percentage for that region.
Gasoline specifications
NISSAN recommends using gasoline that meets the World-Wide Fuel Charter (WWFC) specifications where it is available. Many of automobile manufacturers developed this specification to improve emission systems and vehicle performance. Ask your service station manager if the gasoline meets the World-Wide Fuel Charter (WWFC) specifications.
Nissan ARMADA 2022 “When traveling or registering in another country and Vehicle loading information” User Guide
2022 Nissan ARMADA Traveling/Registering And Vehicle Loading Guidelines
WHEN TRAVELING OR REGISTERING IN ANOTHER COUNTRY
If you plan to travel in another country, you should first find out if the fuel available is suitable for your vehicle’s engine.
Using fuel with too low an octane rating may cause engine damage. All gasoline vehicles must be operated with unleaded gasoline. Therefore, avoid taking your vehicle to areas where appropriate fuel is not available.
When transferring the registration of your vehicle to another country, state, province or district, it may be necessary to modify the vehicle to meet local laws and regulations.
The laws and regulations for motor vehicle emission control and safety standards vary according to the country, state, province or district; therefore, vehicle specifications may differ.
When any vehicle is to be taken into another country, state, province or district and registered, its modifications, transportation, and registration are the responsibility of the user. NISSAN is not responsible for any inconvenience that may result.
VEHICLE IDENTIFICATION
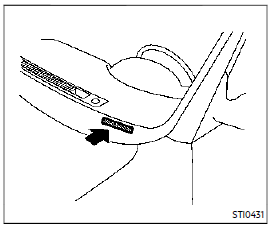
VEHICLE IDENTIFICATION NUMBER (VIN) PLATE
The vehicle identification number plate is attached as shown. This number is the identification for your vehicle and is used in the vehicle registration.
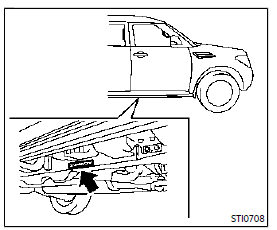
VEHICLE IDENTIFICATION NUMBER (chassis number)
The number is stamped as shown.

ENGINE SERIAL NUMBER
The number is stamped on the engine as shown.

F.M.V.S.S./C.M.V.S.S. CERTIFICATION LABEL
The Federal/Canadian Motor Vehicle Safety Standards (F.M.V.S.S./C.M.V.S.S.) certification label is affixed as shown. This label contains valuable vehicle information, such as: Gross Vehicle Weight Ratings (GVWR), Gross Axle Weight Rating (GAWR), month and year of manufacture, Vehicle Identification Number (VIN), etc. Review it carefully.
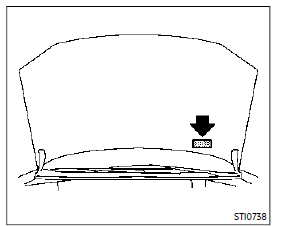
Nissan ARMADA 2022 Towing a trailer and Uniform tire quality grading User Guide
2022 Nissan ARMADA Towing Trailer And Uniform Tire Quality Grading
TOWING A TRAILER
WARNING
Overloading or improper loading of a trailer and its cargo can adversely affect vehicle handling, braking and performance and may lead to acci-dents.
CAUTION
- Do not tow a trailer or haul a heavy load for the first 500 miles (800 km). Your engine, axle or other parts could be damaged.
- For the first 500 miles (800 km) that you tow a trailer, do not drive over 50 MPH (80 km/h) and do not make starts at full throttle. This helps the engine and other parts of your vehicle wear in at the heavier loads.
Your new vehicle was designed to be used primarily to carry passengers and cargo. Remember that towing a trailer places additional loads on your vehicle’s engine, drivetrain, steering, braking and other systems. A NISSAN Towing Guide (U.S. only) is available on the website at
www.nissanusa.com. This guide includes information on trailer towing capability and the special equipment required for proper towing.
MAXIMUM LOAD LIMITS
Maximum trailer loads
Never allow the total trailer load to exceed the value specified in the “Towing load/specification” (P.10-23). The total trailer load equals trailer weight plus its cargo weight.
- When towing a trailer load of 3,500 lbs (1,587 kg) or more, trailers with a brake system MUST be used.
The maximum Gross Combined Weight Rating (GCWR) should not exceed the value specified in the following “Towing Load/Specification” chart.
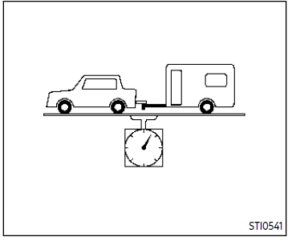
The GCWR equals the combined weight of the towing vehicle (including passengers and cargo) plus the total trailer load. Towing loads greater than these or using improper towing equipment could adversely affect vehicle handling, braking and performance.
The ability of your vehicle to tow a trailer is not only related to the maximum trailer loads, but also the places you plan to tow. Tow weights appropriate for level high-way driving may have to be reduced on very steep grades or for low traction situations (for example, on slippery boat ramps).
Temperature conditions can also affect 10-20 Technical and consumer information towing. For example, towing a heavy trailer in high outside temperatures on graded roads can affect engine performance and cause overheating. The transmission’s high fluid temperature and engine protection mode, which helps reduce the chance of transmission and engine damage, could activate and automatically decrease engine power. Vehicle speed may decrease under high load. Plan your trip carefully to account for trailer and vehicle load, weather and road conditions.
WARNING
Overheating can result in reduced engine power and vehicle speed. The reduced speed may be lower than other traffic, which could increase the chance of a collision. Be especially careful when driving. If the vehicle cannot maintain a safe driving speed, pull to the side of the road in a safe area. Allow the engine to cool and return to normal operation. See “If your vehicle overheats” (P.6-14).
CAUTION
Vehicle damage resulting from improper towing procedures is not covered by NISSAN warranties.
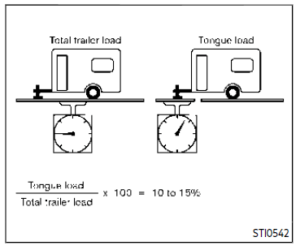
Tongue load
When using a weight carrying or a weight distributing hitch, keep the tongue load between 10 to 15% of the total trailer load or use the trailer tongue load specified by the trailer manufacturer. The tongue load must be within the maximum tongue load limits shown in the following “Towing Load/Specification” chart. If the tongue load becomes excessive, rearrange cargo to allow for proper tongue load.
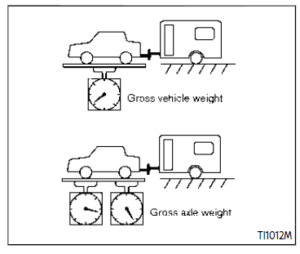
MAXIMUM GROSS VEHICLE WEIGHT
(GVW)/MAXIMUM GROSS AXLE WEIGHT (GAW)
The GVW of the towing vehicle must not exceed the Gross Vehicle Weight Rating (GVWR) shown on the F.M.V.S.S./C.M.V.S.S. certification label. The GVW equals the combined weight of the unloaded vehicle, passengers, luggage, hitch, trailer tongue load and any other optional equipment. In addition, front or rear GAW must not exceed the Gross Axle Weight Rating (GAWR) shown on the F.M.V.S.S./C.M.V.S.S. certification label.
Towing capacities are calculated assuming a base vehicle with driver and any options required to achieve the rating. Additional passengers, cargo and/or optional equipment, such as the trailer hitch, will add weight to the vehicle and reduce your vehicle’s maximum towing capacity and trailer tongue load.
The vehicle and trailer need to be weighed to confirm the vehicle is within the GVWR, Front GAWR, Rear GAWR, Gross Combined Weight Rating (GCWR) and Towing capacity.
All vehicle and trailer weights can be measured using platform-type scales commonly found at truck stops, highway weigh stations, building supply centers or salvage yards.
To determine the available payload capacity for tongue/kingpin load, use the following procedure.\
Read all Instructions for Towing a trailer and Uniform tire quality grading User Guide
Nissan ARMADA 2022 Emission control system warranty User Guide
EMISSION CONTROL SYSTEM WARRANTY
Your NISSAN is covered by the following emission warranties.
For USA:
- Emission Defects Warranty
- Emissions Performance Warranty Details of these warranties may be found with other vehicle warranties in your Warranty Information Booklet that comes with your NISSAN. If you did not receive a Warranty Information Booklet, or it has become lost, you may obtain a replacement by writing to:
- NISSAN Division
Nissan North America, Inc. Consumer Affairs Department P.O. Box 685003
Franklin, TN 37068-5003
For Canada:
Emission Control System Warranty
Details of these warranties may be found with other vehicle warranties in your Warranty and Roadside Assistance Infor-mation that comes with your NISSAN. If you did not receive a Warranty and Road-side Assistance Information, or it has become lost, you may obtain a replacement by writing to:
- Nissan Canada Inc.
5290 Orbitor Drive
Mississauga, Ontario,
REPORTING SAFETY DEFECTS
For USA
If you believe that your vehicle has a defect which could cause a crash or could cause injury or death, you should immediately inform the National Highway Traffic Safety Ad-ministration (NHTSA) in addition to notifying NISSAN.
If NHTSA receives similar com-plaints, it may open an investigation, and if it finds that a safety defect exists in a group of vehicles, it may order a recall and remedy campaign. However, NHTSA cannot become involved in individual problems between you, your dealer, or NISSAN.
To contact NHTSA, you may call the Vehicle Safety Hotline toll-free at 1-888-327-4236 (TTY: 1-800-424-9153); go to http://www.safercar. gov; or write to: Administrator, NHTSA, 400 Seventh Street, SW., Washington, D.C. 20590. You can also obtain other information about motor vehicle safety from http://www.safercar.gov.
You may notify NISSAN by contacting our Consumer Affairs Department, toll-free, at 1-800-NISSAN-1 (1-800-647-7261).
For Canada
If you believe that your vehicle has a defect which could cause a crash or could cause injury or death, you should immediately inform Trans-port Canada in addition to notifying NISSAN.
If Transport Canada receives com-plaints, it may open an investigation, and if it finds that a safety defect exists in a group of vehicles, it may request that NISSAN con-duct a recall campaign. However, Transport Canada cannot become involved in individual problems be-tween you, your dealer, or NISSAN.
You may contact Transport Canada’s Defect Investigations and Re-calls Division toll free at 1-800-333-0510. You may also report safety defects online at:
https://wwwapps.tc.gc.ca/Saf-Sec-Sur/ 7/ PCDB-BDPP/Index.aspx.
Additional information concerning motor vehicle safety may be obtained from Transport Canada’s Road Safety Information Centre at 1-800-333-0371 or online at www. tc.gc.ca/road safety (English speakers) or www.tc.gc.ca/securiterou-tiere (French speakers).
To notify NISSAN of any safety concerns please contact our Consumer Information Centre toll free at 1-800-387-0122.
READINESS FOR INSPECTION/MAINTENANCE (I/M) TEST
WARNING
A vehicle equipped with Four-Wheel Drive (4WD) should never be tested using a two wheel dynamometer (such as the dynamometers used by some states for emissions testing), or similar equipment. Make sure you inform test facility personnel that your vehicle is equipped with 4WD before it is placed on a dynamometer. Using the wrong test equipment may result in transmission damage or unexpected vehicle movement which could result in serious vehicle damage or personal injury.
Due to legal requirements in some states and Canadian Provinces, your vehicle may be required to be in what is called the “ready condition” for an Inspection/Maintenance (I/M) test of the emission control system.
The vehicle is set to the “ready condition” when it is driven through certain driving patterns. Usually, the “ready condition” can be obtained by ordinary usage of the vehicle.
If a powertrain system component is repaired or the battery is disconnected, the vehicle may be reset to a “not ready condition”. Before taking the I/M test, check the vehicle’s inspection/maintenance test readiness condition. Place the ignition switch in the ON position without starting the engine. If the Malfunction Indicator Light (MIL) comes on steady for 20 seconds and then blinks for 10 seconds, the I/M test condition is “not ready”. If the MIL does not blink after 20 seconds, the I/M test condition is “ready”.
It is recommended you visit a NISSAN dealer to set “ready condition” or to prepare the vehicle for testing.
EVENT DATA RECORDERS (EDR)
This vehicle is equipped with an Event Data Recorder (EDR). The main purpose of an EDR is to record, in certain crash or near crash-like situations, such as an air bag deployment or hitting a road obstacle, data that will assist in understanding how a vehicle’s systems performed. The EDR is designed to record data related to vehicle dynamics and safety systems for a short period of time, typically 30 seconds or less. The EDR in this vehicle is designed to record such data as:
Read all Instructions for Emission control system warranty User Guide
Reference Links
Download Manuals: https://www.nissanusa.com/owners/ownership/manuals-guides.html